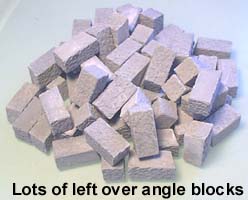
Tips & Tricks 15
Please note that all of the molds shown here (#41, 42, 43 and 44) are meant to be used with mold #45 (the Gothic Dungeon Builder mold). If you do not have mold #45, then you will not be able to build the items shown on this page.
How to Use Mold #41
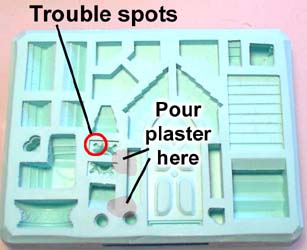
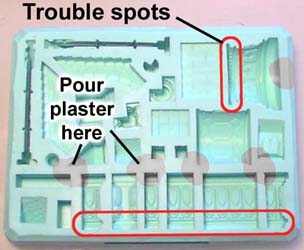
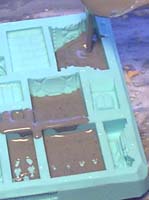
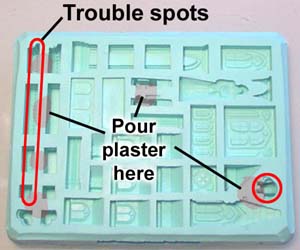
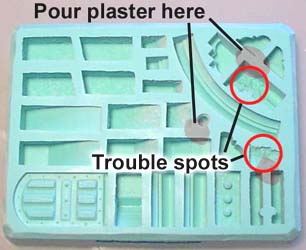
| 1. | There are a few pieces on mold #41 that can be difficult to cast. These difficult parts are circled in red. Be sure you use the wet water method found on the Advanced Casting Instructions page. Make sure the "wet water" gets down into the small round knobs on the corners of this piece. Many times a small water bubble will form over this part. When you pour in the plaster, pour it onto the ridges between the blocks and not directly into the block cavity. This gives time for the plaster to flow down the sides of each cavity and into the details. |
 |
|---|
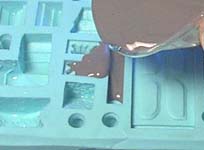
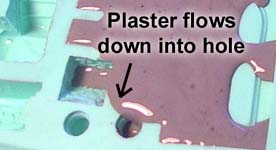
| 2. | Pouring in this manner gives time for the plaster to creep into the detail and flow into the small pockets. |
 |
 |
|---|
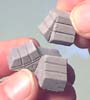
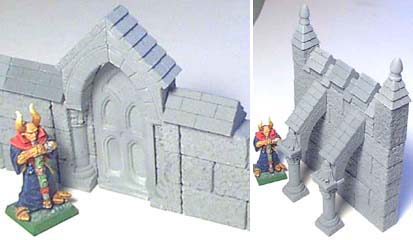
| 3. |
The large corner arch is made in 2 pieces that go together as shown. The door has no handle, so when you glue them front-to-back, you don't have to worry about the hinges and door handles. |
 |
|---|
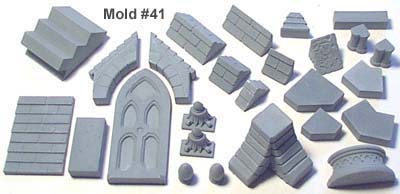
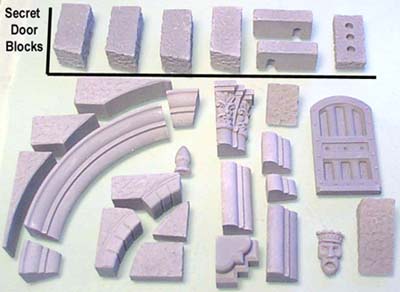
 Here is what the blocks from the mold look like.
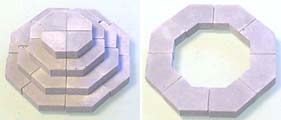
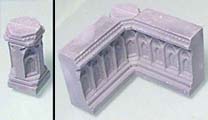
| 4. | Any length of steps can be made from the smooth blocks and step blocks on this mold. |
 |
|---|
| 5. |
These photos show how they could be stacked up to make a statue stand, or used to make outer rings of pools and fountains. |
 |
|---|
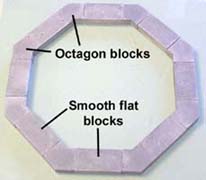
 The octagon blocks can be used for a number of things.
| 6. | You can use these to finish off the ends of stairs leading up to a doorway or platform. When using these for an outer ring of a fountain, there are an endless number of shapes you can make when you combine these with the smooth flat tiles. For an example of a fountain, check out the Advanced Gothic Dungeon section. |
 |
|---|
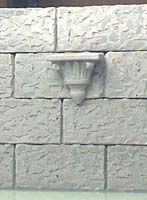
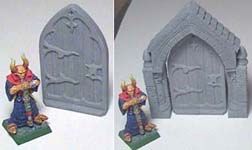
| 7. | The decorative piece shown here can either be glued flat onto a wall, or be placed back-to-back with another to make a decorative top cap. If glued to a wall, it can be used as a statue base for very small statues (10mm figures) or a wall sconce. The round decorative base can also be glued flat onto a wall (for a statue stand), or glue 2 of them together for a round base. |
 |
 |
|---|
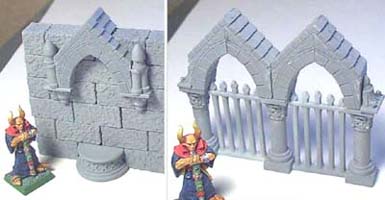
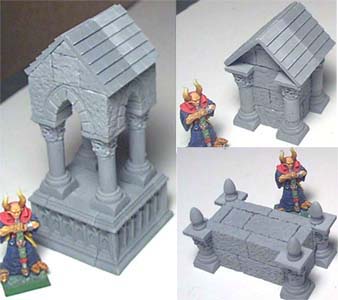
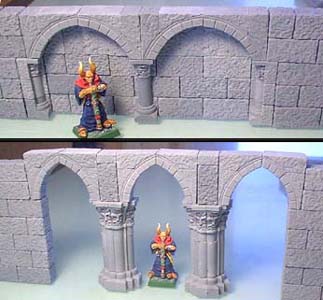
| 8. | The roofed arches (also shown in step 6 above), fit the door on the mold perfectly. These can be put flat against a wall to make an alcove decoration for a statue, or be glued back-to-back to make a self standing arch. If you sand the ends off, you can place the arches side by side for a continuous arch row. |
 |
|---|
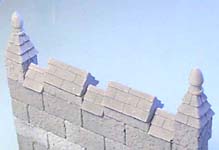
| 9. | The roof caps are used to dress up flat wall tops. You mainly see these on garden walls or self standing walls with no roofs. The post caps help finish off the corners of these types of walls. |
 |
 |
|---|
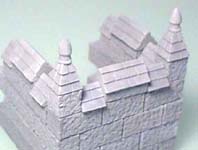
| 10. | The roof caps can also be used in combination with the roofed arches (as in the first photo). The roofed arches can also be used as buttresses when placed against a wall. Notice the decorative piece on the front of each buttress is from this mold also. A different combination of the roof caps can give you different designs along a wall top. |
 |
|---|
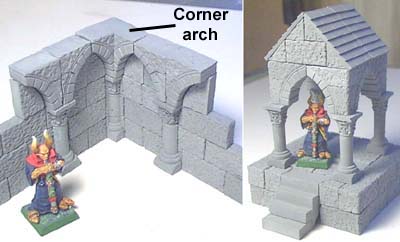
| 11. | The corner arches allow you to run the arches all the way into the corner on either the inside or outside of a building. The roof pieces can be used in combination with the angle blocks, to add small roof sections to your monuments. For more examples of how this mold can be used, check out the Advanced Gothic Dungeons page. |
 |
|---|
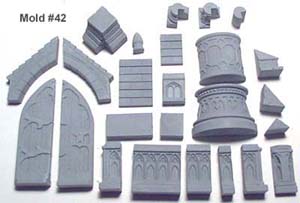
How to Use Mold #42
| 1. | There are a few pieces on mold #42 that can be difficult to cast. These difficult parts are circled in red. Be sure you use the wet water method found on the Advanced Casting Instructions page. Make sure the "wet water" gets down into the small details and into the doors on this mold. When you pour in the plaster, pour it onto the ridges between the blocks and not directly into the block cavity. This gives time for the plaster to flow down the sides of each cavity and into the details. |
 |
|---|
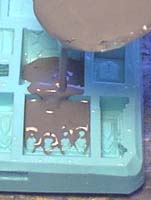
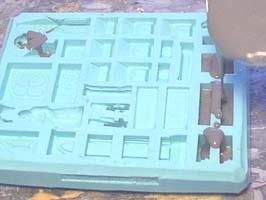
| 2. | Pouring in this manner gives time for the plaster to creep into the detail and flow into the small pockets. These photos illustrate how the "wet water" method allows the plaster to flow. You can see the plaster working its way into the cracks of the design. It's very important that you pour slowly and on the ridges between blocks, especially if you want to get the small rivet designs along the tops of the decorative blocks. |
 |
 |
|---|
| 3. | Here are the blocks that mold #42 will make.
The door is made to fit under the large roofed arch pieces. |
 |
|---|
 The door is in 2 halves. One half has the hinges, and the other half has the lock.
| 4. |
One of these pieces (shown in the far left photo) is used to fill the inside corner where two bases meet. This piece can also be used on its own as a short post, or to add decoration to a wall. |
 |
|---|
 The decorative base pieces can be used to finish the bottom of walls and buttresses.
| 5. |
When you combine this with the 3/4 pillar pieces, you can make outside corner arches as well. The 3/4 pillar blocks allow you to put pillars onto the outside corners of walls or monuments. |
 |
|---|
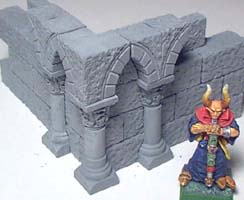 The small corner arch allows you to continue wall arches into the corners of walls.
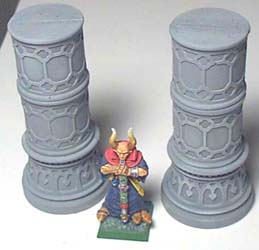
| 6. | The roof shingle pieces (shown above), are used with the angle blocks to make small roof sections over monuments or statue stands The large column blocks can be glued back to back for complete columns. These can also be used to raise dungeon sections up to the next level in height. For more examples of how this mold can be used, check out the Advanced Gothic Dungeons page. To see how this mold is used to make the Gothic Arena, check out the Gothic Arena building instructions. |
 |
|---|
How to Use Mold #43
| 1. | There are a few pieces on mold #43 that can be difficult to cast. These difficult parts are circled in red. Be sure you use the wet water method found on the Advanced Casting Instructions page. Make sure the "wet water" gets down into the small details and into the doors on this mold. When you pour in the plaster, pour it onto the ridges between the blocks and not directly into the block cavity. This gives time for the plaster to flow down the sides of each cavity and into the details. |
 |
|---|
| 2. |
For the rest of the mold, pour slowly and on the ridges between blocks, especially if you want to get the small rivet designs along the edges of the decorative blocks. |
 |
|---|
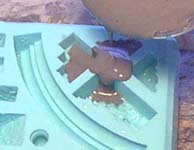
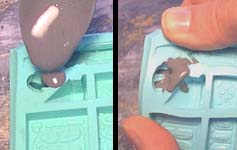 Some of the hardest pieces to get right are the gargoyle wing tips. The best method is to put a drop of plaster where shown, then spread the mold open while tapping the mold against the table.
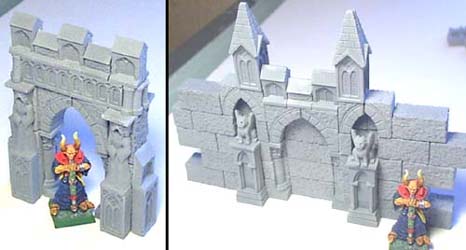
| 3. | The pieces from this mold are mostly decorative in nature. In other words, there are a lot of small pieces and it takes a longer time to build with them. However, you can really dress up simple things like doorways, arches and monuments with these pieces. |
 |
|---|
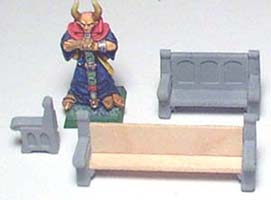
| 4. | One of the most unique pieces is the bench. Be sure you use very little glue when putting the pieces together because they fit tightly and glue will squeeze out and become noticeable. The decorative piece goes on the back and the smooth slab is for the seat. I've also made this seat so that you can use wooden craft sticks (or sticks from an ice cream bar) to make long pews for a church or cathedral. Be sure you cut the pieces the exact same length for the seat and the back. |
 |
|---|
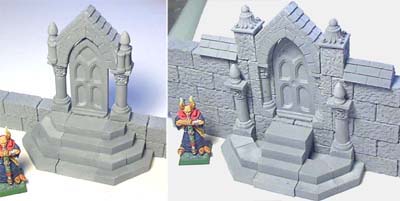
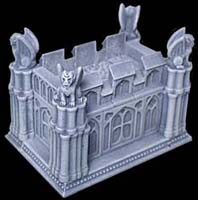
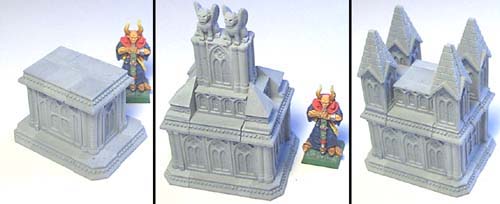
| 5. | You'll notice a number of decorative slabs on this mold. They come in different sizes, but they're all 1/4" thick and have smooth flat sides. These slabs are meant for the outside of tombs, monuments, fountains, or any other type of furnishings you would find in a cathedral. These slabs are joined on the corners using the fluted pieces. These come in 1/4" and 1/2" tall. The sepulcher shown here uses this principle. For complete building instructions on this, go to the Advanced Gothic Dungeons page. |
 |
|---|
| 6. | The decorative flat tiles are used to make the flat top and bottom of the tombs or monuments. These have either a square corner or an octagon corner. By adding some of the other decorative blocks on top you can make these items. |
 |
|---|
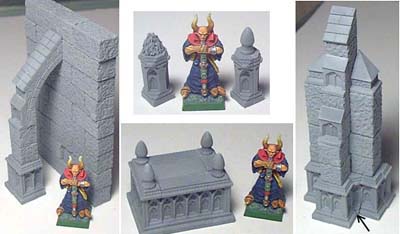
| 7. | The robed figures can be used as wall decorations, but if you add the top caps onto them, they can become pillars to support an arch. For more examples of how this mold can be used, check out the Advanced Gothic Dungeons page. |
 |
|---|
How to Use Mold #44
| 1. | There are a few pieces on mold #44 that can be difficult to cast. These difficult parts are circled in red. Be sure you use the wet water method found on the Advanced Casting Instructions page. Make sure the "wet water" gets down into the small details and into the doors on this mold. When you pour in the plaster, pour it onto the ridges between the blocks and not directly into the block cavity. This gives time for the plaster to flow down the sides of each cavity and into the details. |
 |
|---|
| 2. |
You may only have difficulty with the column faces and the decorative face on this mold. The pieces at the top are used to make secret passages where the wall will swing open, but when it's closed you won't see any trace of it. |
 |
|---|
 This mold has very few pieces that would give you trouble.
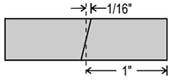
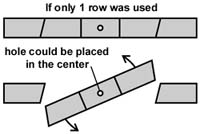
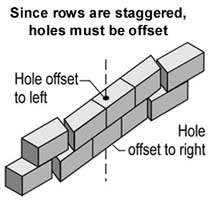
| 3. | The secret door blocks are angled. If you placed 2 blocks end-to-end, you would have a perfect 2" long block. This angle allows the door to open without binding. If I only needed to rotate one row of blocks, I could have put the rotation point in the center. Since walls are made from rows of staggered blocks, I had to offset the hole to one side. |
|
 |
|---|
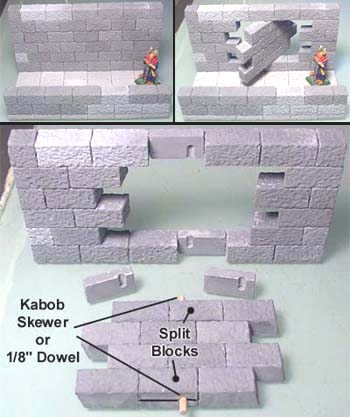
| 4. | The top photos show how the secret door looks when closed, and then again when opened. The angle of the blocks is not enough to notice on a wall, but just enough to allow the door to open without binding on the ends. The hinge pins are made of kabob skewers or 1/8" diameter dowel rods. The hinge socket is made from two flat blocks sandwiched together. This allows you to insert the door and hinge pins later on.
|
 |
|---|
 The flat block with holes allows the secret door to be set directly onto the floor. This flat block is also used to make prison bars and gates with.
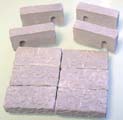 The split blocks that make the hinge socket can also be used for other things. You can take the leftovers and lay them down flat for floor tiles, or glue them together and use them for wall blocks.
| 5. |
These can still be very useful. Glue together the blocks in sets of 2 (angles facing each other). These can then be used as perfect 2" long blocks. |
 |
|---|
 There are only so many secret doors that you can make. After that you'll have a bunch of angle blocks left over.
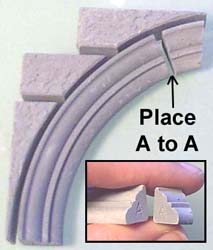
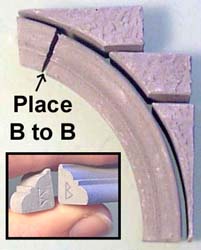
| 6. | The great arches are made by putting the blocks together as shown. To assemble the smooth trim piece, you need to look at the letters on the ends of the piece. For the left arch, you will need to match up the letter A's, and for the right arch you need to match up the letter B's. |
 |
 |
|---|
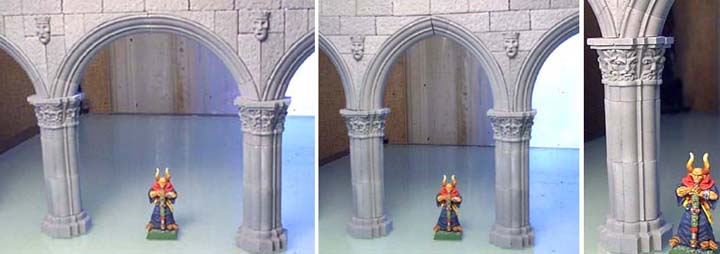
| 7. | The great arches can be placed as a 4" wide opening round topped arch, or turned the other way as a 3" wide opening pointed arch. Here is a close-up of the face columns as well. |
|---|---|
 |
| 8. |
This arch can make a 2" wide opening round topped arch, or you can turn them the other way to make a 1.5" wide opening pointed arch. The arch fillers are used to fill in the back, so you can have recessed arches (just like on the Gothic Dungeon Builder mold #45). |
 |
|---|
 The large arch on this mold is made up of 2 pieces. The arch fillers are made up of 2 pieces as well.
| 9. | The prison door fits under the small arches on mold #45 (gothic dungeon builder). It will also fit under the small arches on mold #70 (fieldstone wall mold). There is wood recessed paneling on the door, but it is very thin. If you sand the back of the door, you can remove this and have a door where you can see through the bars. |
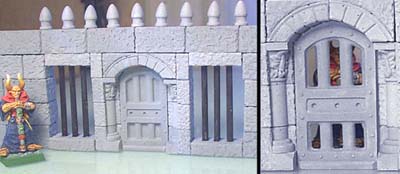 |
|---|
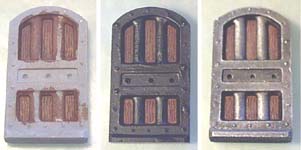
| 10. | This door I've painted in 3 steps. The first step is to paint the wood panels brown. The second step is to paint the iron and frame solid black. The last step is to dry brush silver over the black. For more examples of how this mold can be used, check out the Advanced Gothic Dungeons page. |
 |
|---|
Making Water for Fountains and Pools
| 1. |
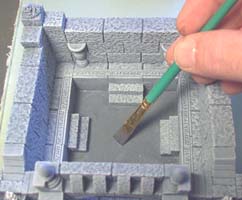
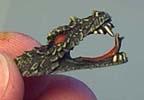
I've taken the head off of a MageKnight monster to be put into the water. I've dry brushed a little bright green on him so he would show up a little better. Start by painting the bottom of the pool a dark gray, the same dark gray you used for your first coat of paint on the model. |
 |
|---|
 Here I will show how to add murky water to the
 | 2. |
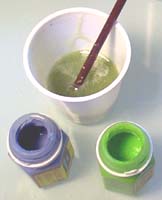
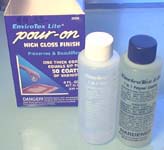
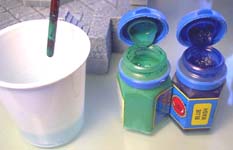
Pour equal parts of A and B into a cup. I'm mixing up about 1 ounce of resin. Stir slowly and try not to introduce air into the mixture. To add color, I'm adding one small drop of green paint and an even smaller bit of blue to the resin. You need very little paint to murk up the water! |
 |
|---|
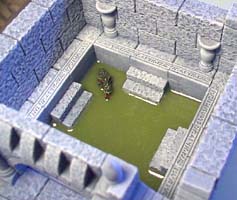
| 3. | Pour the resin into the pool. Make sure the pool is sealed well, which it should be if you glued the cereal box onto the bottom of the foam. The resin is the consistency of honey. Pour it slowly and you won't get as many air bubbles trapped around items in the pool. After 24 hours it will harden completely and look great! |
 |
 |
|---|
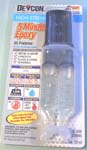
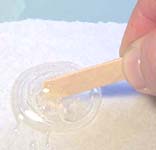
| 4. | Next I'm going to add water to the Specter Fountain. First, you will have to seal the fountain base. If you don't, the resin will leak under the stones and end up all over your model. I'm using 5 minute epoxy to seal it. Using a wooden craft stick, mix up a blob about the size of a quarter on a piece of thick paper. |
 |
 |
|---|
| 5. | Epoxy mixes quickly and is fairly thick. It will flow just enough to plug up any holes, but not flow too far through them. Scoop up a little epoxy on the stick and drizzle a small amount into the cracks around the base of the fountain. You will have to work quickly, because the epoxy will start to set up in about 2 minutes. |
 |
 |
|---|
| 6. | Once again I will use Envirotex Lite for the water. This time I'm adding blue and green ink wash to the mixture. This will tint the resin but not make it murky. I dipped a paintbrush handle into the ink and then into the resin. You want less than a drop of each, otherwise the color will be too vibrant and strong. |
 |
 |
|---|
| 7. | I tried adding ripples to the water with a paint brush handle but it didn't work! This Envirotex Lite resin is strange stuff. It hardens very slowly, which ensures that the coating will be flat and smooth. If the resin is soft enough to move and cause ripples, then the ripples flow back down until the surface is smooth again. When the resin finally hardens enough to keep its shape, it's like a gelatin material and wants to tear when pushed (which doesn't make good ripples). I decided to add the ripples after putting in the water spout. |
 |
|---|
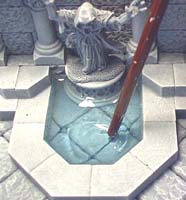
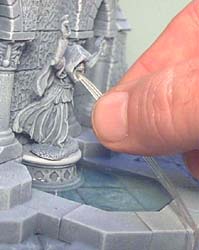
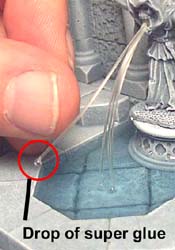
| 8. | The water spout is made from fishing line. Cut 5 strands about 3" long and super glue them into the mouth of the statue. Carefully trim the fishing line so it makes a gentle arc down and touches the water. I found that it looks better if you have to pull the fishing line down slightly to glue it to the water. Trim small amounts off at a time. If you cut the lines too short, you'll have to replace them with new pieces. Use a drop of super glue to attach the lines to the center of the water. |
 |
 |
|---|
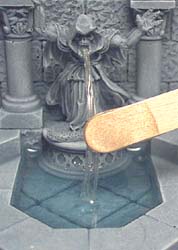
| 9. | As the final touch, mix up some 5 minute epoxy. Spread it over the fishing line and it will look more like water pouring from the mouth. Also, add a few drops of epoxy where the water splashes down into the pool. Since the epoxy will set up after a couple of minutes, use a paint brush handle to add ripples in the water where the spouting water splashes down, just as the epoxy is starting to harden. To see the completed fountain, visit the Advanced Gothic Dungeon page. |
 |
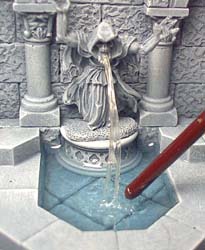 |
|---|