Advanced Casting Instructions
 Casting Instructions |
 Advanced Casting Instructions |
 Casting Using Dental Stone |
 Casting Using Plastic & Resin |
 Customer Reviews of US Products |
 Customer Reviews of Overseas Products |
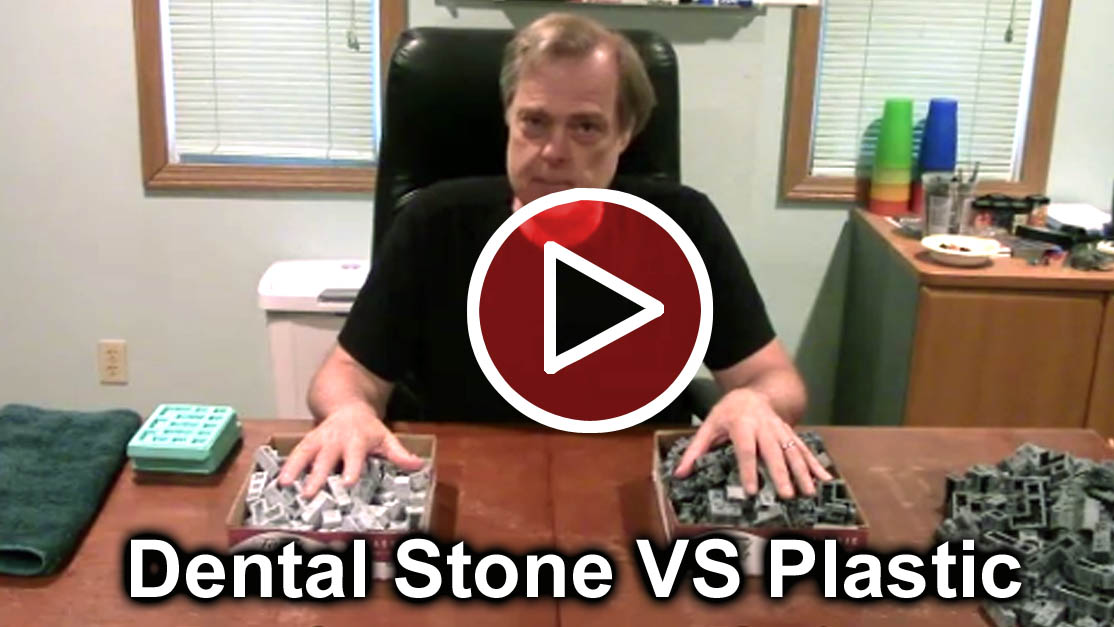
Dental Stone VS Plastic
This section covers many of the pros and cons when comparing dental stone to plastic. This video tries to explain the differences in material cost and the resulting product. This video shows pieces that were cast for the Hirstopolis Project. |
 |
There are several factors to consider when comparing dental stone to plastic. Much depends on your budget and the final use of the project. Keep in mind that the information here is my opinion resulting from my experiences working with both materials.
| Dental Stone | Plastic | |
|---|---|---|
| Mold Wear | Using dental stone you can get hundreds of castings without any wear on the molds. Any casting material that mixes with water is completely safe for the molds. |
Plastic will cause damage to the molds over time. Without the use of mold release, castings will become harder to remove depending on the depth and detail of the blocks. Eventually tiny bits of rubber will stick to the castings and come out of the mold. Using mold release will increase the life of the mold but no more than 50 castings would be expected without obvious damage to the mold. |
| Cost | Dental stone is fairly inexpensive. Usually shipping is where the greatest cost is. In the video above, I was able to cast the Hirstopolis Project with about $40 worth of dental stone and that included the shipping cost. This project took about 25 pounds of dental stone. |
This same project cost me about $200 in plastic. Not only is plastic much more expensive, you also need additional materials such as mold release and colorant which add to the cost. Be sure you add everything up before deciding on which you want to use. |
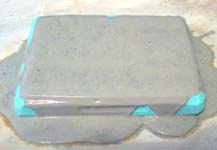
| Use | There are many items you simply cannot cast in dental stone because they are too thin or delicate. Fences, ladders and other small details would break easily and will not hold up to handling. Larger sections such as dungeon walls hold up just fine. Dungeon sections will be slightly heavier than if cast in plastic but I like the extra weight which keeps them from moving when set on the table. Dental stone will chip so you won't be able to just dump all of your dungeon sections into a box. |
With plastic, you can cast just about anything and it will hold up without chipping. Tiny thin details come out just fine and will hold up well. Most casting plastics are not as resilient as plastic used in the toy industry so tiny items such as swords would still break if you bent them. Big solid sections of wall might seem a bit of an expensive waste to cast them in plastic. However, you can just toss them into a box without damage. |
| Gluing | I find that gluing dental stone is easier than gluing plastic. I like to use Aleene's Tacky glue which is a white water based glue which sets up in about 5 minutes. It doesn't have the instant bond of super glue but you have plenty of time to get things lined up while the glue is drying and you can still make adjustments. Part of this opinion may simply be my long years of familiarity with this type of glue. |
For plastic I use super glue (Cyanoacrylate). I have not tried regular plastic model cement which I don't think would work because casting plastic is different than what you find in model kits. With super glue, blocks must be lined up precisely and there is no adjustment after the fact unless you break them apart. Sometimes super glue can be frustrating to work with if you do not have good contact between the surfaces. |
| Painting | Dental stone is a porous material so any type of acrylic or latex paint will work. Paint sticks well will not scrape off unless the stone underneath is chipped. These types of paints are plentiful and fairly inexpensive. However, you will have to slop on a dark basecoat which probably takes the greatest amount of time when painting. |
With plastic, the right kind of mold release such as Mann Ease Release 200 (or no mold release at all) must be used if you want any kind of paint to stick to it. Most pieces cast this way can take regular spray paint, which works well for the dark undercoat. If you have the extra money, coloring the plastic dark will remove the need to basecoat the pieces and save you a lot of painting time. |
| Casting | Dental stone is slightly easier to clean up after casting. You can also take your time while casting and scraping because it will take at least 5 minutes to thicken up. The real disadvantage is that you have to knock the air bubbles out of the mold after pouring the stone in. Most simple block molds will not give you problems. However, very detailed molds such as the gothic line or the accessory molds will be more difficult. |
With plastic you will get perfect castings every time without really trying. Of course this may depend on the viscosity of the plastic you use but what I use is as thin as water when pouring. I find that with plastic, I have to be more careful to not make a mess because I cannot simply clean it up with water. Also, many plastics are sensitive to moisture and have a shelf life much shorter than dental stone. |
In conclusion, both of these materials have their advantages. In my opinion, I make all of my large dungeon sections in dental stone because the cost is so much less and it does not cause wear on the molds.
However, if I were making game pawns or heavily handled smaller items such as furniture, ladders and fences, I would definitely cast those items in plastic.
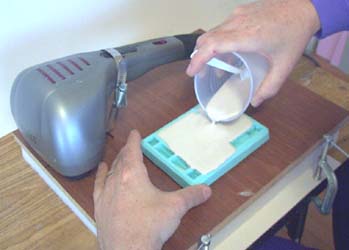
How to Use a Surfactant
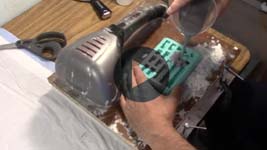
Making your Own Surfactant/Debubblizer This video shows how to mix up your own surfactant using Jet Dry and water. The kind you buy works the best but I've found that mixing your own will work very well also. |
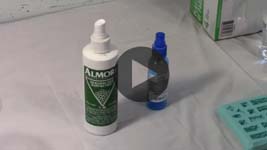 |
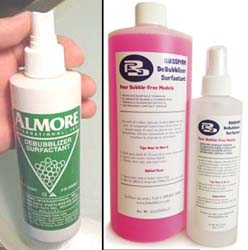
The first is Almore debubblizer and the second is Russman debubblizer. At the writing of this article, an 8 ounce bottle of Russman costs $13.00 and the Almore costs $19.00 but I've found both to work equally as well. It may seem expensive but an 8 ounce bottle will get you through a 50 pound box of dental stone.
This usually takes from 6 to 8 squirts from the bottle to get the whole surface. Flat floor tile molds take a little less and deep molds take a little more. Immediately after spraying, pour your casting material into the mold and vibrate it or pound on the mold table as usual. You will see the casting material slide around and creep into all the cracks of the mold.
For a 2 ounce spray bottle, put about 3 drops of Jet Dry rinse agent in the bottle and fill the rest up with water. Shake up the bottle and spray it over the surface of the mold before pouring your plaster in. This gets rid of most of the bubbles in the mold but the kind you buy works slightly better. |
 A surfactant is a wetting agent. It reduces the surface tension of a liquid so it will not "bead up" but instead flow into cracks. The products shown here work a little better than mixing up your own surfactant made from a dishwasher rinse agent.
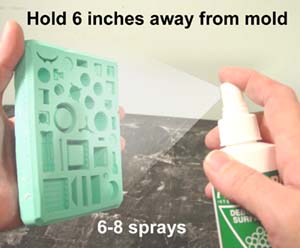 Surfactant is pretty easy to use. Just hold the bottle about 6" away from the mold and give it a good even coat on the surface of the mold.
 The video at the top shows how to make your own surfactant. Get yourself a fine mist spray bottle from the health and beauty area at your local Wal-Mart.
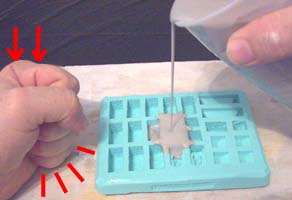
Using the Glass Method Instead of Scraping
| 1. | Click on the video to watch it on YouTube. This video shows how you can use a piece of Plexiglas or plastic to lay over the mold instead of scraping the mold. |
 |
|---|
When using this method, keep in mind that not all molds are perfectly flat on the top. I try my best to make sure that the top of every mold is as flat as possible but there may be slight variations, such as the mold humping up a few thousands of an inch in the center.
If this is the case, you may have to place two separate weights on each side of the mold for the plastic to make full contact with the surface. Keep in mind that scraping the mold is still the most accurate way to get the blocks completely flat on the top.
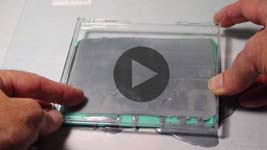
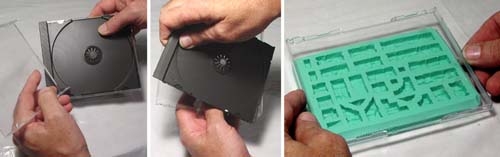
| 2. | For the glass method, you will need a piece of hard plastic to lay over the mold. The easiest way to find one is to take apart an old CD case and use the very bottom plastic of the CD case. |
 |
|---|
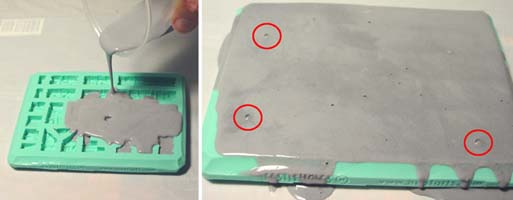
| 3. | When pouring the plaster in, overfill the mold. After pounding the air bubbles up, blow across the top of the mold to pop air bubbles on the surface. |
 |
|---|
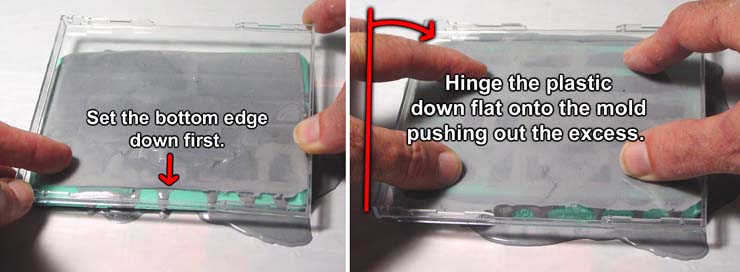
| 4. | Place the plastic over the mold, setting down one end first. As you hinge the other side down, the excess plaster will squeeze out from under the plastic, pouring onto your work surface. |
|---|---|
 |
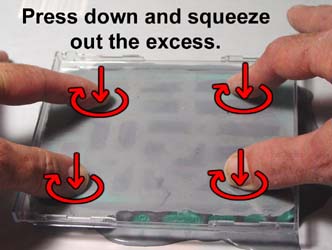
| 5. | Press the plastic down hard onto the mold. Move the plastic in a circular motion to help squeeze out the extra plaster. Try to keep an eye out for bubbles. You may find that when you press down, you can squeeze out a bubble or two. However, when you let up pressure the bubble may want to flow back onto the surface under the plastic. |
 |
|---|
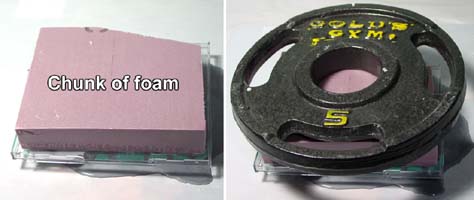
| 6. | To keep the plastic pressed hard against the surface of the mold, I've going to put a 5 pound weight on top of the mold. Because the CD case has a framework around the border, I've placed a chunk of foam under the weight. If you used a flat piece of Plexiglas instead then you may not need the foam. |
 |
|---|
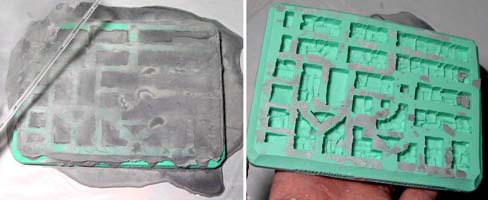
| 7. | After 25 minutes, remove the plastic from the surface. You will see there is a thin layer of plaster on the surface of the mold. In most cases, this thin layer is usually not enough to mess up the height of the blocks.
After removing the blocks, some of the plaster will still be on the surface of the mold. |
 |
|---|
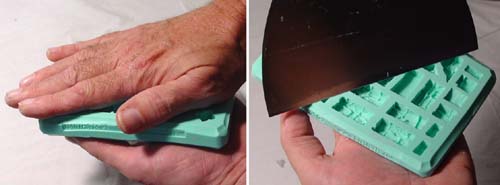
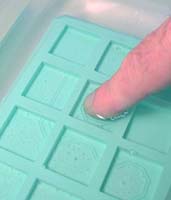
| 8. | Most residual plaster you can rub off using the palm of your hand. Stubborn plaster can be scraped loose using a putty knife. Gently scrape across the surface to loosen any excess plaster then rub off the remainder with your hand. |
 |
|---|
Making a Vibrating Table for About $40
| 1. | Using a Homemade Vibrating Table This video shows how to use the homemade vibrating table to cast a mold using dental stone. |
 |
|---|
| 2. | 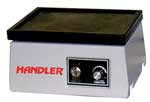 A vibrating table will reduce the number of bubbles in your castings dramatically. Dentists have used vibrating tables for years to get perfect casts when making dentures and crowns. Even chocolate makers use vibrating tables for casting chocolate in molds. A vibrating table will reduce the number of bubbles in your castings dramatically. Dentists have used vibrating tables for years to get perfect casts when making dentures and crowns. Even chocolate makers use vibrating tables for casting chocolate in molds.
The vibrating table shown here made by Handler Manufacturing costs around $185 (priced January 2014) and is large enough to hold one mold. If you really want one of these, you can call Kevin Smith at Kingwood Industrial Products at (908) 852-8655 (he's a Handler distributor) or check on the internet for a dental vibrating table. |
|---|
| 3. | 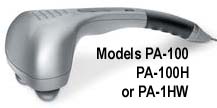 That's a little too expensive for me, so I'm going to show you how to make a good vibrating table for about $40. That's a little too expensive for me, so I'm going to show you how to make a good vibrating table for about $40.
The most important part of the table is the vibrating device. The best I have found (for a reasonable price) is made by Homedics Inc. It cost me $28.76 at Wal-Mart in the health and beauty aids section. If you cannot find this type and want to try other brands of vibrating massagers, you may have to change the way you mount it to the board depending on its shape. I have tried using power tools for the vibration (such as an orbital sander), but they were far too noisy, difficult to mount and vibrated too wildly. |
|---|
| 4. |
|
|---|
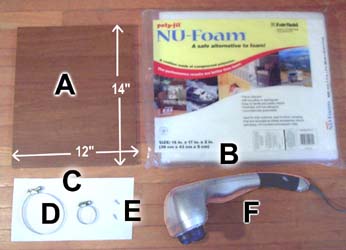 List of supplies needed:
| 5. |
|
|---|
 List of tools needed:
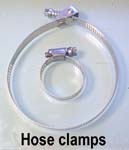
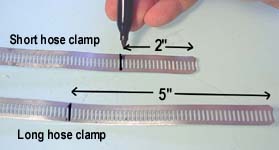
| 6. | Use a screwdriver to loosen the hose clamps and unroll them all the way. On the short hose clamp, measure back 2" from the plain end and put a mark. On the long hose clamp, measure back 5" from the plain end and put a mark. |
 |
 |
|---|
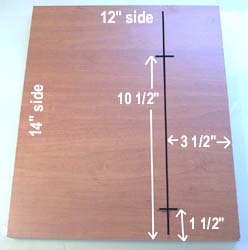
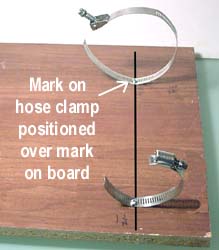
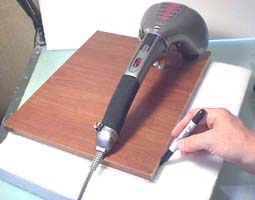
| 7. | Get the tape measure and a marker and draw the black lines on the board as shown. The intersection of the lines is where we are going to screw the hose clamps into the wood. The second photo shows what the board will look like once the hose clamps are screwed in. |
 |
 |
|---|
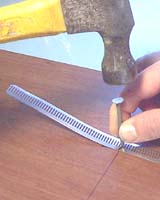
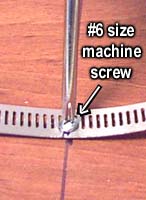
| 8. | You won't be able to put a screw through the hose clamp unless you drive the nail through the hose clamp into the board (not all the way). This will spread the slot in the hose clamp out enough so you can get a screw through it. Now screw a #6 machine screw through the hose clamp and into the board and tighten it down completely. Do this for both hose clamps. |
 |
 |
|---|
| 9. |
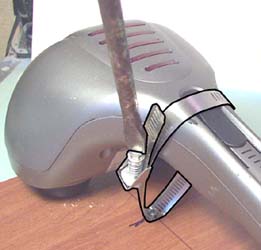
The first photo shows the small hose clamp closing around the small end of the vibrator. The second photo shows the large hose clamp put around the large head of the vibrator. Do not tighten this down too tightly or the vibrator may not work. |
 |
|---|
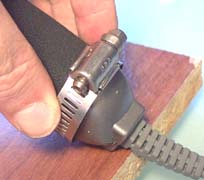 Now that the hose clamps are secured to the board, place the vibrating massager into the hose clamps and tighten them up around it.
Update as of 4/23/06
The hose clamps break because they make a sharp bend right under the screw heads. The vibration causes too much pressure on the thin edges of the hose clamp and it will snap after continued use. I even tried adding a rubber washer under the screw heads, but the clamps continued to break.
Because I can't tighten this kind of belt as tightly (just pulling on it by hand), the vibrator moves around on the table a little and is a little noisier because the pads are hitting the board, but it does an excellent job of getting rid of air bubbles in your casts. |
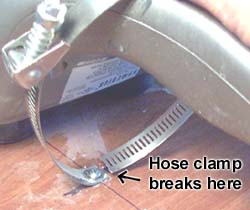 After using the vibrating table for several months, I've noticed that both hose clamps will break.
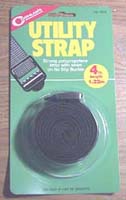 To solve this, I decided to replace the hose clamps with nylon straps. The kind shown here cost about $1.99 and come with a plastic buckle. I used the same #6 sheet metal screw and added a #6 steel washer under it. Otherwise the head of the screw would pull through the strap.
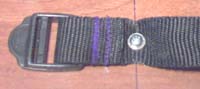 Be sure to put the screw close to the buckle, especially on the small end of the handle. Wrap the straps around the vibrator and pull them as tight as you can. Use scissors to cut off the extra strap.
 When finished, the vibrating table will look like this. You won't have the option to tighten and loosen the large belt to adjust vibration, but so far that hasn't been a problem.
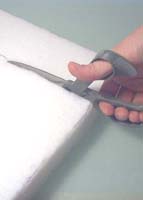
| 10. | Lay the table on top of the piece of cushion foam and draw around it. Use the pair of scissors to cut the foam a slight bit smaller than the size of the table. If you have difficulty cutting the foam with scissors, you can also make several cuts with a hobby knife. |
 |
 |
|---|
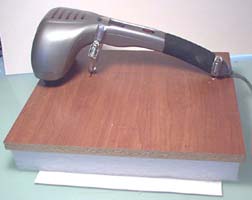
| 11. | Glue the table on top of the foam using the wood glue.
Finally, take the piece of mat board (or card board) and glue it to the bottom of the foam, making sure that it sticks out about 1". The mat board will be used to help clamp the vibrating table to your work surface when you cast. |
 |
|---|
| 12. | 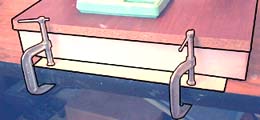 Use the C-clamps to hold the table in place. Use the C-clamps to hold the table in place.
You can adjust the vibration by using the slider adjustment on the massager, or you can also loosen or tighten the large hose clamp. |
 |
|---|
| 13. | When mixing up plaster, touch your cup to the vibrating table to remove air bubbles in the mixed plaster. When pouring plaster into the mold, steady the mold with one hand and pour the plaster with the other. You will have the best results if you spray a surfactant on the mold when using this table. Using the vibrating table will allow you to mix plaster slightly thicker than normal and still get good casts. |
 |
|---|
Dunking the Molds in "Wet Water"
This method is one that I had used in the past but I no longer use. Spraying surfactant on the mold surface seems to have solved most of the air bubble problems for me without having to dunk the molds in a solution. However, if you have a particularly difficult problem with bubbles that nothing else will solve, you might submerge the mold in "wet water" and use a toothbrush to scrub the pockets of the mold.
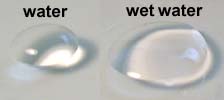
| 1. | One reason plaster won't flow into the mold is because of surface tension. By using an additive that breaks the surface tension, you can make the water "wetter", allowing it to spread and flow easier.
You'll notice the drop of wet water on the right spreads out more than the drop of plain water on the left. |
 |
|---|
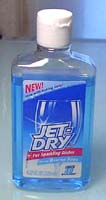
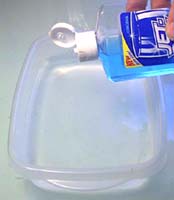
 "Wet" water can be made by adding a little rinse agent. My favorite is "Jet Dry". You add it to your dishwasher to keep your dishes from getting spots.
| 2. | Get plastic container large enough to fit a mold in. Put an inch of water in it and then a very small squirt of "Jet Dry". Gently mix it into the water so you don't cause a lot of bubbles. If you have several molds you can use a small bucket instead. This will allow you to dunk and leave several molds submerged in the "wet water" solution at one time. |
 |
|---|
| 3. | Submerge the mold in the "wet water". When dunking a mold for the first time, look closely and you will see several air bubbles caught in the details on the mold. These air bubbles need to be removed in order to get a good cast. Please note that you only have to remove these air bubbles once. Once the "wet water" solution reaches all of the crevices on the mold, it will continue to flow there again each time you dunk it. From then on, plaster will easily flow into these details. |
 |
|---|
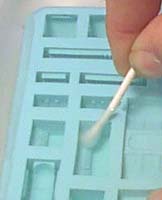
| 4. | You can remove the air bubbles with your finger, or in small tight areas use a dull pencil or cotton swab. If you use a cotton swab, try to find the kind with the wooden stick. The paper ones dissolve rather quickly. |
 |
 |
 |
|---|
| 5. | Remember, you only have to remove the air bubbles before your first cast. After that you simply dunk the mold before casting and don't worry about removing them. Smack the excess water out of the mold. To do this, hold the mold in one hand and smack it face-down into your other hand. It won't be as messy if you do this over a trash can or towel. Fill the mold as usual while tapping on the work surface. |
 |
|---|
| 6. | You'll notice that the plaster will flow everywhere, even off the top of the mold, making more of a mess than usual. Be sure to pound on the work surface as you're filling the mold to bring air bubbles to the surface. When you need to fill a lot of molds, place a half gallon of water in a bucket and add 3 tablespoons of Jet Dry to it. Dunk the molds in the solution and shake off the excess before filling with plaster. |
 |
|---|