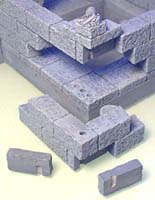
Advanced Gothic Dungeon Pieces Page 5
These dungeon pieces use a variety of molds. Click on the photo to see building instructions for each piece.
 |
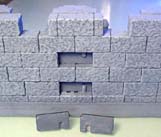
 Cell Block |
 Secret Column |
 Low Arch Chamber |
 The Knights' Bridge |
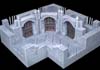
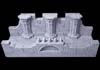
 Completed Photos |
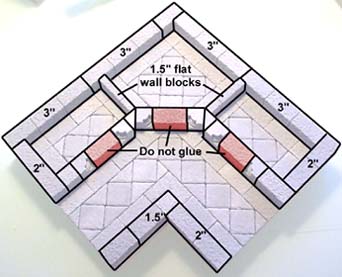
Cell Block
| 1. |
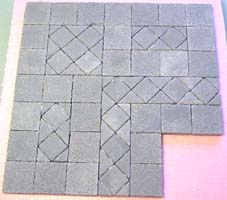
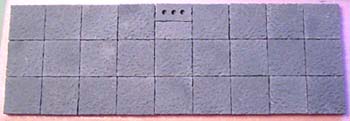
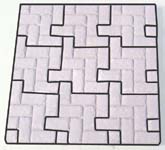
This floor uses decorative tiles from mold #205. If you don't have this mold, you can just use regular floor tiles instead. Glue the tiles to the 1/2" foam. Make sure the edges are square and straight. The diamond tiles take a little bit of shoving around to make them fit properly. |
 |
|---|
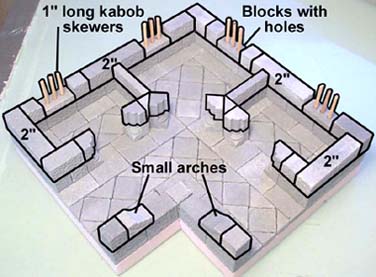
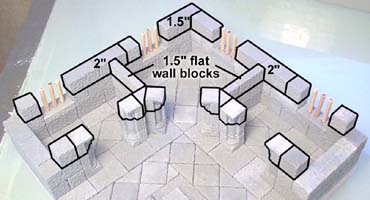
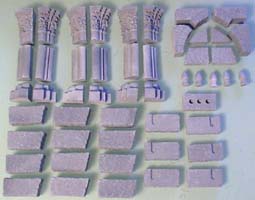
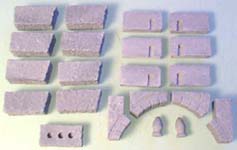
 You will need these pieces from mold
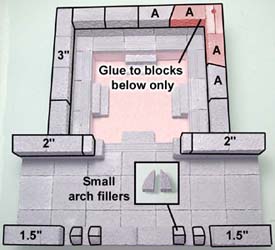
 | 2. | Laying down the first row is a bit tricky. The blocks are not meant to go at a 45 degree angle, so you'll have a little more width to the doorways than you would usually have. Do not glue the blocks in red. These will help you keep the 1" space for the doorways while gluing the first row. On the second row, use the blocks with holes in them, and cut 1" long kabob skewers (or 1/8" dowel rod pieces) to glue into the holes. Be sure to keep them straight until the glue dries. | |
|---|---|---|
 |
 | |
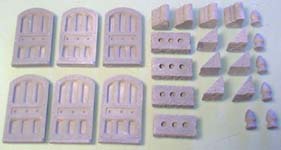
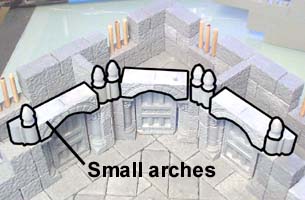
| 3. | Cap off the top of the doorways using small arches. Glue two door halves back to back for a complete door. Add the top spikes to complete the doorways. | |
|---|---|---|
 |
 | |
| 4. | The doors are painted in 3 steps. First the wood panels are painted dark brown. Next the bars and outside frame are painted black, then dry brushed with silver to give them a metallic look. | |
|---|---|---|
 |
 | |
The Secret Column
| 1. |
On the floor, you will need to use the floor tile with holes in it (shown in the top middle of the floor). This will allow us to put a hinge pin in the floor. |
 |
|---|
 You will need these pieces from mold
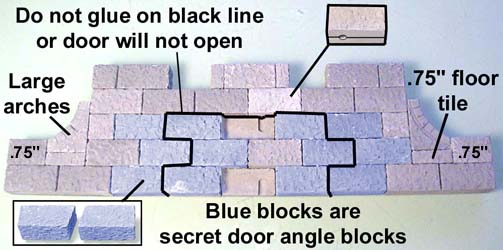
 | 2. | When assembling the back wall, do not put glue on the black line! The black line shows the outside edge of the secret door. The blue blocks are the angle blocks from mold #44. The angle sides face each other when set in the wall. Be sure the scraped side of these blocks is always facing down (toward the floor of the model). |
 |
|---|
| 3. | Let the wall dry completely. Then you should be able to remove the secret door from the wall. You will have to twist the wall out by rotating it counter clockwise (as you're looking from the top down). |
 |
|---|
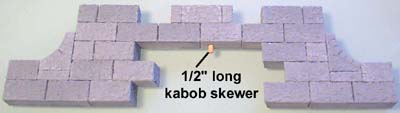
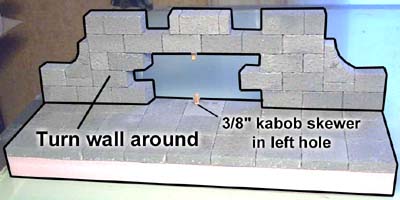
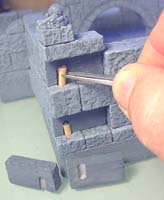
| 4. | Turn the wall piece around before you glue it onto the floor. Otherwise the kabob skewers won't line up correctly. Glue in the kabob skewers as shown. You can also use 1/8" diameter dowel rods instead. Be sure to put the bottom pin in the left hole in the floor. |
 |
|---|
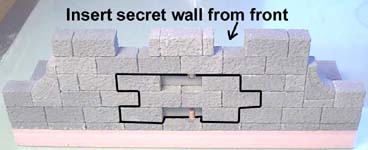
| 5. | Test fit your door. You'll need to insert it from the front side. Since the blocks are angled, the door won't push straight in. You'll have to stick one end in first, then rotate the door into position. You will probably have to sand the bottom of the door to get it to fit. You want it to fit loosely, because the door will be much tighter after a few coats of paint. |
 |
|---|
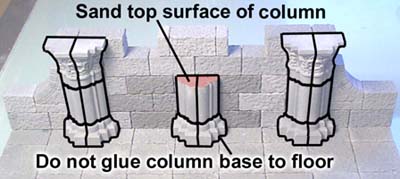
| 6. | Glue the column pieces onto the front of the wall. You will have to sand the top middle column, otherwise it may not slide under the wall when you try to open the door. Do not glue the center column to the floor. If you do, your door will not open. Just glue it to the secret door instead. |
 |
|---|
| 6. | Do not glue the backing blocks on the secret door until after we paint the model. Check to make sure your door will turn freely and easily with the column attached. It's better if it's a little loose. |
 |
 |
|---|
| 7. | When gluing the column tops on the back wall, place a piece of cereal box under them. This will set the column top a little higher, so it will clear the rotating wall underneath. Finally, add the pieces onto the front of the hallway section. |
 |
|---|
| 8. | Put the first 2 coats of paint on the model, then glue the backing blocks in. Once the model is assembled, then do the final dry brush in the lightest color of gray. |
 |
 |
|---|
Low Arch Chamber
| 1. | Gather these pieces from mold #44. If you do not want the secret passage, the only special pieces you will need are the arch and decorative points. Assemble and glue the brick floor using the pieces from mold #205. If you do not have this mold, simply use 9 regular floor tiles in a 3 x 3 pattern. |
 |
 |
|---|
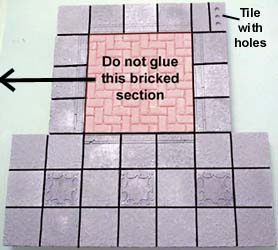
| 2. |
The decorative tiles are from mold #205 but you can use regular floor tiles if you do not have this mold. The bricked section will be removed and you can cut an opening for the pool using a sharp hobby knife. |
 |
|---|
 Glue down the floor tiles as shown. Do not glue the bricked section. Also note that there is a tile with holes in the upper right corner.
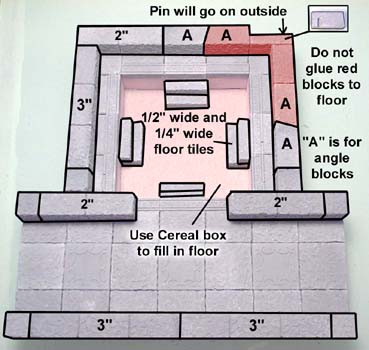
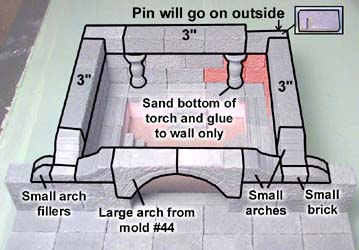
| 3. | The first step is to glue a piece of cereal box under the hole in the floor. This will give you something to pour water into later on. Next, glue the floor tile steps into the bottom of the pool. These steps are made with 1/2" wide and 1/4" wide floor tiles. Now glue the wall pieces onto the floor. Do not glue down the blocks shown in red. Be sure to glue them to each other, but not to the floor or other wall blocks. These red blocks are used to make the secret passage door. The block in the upper right of the photo is used to make half of the hinge. The hinge pin will end up going on the outside (when we finally add it later on). |
 |
|---|
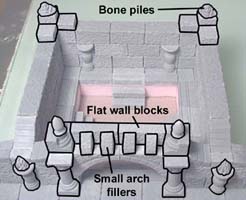
| 4. | Glue the second row of blocks on. The blocks in red are for the secret door. Only glue them to the blocks below and to each other. Do not glue them to the other gray blocks. You'll notice that there is a hinge block in the upper right corner of the photo. The small decorative blocks in the front are 2 small arch fillers glued face to face. |
 |
|---|
| 5. | Do not glue this top row of blocks to the secret door (shown in red). Only glue the blocks to each other in that area. Be sure you put half of a hinge block in the upper right corner. Sand the bottom of the torch. The torch is a little taller than the secret door, and will catch on the wall if you don't sand it. Once dry, remove the secret door and sand the bottom of it until you can slide it in and out easily. If not, the door will be too tight once you paint it. |
 |
|---|
| 6. | Add the finishing decorations to the top. These will help hide the hinge blocks. The second photo shows what the back of the secret door should look like. The secret door is shown in red and you should be able to remove it easily. The hinge pins will be added after the room is painted. |
 |
 |
|---|
| 7. | After the 2nd coat of paint, you can assemble the secret door. Place the secret door in its place. Cut two 3/8" long kabob skewers (or 1/8" diameter dowel rods) and slide them into the holes. Glue the back of the hinge covers into place. |
 |
 |
 |
|---|
| 8. |
You may notice that I have a couple of skull piles on the brick floor. These give me something to grab onto so I can easily lift the brick floor out to reveal the slimy pool underneath. For instructions on how to make the slimy pool, refer to the Tip & Tricks 15 page. | |
|---|---|---|
 |
 | |
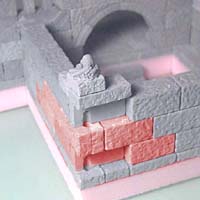
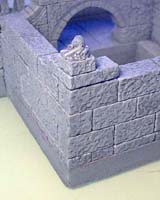
 The first photo shows how the secret door opens up. Actually, you don't have to add the secret door if you don't want to. I just wanted to demonstrate how it could be used on a corner.
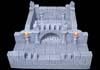
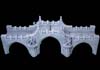
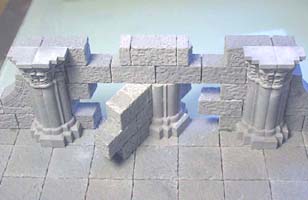
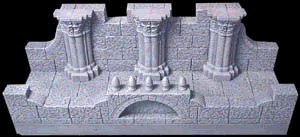
The Knights' Bridge
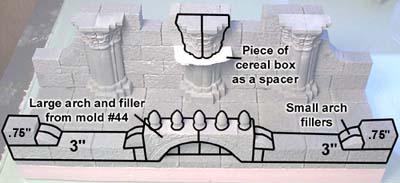
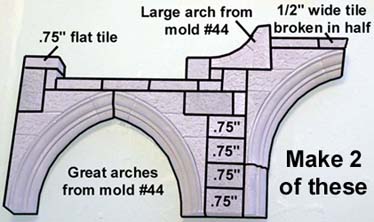
| 1. | Gather these pieces from mold #44. The large arches will need to be assembled from the smaller pieces shown. Glue these together to form the large arches before you begin the project. The miniatures are from Reaper Miniatures. Their web site is at www.reapermini.com. These will be primed and painted separately. They will be added once the bridge is completely painted. |
 |
|---|
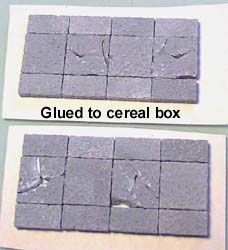
| 2. |
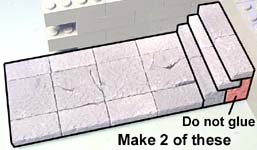
I've broken the tiles with a pair of pliers to give the floor a ruined look. Be sure to wear safety glasses any time you do this. The other 2 sections are side walkways, and all of these sections are glued to pieces of cereal box. You may have to set a heavy book on them so they'll dry flat. |
 |
|---|
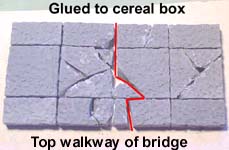 Assemble the 3 walkways. The first shown is the top walkway. The red line represents where the bridge will separate in the middle.
| 3. |
|
 |
 |
|---|
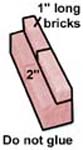
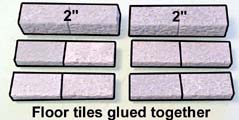 Make the bridge steps by gluing the flat tiles as shown. Do not glue the blocks shown in red. These are used to support the stairs until the glue dries. Make 2 of these.
| 4. | Glue the pieces shown to make each half of the bridge. Be sure you make 2 of each side. You'll notice that where the bridge meets, I have a 1/2" wide tile broken in half. The two halves will meet together when the bridge sets together. | |
|---|---|---|
 |
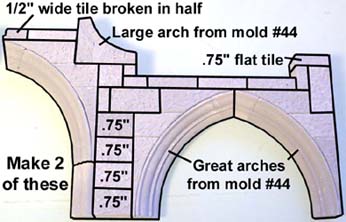 | |
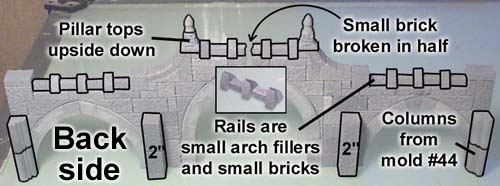
| 5. | Add these blocks to the back side of the arches. You'll know you're gluing them on the correct side if the smooth side of the great arches is facing you. Do this for the other half of the bridge as well. The top rail is made from small arch fillers and small bricks. |
 |
|---|
| 6. |
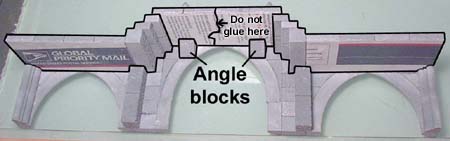
Glue the side walkways on top of the column blocks and 2" blocks recently added. The ends of the walkways will be flush with the ends of the bridge. Glue the top walkways on top of the side walkways. Add the angle blocks for support. |
 |
|---|---|---|
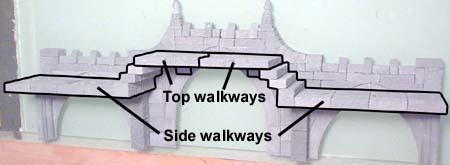 |
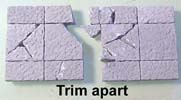 Trim apart the upper walkway. Each half will go on each side of the bridge.
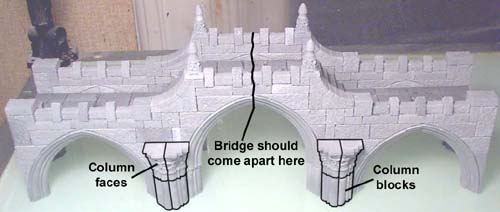
| 7. | Glue the other half of the bridge on. Be sure the walkways are flush with the ends of the bridge. The bridge should come apart in the center. Glue the column faces and blocks onto both sides of the bridge. This is where the statues will be placed. |
 |
|---|
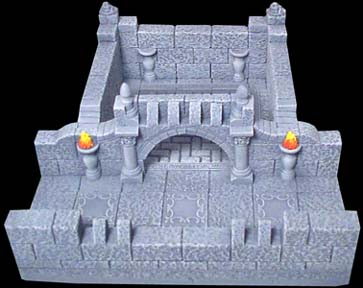
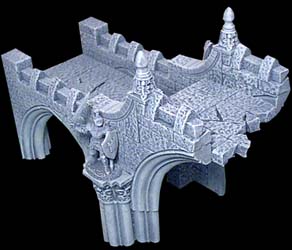
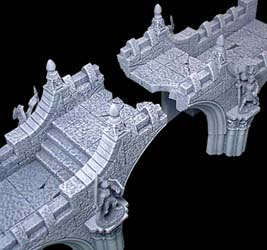
| 8. | Here are photos of the completed bridge. The statues are pinned in place. You can do this by drilling a small hole in the base of the miniature and gluing a piece of wire into it. Then drill a small hole into the floor where the statue sits and glue the wire into that when you put the statue into place. The bridge halves can be moved separately so you can make a large gap that characters would have to leap across to continue their quest. |
 | |
|---|---|---|---|
 |
 | ||
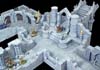
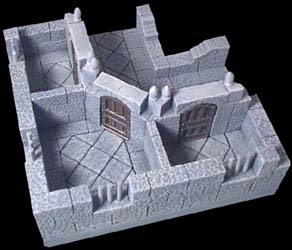
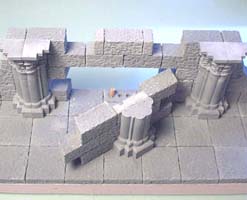
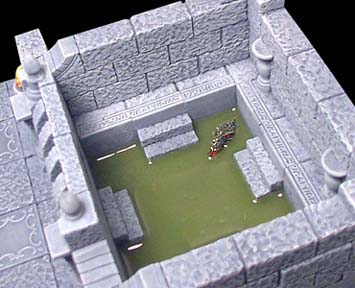
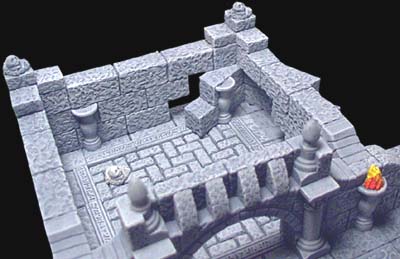
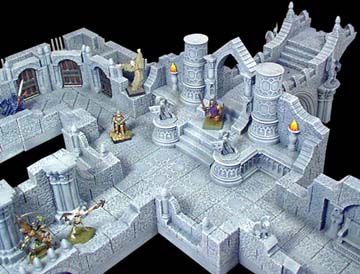
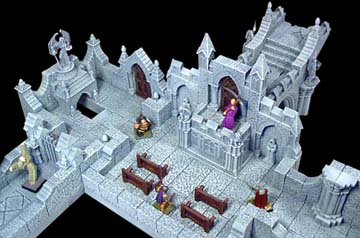
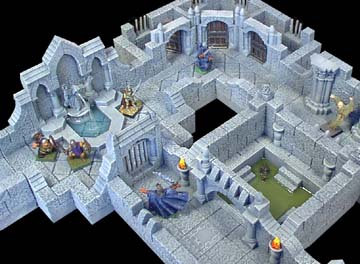
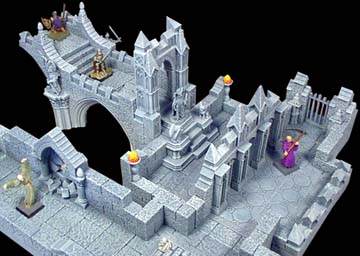
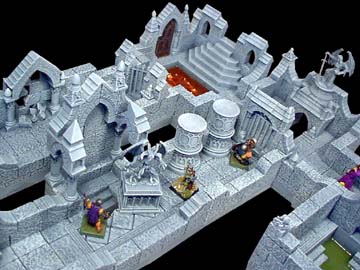
Completed Photos
Here's a few photos showing possible layouts of the dungeon. Hopefully there's enough variety in these dungeon building articles to give you ideas for your own custom pieces.
|
|