Gothic Dungeon Arena
|
This page contains instructions for building a dungeon arena that can be used for MageKnight(TM), and many other miniature games. The type of dungeon layout shown here is best used for a battle arena. This format allows you to make large interconnected rooms easily. |
|
How the Walls Work
| 1. | The Finished Gothic Arena This video shows what the finished Gothic arena looks like if you make both the basic and decorative wall set. |
 |
|---|
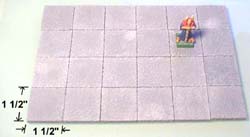
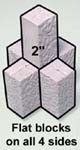
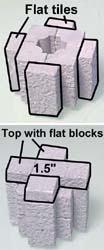
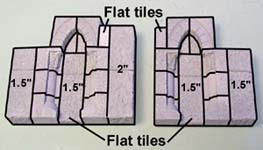
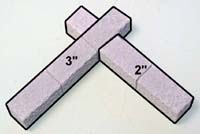
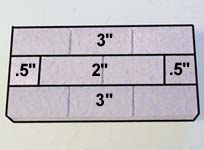
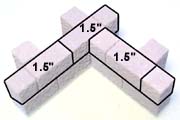
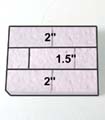
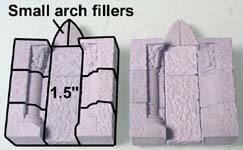
| 2. | For this gothic arena, we're going to use mold #45 for the wall sections, and mold #267 for the floor tiles. To understand how the wall pieces will work, you first need to make a grid of 1 1/2" floor tiles as shown in the photo. The miniature you see is a Warhammer(TM) 25mm figure. |
 |
|---|
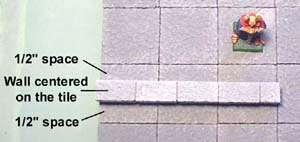
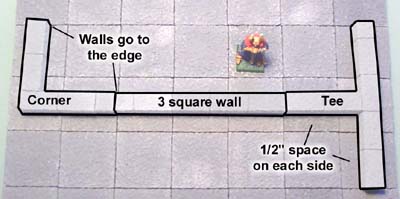
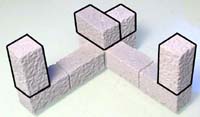
| 3. | The wall sections of this arena will set in the middle of the floor tiles. This will give you 1/2" of space on each side of the wall. This extra space will come in handy later on, when you want to add details that stick out from the wall (such as buttresses and columns). |
 |
|---|
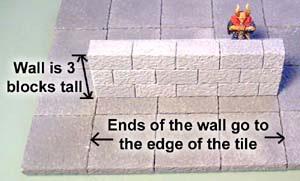
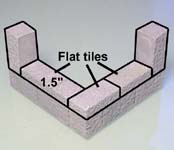
| 4. | The ends of the walls will go to the edge of the floor tiles. Each wall section will also be 3 blocks tall. If the ends of your walls are always 3 blocks tall, then all of your walls will flow together nicely. |
 |
|---|
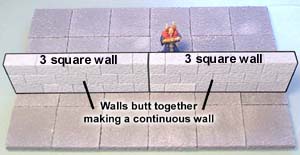
| 5. | The ends of the walls will always butt against each other. I'll call this wall section a 3 square wall because it spans 3 squares of floor tiles. |
 |
|---|
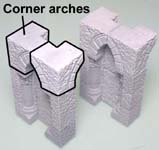
| 6. | Here's what the corners and tees would look like from the top view. You'll notice that the ends of the wall go all the way to the edge of the floor tile. Also, the sides of the wall still have a 1/2" of space on each side. |
 |
|---|
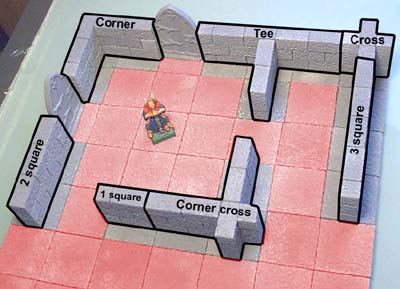
| 7. | Here's what a dungeon layout would look like using a corner, tee, cross, corner cross, 1 square, 2 square and 3 square wall section. You'll notice that all of the wall sections ride in the center of the floor tiles and also butt against each other on the ends to make a continuous wall. The red floor tiles show where your miniatures can move. Since you have extra space on each side of the wall, this will help with miniatures that have arms and weapons that stick out beyond their base. |
 |
|---|
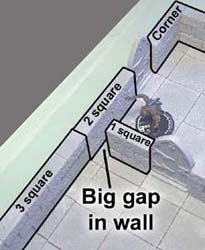
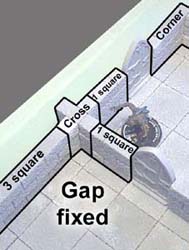
| 8. | Because of the 1/2" space on each side of the wall, you can't set walls together at an angle. If you do you'll notice a big gap between the walls (first photo). To solve this problem, you need to use a cross, corner or tee when you want to turn or add a wall 90 degrees from another. The second photo shows how to rearrange pieces to solve the gap problem. |
 |
 |
|---|
| 9. | Now that you understand how the walls work, the next step is to make walls that look good. |
 |
 |
|---|
Making a Basic Wall Set
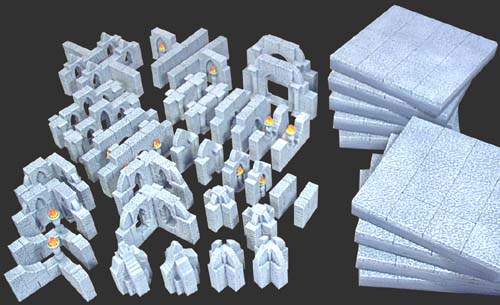
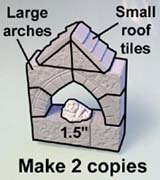
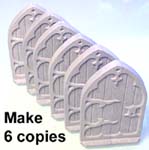
| 1. | To build the basic set shown here, you will need to cast the #267 Large Floor Tile mold 24 times and the #45 Gothic Dungeon Builder Mold 24 times. I know that sounds like a lot of casting, but you are going to cover a very large area of floor with these tiles. For directions on painting your pieces visit our Painting Instructions page. |
 |
|---|
| 2. |
This is the stuff they use for sheeting on houses before they put siding on. You can get it at any lumber yard and usually comes in pink or blue. I got the idea of mounting the floor tiles on foam from Mitch Michaelson, who had used this method for some of his dungeon pieces. The main advantage is that it's stiff and doesn't warp easily. It's also easy to cut (with a sharp knife), and you can make pits and holes in the floor that actually look deep. |
|---|
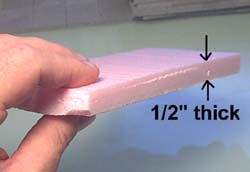 We'll start with the floor sections first. For this example, I'm going to mount the floor tiles on pieces of 1/2" thick polystyrene foam insulating board.
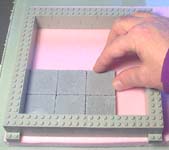
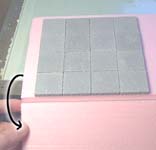
| 3. | I made one interesting discovery while making the floor sections. Legos make a perfect frame to keep your floor tiles square. They fit around the floor tiles fairly tight and keep the floor section square while you're gluing the pieces. I'm making the floor in 4 x 4 sections. These are small enough to move around easily, yet large enough to cover a good amount of room. However, feel free to make the floor sections any size you like. Many of our MageKnight players prefer to make their floor sections in 3 x 5 or 5 x 5 squares. |
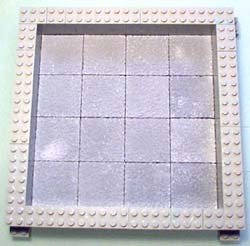 |
|---|
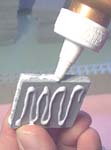
| 4. | When gluing the tiles down to the foam, place glue on the bottom and sides of each floor tile. This will give your floor some extra added strength. Set the floor tiles down into the Lego frame. If you don't have Legos, just use a straight edge to push against each side of the tiles after you glue them down. |
 |
 |
|---|
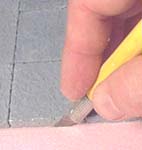
| 5. | Be sure the glue is completely dry before you try to trim off the excess. To trim the pieces, run a sharp hobby knife straight down into the foam across one side. Then, place the foam along the edge of the table and snap off the excess by pushing down. The foam will break easily and fairly clean. If you have any excess foam sticking out, trim it off with the hobby knife. |
 |
 |
|---|
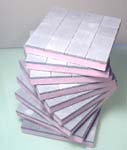
| 6. | Make 9 of these floor sections. To paint the floor sections, you'll need to look at the Painting Instructions page. You can also protect the surface with a spray sealer. Flat lacquer or varnish works the best. Don't use a glossy sealant because it will look strange to have a glossy floor. |
 |
|---|
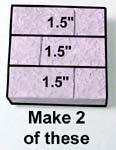
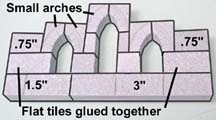
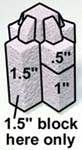
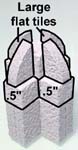
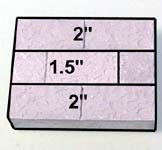
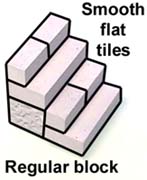
| 7. | We'll start with the 1 square wall pieces. They're called 1 square wall pieces because when you set them down on the gaming board, they'll cover 1 square floor tile. For the first wall section, take 3 of the 1.5" blocks, stack and glue them together. Make 2 of these pieces |
 |
|---|
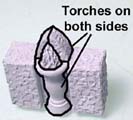
| 8. | The second 1 square wall piece assembles like this. Be sure to glue torches on each side of the wall. Make 2 of these pieces |
 |
 |
 |
|---|
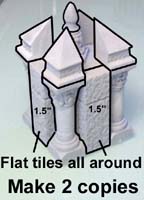
| 9. | The last of the 1 square wall sections uses these pieces. The pillar blocks stack up on each side of a flat tile. Then you add the large pointed pieces on the top. Make 2 of these pieces |
 |
|---|
| 10. | The first 2 square wall piece is pretty simple. Be sure you use the exact blocks shown here, otherwise you will run out of the blocks you need later on. Make 2 of these pieces |
 |
 |
|---|
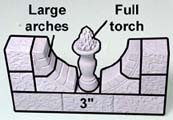
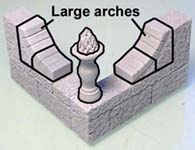
| 11. | The next 2 square wall piece assembles like this. Use the large arches on each side of the torch. Make 2 of these pieces |
 |
|---|
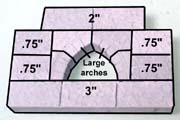
| 12. | The last 2 square wall piece is very simple. Use the large arches for the window. You can also add a bone pile in the window for more detail. Make 2 of these pieces |
 |
|---|
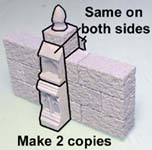
| 13. |
Place torches on one side of this wall, and place pillars on the other side. Notice that there is an extra pillar piece to make it a little taller. Add the bone pile for a little extra decoration. Make 2 of these pieces |
 |
|---|---|---|
 |
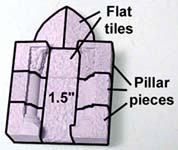
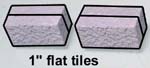
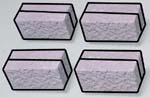
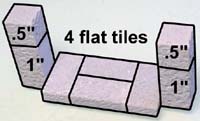
 Now for the 3 square wall pieces. Start by gluing 4 flat blocks together as shown. The reason we need to do this is because we will run out of 1.5" blocks if we don't. I've used up just about all of the blocks from the 24 castings of mold
 | 14. |
Once again, you don't want to run out of 1" blocks, and you will if you don't use the flat tiles here. I've used up just about all of the blocks from the 24 castings of mold #45. Place pillars on both sides of this wall. Make 2 of these pieces |
 |
|---|---|---|
 |
 For the next 3 square wall piece, start by gluing 4 flat blocks together as shown.
| 15. |
Make 2 of these pieces |
 |
 |
|---|
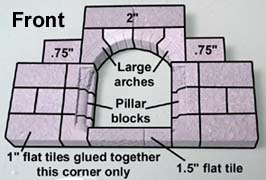
 The Entrance is fairly simple. Glue 2 flat tiles and place them in the bottom left only.
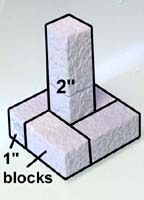
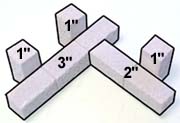
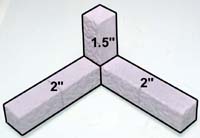
| 16. | Now for the cross pieces. First, gather the pieces you see here. For 3 of the sides we'll use a combination of 1" and .5" blocks. For the remaining side we'll use a 1.5" block. Stand up a 2" piece and glue the other blocks around the outside. Make 2 of these pieces |
 |
 |
 |
|---|
| 17. |
Stand up a 2" piece and glue these blocks around the outside. Then top them off with square blocks and pointed blocks. Make 2 of these pieces |
|
 |
 |
|---|
 For the next cross piece, start by gluing 8 flat tiles together to make four 1" blocks.
| 18. | For the last cross piece, start with two 1" blocks. Next put down four column squares. If you don't do this you'll run short of square blocks later on. Now glue four flat tiles around the edges and then top them off with the flat tiles shown. The top uses two small arches and two large arches. Make 2 of these pieces |
 |
 |
 |
|---|
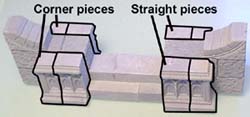
| 19. | Here is one of the corner pieces. Make 2 of these pieces |
 |
 |
 |
|---|
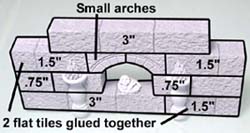
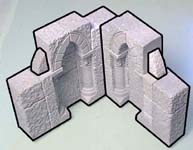
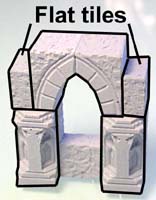
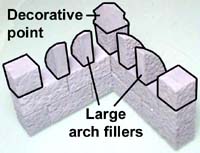
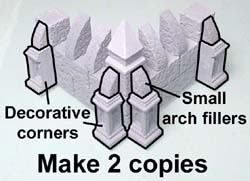
| 20. | Here is the second of the corner pieces. This one uses the flat tiles and arch fillers. The torches go on the back side of the walls. Make 2 of these pieces | ||
|---|---|---|---|
 |
 |
 | |
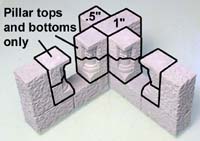
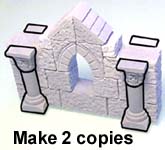
| 21. | The last corner is a bit more complicated. For this piece you want to use only the pillar top and bottom. You won't use the middle pillar piece. Use the small arches above the pillars. You'll use the large arch fillers to decorate the top sides. Make 2 of these pieces |
|
|
|---|
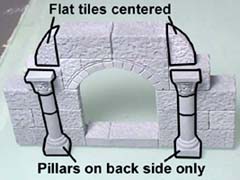
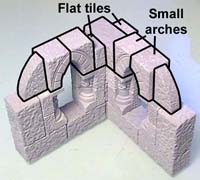
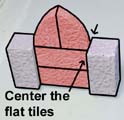
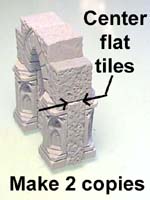
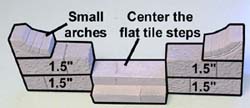
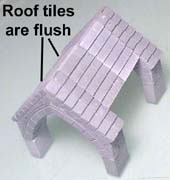
| 22. | Here's one of the tee pieces. The flat tiles are shown in red. Be sure to center the flat tiles under the arch. Place torches under both sides of the arch. Make 2 of these pieces |
|
 |
|---|
| 23. | Here is the last of the tee pieces. Make 2 of these pieces | ||
|---|---|---|---|
 |
 |
 | |
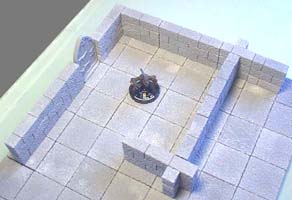
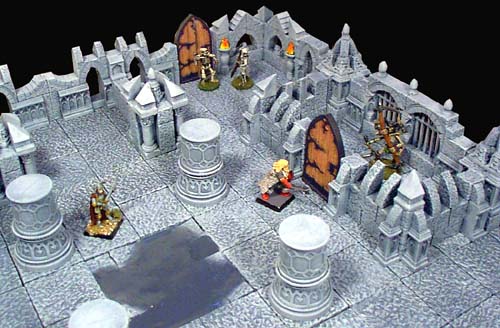
Here are a couple of photos of an arena you can build with these pieces. For directions on painting your pieces visit our Painting Instructions page. The miniatures you see used here are MageKnight figures. Each square gives your model a full 1.5" to move in plus some extra room for overhanging arms and weapons. |
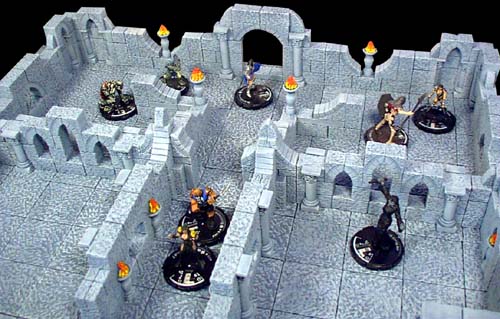 |
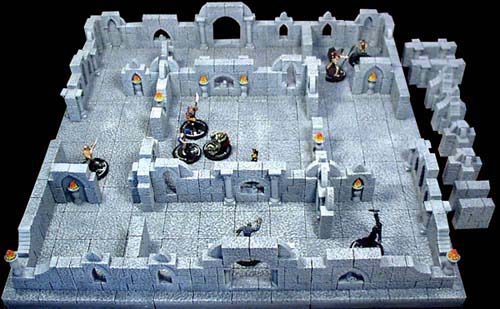
This photo shows a complete layout. Notice that there are a few pieces left over (on the right). These come in handy depending on how you want to arrange your walls. Of course, you can make as many floor tiles and walls as you like, and make a much larger dungeon layout. |
 |
Making a Decorative Wall Set
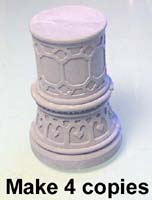
| 1. | To make this decorative wall set you will need to cast the #267 Large Floor Tile mold 25 times, the #45 Gothic Dungeon Builder mold 25 times, and the #42 Gothic Arena mold 25 times. For directions on painting your pieces visit our Painting Instructions page. The instructions for making the floor tiles are in the article above. |
 |
|---|
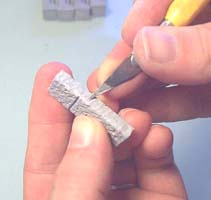
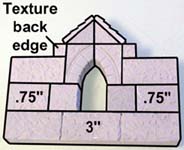
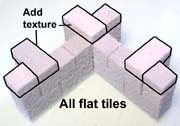
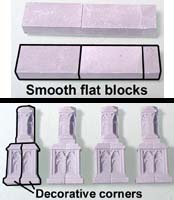
| 2. | There will be many times where you'll need to add texture to the side of the flat tiles. These flat tiles were originally meant to stand on end, so any time you lay one down, you'll have a flat side (or scraped side) that will show. To texture these flat edges, use a hobby knife to chip and gouge the edge of the tile. It may not look exactly like the rest of the texture when you get done, but it will be close enough to cover up the smooth side. |
 |
|---|
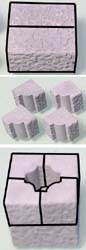
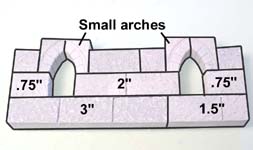
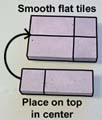
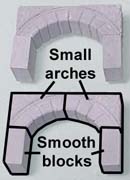
| 3. | We'll start with the one square pieces. The first two are very simple to make, so I think the photo pretty much explains the pieces for you. Make 2 each of these pieces |
 |
 |
|---|
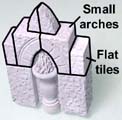
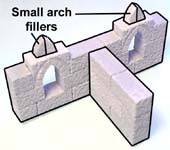
| 4. | Here's the last of the one square pieces. The flat tiles get centered under the arch side to side. The decorative pieces under the arch are placed on front and back of the piece. Make 2 of these pieces |
 |
 |
 |
|---|
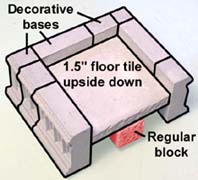
| 5. | Now for the two square pieces. The first is very simple to make. The buttress made out of decorative pieces (from mold #42) is placed on both sides of the wall. Make 2 each of these pieces |
 |
 |
|---|
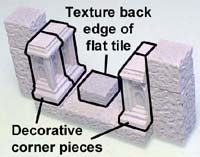
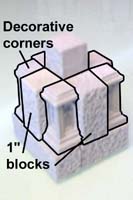
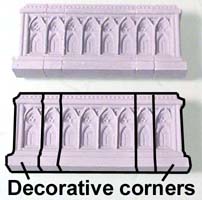
| 6. | For the next two square piece, glue together 4 large arch pieces from mold #42 as shown. Next glue the flat tiles together to make the floor and center them between the 1" pieces. Use the decorative corner pieces on the inside, and then glue the large arch on top. Glue together a complete torch, but don't glue the torch in until after you paint the piece. Otherwise you won't be able to paint the inside of the arch. Make 2 of these pieces |
|
|
|---|
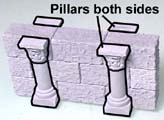
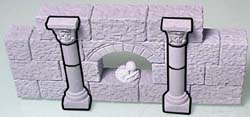
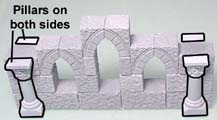
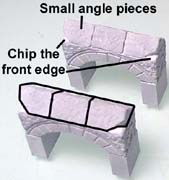
| 7. | The last of the two square pieces is very simple. The smallest rectangular blocks will need to be textured on one side (because the scraped side of the block will show). Be sure that you put pillars on both sides of the wall. Make 2 of these pieces |
 |
 |
|---|
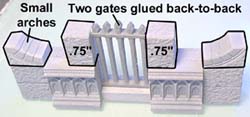
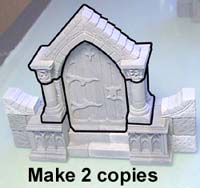
| 8. | For this 3 square piece, your gate will hold up better during game play if you cast it out of plastic. Visit our Plastic Casting Instructions for more details. Be sure to glue 2 gates back-to-back. Make 2 of these pieces |
|
 |
|---|
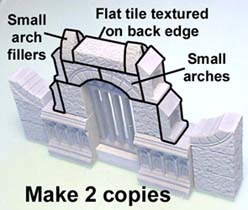
| 9. |
|
Glue the additional blocks shown. There will be gaps at the top of the gate. Place the gate in the center. 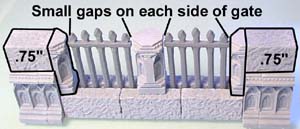 Add the small arches, small blocks and points to finish the piece. 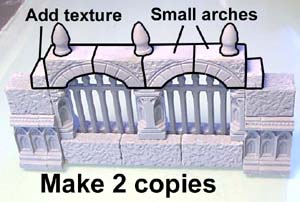 |
|---|

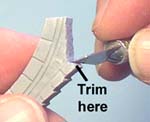
| 10. | The doors may give you some trouble because they're harder to scrape evenly when casting them. To make them fit properly, sand the edges flat. Then glue the two halves together for a complete door. Make 6 complete doors. |
 |
 |
|---|
| 11. |
|
| ||||||||||||||
|---|---|---|---|---|---|---|---|---|---|---|---|---|---|---|---|---|
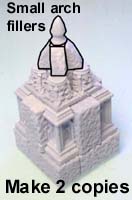
| 12. | The crosses are next. I guess the first one isn't really a cross piece, but the big pillars look good in the center of large open areas. For the second one, glue together 4 inside pillar corners. Use the large arch fillers on top. You'll have to texture the back edge of the 1.5" pieces. |
 |
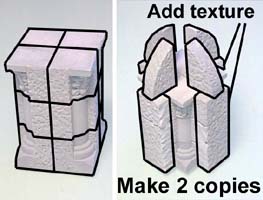 |
|---|
| 13. |
Finish the piece by adding 1.5" flat tiles on all four sides, then the top spike decorations. Make 2 of these pieces |
 |
 |
|---|
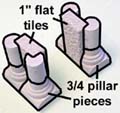
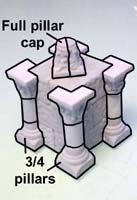
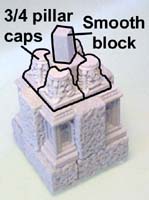
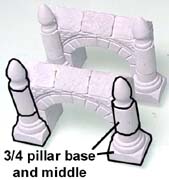
 The next cross piece starts using six 1" regular blocks. Glue four complete sets of the 3/4 pillars around the outside of these blocks. On the top add a full pillar cap made by gluing two halves together.
| 14. | The last cross piece starts using a 2" block and four 1" regular blocks. Make 2 of these pieces |
 |
 |
 |
 |
|---|
| 15. |
|
|
|---|
| 16. |
|
|
|---|
| 17. |
This corner starts with 2" blocks and .5" blocks.  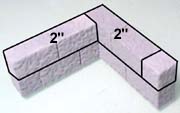
|
|
|---|
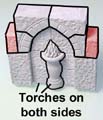
| 18. | The tee piece fits together as shown. Add the bone piles under the arches and add torches on both sides of the plain wall. Make 2 of these pieces |
 | |
|---|---|---|---|
 |
 | ||
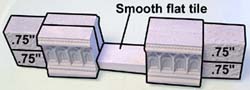
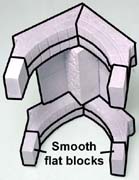
| 19. | The last tee piece is more complicated. Be sure you use the smooth flat tiles where shown, but regular flat tiles on the ends. Make 2 of these pieces |
|
 |
|---|
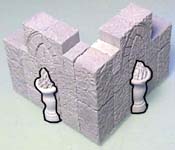
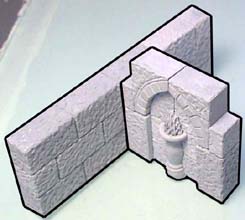
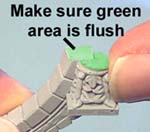
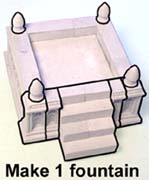
| 20. | Here's the fountain. Don't glue the block shown in red. To add water to the fountain, see the Tips and Tricks 14 page. Make 1 of these. |
 |
 |
 |
|---|
Making the Large Archway
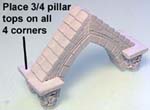
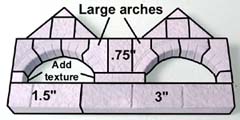
| 1. | When you build the decorative wall set above, you'll have several blocks left over. You can use these extra blocks to build this large archway. If you have not made the decorative set above, you'll need molds #267, #45 and #42 to build this arch. The archway can be used as an objective for your game, or a place for monsters to come out of onto your gaming board. |
 |
|---|
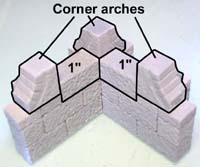
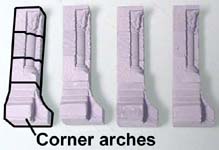
| 2. | We'll start with the base pieces of the arch. Glue together two of the pieces shown here. Use the 1.5" flat tile to go in the middle. Then add the corner arch pieces onto the top of these. Once finished, set these pieces aside for the moment. |
 |
 |
|---|
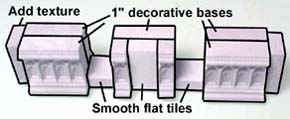
| 3. |
Next, glue together the decorative base pieces. Finally, you can assemble all of these pieces to make half of the large base to support the arch. |
 |
 |
|---|
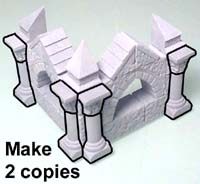
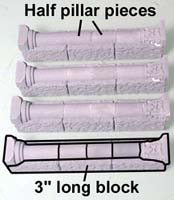
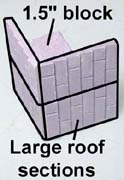
 Assemble the 4 post pieces as shown.
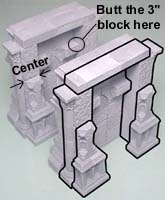
| 4. | Assemble the next pieces and add them onto the back side of the arch base. The 3" block should butt against the corner arch on the inside (as circled). |
 |
 |
 |
|---|
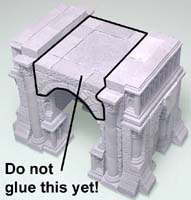
| 5. |
Do not glue this platform into the arch. I just set them together so you can see how it fits. You'll want to paint the pieces separately before you glue them together. Otherwise you won't be able to paint the inside of the arch easily. |
 |
|---|
 To tie the two halves of the base together, we'll make a platform.
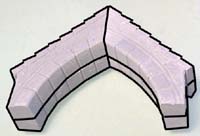
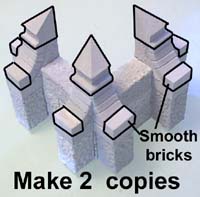
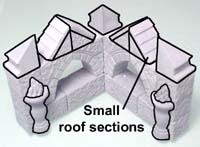
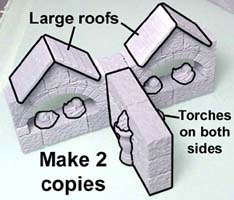
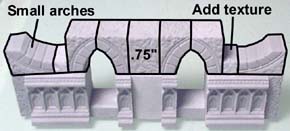
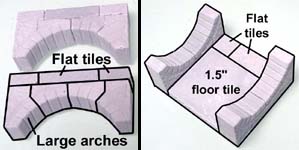
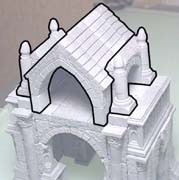
| 6. | Now for the roof of the arch. Glue some large roof tiles to a 1.5" block and let it dry completely. Then glue the completed roof section onto eight large arch pieces as shown. Once dry, add the smooth blocks onto the bottom of the arches. |
 |
 |
 |
|---|
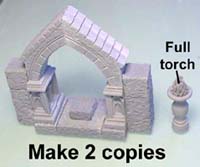
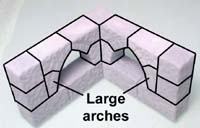
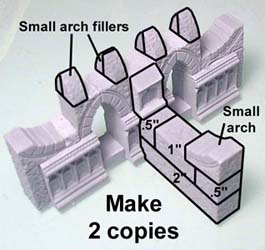
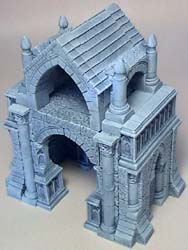
| 7. | The remaining pieces to be made fit into the gap on each side of the roof. Do not glue the roof pieces on the arch! You will want to paint the inside of the arch before you glue the main pieces together. The large arch is complete. | |||
|---|---|---|---|---|
 |
 |
 |
 | |
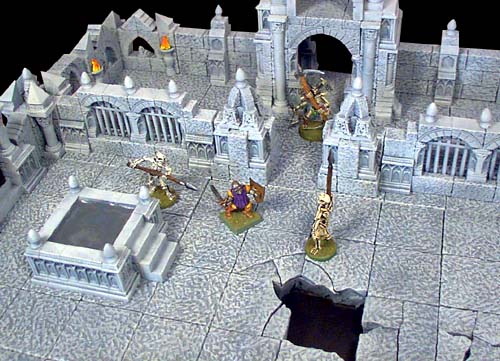
Finished Photos
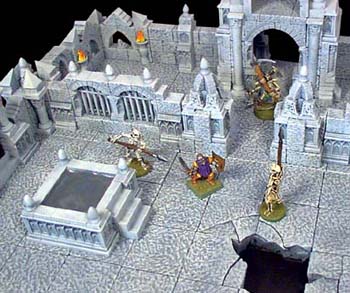
For directions on painting your pieces visit our Painting Instructions page. Here's a close-up of the decorative set. The large arch is in the background where a skeleton is coming out of it. Directions for making the large hole in the floor are on my Tips and Tricks 14 page. The large hole shows the advantage of making your floor on the 1/2" foam. The hole is deep enough that it really looks like a hole instead of just a missing floor tile. |
 |
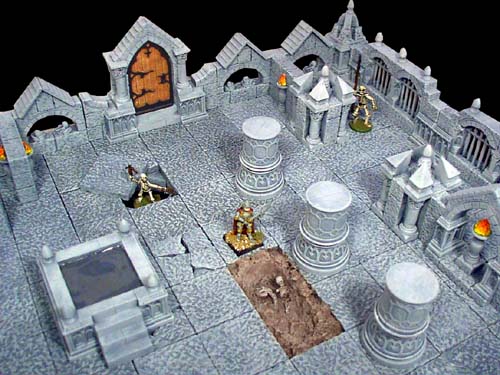
This photo includes the painted doors. The wood texture is painted dark brown and dry brushed with light brown. You can even dry brush the black frame with silver to make it look like steel. Directions for making the puddle of water are on my Tips and Tricks 14 page. The puddle looks good, but would have looked a little better with a darker color, and a little green added. |
 |
Here's a tile with an open grave. Directions for making this open grave is on my Tips and Tricks 14 page. In the upper left, you'll also see a loose tile that's actually a secret entrance for enemies. Directions for making this secret entrance are also on my Tips and Tricks 14 page. I didn't make any river or lava tiles for the gothic dungeon. They just didn't fit into the theme of a stone crypt very well. |
 |