Painting Cavern Floors
|
Getting Ready to Paint
Painting Flat Game Boards
Cavern Floor ColorsPainting the Dark Base Dry Brushing the Medium Color Dry Brushing White Painting Cavern Layouts With Walls
Cavern Floor ColorsCavern Wall Colors |
 Castle Gray Colors |
 Earth Tone Colors |
 Antiquing Method |
 Spray Painting |
 RAL Color System |
 Cavern Floors |
 Aging Techniques |
 Ship Corridors |
 Wood & Brick |
 Outdoor Areas |
 Game Pawns |
Getting Ready To Paint
|
|
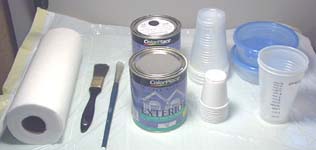 Get your materials together. You will need:
Painting Flat Game Boards
Cavern Floor Colors
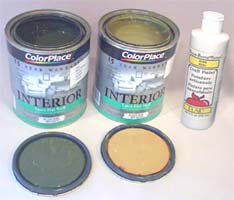
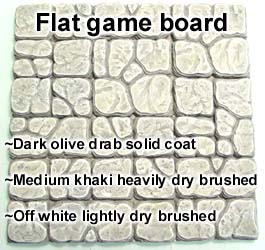
Since flat game boards have no walls, you don't have anything to look at but the flat tiles. I tried to paint the cavern floor tiles with more subtle and realistic colors, but it ended up looking flat and lifeless. The only way to make a flat floor with no walls look good is to bring out all the detail with stark colors. The colors I finally decided on are shown below. The Water Cavern Dark color is a dark olive drab, the Water Cavern Medium color is a medium khaki and finally the highlight is almost straight white. If you would like me to send you a sample chip of the first 2 colors (you don't need a color chip of white), mail me a self-addressed stamped envelope or send me an e-mail when you place an order. Any place that sells paint can mix up a quart the exact color to match the samples. |
 The colors I am going to use for a flat game board will be very high contrast. In other words, the dark color is very dark and the light color is very light.
| My color | RAL Classic | RAL Design System |
|---|---|---|
| Water Cavern Dark |
RAL# 7031 Blue grey | RAL# 100 40 05 |
| Water Cavern Medium |
RAL# 1020 Olive yellow | RAL# 085 60 30 |
|
Painting the Dark Base
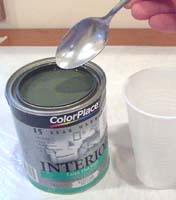
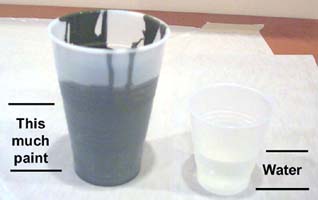
| 1. | We need to thin the paint so it will go into the cracks easily. Use a large spoon to dip out the paint. Take 3 parts paint and add one part water. I would start with a cup of paint and 1/3 cup water. This should be enough to paint all the pieces. |
 |
 |
|---|
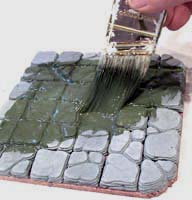
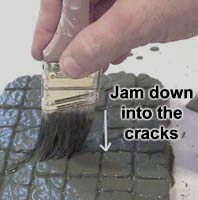
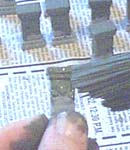
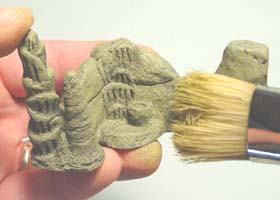
| 2. | Dip the brush into the paint and slop it onto the floor. You want the paint to run into all of the cracks and crevices between the tiles. Notice that I'm using a 1" wide cheap trim brush for this work. It can even be wider if you like. You'll have to jam the paint down into the cracks on these floor sections. The cracks between the tiles are so narrow and deep that the paint must be thinned or it will never flow down there. |
 |
|---|
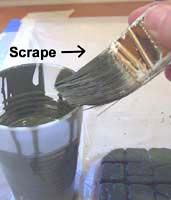
| 3. | Once the gaps are completely filled, you'll need to remove the excess paint from the cracks. The best way to do this is to scrape off the excess paint from the brush by scraping it along the edge of the cup. Then jam the brush down into the cracks to pick up paint out of them. Then scrape the brush off again. Repeat this until you have no paint pooling in the cracks. |
 |
 |
|---|
| 4. | When painting the small pieces (such as the posts), I found it easier to paint the top half and let it dry while painting other bits. Once dry, I painted the other half. This helped keep excessive paint off of my hands and kept the pieces from sticking to the newspaper when the paint dried. Once dry the pieces will be extremely dark. Paint will usually dry darker in color. |
 |
|---|
Dry Brushing the Medium Color
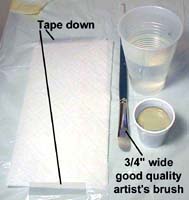
| 1. | To do the dry brushing properly you'll need a good quality paint brush. I cannot stress this enough! Go to your local craft or art store and spend $12 on a good 3/4" wide artist's brush. The bristles should be medium soft and about 1" long. Pour some of the medium color into a small cup. Do not thin the paint! The formula for the Water Cavern medium color is listed above. I like to tape down a paper towel to the table. This keeps it in place when I brush the excess paint out of the brush on it. |
 |
|---|
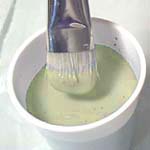
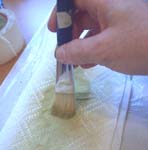
| 2. | When dipping your brush, only dip the bristles half way into the paint. This will help keep paint from drying way up into the bristles. Wipe out the excess paint from the brush onto the paper towel. You want a very small amount of paint in the bristles of the brush. |
 |
 |
|---|
| 3. |
|
|---|
 Follow these steps exactly when dry brushing!
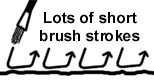
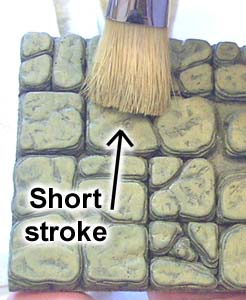
| 4. | The technique I use is a quick jabbing motion. It's a cross between a jab and a stroke. You want to pepper the surface with lots of short strokes, making sure there's very little paint on the brush. The more brush strokes you use, the more subtle shades between light and dark will appear. |
 |
|---|
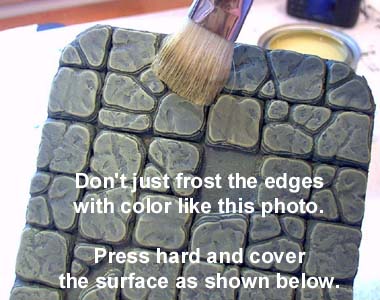
| 5. | You will notice the main surface is covered with this color. However, you still see some of the dark coming through on the textured places. Usually I would say this is too solid of a coverage, but we still have the white highlight to go. I didn't want to just frost the edges with this color because the white highlight paint will do that. |
 |
 |
|---|
| 6. | You should clean your brush about once every 10 minutes. This will keep the paint from drying way up on the bristles and ruining the brush. To clean the brush, dip it in water and rotate it against the side of the cup. Wipe out the brush and repeat this several times. When finished, blot the excess water off and you'll be ready to paint again. |
 |
 |
|---|
| 7. | When you finish the first piece to your liking, leave it on the table as a guide for the other pieces you will paint. Try to get them to match in the same color and texture as the first one you painted. Also notice the big difference between the first and second coat of paint. Usually I don't paint pieces with this much contrast in color. I tried painting the color more naturally (not so stark), but the game board looked like a field of grass and none of the texture stood out. Since this is a flat game board and there are no walls to catch your attention, the floor texture has to pop, and it will only do this if we vary the colors from very dark to very light. |
 |
|---|
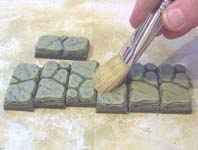
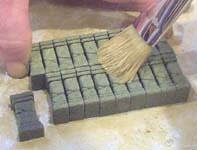
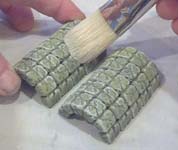
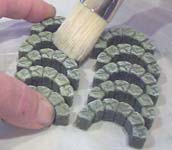
| 8. | For smaller pieces like the 1 x 2 floor sections, I just line up several in a row and paint them all at once. The door posts line up especially well and you can do all 20 posts fairly quickly this way. |
 |
 |
|---|
| 9. | You can also line up the arches the same way and paint them all at one time. |
 |
 |
|---|
Dry Brushing White
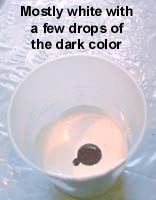
| 1. | The Light color is mostly white paint with a few drops of the Water Cavern Dark paint in it. You can use just straight white if you want to, but I liked the tinge of color in it myself. Mix it up well and do not thin the paint. Be sure you tape a paper towel down and use the same dry brushing method as above with a few exceptions. This time you will not jam the brush down into the face of the floor. Instead you will lightly brush across the face of the tile only. |
 |
|---|
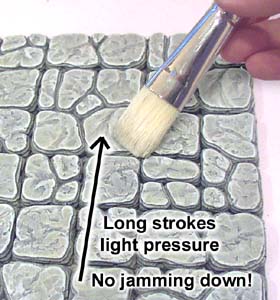
| 2. | Dip the brush into the paint and wipe all of the paint out on a paper towel just as we did in the steps above. This time use a very light pressure and longer strokes. This last coat will take very little paint, so if you mix more than 2 ounces it will probably get wasted. This step will frost the edges and help them to glow. It will also mute the strong color of the floor so it will look a bit more natural and not so green. Be sure that you do not jam the brush down into the face of the floor but only lightly brush across the top and edges. |
 |
|---|
This finishes the painting instructions for the Descent board. For instructions on how to build the Descent board, check out the Descent Board Building Instructions page. To see how to paint the other features and see close-up photos of the models, take a look at our Tips & Tricks 20 page. |
 |
Painting Cavern Layouts With Walls
Cavern Floor Colors
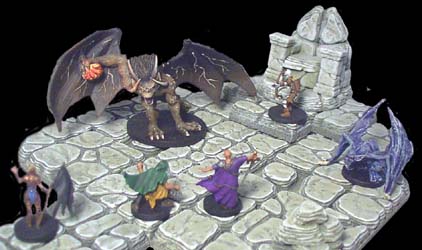
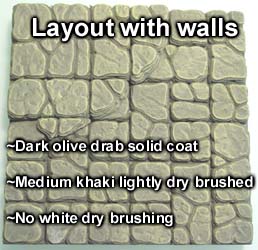
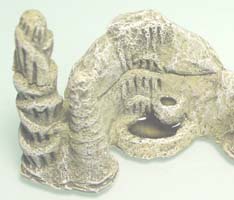
There is a big difference between painting a flat game board and painting a layout with walls. On a flat game board, the floor is all you have to look at so you want to make the details come out nice and bright. However, on a layout with walls you do not want the floor to be as bright. The cavern walls add so much more detail that painting the floors in the same manner would make them too distracting and take away from the look as a whole. Below is a quick comparison between how a flat game board should be painted and how a layout with walls should be painted. |
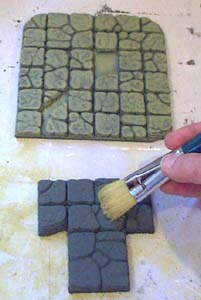
The first photo is painted using the instructions above. The second photo is how we want to paint a cavern floor with walls. We're going to paint our floor darker so it will not be so distracting. |
 |
 |
To paint your cavern floor, follow these instructions
|
Cavern Wall Colors
| 1. | The cavern wall pieces will be using the same colors and instructions as the flat game boards. This includes:
The quickest way to put the first dark coat on is to dip the pieces in the paint. Be sure to wear a rubber glove on the hand that does the dipping. |
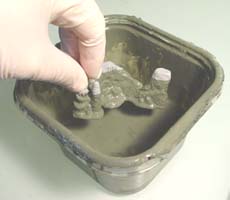 |
|---|
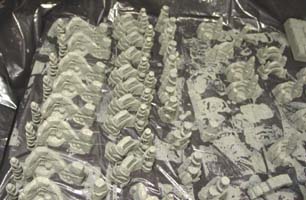
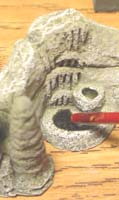
| 2. | I'm using a 1.5" trim brush to brush off the excess paint after dipping. Then I place the pieces on a plastic trash bag to dry. |
 |
 |
|---|
| 3. | Dry brush the Water Cavern Medium color using the medium color instructions above. Dry brush the white color using the white drybrushing instructions above. |
 |
 |
|---|
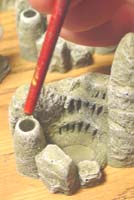
| 4. | I've finished the pools using Envirotex Lite with a tiny amount of black ink wash mixed in. I have extensive instructions on using Envirotex Lite for water on my Tips & Tricks 24 page. |
 |
 |
 |
|---|
This finishes the painting instructions for the water cavern layouts. For instructions on how to build the water caverns, check out the Water Cavern Building Instructions page. To see how to make the other features such as bridges, rivers and accessories, take a look at our Tips & Tricks 24 page. |
 |