Spray Painting
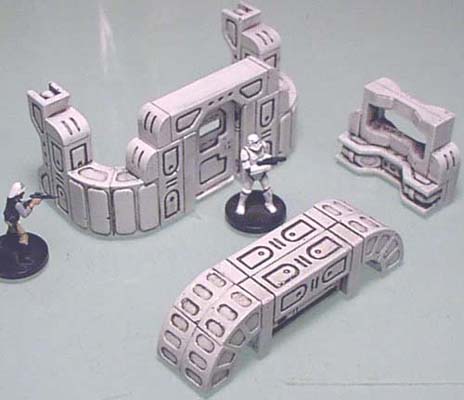
You do not have to use all of the steps shown here. Feel free to stop at any point you want, depending on how much detail and work you want to put into your paint job. This paint job was used on the starship pieces shown on our web site.


Spray Painting
Protecting the Foam Base
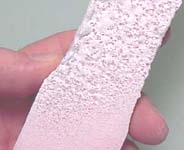
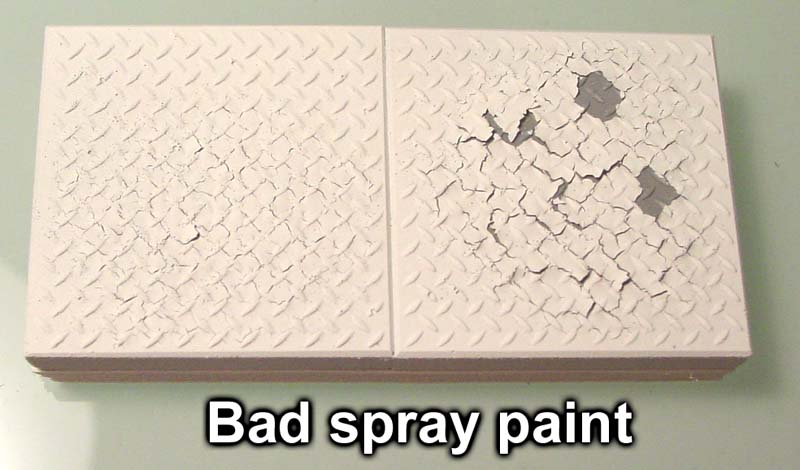
| 1. | To begin with, we'll need to protect any parts of your model that used insulating foam board on them. Most of our floor sections are mounted on this type of foam board. If you do not protect the foam by sealing it first, the spray paint will dissolve it! This photo is an example of what happens to foam if you apply spray paint directly to it. There are special types of spray paint that are safe to use on foam, but the types I have tried didn't cover as well. |
 |
|---|
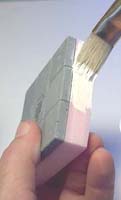
| 2. | To protect the foam, give it a coat of acrylic paint, or any type of paint that cleans up with water. Try to not get paint too far up on the tiles. Any excessive overpainting will make your floor not look as clean. Also, be sure to paint under the edge as well. If you don't, the spray paint will creep under the edge and dissolve the bottom of the foam. |
 |
 |
|---|
Spraying the Base Coat
It's important to note that I am using gray dental plaster for these pieces. However, if you are using white plaster, you still need to spray paint them white! I've tried skipping this step and just sprayed clear varnish onto white plaster and it doesn't work. The clear coat soaks in and does not seal the piece like white spray paint does. If the piece is not base coated with white paint, the shoe polish will soak into the plaster and ruin the effect. |
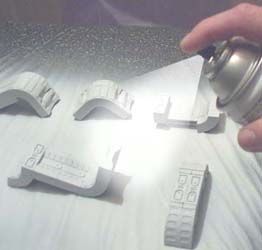
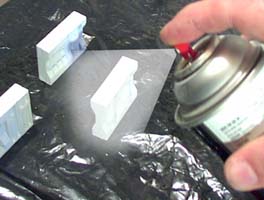
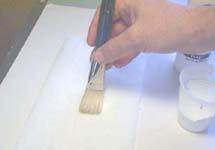
| 1. | First, I strongly suggest that you do your spray painting outside. The fumes from spray paint are very bad so you must work in a well ventilated area. My painting surface is a piece of plywood wrapped in a trash bag. This works well because if the paint build-up gets too thick on the board, I simply replace the trash bag. I've set this board onto saw horses to get it the right height. |
 |
|---|
Test your paint! I used flat white spray paint for all of the pipes and sci-fi pieces. For my next display I had purchased new spray paint (same brand) and apparently the paint formula had changed along with the nozzle type. When I painted these floor tiles, the paint flaked off after it was dry. The moral of this story is to test your paint first! |
 |
| 2. |
Here are the steps I use when spray painting:
|
|---|
 I'm using flat white spray paint for my model. Flat paint covers better than satin or gloss and it soaks into the plaster more evenly.
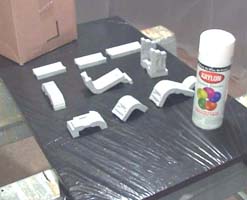
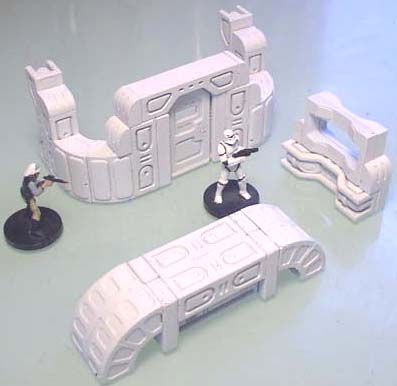
| 3. | You can stop here if you like. If you don't want to take as much time and want to start using the pieces right away, you can simply spray paint them white and start using them. This photo shows pieces that have been spray painted white only. If you want to see it better, click on the photo for a larger image. The blocks shown here are from the starship pieces. |
 |
|---|
Spraying a Clear Coat
| 1. |
You may ask "why not just use gloss white spray paint?" Gloss white does not cover as smoothly as flat white spray paint. Gloss runs and puddles much more quickly and the color is not as uniform when sprayed on plaster. If you do not clear coat your pieces, they will turn out to be a metallic gray when you use shoe polish on them, which may be something you want (see below). |
|---|
 Spraying a clear coat is optional. Giving your pieces a clear coat of varnish or lacquer will make it so that the shoe polish will wipe off more cleanly leaving the main faces much more white.
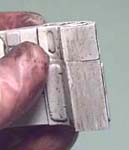
| 2. | The first photo did not get a clear coat and the shoe polish stuck to the main surfaces more giving it a metallic look. The second photo has the clear coat before the shoe polish was applied, and it wipes off to a much cleaner look. This paint job was used on the starship pieces. |
 |
 |
|---|
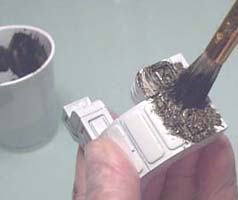
Applying Black Shoe Polish
| 1. |
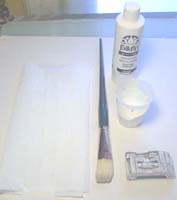
A. A plastic or rubber glove. This helps keep black shoe polish from getting all over the hand that holds the wall piece. B. Paper towels. You'll need a whole roll of these. You use these to wipe off the major amount of shoe polish on the piece you're painting. C. A paint brush. I'm using a large rounded brush to apply the shoe polish. Bristles with a medium amount of stiffness will help you get the shoe polish down into the cracks. D. Kiwi brand liquid black shoe polish and a plastic cup to pour it into. E. Damp rags. These could be old pieces of t-shirts cut up. Since shoe polish is water based, these damp rags will help you wipe the surface of the pieces off cleanly, if you want the clean spaceship look. F. Cotton swabs and/or cotton pads. These help you wipe the shoe polish out of small tight areas that you can't reach using a paper towel. G. The wall piece you are painting. |
|---|
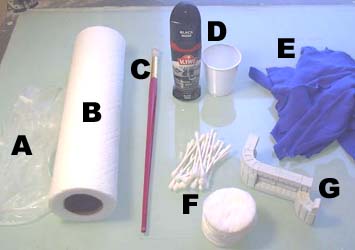 The next step is to apply black shoe polish as an antique. Here are the supplies I used:
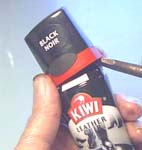
| 2. | The easiest way to get into the shoe polish bottle is to take a screwdriver and poke it up under the red rim of the top part. Carefully and slowly pry the lid up by twisting the screwdriver. You might do this over a trash can just in case things don't go smoothly and you end up spilling shoe polish. Pour the shoe polish into a plastic cup so that you can reach it with a paint brush easily. |
 |
|---|
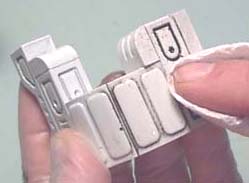
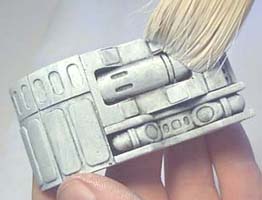
| 3. | Painting the polish on will be much neater if you do not load up the brush. Just get a little on the brush and paint it onto a small area, jamming the brush into the cracks. You want to paint small areas and wipe the polish off quickly for the best result. The longer you leave the shoe polish on the surface of the wall, the more gray will stick to the wall and it will turn darker. |
 |
|---|
| 4. | Use a paper towel and wipe of the polish immediately. Continue to use new paper towels when the current ones get loaded up with shoe polish. Work in small areas, painting it on and wiping it off quickly. Use the cotton swabs or cotton pads to wipe shoe polish out of the small tight areas of the piece. Use a damp rag to wipe main surface areas back to a bright white. |
 |
|---|
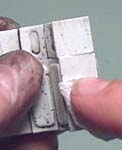
| 5. | Some areas may turn a darker gray than you want. For these areas, immediately wipe them off with a wet rag to clean them up. The shoe polish is water based and will clean up with water. However, if you wait too long before wiping it off, it will dry and you won't be able to remove it. |
 |
 |
|---|
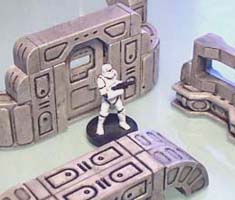
| 6. | You can stop here if you like. At this point the pieces should look pretty good and you do not have to continue down the page if you don't want to. This photo shows pieces that have been spray painted white and have shoe polish applied to them. If you want to see it better, click on the photo for a larger image. This paint job was used on the starship pieces. |
 |
|---|
Dry Brushing White
| 1. | You do not have to do this last drybrushing step, but I have found that it cleans and brightens up the pieces for a more finished look. To drybrush you will need a 1" wide soft bristled paint brush, a paper towel and some acrylic white paint. The paint should be the consistency of heavy cream. In other words, if you cannot pour the paint then it's too thick. Thin it with a little water until you can get it to pour. House paint is the perfect consistency. |
 |
|---|
| 2. | Dip your brush into the paint and wipe most of it off on a paper towel. There will still be a small amount of paint on the brush. Do this a few times to prepare your brush and get the right amount of paint in it. |
 |
|---|
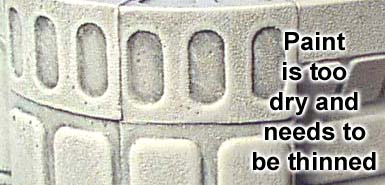
| 3. |
Continue to sweep across the piece for several strokes until the streaks disappear and the top surfaces are solid white again. All we're trying to do here is to bring the dull gray surfaces back to bright white again. Do not let the paint go down into the cracks and cover up the dark blacks. If it does this, either you have too much paint on your brush, you're pushing too hard or your paint is too thin. |
|---|
 Gently sweep the brush across the piece. Do not jam it into the cracks! Since the paint is slightly thinner it may cause paint streaks across the surface.
| 4. | If your paint is too thick, then it will form a grainy texture on the surface and won't look smooth and clean. Getting the paint the right consistency may take a little practice. I strongly suggest making and painting a few test pieces before you paint your completed ship walls. |
 |
|---|
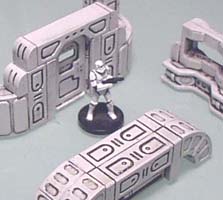
| 5. | This is the last major painting step of the process. You don't have to take this extra dry brushing step, but if done correctly it will clean up the wall sections and make them look new. This photo shows pieces that have been dry brushed with white. If you want to see it better, click on the photo for a larger image. This paint job was used on the starship pieces. |
 |
|---|