Basic Gothic Dungeon
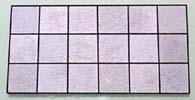
For this set, you will need to cast the #201 Floor Tile mold 14 times and the #45 Gothic Dungeon Builder mold 14 times. The casting will take the average person about 1 full day, and the pieces can be glued together in about two hours! After you complete these, feel free to make your own custom pieces any size you want. The beauty of casting pieces is that you can always make more and build whatever you want. For more decorative gothic pieces, visit our Advanced Gothic Dungeon building page. |
 |
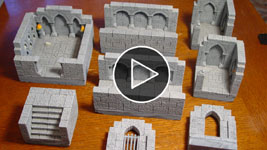
Finished Model Video This shows what the finished basic gothic set will look like and shows it with a 28mm scale figure. |
 |
Casting Tips
| 1. |
Unless you use a very hard dental plaster or resin when casting this piece, you're not going to remove the gate without breaking it. For this reason, I didn't make the gate a necessary part of the basic gothic dungeon. For information on how to find and use dental plaster, check out my web page on Casting Using Dental Plaster. For information on resin, check out my web page on Casting Using Plastic and Resin. Resin will slowly damage the mold, but if used properly you should be able to get several plastic gates without doing any noticeable harm. |
|---|
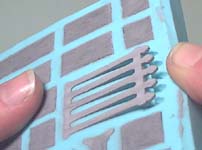
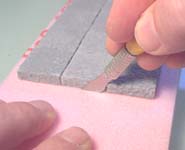
 The one thing on this mold that will give you problems is the iron gate. I placed the iron gate on this mold because I thought it needed one badly. Most crypts, graveyards or cathedrals have gated off areas to keep people out of the holy places or to protect relics.
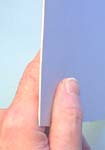
| 2. | The gate in this photo is cast out of Excalibur dental plaster (the dark gray variety). Be sure to let it cure completely, at least 30 minutes before you try to remove it from the mold. Hold the mold in both hands as shown. Use your right thumb to gently pull down the mold underneath the top of the gate. Do it in several small pulling motions. This will gently work the top of the gate loose. |
 |
|---|
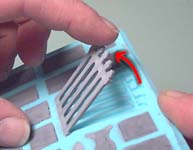
| 3. | Once the top of the gate is loose, gently swing the top up and out of the mold. Be very careful when handling the piece because it will be quite fragile. To increase the strength, glue two gates back-to-back. Of course the best solution is to cast the gate out of plastic. |
 |
 |
|---|
| 4. | The other problem that you may find with this mold is the amount of detail on the columns and bone piles. The best method of casting these pieces is to use the "wet water" method shown on the Advanced Casting Instructions page. Using this method, most of the air bubbles will be eliminated giving you nearly perfect castings. |
 |
|---|
Building Tips
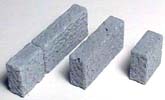
| 1. | I want to describe a few parts on the Basic Gothic Dungeon Builder mold. The flat blocks shown here are textured on both sides so you can stand them on edge to make thin walls. These thin walls are needed to make recessed areas that continue down long stretches of hallway. The small curved pieces shown here are used to fill in the back of the arches. These are also textured on both sides so the back of your hallways will look good. |
 |
|---|---|---|
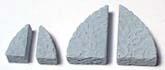 |
| 2. | There are two sizes of arch pieces. These can make either a pointed arch or a low arch depending on how you place them. The small curved pieces are used to fill in the back of the arch (when needed). |
 |
 |
|---|
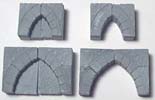
| 3. | There are several ways to use the arches and columns together. The shaded blocks represent the flat blocks used to make the recessed area. The left arches are made by using the blocks with the column pieces embedded in them. The center arches use the flat column pieces glued against the back. The right arches use two flat column pieces glued back-to-back to make a full column. The arches are left empty to form a doorway or passage. |
 |
|---|---|---|
 |
| 4. | You'll find that there are times when you may have to sand the columns slightly to fit. I made them a few thousandths of an inch taller to compensate for how most people scrape the molds. |
 |
|---|
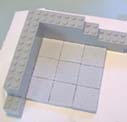
| 5. | For the floor bases, I'm going to use mat board. It's a stiff paper board about 1/16" thick used to add a colored border around pictures. You can find scraps at any picture frame shop or at most college bookstores. You can also use cardboard or any thick paper stock instead. You'll also need some glue. My favorite choice is "Aleene's Tacky Glue". It's a water based craft glue that's really thick. You can find it at most craft stores or at any Wal-Mart. Lastly, you might want a guide to help get your corners straight. I built a simple "L" shape using Legos. When you set your blocks against this guide, they will line up straight. You can also build forms by looking at the Tips & Tricks Page. |
 |
 |
|---|---|---|---|
 | |||
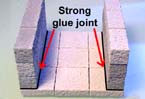
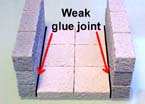
| 6. | All of these pieces are made with the walls setting on top of the floor tiles. I've done it this way for 2 reasons:
Second, you get a stronger joint when you glue the wall blocks down on the flat floor tiles. |
 |
|---|---|---|
 |
 First, you'll end up with one full square in the center of the hallway pieces. This will allow you to move figures with larger bases in even 1" squares and be able to see exactly which square they occupy.
| 7. | Start by gluing your floor tiles down to a piece of mat board. Use the Lego "L" shape to get them straight. Be sure to apply glue to the edges of the blocks also. This will make the floor nice and strong. If the floor section warps a little from the wet glue, lay a heavy book on top until it dries. |
 |
 |
|---|
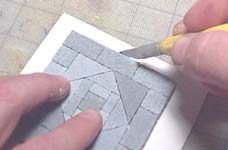
| 8. | When the piece is dry, use a hobby knife or pair of scissors and trim off the excess mat board around the outside. The next section shows you how to build each of the pieces for the basic gothic dungeon set. |
 |
|---|
Update On Mounting Dungeon Sections
All of the Advanced Dungeon Pieces, which add to this simple dungeon are mounted on 1/2" foam.
After writing this article, I found several advantages to mounting the dungeon pieces on foam instead of mat board. Because of that, I have re-based all of my gothic pieces in this article on 1/2" foam.
I have found that the foam allows you to add more depth to your dungeon because you can make open graves, pools and pits much easier and better looking. Therefore, if you want to expand your dungeon later on, things will go much easier if you mount these first dungeon pieces on foam.
| 1. | To base these dungeon sections, I'm going to mount the floor tiles on pieces of 1/2" thick polystyrene foam insulating board. This is the stuff they use for sheeting on houses before they put siding on. You can get it at any lumber yard and usually comes in pink or blue. The main advantage is that it's stiff and doesn't warp easily. It's also easy to cut (with a sharp knife), and you can make pits and holes in the floor that actually look deep. |
 |
|---|
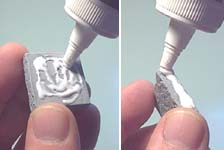
| 2. | When gluing the blocks down, be sure to spread glue on the bottom and sides of the blocks. I'm using a corner made out of Legos as a guide to keep the tiles square and straight. Let the glue dry completely before trying to trim off the outside edges of the foam. |
 |
 |
|---|
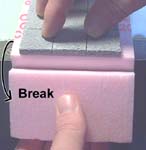
| 3. |
If it doesn't cut all the way through, break off the excess edge after you cut the foam and it will break fairly clean. |
 |
 |
|---|
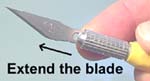 If you extend the blade of your hobby knife, you can cut completely through the foam. Be sure you use a sharp blade or the foam will tear.
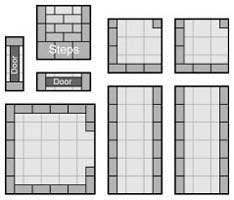
Basic Set Pieces
| 1. | This basic set is fairly small, but enough to make a crypt diorama. I've created just enough pieces to show you how to use this mold with very few casts. To build these pieces, you will need to cast the #201 Floor Tile mold 14 times, and the #45 Gothic Dungeon Builder mold 14 times as well. Once you build these sections, feel free to add dead ends, tees and sections of any length. |
 |
|---|
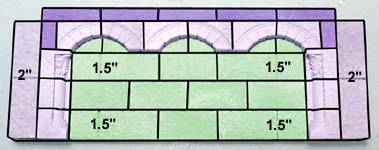
| 2. | We'll start with the doorway pieces. Make the floor by gluing three 1" square floor tiles down to a piece of mat board. |
 |
|---|
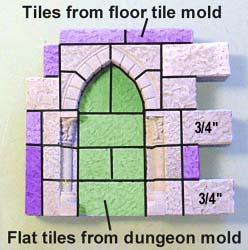
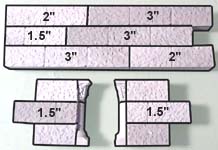
| 3. | One very important note here: There is a difference between flat tiles from the gothic dungeon mold and flat tiles from the floor tile mold! Anytime you see blocks shown in purple, that means I used them from the floor tile mold. Glue these blocks to make the arch shown. I've marked the 3/4" blocks so they're easier to identify. |
 |
|---|
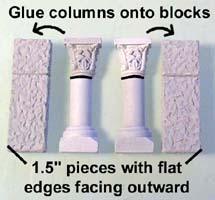
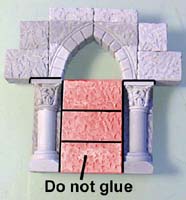
| 4. | Glue two columns onto two 1.5" flat pieces. Be sure the smooth scraped sides of the blocks are facing outward. If the columns are too tall, sand the bottoms slightly. Glue these pieces under the arch. Do not glue the pieces shown in red! These are regular blocks used to keep the doorway the correct width. |
 |
 |
|---|
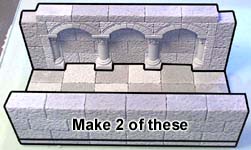
| 5. |
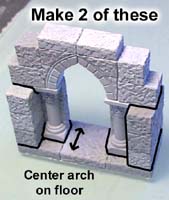
To assemble the full piece, lay down the group of floor tiles for the floor. Next glue the arch in the middle (centered). Last, glue the two sides you just made onto each side of the arch. Make 2 of these pieces. |
 |
|---|
 These two side pieces are made from regular blocks. Glue them together as shown.
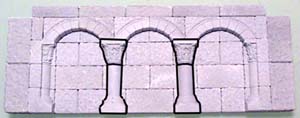
| 6. | New we'll make the corner pieces. Glue together the two pieces as shown. We're using the large arches here. Remember, the purple blocks are from the floor tile mold and the green blocks are the flat tiles from the gothic dungeon mold. |
 |
 |
|---|
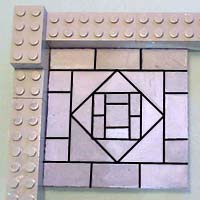
| 7. | I'm going to make the floor of the corner piece a little fancier. Keep in mind you don't have to do it this way. If you prefer to have squares for easy movement, simply place 9 squares to make a 3" x 3" floor section. I just figured it would be nice to use some of the other shapes on the floor tile mold. Notice that I'm gluing these together upside-down. I used an "L" shape of Legos to keep the piece square. To finish the floor, apply glue to this side and place a piece of mat board on top of it. You can also place a heavy book on top to help it dry flat. |
 |
|---|
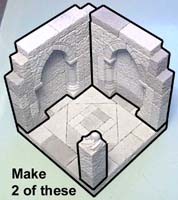
| 8. |
Assemble the pieces and glue them as shown. The two wall pieces interlock to form the corner. Also note that the floor is textured side up with the mat board glued underneath. Once the piece is glued together, trim away the excess mat board with a hobby knife. Make 2 of these corner pieces. |
 |
|---|
 Glue together a column piece to stand on the inside corner. You can decorate the top with a bone pile if you like.
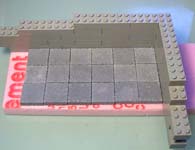
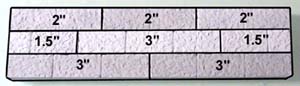
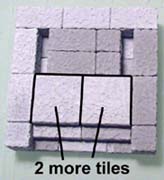
| 9. | Now we'll make the main hallway pieces. Start by gluing 18 square 1" floor tiles down to a piece of mat board. Make sure the pieces are glued down square. |
 |
|---|
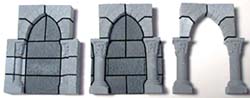
| 10. | This wall section is made with the small arches. I've used the 2" block pieces on each edge. Just as it was shown above, the purple blocks are from the floor tile mold and the green blocks are the flat tiles from the gothic dungeon mold. |
 |
|---|
| 11. | Now add the flat column pieces onto the wall. You may need to sand the column pieces slightly to fit. Also, build the wall section outlined in the second photo. This will be used for the other side of the hallway. This piece is shorter so you can see and move miniatures more easily. |
 |
|---|---|---|
 |
| 12. | Glue the pieces together to form the hallway section. The walls set on top of the floor. I've also added a couple of torch stands on the flat wall (they're on the back side where you can't see them). Make 2 of these hallway pieces. |
 |
|---|
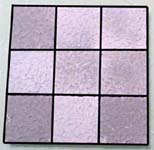
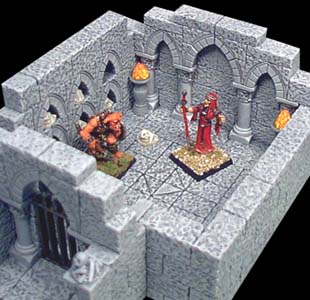
| 13. | Now for the main crypt chamber. I'm going to make this floor a little fancier also. If you prefer to have squares, simply place 25 squares to make a 5" x 5" floor section instead.
I laid these pieces upside-down so that it would be easier to glue the mat board on top of it. Also make the wall sections shown. |
 |
 |
|---|
| 14. | This crypt wall is made using small and large arches. Follow the color codes as shown before. Do not glue the blocks in red! These will help you line up the wall temporarily. Glue on the column pieces as shown. |
 |
 |
|---|
| 15. |
Glue all of the crypt pieces together to make this finished piece. Note that the floor is now textured side up with the mat board glued underneath it. |
 |
|---|
 The other crypt wall is made using the small arches only.
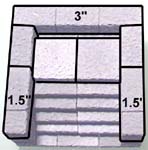
| 16. |
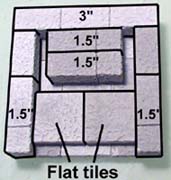
Lay down and glue on the blocks shown to make the walls and steps. |
 |
 |
|---|
 The last piece to make is the stairway. Glue together a grid of 9 square floor tiles.
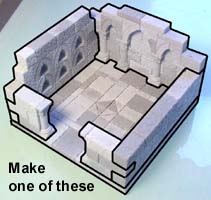
| 17. | Here are the remaining pieces for the stairs. Make one of these pieces. | |||
|---|---|---|---|---|
 |
 |
 |
 | |
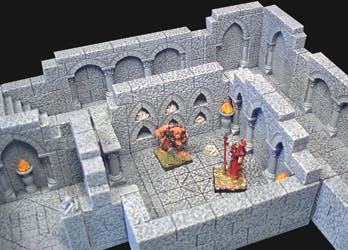
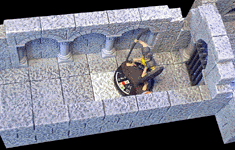
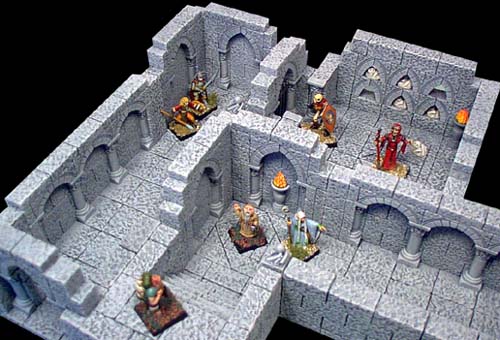
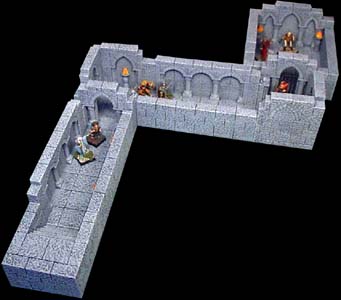
Below is a close-up of the finished gothic dungeon pieces. There are just enough pieces to make a good diorama, or a beginning on a larger crypt. I've also added the torches, flames and bone piles to various parts of the crypt.
For more decorative gothic pieces, visit our Advanced Gothic Dungeon building page. The miniatures shown are from Holistic-Design and come pre-painted with a very tough enamel paint. The quality is good and the enamel paint is really tough. To paint the model follow the instructions on the Painting Instructions page. For ideas on how to paint small items and make multicolor floors, check out the Tips & Tricks 12 page. |
 |
 |
 |