4" Round Fieldstone Tower Building Instructions
|
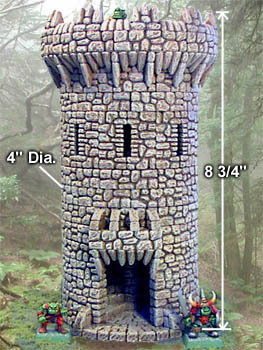
This page contains instructions on how to use mold #72 to build the round fieldstone tower. You will have to cast the mold 18 times to build the tower. |
| |
|
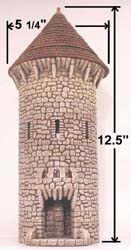
If you would like to add a conical roof to the tower, you will also need mold #86. You will need to cast this mold 4 times to make this roof. |
| |
About Mold #72
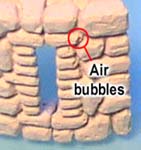
| 1. | Some of the pieces on this mold (such as the arrow slits) are difficult to cast without air bubbles in the pieces. The best method of casting these pieces is to use the "wet water" method shown on the Advanced Casting Instructions page. Using this method, most of the air bubbles will be eliminated giving you nearly perfect castings. |
 |
|---|
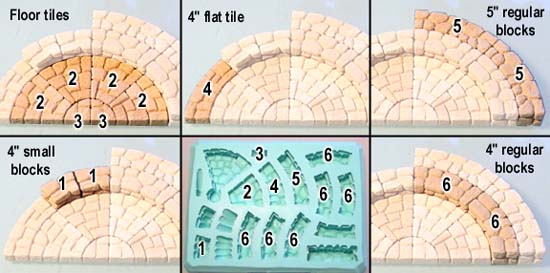
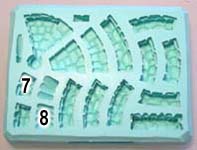
| 2. | Now to describe the pieces on this mold. Connect the numbers on the mold to the numbers on the blocks. This will show you which pocket in the mold will make certain blocks. |
 |
|---|
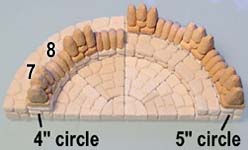
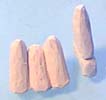
| 3. | These two pieces form the top crenellations. You can place 4 blocks onto a section of the 4" tower, and you can place 5 blocks onto a section of 5" tower. |
 |
 |
|---|
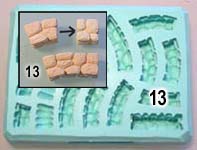
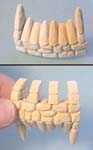
| 4. | These two pieces form the under braces. This photo shows how you can arrange them on a 5" piece of tower, or use them without the long teeth on a 4" tower. |
 |
 |
|---|
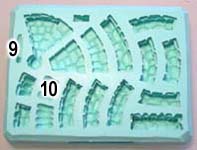
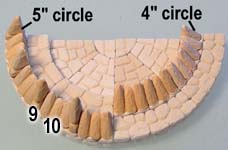
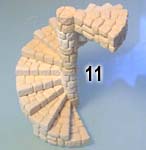
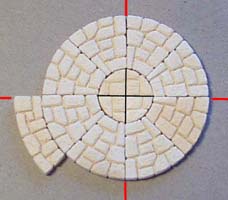
| 5. | This shows the location of the circular stair piece and the arrow slit. |
 |
 |
 |
|---|
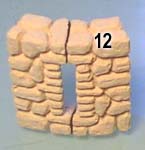
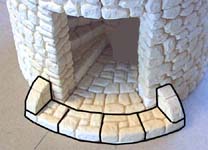
| 6. | The last piece shown is the transition piece. You could make this piece yourself by gluing a curved block to a square block, but you would have a seam down the middle. |
 |
 |
|---|
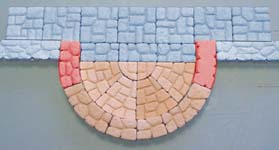
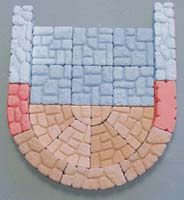
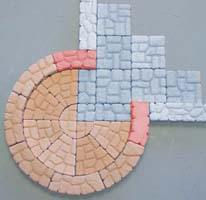
| 7. | This transition piece allows you to attach a curved wall to a straight wall with no obvious seams. The blocks shown in red are the transition blocks. The blocks shown in blue are from mold #70 and #260. You'll have to flip one of the transition blocks upside down to get this to work. You won't see it because the next layer of blocks will alternate with regular circular and straight blocks. |
 |
 |
|---|
Building Instructions
You will need to cast this mold 18 times to have enough blocks to build the circular tower. Be sure the blocks are completely dry before gluing them together.
You can download the plans shown here from the Building Plans Page and print them out yourself. You'll want the plans labeled "4" Circular Fieldstone Plans".
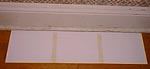
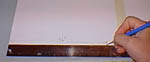
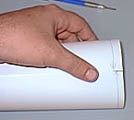
| 1. | We'll start by making a circular form to build around. Take 3 sheets of typing paper and line them up end to end in a perfectly straight line. Tape them together as shown. Measure 9 3/8" from one end and put a mark. Roll up the paper and match the line you've drawn to the edge of the paper. This will form a fairly exact 3" diameter circle. |
|
 |
|---|
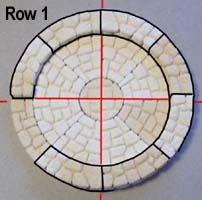
| 2. | Start by gluing the floor tiles down to a piece of cereal box. Next place and glue the wall blocks down around them. This will be considered row 1. |
 |
 |
|---|
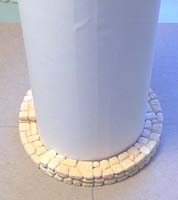
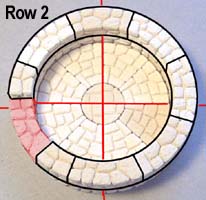
| 3. | Place the paper ring inside of the tower. As you assemble and glue the remaining rows, leave the paper ring in. This will help all of the rows line up and keep your tower circular. Here's row 2. Do not glue the block shown in red! This is a regular block used to hold the place of the doorway and it will be removed once the glue dries. |
 |
 |
|---|
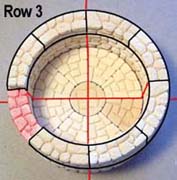
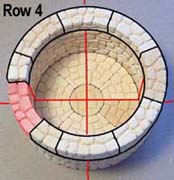
| 4. | Just a reminder to leave the paper ring in while you're gluing the rows on. I didn't show it on these photos so you can see which blocks to use. Here's row 3 and 4. The block shown in red is a regular block used to hold the place of the doorway. This block will be removed once the glue dries. |
 |
 |
|---|
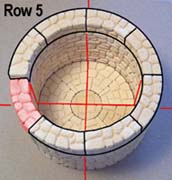
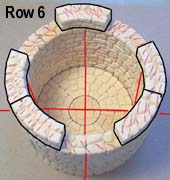
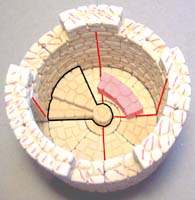
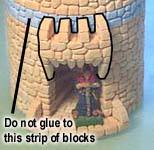
| 5. | Here's row 5 and 6. For row 6, only glue down the blocks as shown. We want this tower to come apart in sections, so we will only glue certain blocks. I drew lines on these blocks with a marker to remind me not to glue any blocks to this surface. |
 |
 |
|---|
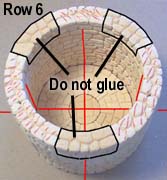
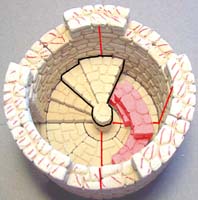
| 6. | Complete row 6 by setting the blocks on but do not glue them down! When gluing down row 7, do not glue where the marked lines are! Remember, you want to remove this section later on. |
 |
 |
|---|
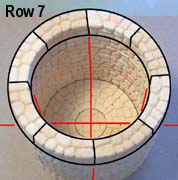
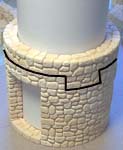
| 7. | You should leave the paper ring inserted while you're stacking and gluing the blocks. At this point you can remove the blocks in the doorway that were used to hold its place. Be sure you occasionally remove the ring! Sometimes excess glue will squeeze out between the blocks and glue the paper sleeve inside the tower! The black line drawn on this photo shows you where the tower should come apart. Remove this top section when you start building the stairs (shown below). It's easier to get your hand inside the tower with this top ring removed. |
 |
|---|
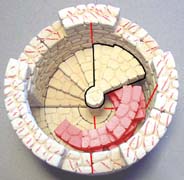
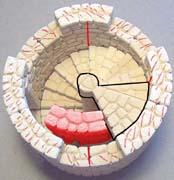
| 8. | For the stairs, do not glue them to the floor or walls! Instead, only glue the stairs to each other. We will want to remove the staircase later on so we can paint it. Start by placing the first step as shown. Do not glue it down! Also, the blocks shown in red are simply extra blocks you will set down to support the next rows of stairs. Glue the second step section onto the first. |
 |
 |
|---|
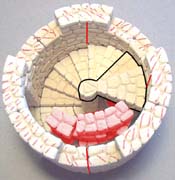
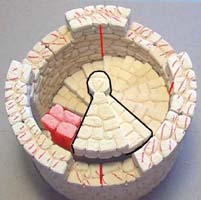
| 9. | Here are the next 3 rows of stairs. Glue the stairs together but do not glue them to the wall. |
 |
 |
 |
|---|
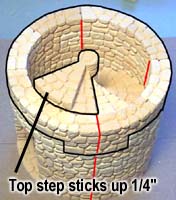
| 10. | Here are the last 2 step pieces. Be sure to place the top ring of blocks back on to help get the stairway on right. The top stair piece will stick above the outside wall by 1/4". Once it's completely dry you'll be able to remove the stairway. Leave it in for right now. |
 |
 |
|---|
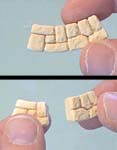
| 11. | The door dressings are optional. You don't have to add them if you would prefer a simple opening in your tower. I've made this flat tile so that it can easily be snapped in half for a smaller piece. Snap 2 pieces in half and place them around the doorway. Then add the 1/4 round pieces on the ends. |
 |
 |
|---|
| 12. | The decorative doorway top is made by gluing the teeth and 1/4 round blocks as shown. Do not glue this to row 7 (shown in blue)! Remember, this row belongs to a section that will lift off later on. The main block of the decoration will glue directly onto row 6. |
 |
 |
|---|
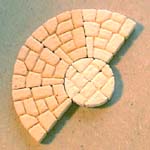
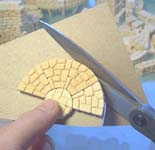
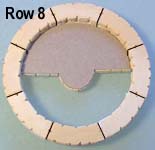
| 13. | Glue these floor tiles down to a piece of cereal box. When dry, trim it out with scissors or a hobby knife. Flip it upside down and glue it into a ring of regular blocks as shown. This will be row 8. |
 |
 |
 |
|---|
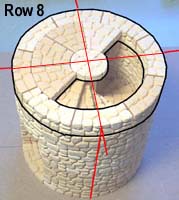
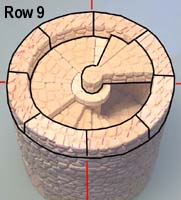
| 14. | Flip it over and glue it on top of the tower in the position shown (don't glue it to the stairs!). Glue another ring of blocks around to form row 9. Also glue one step section to the floor and the wall. I placed marks on the top to remind me not to glue the next row down. I want the tower to come apart here for easy painting. |
 |
 |
|---|
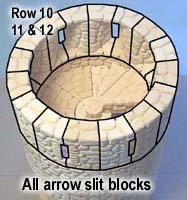
| 15. | Rows 10, 11 and 12 consist of arrow slit pieces all the way around. I'm counting them as 3 rows because the arrow slits take up 3 rows worth of space. Glue the arrow slits together but don't glue them down to the tower. Arrow slits are one of the hardest pieces to get a paintbrush into, so I'm not gluing this ring down. Also, when gluing these together, put lots of glue in between and don't push them together tightly. I found that the ring of arrow slits were just a hair smaller in diameter than the regular tower. |
 |
|---|
| 16. | If you don't want arrow slits all the way around, I've provided two alternatives for you. The arrow slit pieces are shown in blue. You can fill in between them with the regular wall blocks (shown on the left) or using a combination of regular wall blocks and short pieces. |
 |
|---|
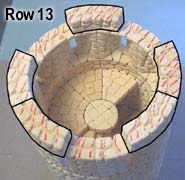
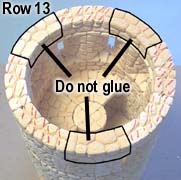
| 17. | Glue these blocks on top of the arrow slits as shown. It does not matter what position these blocks are in since there won't be a connecting stairway from the level below. To finish row 13, place the 3 remaining blocks down but do not glue them. We want the tower to come apart at this level. |
 |
 |
|---|
Do not follow the rest of these instructions, but instead skip down to the Adding a Conical Roof instructions below. |
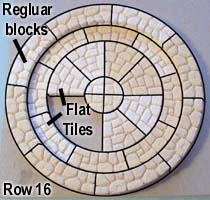
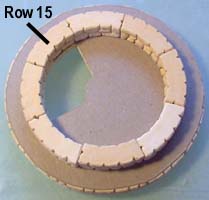
| 18. | For the final levels of the tower, we'll work from the top down. Glue the blocks shown down to a piece of cereal box. When it's completely dry, trim it out with a hobby knife. This is row 16. Flip the piece upside down and glue a ring of regular blocks onto the back as shown in the second photo. This will be row 15. |
 |
 |
|---|
| 19. |
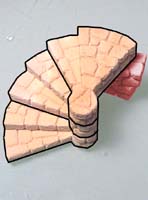
To finish up this section, place an alternating ring of long teeth and small teeth around the bottom as shown. Assemble and glue 3 step sections as shown. These will be inserted later into the tower top. |
 |
 |
|---|
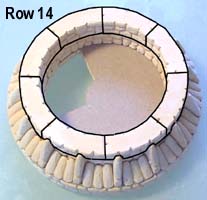
 The next row is row 14. Simply place another ring of blocks onto the existing ones (upside down).
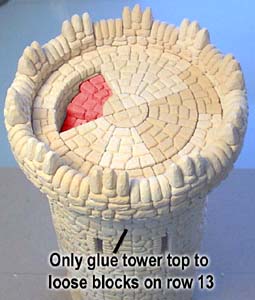
| 20. | Now for the hard part. Remember row 13? (see above) You placed 3 blocks down but didn't glue them on. Flip the tower top over and only glue it to those 3 blocks. Don't glue it down to the rest of the blocks or you won't be able to remove the tower top for easy painting. To finish the top, glue an alternating pattern of the crenellation pieces as shown. Be sure to place them all down before gluing. You'll find that there will be a slight bit of space between them and this will give you a chance to lay them out evenly. Lastly, you'll notice I placed the step section inside. Don't glue this in yet! I'm just showing you where it goes for the moment. It will be too hard to paint if you glue it in now. |
 |
|---|
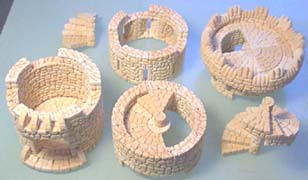
| 21. | Here are the finished pieces. The small stairway will end up being glued into the tower top. The arrow slit section will end up being glued onto the section below. Don't glue any of these pieces together until you paint them first. For help with painting, take a look at the Earth Tone Painting Instructions. |
 |
|---|
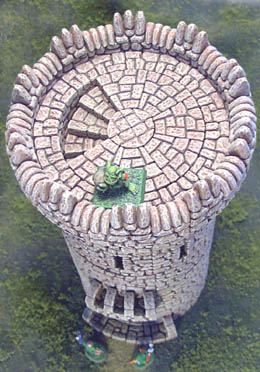
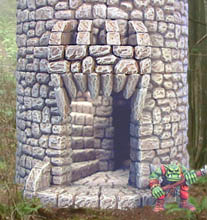
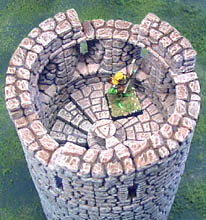
Here are a few photos of the finished tower. The first photo shows the circular staircase, which you can also remove if you want to place figures inside. I've glued the 3 step section in the tower top. It gives the illusion that the stairs continue all the way down, but they don't go low enough to interfere with placing figures in front of the arrow slits. I thought this would make a great orc tower. The orc figures are from Games Workshop(TM). |
 | |
 |
 | |
Adding a Conical Roof
| 1. | To add a conical roof to your tower, you will need to use mold #86. You will have to cast this mold 4 times to build the conical roof. Start by following the building instructions shown above. Follow this until you reach step 17. After you stop there, come back down to these instructions to finish the top of the tower. |
|
|---|
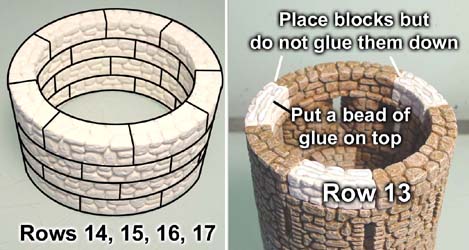
| 2. | Continue the very top of the tower by gluing together rows 14, 15, 16 and 17. To finish row 13, place blocks onto the existing tower but do not glue these down! Place a bead of glue on top of these blocks. |
 |
|---|
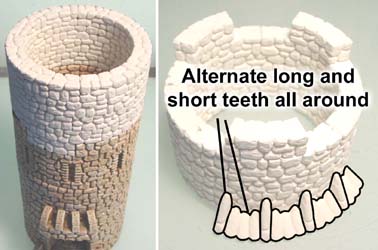
| 3. | With the bead of glue on the white blocks only, set rows 14-17 on top of the tower and let this dry completely. When dry, flip the tower top upside down and glue the decorative teeth around the top of the tower. Alternate the long tooth blocks with the short tooth blocks (which are a group of 3 smaller teeth). You could use the wooden supports from mold #87 but I liked the teeth on mold #72 better. |
 |
|---|
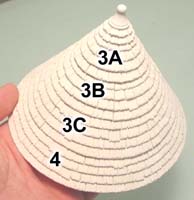
| 4. | Next assemble the roof. You can find instructions on the Conical Roof Building Instructions page. You will need 4 castings of mold #86 to build this roof. |
 |
|---|
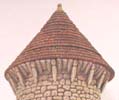
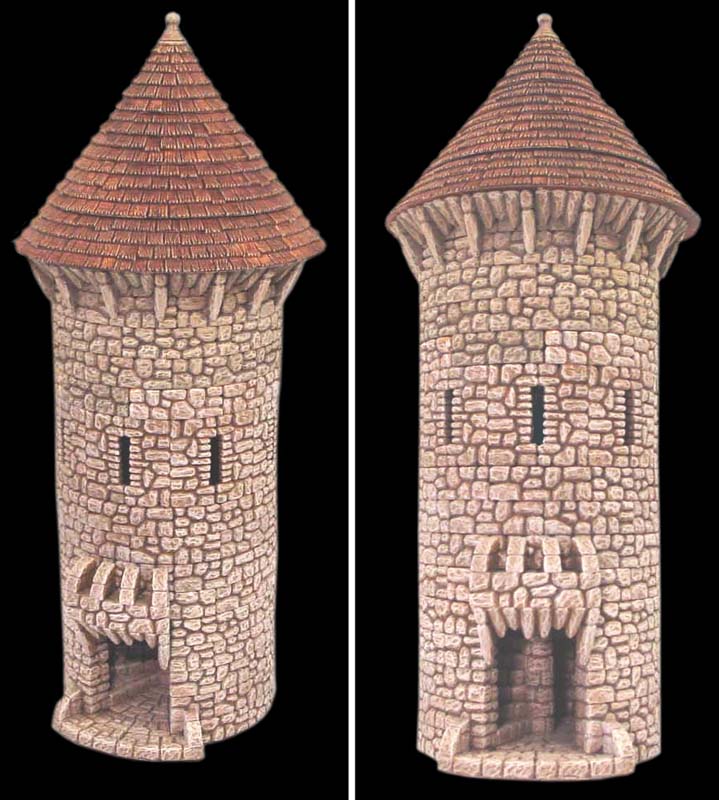
| 5. | After painting all the pieces, glue the roof to the top of the tower. The roof will be permanently attached to the tower top but the tower top will lift off of the rest of the tower so you can see inside. For instructions and colors used to paint the tower, refer to the Earth Tone Painting Instructions page. For instructions on painting the wood shingle roof, visit our Conical Roof Painting Instructions page. Click on the photos for a larger view of the tower. |
 |
|---|