Tips & Tricks 5
Using Mold #230 to Make a Clay Tile Roof
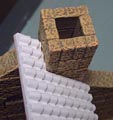
| 1. | To cast the best pieces, you really need to use dental stone. The pieces are fairly thin and delicate, so mixing these products slightly thinner will still result in a fairly tough piece. You can use plaster of Paris (which is what I used for these photos) but it is more difficult to get rid of the air bubbles and still get good sturdy pieces cast. For this example, I'm going to put a clay tile roof on the Dragon's Inn. When you buy the Dragon's Inn mold I'll send building instructions which includes a roof plan. You can also download these plans from the Building Plans Page. |
|---|
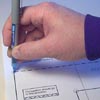
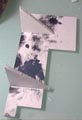
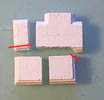
| 2. | Start by laying the roof plan over a piece of cereal box or card stock (I'm using matt board). Poke down hard with an ink pen on the corners which will place a dent on the card stock. Connect the dots to form the roof sections. |
 |
 |
|---|
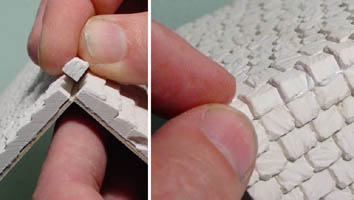
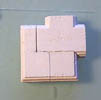
| 3. | The small roof section will have to be trimmed down so it's not as wide. I don't want the small roof piece to overlap the larger piece because of the thickness of the roof tiles. The pieces butt against each other after trimming. |
 |
 |
|---|
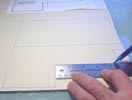
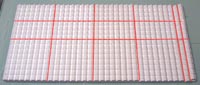
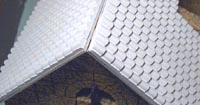
| 4. | Start by laying tile pieces on top of your roof section. I've made a number of different tile shapes to easily fit most roof sizes. The red lines show the separate tile pieces. |
 |
|---|
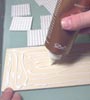
| 5. | Place a bead of glue all over the roof section. Spread the glue around with your finger, then place the tiles on the roof. Let the roof section dry completely! Do the same for all of the roof sections. |
 |
 |
|---|
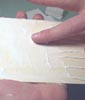
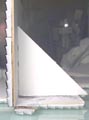
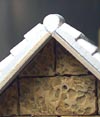
| 6. | Certain parts of the roof will need to be trimmed or sanded. This part of the roof needs to fit up next to the chimney. |
 |
 |
|---|
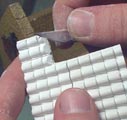
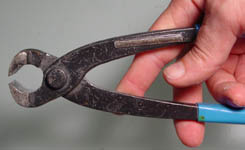
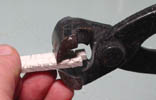
| 7. | If you have a lot of area to trim, be sure to get a pair of tile nippers like the ones shown here. You can find them at any hardware store or lumber yard and they will cost you around $10.00. These are usually used to trim ceramic tile but work very will for cutting dental stone or plaster. |
 |
|---|
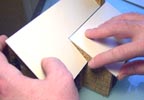
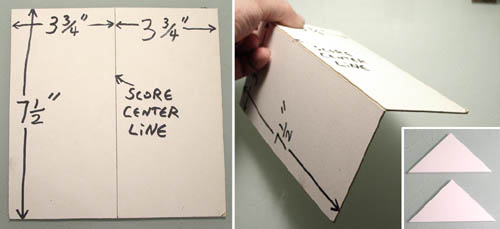
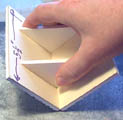
| 8. | Cut a couple of triangles out of cardboard (or foam core board). Make sure at least one angle is 90 degrees for the roof peak. Glue these onto one side of the roof (my roof inside has gray paint on it from another project). When dry, glue the other half of the roof onto the triangles. These will brace the roof and keep the sides at 90 degree angles. |
||
|---|---|---|---|
 |
 | ||
| 9. | When the roof is dry, place it on the model. The peak of the roof now has a bevel in it where the two halves meet. The peak tiles are especially made to fill the gap. Place a bead of glue in the groove across the roof peak and start laying in these peak tiles. When you get to the end, you can sand down the last tile if it sticks out too far. |
 | |
|---|---|---|---|
 |
 | ||
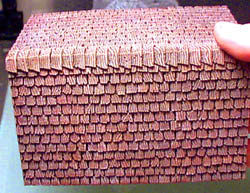
| 10. | Here's the finished roof with the peak tiles on. You can secure the small roof section by gluing a piece of paper under the two roof pieces. Now all that's left is to paint the roof. |
 |
|---|
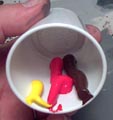
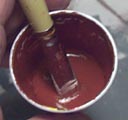
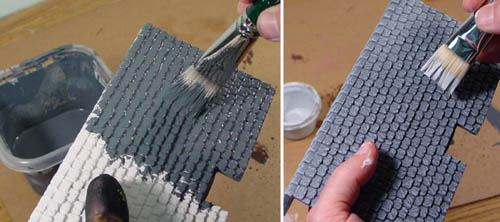
| 11. | I'm going to use acrylic tube paints for the roof. Start with a 2" strip of dark brown paint, a 2" strip of red paint, and a 1" strip of yellow paint. Add water and mix the paint until it's the consistency of milk. |
 |
 |
|---|
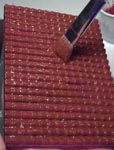
| 12. | Brush the paint on liberally and jam the brush into all of the cracks. Before the paint dries, take a soft rag and wipe away the excess paint like a stain. With a little practice, you can make it look good without dry brushing it. Unfortunately I took my time and the paint got too dry. Since I couldn't wipe off the excess I'm going to dry brush a lighter color to pick up the details in the tile. |
 |
 |
|---|
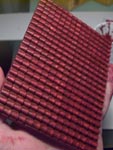
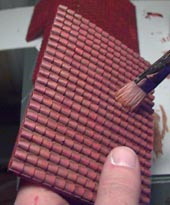
| 13. | Mix a 1" strip of white acrylic tube paint with a teaspoon of the dark paint you've used. You might even add a touch of red to it. The paint will be a peach color. Get some paint on your brush and then brush most of it off on a paper towel. Gently brush over the roof in both directions, across and down. A light layer of paint will accumulate on the highlights. |
 |
|---|
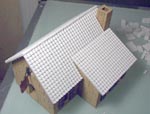
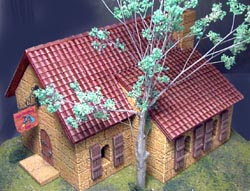
| 14. | Here's the finished inn with the clay tile roof. |
 |
 |
|---|
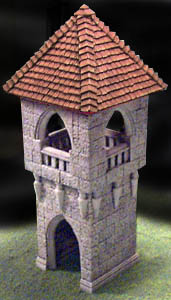
Now I'm going to make a roof for a little tower that I built. |
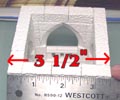
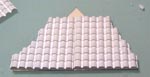
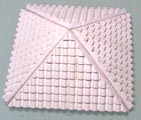
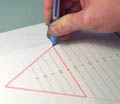
| 1. | I'm going to make a four-sided angled roof for the tower. The tower measures 3 1/2" wide (square) so I'm going to make each roof section 4" at the base so it will overlap the sides of the tower slightly. I've made a roof template that you can find on the Building Plans Page. Feel free to download it and print it out for your own projects. Lay the template over some thick paper stock and use a ball point pen to press down on the corners of your roof section. The template is marked in inches according to how wide you want the bottom of your roof to be (I've highlighted the section I'm using in red). |
 |
|---|---|---|
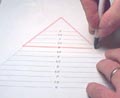 |
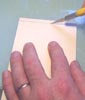
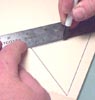
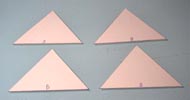
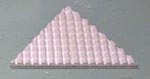
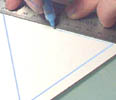
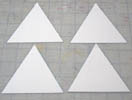
| 2. | Remove the template and connect the dots with a ruler and ink pen. Use a hobby knife to cut out four triangles. Be sure to label the bottom of the roof sections with a "B". |
 |
 |
|---|
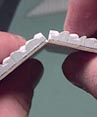
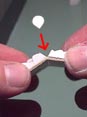
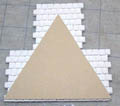
| 3. |
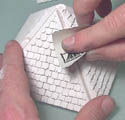
I need to bust off a corner of the roof tile so it will fit the section better. If you don't have tile nippers, then lay the roof tile against the corner of a desk. Gently snap off the corner. What you break off won't break cleanly. There are times when the whole section may break so be careful. |
 |
|---|---|---|
 |
 Now for the tough part. These roof tiles take a bit of cutting and sanding to make angled roof sections. Now is the time to use a pair of tile nippers if you have them.
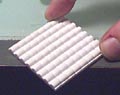
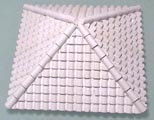
| 4. | Glue the pieces onto the roof section. Line the bottom of the tiles up with the bottom (that you marked with a "B") and let the tiles hang over on the sides. Let the pieces dry completely! You'll need to sand the excess tile off the edges for all four pieces. |
 |
|---|---|---|
 |
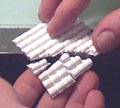
| 5. | Place two roof sections against each other as they would appear on the roof. Most likely there's not enough space to place the peak tile between them (the angle is too steep). To fix this, sand down the edges of the roof at an angle that will accept the peak tile. |
 |
 |
|---|
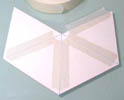
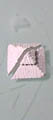
| 6. | Lay the roof pieces against each other face down. Glue a strip of paper onto the backs to act as a hinge. Let this dry. Pull the roof together and glue the remaining two sides together. |
 |
 |
|---|
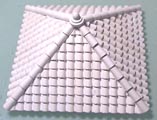
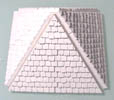
| 7. | When you flip the roof over it should look like this. Glue peak tiles down the seams starting from the bottom and working your way up the roof. |
 |
 |
|---|
| 8. | Sand the top peak flat so you can add the decorative knob. Paint with the dark red-brown as described for the Dragon's Inn roof. |
 |
 |
|---|
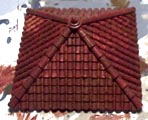
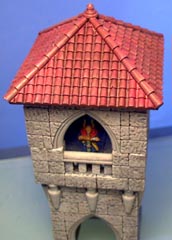
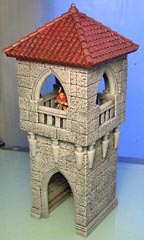
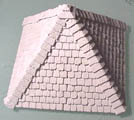
| 9. | Dry brush a light red-brown (or peach color) gently on top to finish the coloring. Here's a couple photos of the tower so you can see the whole thing finished. |
 |
 |
|---|
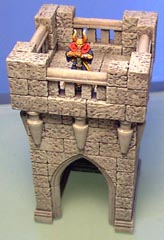
| 10. | I don't have plans available for this tower (so please don't ask). I stacked it together in about 30 minutes using spare blocks I had laying around. The sole purpose of the tower was to show how to make the tiled roof for it. I made the top arches removable so it can also be displayed this way (and it also helped me paint the inside of the arches). |
 |
|---|
Using Mold #245 to Make a Slate Shingle Roof
| 1. | To cast the best pieces, you really need to use dental stone. The pieces are fairly thin and delicate, so mixing these products slightly thinner will still result in a fairly tough piece. You can use plaster (actually I used plaster for these photos) but it is more difficult to get rid of the air bubbles and still get good sturdy pieces cast. |
|---|
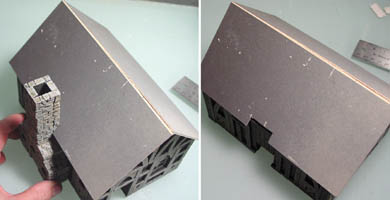
| 2. |
The first thing to do is to make the base of your roof out of some thick card stock. Cereal box is a bit thin but mat board or chip board from the back of a notebook works well. For this example I'm using mat board and have cut a piece that is 7 1/2" square. To get the roof to crease properly I've cut the center fold with a knife. Don't cut it all the way through and it will fold nicely. To keep the roof a nice 90 degrees, cut a couple of 90 degree corners and glue them underneath. |
|---|
 This roof is for one of the cottages made from the
 | 3. | Test fit the roof onto the building. For this project I have a chimney on one side of the house. Use a knife to cut out the area on the roof to fit around the chimney. Be sure to leave a little extra space around the chimney so that you can easily remove the roof without it being a tight fit. |
 |
|---|
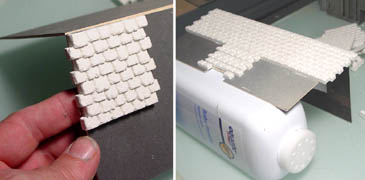
| 4. | Start gluing the shingles at the top peak of the house. The top edge of the shingles should line up with the top edge of the crease. Be sure that you cover board underneath completely. To make your tiles stay in place while gluing, prop something up underneath of it while the glue dries. |
 |
|---|
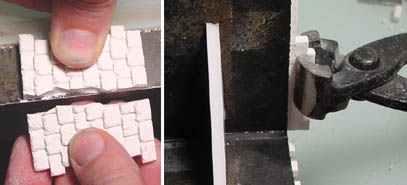
| 5. | You can break some of the larger roof tiles along the hard table edge. However, the easiest way to trim the roof tiles is to use a pair of tile nippers. You can find tile nippers at any hardware store or lumber yard for about $10. |
 |
|---|
| 6. | One difficult area will be trimming down the tiles around the chimney. To do this, I suggest start by using tile nippers where you can. If they can't reach into the hole very far, then you might try some regular pliers to break away the excess. Once you have a little bit left to clean up, at that point you can use a file to smooth the edges down. To clean up the peak edges, tape down a piece of sandpaper to the table. |
 |
|---|
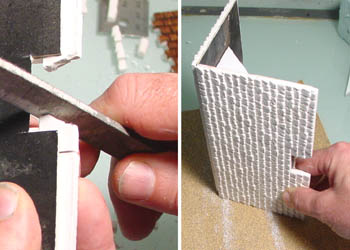
| 7. | To finish off the peak of the roof, simply glue in the top pieces. These are shaped with a 90 degree corner on the bottom so they will fit right into the gap. Do this all the way across the peak of the roof. |
 |
|---|
| 8. | To paint the roof, I'm giving it a base coat of Castle Gray Dark paint color. Once dry, I gave it a very light drybrush of the Castle Gray Medium paint color. This was enough to keep the roof fairly dark yet still show a lot of the texture detail. |
 |
|---|
| 9. | Click on the photo for a larger view. You can get an idea of how to make the rest of this house on the Tips & Tricks 34 page which describes using the Half Timber and Panel molds in detail. |
 |
|---|
Using Mold #240 to Make a Wood Shingle Roof
| 1. | To cast the best pieces, you really need to use dental stone. The pieces are fairly thin and delicate, so mixing these products slightly thinner will still result in a fairly tough piece. You can use plaster (actually I used plaster for these photos) but it is more difficult to get rid of the air bubbles and still get good sturdy pieces cast. |
|---|
| 2. | I'm going to make a four-sided angled roof for the tower. The tower measures 3 1/2" wide (square) so I'm going to make each roof section 4" at the base so it will overlap the sides of the tower slightly. I've made a shingle roof template that you can find on the Building Plans Page. Feel free to download it and print it out for your own projects. The shingle roof template has a steeper pitch than the clay tile roof. Lay the template over some thick paper stock and use a ball point pen to press down on the corners of your roof section. The template is marked in inches according to how wide you want the bottom of your roof to be (I've highlighted the section I'm using in red). |
|
|---|---|---|
 |
| 3. | Remove the template and connect the dots with a ruler and ink pen. Use a hobby knife to cut out four triangles. All three sides will be the same length, so it won't matter which side is up. |
 |
 |
|---|
| 4. |
Now is the time to use a pair of tile nippers if you have them. These make the major trimming very quick and easy. Glue the sections onto the triangle piece and be sure the shingles line up to the bottom of the piece. Let the pieces dry completely! When dry, trim and/or sand the edges off of the pieces. |
 |
|---|---|---|
 |
| 5. | Lay the roof pieces against each other face down. Glue a strip of paper onto the backs or use masking tape to act as a hinge. Pull the roof together and glue or tape the remaining two sides together. |
 |
 |
|---|
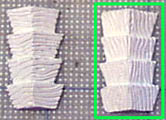
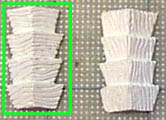
| 6. | Sand down the corners slightly so there's a flat place to glue the edge shingles onto. There are two kinds of edge shingles on the mold. We'll be using the one with the vertical grain lines (shown in the green box). |
 |
 |
|---|
| 7. | Glue the edge shingles on the corners. You'll have to trim them where they meet at the top. When they're completely dry, sand the top slightly flat for the roof cap. |
 |
|---|
| 8. | The top cap is made in two halves. Glue the halves together and place it on the peak of the roof. You may have to sand the peak down until the top cap looks like it sets on correctly. |
 |
 |
|---|
| 9. | Here's the finished painted roof. This time I was able to use the paint like a stain with some really good results. 1) Mix some brown acrylic tube paint with some water to the consistency of milk. 2) Paint it onto one section of the roof liberally. 3) Use a soft cloth to wipe off the excess. When finished, the shadows and highlights come out really nice. It's better to work on small sections at a time. If the paint dries on the roof before you have a chance to wipe it off, it won't work. |
 |
|---|
Now I'm going to make a roof for a small crypt. |
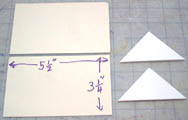
| 1. | Cut two pieces of cardboard or matt board for each side of the roof. The sides of this roof are 5 1/2" x 3 1/4". Also cut a couple of triangle shaped pieces to support the roof. Make sure they have a 90 degree angle on one corner. |
 |
|---|
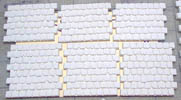
| 2. | Lay down and glue the roof tile sections onto these pieces. These take about 6 sections each. You can easily break off rows by laying the pieces against the sharp edge of a desk and snapping them off. |
 |
|---|
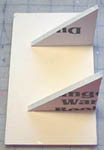
| 3. | Let the glue dry completely! When dry, trim and sand the extra tile off the ends of the sections. Lay a roof section face down and glue two 90 degree supports along the top edge. Glue the remaining side onto the supports. |
 |
|---|
| 4. | To put on the roof peak pieces, you first need to sand the top ridge slightly. Hold the roof upside down onto a piece of sandpaper and lightly sand it. Don't sand too much or the peak pieces won't fit correctly. |
 |
 |
|---|
| 5. | There are two types of roof cap pieces. For this type of roof, you'll use the cap pieces with the horizontal wood grain (shown in the green box). |
 |
|---|
| 6. | Once the cap pieces are on and dry, the only thing left is to paint it. Once again I was able to use the paint like a stain. The roof is finished! Continued on this page are the instructions of how to build the crypt it goes on. |
 |
|---|
Hunter's Lodge Roof
To build the roof shown here, you will need 9 castings of mold #240. The building instructions for the lodge can be found on the Hunter's Lodge building instructions page. You may also want to print out the Hunter's Lodge building plans. The printed plans show where every roof block goes.
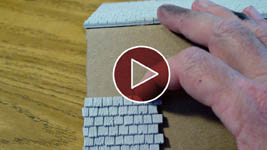
| 1. | Hunter's Lodge Roof Instructions This video shows all of the steps in created the roof for the lodge using the wood shingle roof mold #240. |
 |
|---|
| 2. | I'm going to mount this roof onto corrugated cardboard. However, you can use any kind of thick card stock you like. Draw out this roof layout on the cardboard as shown in the photo. An easy way to do this is to lay your roof plan down onto the cardboard and poke holes through the plan on the corners, then connect the dots. |
 |
|---|
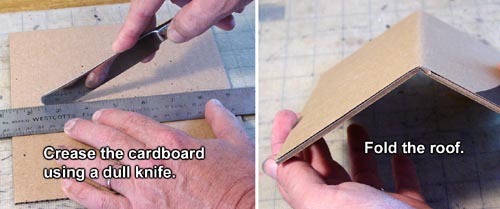
| 3. | Cut the square out of the cardboard and then crease the roof peak using a dull butter knife or some kind of blunt edge. Then fold the roof along this crease. If you have your corrugation running the right way, you should not see the corrugation when looking at the peak of the roof. |
 |
|---|
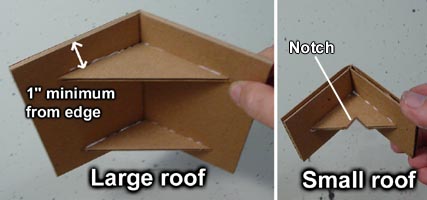
| 4. | Add the braces under the roof and glue them at least 1" from the edge. You can find these braces on the roof plan. Then make the smaller back roof using the same method as shown above. This small roof only has one brace. You may need to notch out the center so it can be positioned past the back room's peak. |
 |
|---|
| 5. | A tool that is very handy here is a tile nipper. This is a tool used to break off the edges of ceramic tile for a bathroom. What you need to do is break off the tabs on one side of the roof tile. They don't have to be broken off smooth. |
 |
|---|
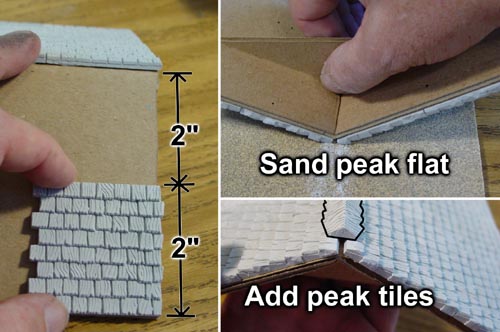
| 6. | Since each tile is 2" tall, our 4" tall roof fits two tiles exactly. Side to side you will also notice that the width of the roof is 1/8" shorter than 8 inches. This makes it so that all of the tiles fit perfectly side to side allowing you to only nip off the excess tabs on each side. After you have glued on the tiles and it has dried, you want to sand the peak a bit so you can give the peak tiles a flat surface to glue onto. |
 |
|---|
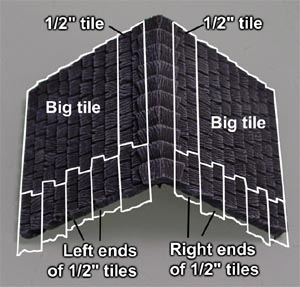
| 7. | This photo shows you how the roof tiles are arranged on the small roof. The left side is almost a mirror image of the right side. For the left side of the roof, start by nipping off the left edge of a large tile and glue it into place. Then add a 1/2" strip above it and also nip off the excess shingle that hangs over. Next take five 1/2" wide shingle strips and break them in half. The left ends of these strips will be used on the left side of the roof. The right ends of these will be used on the other side. After the glue is dry, you will need to use the nippers to nip off the excess ends from these 1/2" tiles. Finish the roof by sanding the peak and gluing on the peak tiles. One peak tile will extend past the edge of the roof so you will need to nip off one end. |
 |
|---|
Making a Small Crypt
| 1. | All of the pieces from this crypt are from the gothic molds #54, 55 and 56. I'm not going to make plans for this model but you should be able to see which pieces to use by looking at the photos. This model took me about 4 hours to plan and build out of extra blocks I had left over from the Cathedral. |
|---|
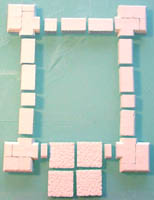
| 2. | I'll start off with the base trim pieces (mold#54). You'll need to trim a couple of pieces with a hobby knife as shown on the red lines. Make four of these corner pieces. |
 |
 |
|---|
| 3. | Here are the remaining base trim pieces. At the bottom are four flat 1x1 floor tiles for steps. After these are glued together, use some flat floor tile pieces on edge to form the inner ring of blocks shown. |
 |
 |
|---|
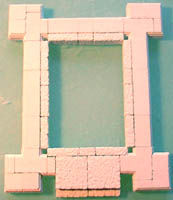
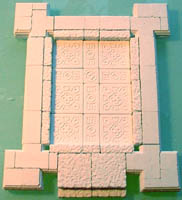
| 4. | Next lay in the floor tiles from mold #56 (tomb mold). After these are glued in, this finishes the base of the crypt. Now make the two pieces shown in the smaller photos. The top photo uses pieces from the tomb mold. The bottom photo uses pieces from the bell tower. |
 |
|
|---|
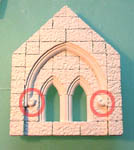
| 5. | Glue the two pieces shown above on top of the other, aligning the top edges and centering them side to side. Glue a small ball on the end of a small brick. This goes on each side of the section (shown in the red circles). Make two of these wall sections. |
 |
|---|
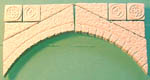
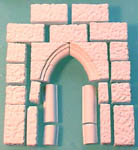
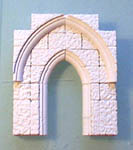
| 6. | Now for the doorway. The arch shown here is the large arch on mold #54. Next, glue the flat arch pieces onto this section found on the tomb mold #56. |
 |
 |
|---|
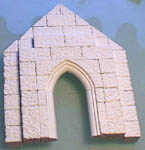
| 7. | Flip the door section over. Now add on the blocks shown and glue them around the edges. This will make the door section stick up about 1/4" on the backside. |
 |
 |
|---|
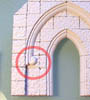
| 8. | Take one of the small decorative pieces from mold #54 and sand one side of it off. Glue it on the front side of the doorway as shown circled in red. Do this for both sides of the large arch. |
 |
|---|
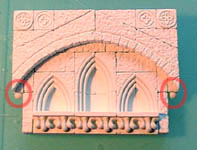
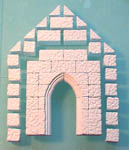
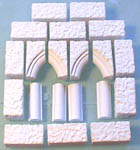
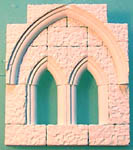
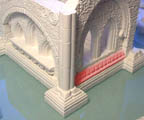
| 9. | On the other side of the crypt will be a wall with 2 windows. The window arches are the small arches on mold #54. Once this section is glued together, add the large flat tomb mold arch on top of it. |
 |
 |
|---|
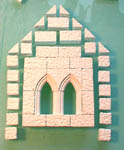
| 10. | Flip the window section over. Now add on the blocks shown and glue them around the edges. This will make the window section stick up about 1/4" on the backside. |
 |
 |
|---|
| 11. | Flip the piece back over and add the small decorative pieces on the bottom of the large arch (circled in red). Now assemble the pieces but don't glue them together yet! You need it in separate pieces so it can be painted. |
 |
 |
|---|
| 12. | I'll use pieces from the tomb mold for the corners. You'll have to cut one in half to go around the corner. Only glue it down to the base! Don't glue it to the wall or the model won't come apart. |
 |
 |
|---|
| 13. | Now for the hard part. You have to sand or cut the column pieces in half so it will go around the corner. You also have to have a bunch of these pieces cast. I happened to have a bunch left over from the cathedral. |
 |
|---|
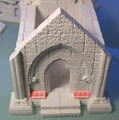
| 14. | Glue the column pieces to the corners but not to the base. When dry, sand the columns down to match the roof angle. Also, add decorative trim from the tomb mold in the area shown in red. |
 |
 |
|---|
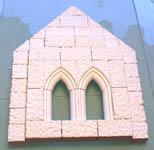
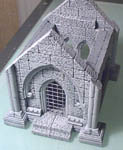
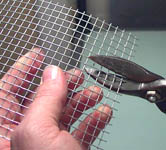
| 15. | Here's the finished crypt painted using the same colors as the Wizard's Tower. For the iron gate, I'm going to use hardware cloth. It's available at most hardware stores and the mesh is 1/4" square. |
 |
 |
|---|
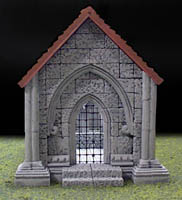
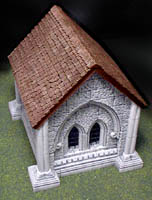
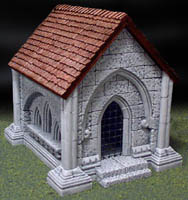
Here's pics of the finished crypt. The hardware cloth was spray painted black and inserted into the doorway and windows. | ||
 |
 |
 |