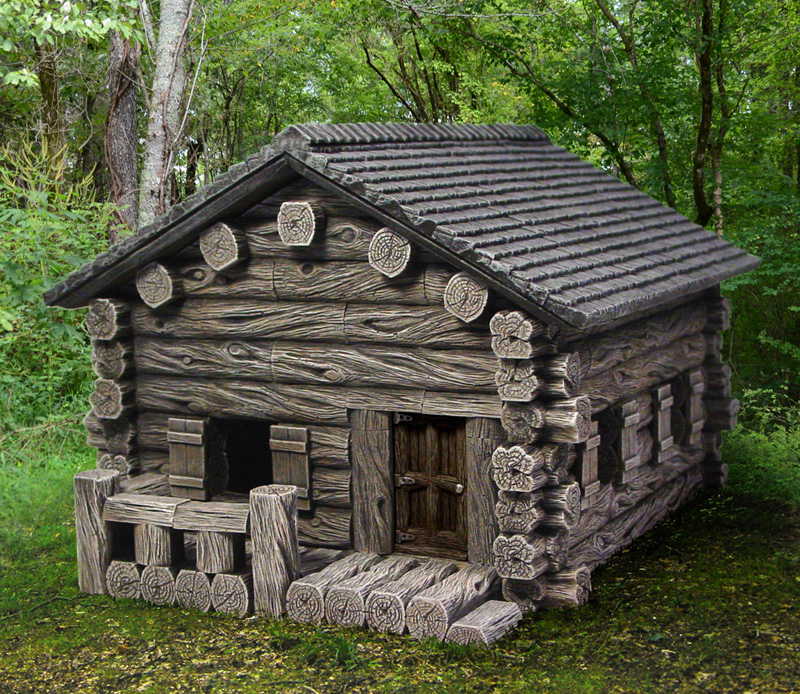
Hunter's Lodge Building Instructions
|
To build the lodge shown here, you will need 12 castings of mold #720 cedar log mold and 9 castings of mold #240 wood shingle roof mold. If you would like to add the wooden floor, then you will also need 4 castings of mold #226 wooden beam mold. The wooden floor is optional. Also, feel free to use any floor or roof mold you have for this lodge. A stone floor or a different style of roof will work just fine. You will also want to print out the Hunter's Lodge Building Plans. The printed plans show where every block goes. |
|
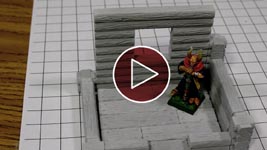
The Finished Hunter's Lodge This video shows what the lodge will look like which may help you to decide if you want to attempt this project. |
 |
About the Cedar Log Mold
| 1. | Click on the video to watch it on YouTube. This video shows suggestions on how to stack and use the cedar log blocks. |
 |
|---|
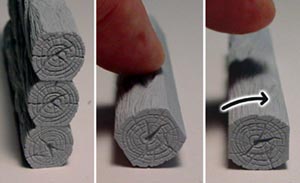
| 2. | The cedar logs are rounded on both sides with a flat top and bottom. Side to side each log measures 1/2" exactly. This makes it so that you can lay the logs side by side for a floor and the measurements will stay exact. |
|---|---|
 |
| 3. | However, logs are meant to be stacked flat to flat with the scraped side of the block facing down. An interesting thing about these blocks is that the rounded side is actually flat in the center. This will cause the block to naturally roll to their center position if you lay them on their sides. This makes constructing walls much easier since you can glue them together while lying the blocks flat of their sides. |
 |
|---|
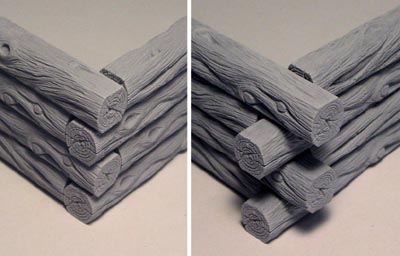
| 4. | The easiest way to join the blocks on the corners is to simply stack them with the ends overlapping. You can make them stop flush with the adjoining side (left photo) or have them extend past the side of the wall (right photo). If you do extend the logs past the adjoining side, be sure to make them extend past by an even amount such as a 1/4" or 1/2". Otherwise it may be difficult to get your window and door openings to line up. |
 |
|---|
| 5. | Here's where the corner blocks come in handy. You'll notice that I have made three different corner blocks. Be sure that the long ends stick out when you place them in the corner. By changing around the order of these three blocks, you can give a random appearance to your corners. |
 |
 |
|---|
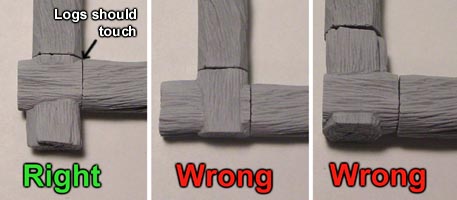
| 6. | To use the corner blocks correctly, make sure your long logs touch on the corners. If you have to spread out the logs in order to make the corners fit then they are being placed incorrectly. The flush ends of the corner blocks should be touching the faces of the logs. |
 |
|---|
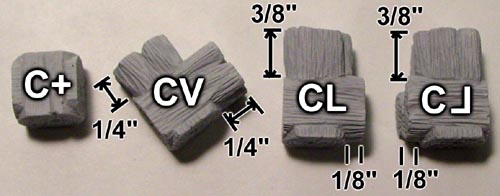
| 7. | I've labeled the corners in this manner when referring to building plans I've made. The first (C+) is used for interior corners, tees and crosses. The other corners have the dimensions listed as to how far each log sticks out on the ends. |
 |
|---|
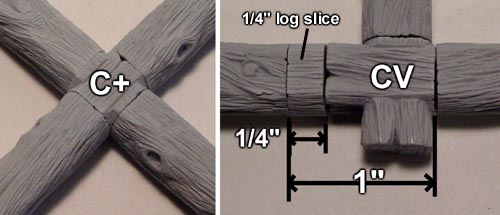
| 8. | Here you see the cross used for an interior joining of logs. If you want to use any of the other corners for an interior corner, you will need to shim up one of the ends to make it an even size. This is the purpose for the 1/4" and 1/8" log slices. They are used to extend the corner blocks to even increments. |
 |
|---|
| 9. | Here is another example of using the log slices to even up the odd ends of the corner blocks. This may be a bit confusing but I doubt most people will try to use corner blocks this way. |
 |
|---|
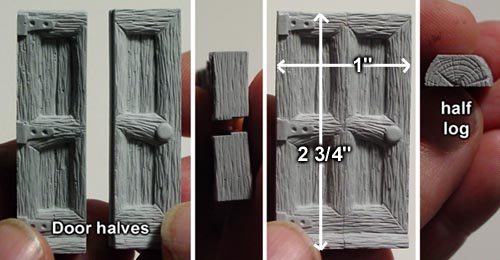
| 10. | The door is made by putting two door halves together. Be sure you have hinges on the left and a knob on the right. There is an offset on the edges that meet to help you line them up properly. The half log (on the right) is used to fill above a doorway if needed. |
 |
|---|
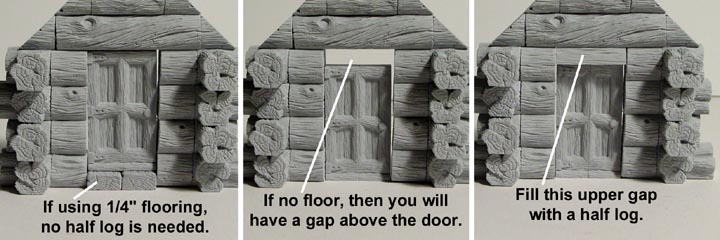
| 11. | The half log is used to fill above the doorway if needed. If you are using a 1/4" floor tile under your cabin, then you will not need to fill above the door. However, if you do not have any floor in your cabin, you will need to fill the gap above the door using one of these half logs. |
|---|---|
 |
Building Instructions
To build the lodge shown here, you will need 12 castings of mold #720 cedar log mold and 9 castings of mold #240 wood shingle roof mold.
If you would like to add the wooden floor, then you will also need 4 castings of mold #226 wooden beam mold. The wooden floor is optional. If you do not have an extra mold for the floor then you can simply use the table surface you are setting the cabin down on as the floor.
Also, feel free to use any floor or roof mold you have for this lodge. A stone floor or a different style of roof will work just fine.
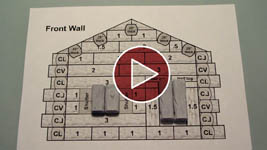
You will also want to print out the Hunter's Lodge Building Plans. The printed plans show where every block goes.
| 1. | Hunter's Lodge Building Instructions This video shows how to assemble the logs for each wall section of the cabin. |
 |
|---|
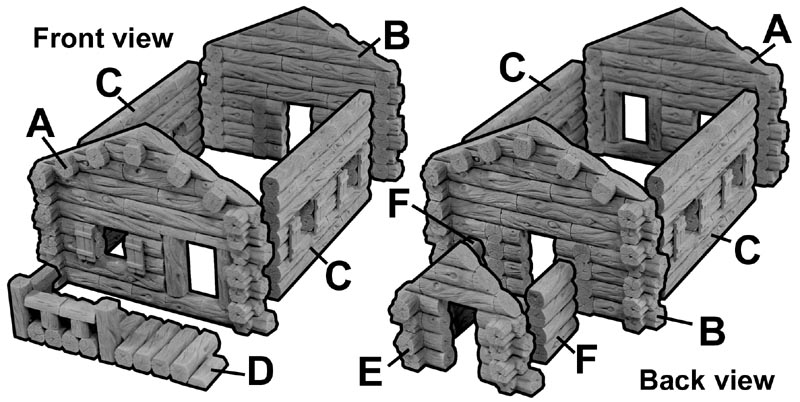
| 2. | Here is a quick view of what all of the pre-assembled pieces will look like and how they go together. Click on the photo for a larger view. |
 |
|---|
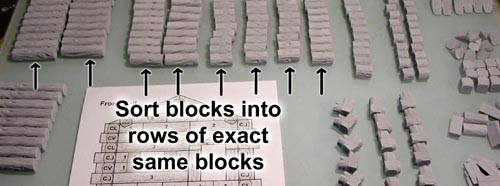
| 3. | Sort out the blocks on your work surface so that the exact same blocks are in the exact same rows. This will help us lay out the blocks so that we do not have repeated textures in the wall sections we make. |
 |
|---|
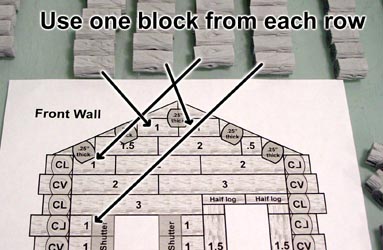
| 4. | When laying the blocks down on the building plans, you want to take one block from each row to set down on the plan, moving from left to right. When you have depleted that row, start again on the left but spin these blocks around to the back side to show the back texture of the block. After you have placed all blocks on the building plans, look it over and make sure that you do not have any obvious repeats in the wood texture. |
 |
|---|
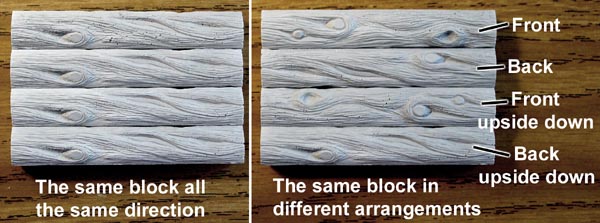
| 5. | The example on the left shows all of the 3" blocks laid the same direction. To hide the texture, flip some blocks to the back side and flip some upside down. |
 |
|---|
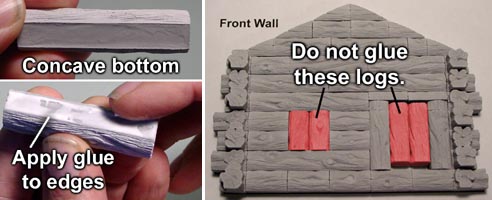
| 6. | Some of the blocks may not be flat on the bottom. Be sure to spread the glue around the edges to make good contact with the row below. The red logs are holding the place of the window and door. Do not glue these logs. They will need to be removed later on. |
 |
|---|
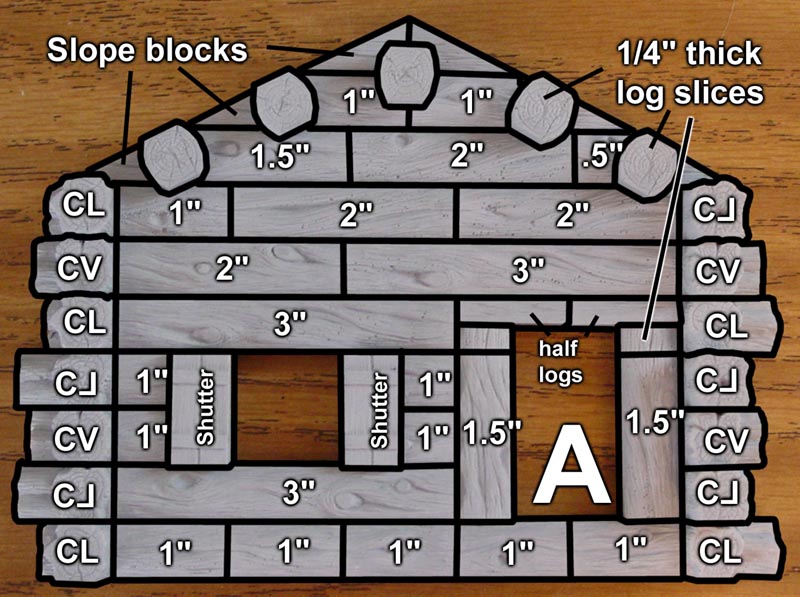
| 7. | Wall AClick on the photo for a larger view. When placing the corner blocks, be sure that the smooth scraped side is facing down towards the floor of the cabin. To understand which corner blocks are used, please refer to the section above. All of these log blocks are laid on their sides with the scraped sides of the blocks facing the bottom of the cabin. |
 |
|---|
| 8. | Wall B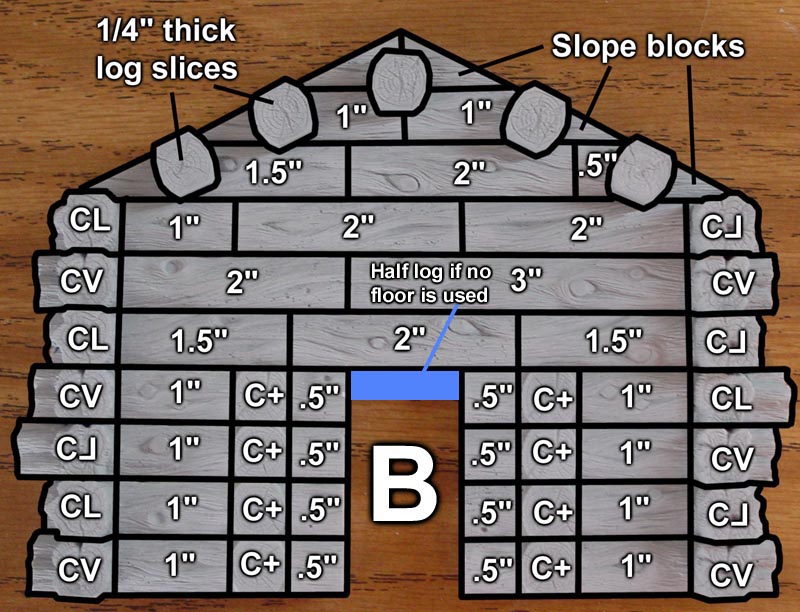 |
Wall C |
|---|
If you do not want to add a floor to the cabin then you must add a half log above the doorways on wall sections B and E. These areas are indicated by the blue bars above the doorways (photo above and below). The cabin will simply set down on your tabletop and when you remove the roof you will see your table surface underneath. If you add a floor, most of my floor tiles are 1/4" thick. This will fill under the bottom of the doorway so half logs will not be needed above these doorways. |
| 9. | Porch D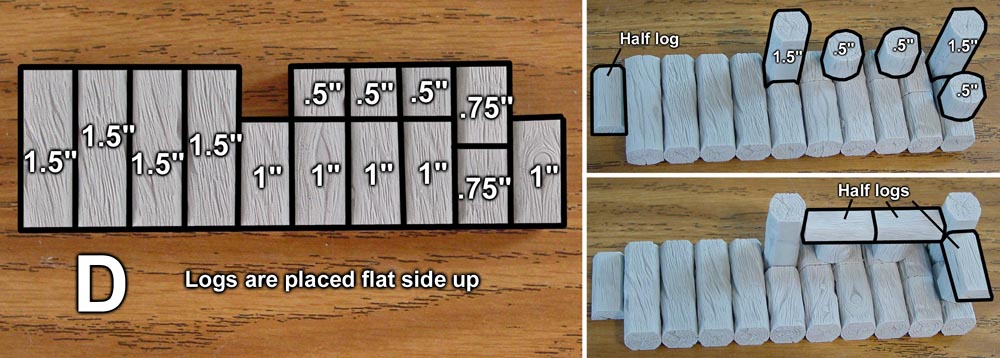 |
Back Room E, F |
|---|
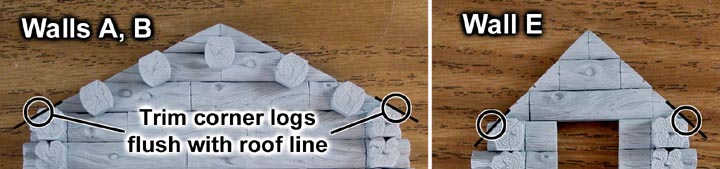
| 10. | On the walls A, B and E, you will notice the corner log ends stick out on each side and will interfere with the roof lying flat. Trim or sand these corners so your roof can lay flat down onto the peaks of the cabin. |
|---|---|
 |
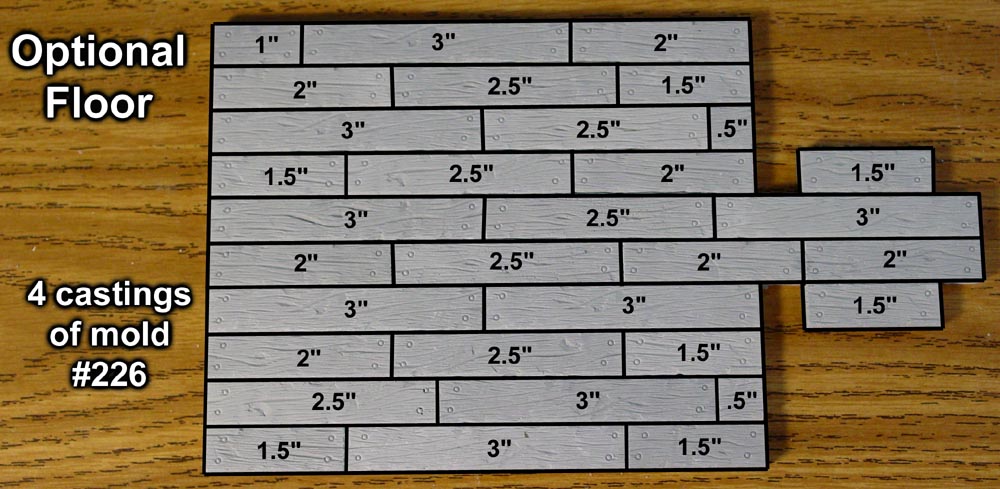
| 11. | Optional FloorClick on the photo for a larger view. You do not have to make a floor for this cabin. But if you want to make one, this floor was made from 4 castings of mold #226. If you do add a floor, then you will not need to add half logs above the doorways as shown in steps 8 and 9 above. |
 |
|---|
Roof Building Instructions
To build the roof shown here, you will need 9 castings of mold #240 wood shingle roof mold. Feel free to use any roof mold you have for this lodge. A different style of roof will work just fine.
You will also want to print out the Hunter's Lodge Building Plans. The printed plans show where every roof block goes.
| 1. | Hunter's Lodge Roof Instructions This video shows all of the steps in created the roof for the lodge using the wood shingle roof mold #240. |
 |
|---|
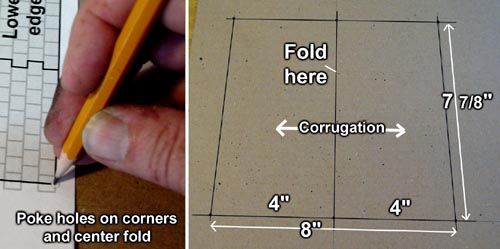
| 2. | I'm going to mount this roof onto corrugated cardboard. However, you can use any kind of thick card stock you like. Draw out this roof layout on the cardboard as shown in the right photo. An easy way to do this is to lay your roof plan down onto the cardboard and poke holes through the plan on the corners, then connect the dots. |
 |
|---|
| 3. | Cut the square out of the cardboard and then crease the roof peak using a dull butter knife or some kind of blunt edge.
Then fold the roof along this crease. If you have your corrugation running the right way, you should not see the corrugation when looking at the peak of the roof. |
 |
|---|
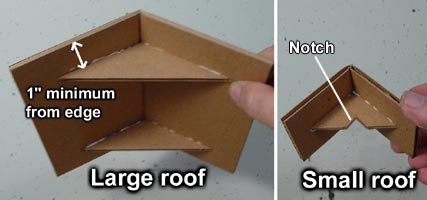
| 4. | Add the braces under the roof and glue them at least 1" from the edge. You can find these braces on the roof plan.
Then make the smaller back roof using the same method as shown above. This small roof only has one brace. You may need to notch out the center so it can be positioned past the back room's peak. |
 |
|---|
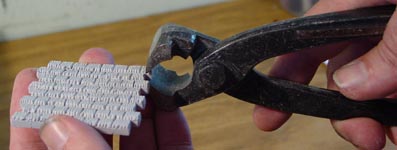
| 5. | A tool that is very handy here is a tile nipper. This is a tool used to break off the edges of ceramic tile for a bathroom. What you need to do is break off the tabs on one side of the roof tile. They don't have to be broken off smooth. |
 |
|---|
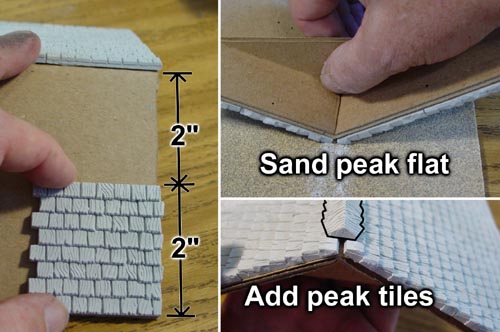
| 6. | Since each tile is 2" tall, our 4" tall roof fits two tiles exactly. Side to side you will also notice that the width of the roof is 1/8" shorter than 8 inches. This makes it so that all of the tiles fit perfectly side to side allowing you to only nip off the excess tabs on each side. After you have glued on the tiles and it has dried, you want to sand the peak a bit so you can give the peak tiles a flat surface to glue onto. |
 |
|---|
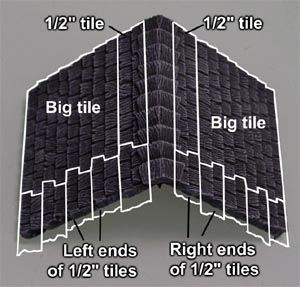
| 7. | This photo shows you how the roof tiles are arranged on the small roof. The left side is almost a mirror image of the right side. For the left side of the roof, start by nipping off the left edge of a large tile and glue it into place. Then add a 1/2" strip above it and also nip off the excess shingle that hangs over. Next take five 1/2" wide shingle strips and break them in half. The left ends of these strips will be used on the left side of the roof. The right ends of these will be used on the other side. After the glue is dry, you will need to use the nippers to nip off the excess ends from these 1/2" tiles. Finish the roof by sanding the peak and gluing on the peak tiles. One peak tile will extend past the edge of the roof so you will need to nip off one end. |
 |
|---|
Painting Instructions
If this is the first time you have ever painted a model building, you will find much more detailed information on the Painting Instructions Pages. These pages will describe the dry brushing process in detail and also has recipes for the colors of paint used here. This is a very brief description of painting to allow you see the colors used.
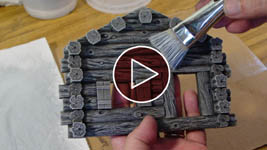
| 1. | Hunter's Lodge Painting Instructions This video shows the basic colors and technique used to paint the cabin and the roof. |
 |
|---|
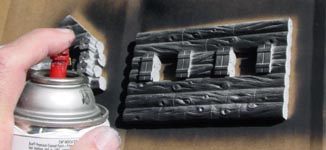
| 2. | I started by spray painting everything flat black. Be careful to spray at all angles to get into the deep cracks. Many times it's helpful to look over each piece out of direct sunlight. This will help you spot places you may have missed. If you don't want to use spray paint, you can always simply brush on flat black paint instead. |
 |
|---|
| 3. | Next I dry brushed on a dirt color of paint. Click on the photo for a larger view. You can a recipe for the dirt color here. You can dry brush it on fairly heavily but do not slop it on. Get most of the paint out of the brush first. You want the brown to slowly show up with lots of strokes. That will give you a lot of variations in shading from black to medium brown. |
 |
|---|
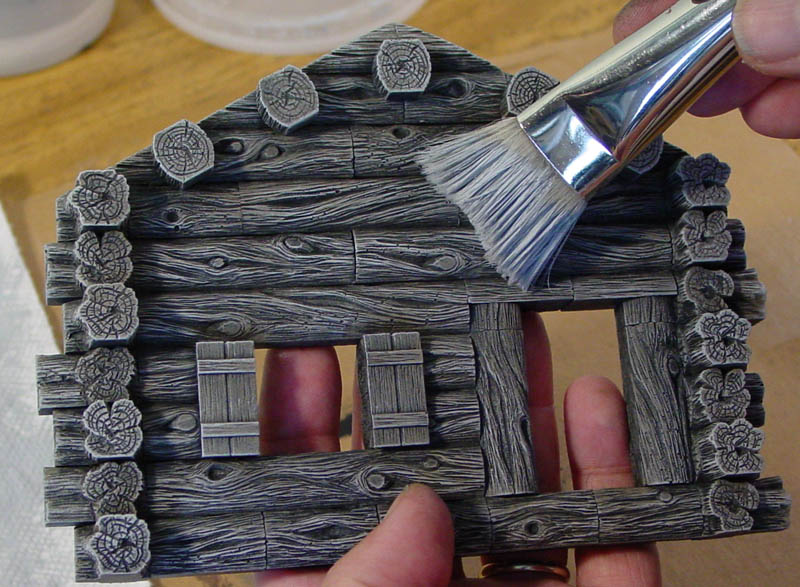
| 4. | The final dry brush is using a light gray, which I call Castle Gray Light. Click on the photo for a larger view. You can a recipe for the light gray here. This should be applied very lightly. Be sure to wipe most all the paint out of the brush before you start. When first brushing it on, you should not see any gray on your piece. The gray color gives it a very weathered look similar to driftwood. It will make your cabin look very old. |
 |
|---|
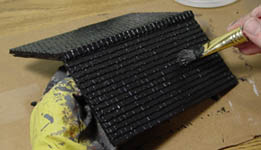
| 5. | When painting the roof, I completely covered it in flat black paint. I could have used spray paint but I already had some black paint out for another project. Be sure to get it down into all the cracks and let it dry completely. |
 |
|---|
| 6. | Since I wanted this roof slightly darker, I finished the paint job by dry brushing a medium gray on. Click on the photo for a larger view. You can a recipe for the medium gray here. This should be applied very lightly. Be sure to wipe most all the paint out of the brush before you start. When first brushing it on, you should not see very much gray on your piece. Take your time and use lots of brush strokes very lightly. Don't forget to paint the smaller roof as well. |
 |
|---|
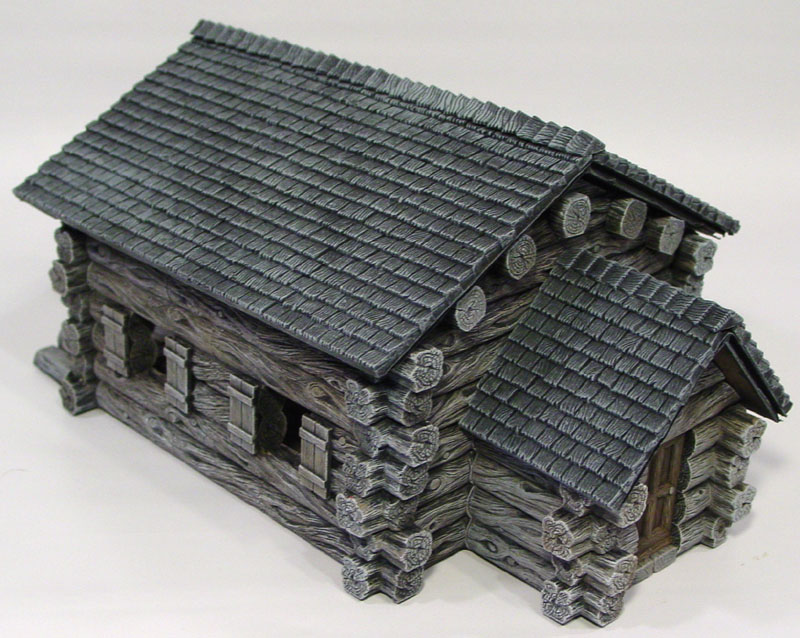
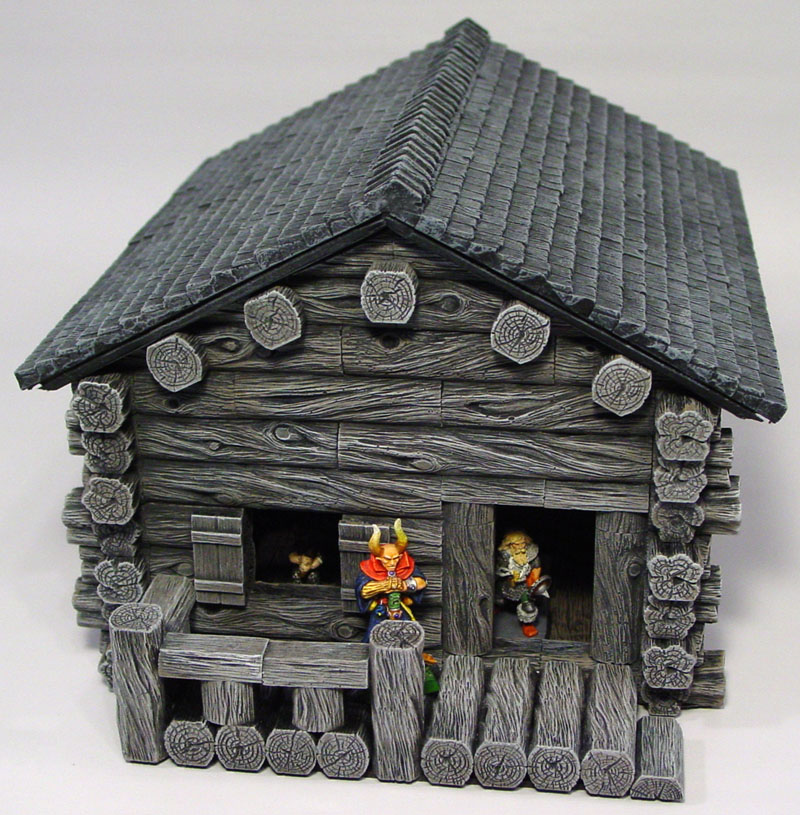
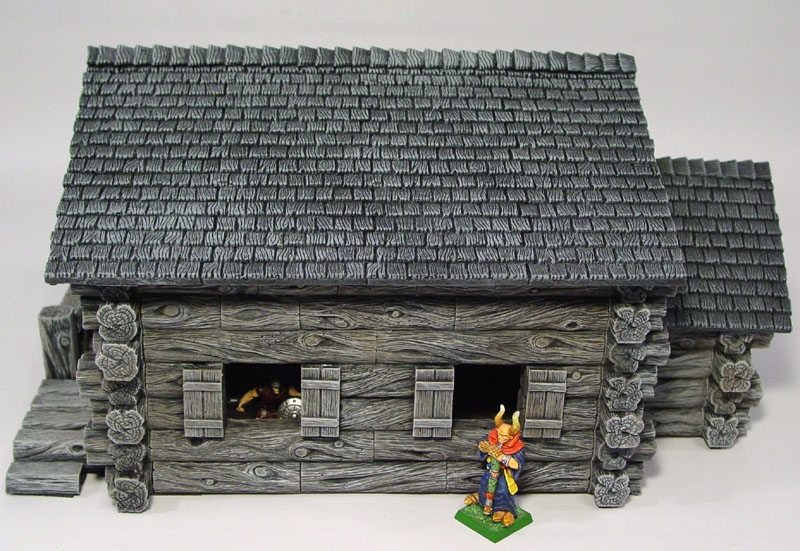
Finished Photos
Click on the photos to see a larger view.
 |
 |
 |
 |
Sculpting the Logs
Designing Cedar Logs This video shows some of the steps in the process of deciding on the size and shape of the logs. Different versions of the logs were tried before ending up with the final version. |
 |
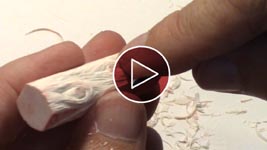
Cedar Log Carving Demonstration This video shows how one of the cedar logs is carved from a perfectly sized blank of polymer clay. This is a time lapse video with no narration. |
 |