Tips & Tricks 11
Skematic Pyramid Painting Tips
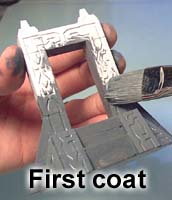
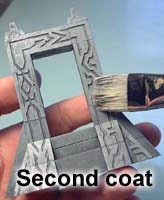
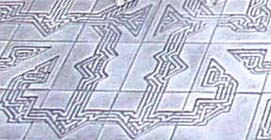
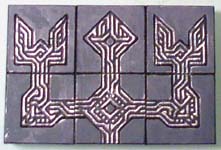
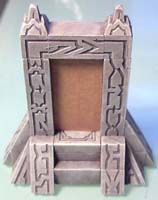
| 1. | Painting the Skematic Pyramid mold is a little different from painting any of the other models. Start by using a dark gray paint mixed as thin as milk (maybe slightly thicker). Paint the piece completely and make sure to slop it into all of the cracks and designs. The second coat is where things are different. You have to carefully dry-brush this coat using medium gray. Don't thin the paint. Dip your brush into the paint and wipe most of it off onto a paper towel. Gently brush it onto the model. If you push too hard or have too much paint in the brush then it will fill in the designs. |
 |
|---|
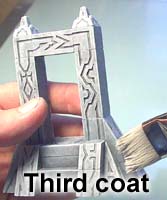
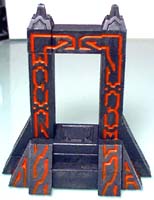
| 2. | The third and final coat is pure white. Don't thin the paint. Dry-brush this coat on just like the second coat, only use lighter pressure and have even less paint on the brush. All of the pieces shown on the Skematic Pyramid page and on the Ship Diorama were done using this painting method. I'll also cover several other methods below. |
 |
 |
|---|
| 3. |
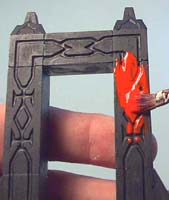
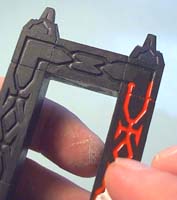
I painted on the red and carefully wiped off the excess with my finger. You can't wipe the excess off with anything absorbent because it will pull the paint out of the cracks. |
 |
 |
|---|
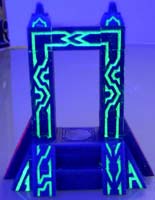
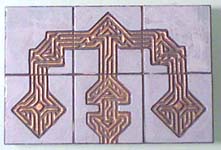
 The next thing I tried was using fluorescent paints in the designs. I've painted this arch black and filled the design with fluorescent red.
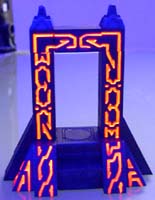
| 4. | The disadvantage of this method is that no matter how careful you are, you still get a little of the paint on other parts of the arch. Fortunately, most fluorescent paints are very thin and transparent and you won't see the slight mistakes. You'll notice that when it's dry, the fluorescent red isn't quite as bright. The cool part is when you look at it under a black light. The black light makes all of the lines glow like they're on fire. |
 |
 |
|---|
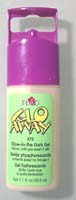
| 5. | I also tried glow in the dark paint in the designs. This paint will glow under a black light or it will also glow in the dark for a short time if you hold it under a bright light. The disadvantage is that the paint doesn't look good by itself, kind of a clear greenish tint which doesn't make the design stand out in regular light. However, if you put a black light in your display cabinet, your pieces will light up with a wild glow when on display. |
 |
 |
|---|
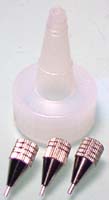
| 6. | The wipe-off method doesn't work at all when you're using metallic paints. The metallic pigment goes everywhere and doesn't wipe off. To solve this I bought a set of paint tips. You can get these in most craft stores for about $1. They come with a plastic screw-on top and different sizes of metal tips. These tips are exactly the same as what your mechanical pencil has on the end of it. The plastic screw top fits most paint squeeze bottles. |
 |
|---|
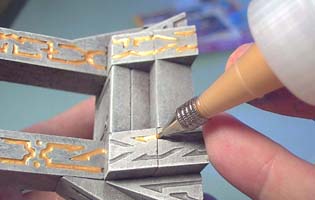
| 7. | Painting takes a little practice, but I got very good results within a few minutes. The point sets right into the recessed design of the blocks so tracing is easy. The hard part is to squeeze just enough to let the amount of paint out that you want. Most paints are thin enough that they gently flow out of the tip without you having to squeeze at all. I had the best luck using the smallest tip in the package. The gold paint really looked great when I was finished. |
 |
|---|
| 8. | The gold would look nice on temples. It really looks like the walls were inlaid with solid gold. I suggest a more earth colored stone (instead of the gray) for it. The fluorescent paint really gives pieces a "Tron" look. I could imagine making a display and using fluorescent paints on the models as well. Glowing skull faces, control panels and techno line patterns would make a great display. |
|---|
Skematic Floor Tile Painting
| 1. | The easiest way to paint the Skematic Floor tiles is to use the same method that I used for the Skematic Pyramid pieces (above). Start with a thin dark gray, lightly dry-brush a medium gray and then lightly dry-brush white last. |
 |
|---|
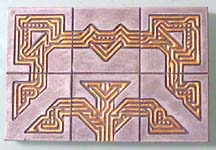
| 2. | I also like the earth colored temple look. These are the exact same colors I used on the Earth Tone Painting Instructions. I also painted each ridge individually in gold. It took me about 15 minutes to do these 6 tiles. |
 |
 |
|---|
| 3. | For this example I started with a dark gray base and dry-brushed a metallic bronze onto it. Just those colors looked pretty interesting. I finished the tiles by painting the outsides a medium gray color. This only took about 3 minutes to paint. |
 |
 |
|---|
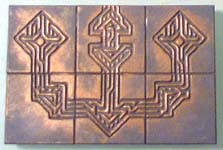
| 4. | This example started with an undercoat of solid black paint. Next, I lightly dry-brushed a metallic silver on top. The color was called "chainmail" and is a little darker than your average silver. Finally, I painted the outside a solid dark gray. The dark gray helped the silver show up better. This method was also much easier than painting the individual ridges, and I had it painted in about 3 minutes. |
 |
|---|
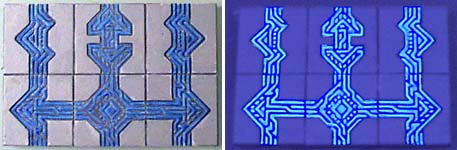
| 5. |
Since fluorescent paints are thin and transparent, I knew I wouldn't be able to see it if I just painted it onto the dark gray. So my next step was to dry-brush with white paint. This caused all of the ridges to become very light. After the white, I painted fluorescent blue onto every ridge, putting it on as thick as I could, but without slopping it into the crack of the design. This took me about 15 minutes to paint these 6 tiles. My last step was to paint the outside of the tiles medium gray. In regular light, the tiles look okay, but when you put it under a black light, these tiles have an electric glow to them that really looks great. |
|---|
 I wanted to try fluorescent colors on a few tiles. For this one, I started with an undercoat of dark gray paint.
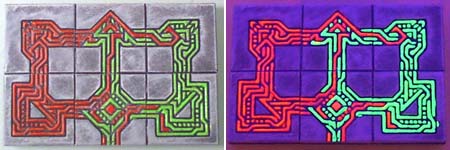
 | 6. |
My next step was to dry-brush with white paint. This caused all of the ridges to become very light. After the white, I painted fluorescent red and fluorescent green onto every ridge, putting it on as thick as I could, but without slopping it into the crack of the design. This took me about 15 minutes to paint these 6 tiles. The outside areas I didn't do anything to. Instead of painting a medium gray, I just let the dry-brush of white show instead. In regular light it looks pretty good, but when you put it under a black light it looks fantastic. The photo just doesn't describe how cool the glowing colors look on the tiles. |
|---|
 For this last example, I did much the same. I started with an undercoat of dark gray paint.
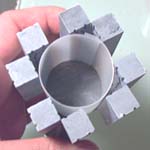
Plastic Tubes for Cryo Chambers
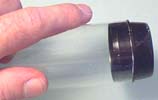
| 1. | For cryo chambers and other sci-fi bits that need a clear plastic tube, I'm going to use a fluorescent light bulb protector. These are used to cover a fluorescent bulb so that if it breaks, it doesn't shower broken glass on everyone. You can find these at most hardware stores for about $2. They're a clear plastic tube about 4' long with black caps on each end. |
 |
|---|
| 2. | To begin with, place the tube next to the cryo chamber you made and place a mark where it needs to be cut. To find out how to make this cryo tube, check out the Ship Diorama page. These covers are easy to cut with scissors. Start by slitting it up the middle. Unroll it face-down flat on the table and use a ruler to mark the edge straight. |
 |
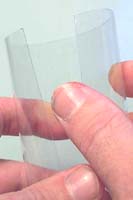 |
|---|
| 3. | Place the plastic tube inside the chamber and trim it down until it fits. Also, trim the sides so that it forms a "C" shape, and stretches from one side of the chamber to the other, but doesn't stick out the back of the chamber. Place one of your miniatures into the back of the chamber to see how it fit. Large figures and those with guns sticking out probably won't fit well, but there should be plenty of models that will fit in the space. |
 |
|---|
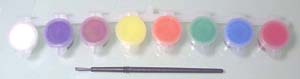
| 4. | I'm going to tint the plastic using cheap stained glass paint. You can find this at any craft store really cheap. What I have here cost about $1, and it's enough to paint several glasses. |
 |
|---|
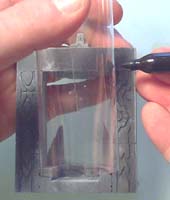
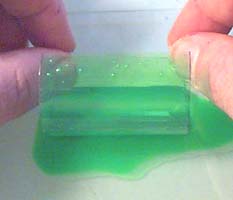
| 5. | I've found that brushing the paint on doesn't work at all! The best way to get a uniform tint is to dip the plastic into the paint. First lay down a piece of scrap plexiglass, glass or aluminum foil. If you use glass, you can always scrape the paint off of it later on. Pour a bead of paint down a little wider than the plastic is. Gently roll the plastic into the paint. Try to hold onto the corners of the plastic, because if they don't come out, you won't see them anyway. |
 |
|---|
| 6. |
These paints can really make a mess! I tipped the container over more than once. It washes up with water (unless it's dry) and it dries quickly. |
 |
|---|
 Lay the painted plastic onto a paper towel to dry. If there are any air bubbles on the surface (where you'll see them) gently blow on them to pop them. Don't use a brush on them or you'll mess up the uniform surface!
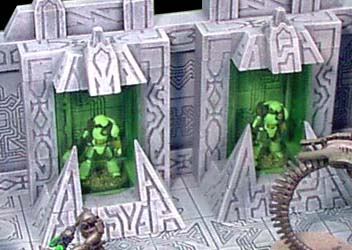
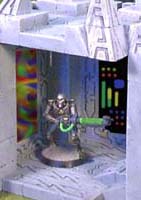
| 7. | The cryo chambers are easy to use. Just pull them out from the wall and place your figures in behind them. For instructions on how to make this cryo chamber, check out the Ship Diorama page. Feel free to use other colors besides green, or experiment with a swirly pattern. The bulb protectors will have a lot of uses for anywhere you need a curved piece of glass. It's cheap, easy to cut and very flexible. |
|---|
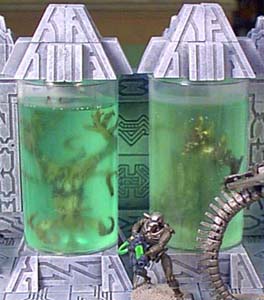
Using Resin for Specimen Tubes
| 1. | To make specimen tubes, you're going to need 4 things. A plastic tube, some resin, some stained glass coloring and a model you don't mind sacrificing for the project. |
|---|
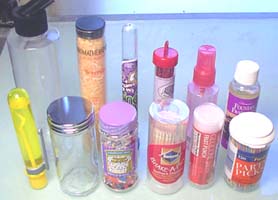
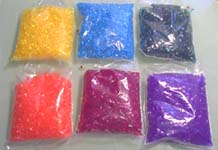
| 2. |
I found several containers, most of which were under $2, even with buying the stuff that's inside them. Here's a description of what's in the photo from back left to bottom right: A hamster water bottle, bath fragrance, liquid sour candy, glitter, a spray bottle (assorted colors), water fountain fragrance, blowing bubbles, spice container, sprinkle cake decorations, toothpicks, glucose tablets and another toothpick container. |
|---|
 We'll start with the plastic tubes. You'll have to take a trip to Wal-Mart (or your nearest department or grocery store) and spend a few minutes looking around.
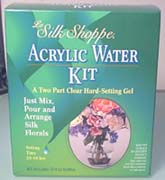
| 3. | The resin I'm using is called "Le Silk Shoppe, Acrylic Water Kit". I found it at Wal-Mart in the fake flower section, but it might also be in the craft section as well. This stuff is meant to be poured into a glass vase. You stick your fake flowers into it and it hardens, looking like water in the vase. It cost me $5.97 for 8 ounces of resin. This kind of resin also doesn't heat up (that I'm aware of), but it does take 24-48 hours for it to set up. |
 |
|---|
| 4. | I'm going to tint the resin using cheap stained glass paint. You can find this at any craft store really cheap. What I have here cost about $1, and it's enough to tint all the resin you want. |
|
|---|
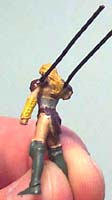
| 5. | The model I'll use is a MageKnight figure. I had one that was missing an arm already, so it looked right for a specimen. MageKnight figures have 2 main advantages for this type of thing, they're inexpensive and they're already painted. I had thought about using one of my painted Genestealers, but I just couldn't sacrifice something I spent 4 hours painting. I want the figure to be suspended in the liquid, and to look like it's being kept alive by hoses attached to the body. To do this I super glued two pieces of electrical wire to the back. To get them to stay in place, you may have to use "zip kicker" which hardens the super glue instantly, or you may have to drill small holes in the model. |
 |
|---|
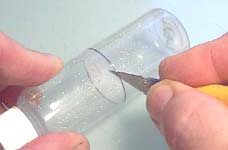
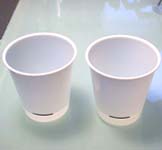
| 6. | Remove the label from the plastic bottle you want to use. Be sure that your model will fit inside the bottle before you go through all the trouble of preparing it. Feel free to lop off an arm or leg to help the model fit. Sometimes removing the label can be difficult. Take it slow and try not to scratch the plastic. If you have excess label glue on the bottle, use the label to help pull it off (example in the photo). Soaking the bottle in hot soapy water may help too. Also, pick a bottle that's thin and easy to cut with a knife. Hard plastic bottles are more trouble then they're worth. |
 |
|---|
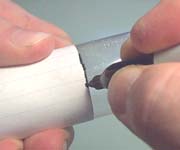
| 7. | If you can squeeze the bottle, it will be soft enough to cut easily. Wrap a piece of paper around the bottle to give you a level line to mark. Cut the bottle by pushing a hobby knife into it along the mark using a sawing motion. Keep your fingers out of the way! |
 |
 |
|---|
| 8. | Here's an easy way to mix the right amount of resin without wasting any. First, fill the specimen tube with water to the level you want it to appear at when finished. Divide the water equally into 2 mixing cups. Mark the cups where the water line is. Pour out the water and dry the cups and tube completely. |
 |
 |
|---|
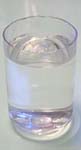
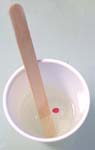
| 9. | Pour equal amounts of part A and part B in each mixing cup, but go well over the marks that you put on the cup. The resin is the consistency of honey and you'll lose a lot of it when it sticks to the mixing cups. Pour the 2 parts into one cup and mix completely with a wooden stick. Now add one drop of stained glass color to the mixture and stir it up to see if you like the color. If you want it darker, you can always add more, but if it's too dark you'll have to start over. |
 |
|---|
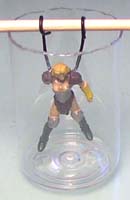
| 10. | Wrap the wires around a toothpick or stick to suspend the figure. Carefully pour the resin in and try not to spill it on the outside or up the sides of the tube. You'll notice a lot of bubbles from the mixing process. Don't worry, these bubbles will go away as the figure sets. If you get an air bubble in an eye socket or some deep recess, you may have to lift the figure out of the resin and use a toothpick to push resin into that area. |
 |
 |
|---|
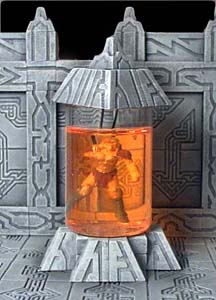
| 11. | It will take a full 48 hours for this type of resin to cure completely. Be sure to check the position of the figure occasionally as it's curing. I had to keep moving them back into position almost as if they were swimming around on their own. I also noticed that the hard plastic tubes (second photo) seemed to fog up a little as if the resin etched the plastic slightly. I didn't mind because it gave those containers a nice eerie look. |
 |
 |
|---|
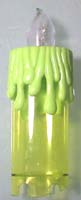
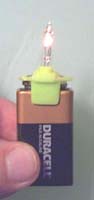
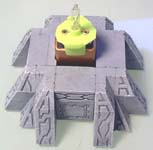
Adding Battery Powered Light
| 1. | The hardest thing about adding a battery powered light to a model is finding a light the size that you need. I found a wonderful light for about $2 in the Halloween section. It's a blinking light that runs off a 9 volt battery. It's meant to be stuck inside a pumpkin and light it up, so it's a fairly bright light. You can also find cheap miniature flashlights for around $2 to $5 by the check-out stands at the store. The smaller the better. I'm sure when Christmas rolls around, there will be some seasonal battery lighted decorations as well. |
 |
 |
|---|
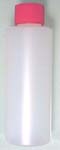
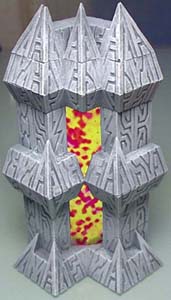
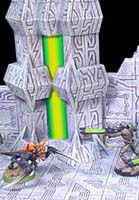
| 2. | The first project will be to add the flashing light to the signal tower. For instructions on how to make the signal tower, check out the Skematic Pyramid page. I'm using a frosted plastic bottle I found at Wal-Mart in the "health & beauty aids" section. They sell small empty bottles you can use to put shampoo and other travel items in. Cut and slit the bottle to fit inside the tower as shown. |
 |
 |
|---|
| 3. | I've pulled out the plastic tube and I'm painting the inside of it using the stained glass paint that was mentioned in the previous articles. Try swirling darker colors, because it goes on really thin. It will also help if you put a piece of clear tape over the seam. That way the paint won't run out through the seam and get on the outside. I've placed the battery and light inside the base of the signal tower. I had to file down the opening so the 9 volt battery would fit in. Once you set the top on, you'll have a lighted signal tower. If you can't find my specific light, there are several small pen lights that could fit into the base as well. |
|
 |
|---|
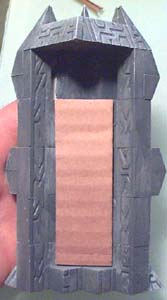
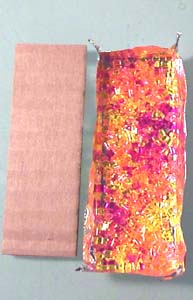
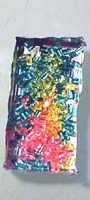
| 4. | The last thing we will attempt is to make a stained glass piece that can be lit from the back. I'm trying out a product called Makit & Bakit. What you get are packets of small plastic beads specially made to melt in the oven. I purchased a large kit which included 6 bags of these beads for about $9 (kind of expensive), but you can get the beads to go a long way. |
 |
|---|
| 5. | The trick is to make these beads melt in the correct shape, because the finished plastic pieces are very hard to trim. I'm going to fit a colored glass into the engine core. For instructions on how to make the engine core, check out the Ship Diorama page. Start by cutting a piece of cardboard to fit where the glass should go. Cut a piece of foil a little larger than the cardboard and wrap the foil around it to make a shallow tray. Carefully remove the cardboard and sprinkle in a layer of the colored beads. |
 |
 |
|---|
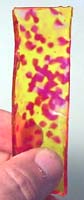
| 6. | Bake it in the oven according to the instructions on the box. It will be extremely hot when you take it out of the oven. Using hot mitts, it's possible to bend the shape in the foil to make a curved glass, but it takes a bit of practice. You won't be able to remove it from the foil until it's completely cool.
The next photo shows what the glass looks like when placed inside the engine core. I had to trim the glass a slight bit using a hobby knife and it was fairly difficult to do. I also found that you need to put a fairly thick layer of beads in the tray to get good results (about 3 layers of beads). There is a slight smell (of melting plastic) when you make these, but it isn't too bad. |
 |
|---|
 I had also heard that you can swirl the colors once they're melted, but I had a hard time doing it. The plastic seemed to harden almost instantly once it's removed from the oven.
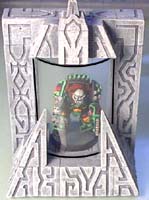
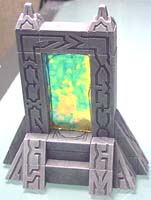
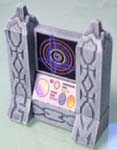
| 7. | I've repeated the process to make a colored warp doorway on this arch. This could be used to transport troops to different locations on the battlefield. I think there are a lot of interesting ways this product could be used. If you can't find this product, another option is to apply the stained glass paint onto a piece of thin clear plastic. |
 |
 |
 |
|---|
Printed Control Panels
| 1. |
I'm working on ways to make control panels available and should have some on the Building Plans page fairly soon. The engine core simply has a piece of printed paper slipped into it. Many of the paint programs can help you create interesting designs for these. |
 |
 |
|---|
 The last idea for this section is to print out control panels from your printer and glue them onto your model.