Egyptian Pyramid Building Instructions |
|
Kinds Of Pyramid Molds
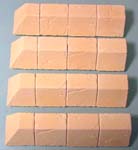
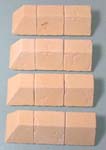
There are 3 kinds of pyramid molds. All of these molds contain the same blocks. The only difference is the texture. Any of these molds can be used to make the outside of the pyramid on any of the models shown here (including the doorway).
You do not have to put an inner chamber on your pyramid. If you do not, you can still make the top lift off. The inside will be hollow and you can place items inside it. However, additional molds are used to make a straight walled inner chamber if you choose to have one.
|
|
|

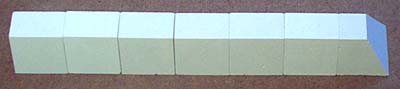
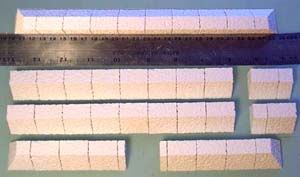
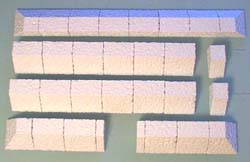
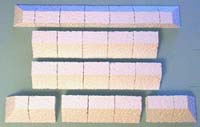
Pyramid Block Specifications
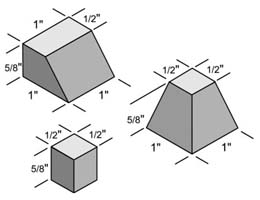 The sizes of the pyramid blocks are shown on the left. The blocks are made so you can stack normal building blocks on top of them, under them, or use them to make inner chambers in your pyramid.
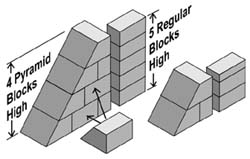 The only odd thing about the blocks is the height. The 5/8" height is necessary to keep the angle of the slope correct.
Using the pyramid blocks with regular blocks is fairly easy. When stacking them up, 4 pyramid blocks equal 5 regular blocks. Also, stacking 2 pyramid blocks is the same height as 2 regular blocks plus 1 floor tile.
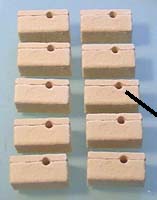
The small square block on the left is used to fill in so you can make the inside walls of the pyramid flush. It can also be used to support the inside to the pyramid while you're building it.
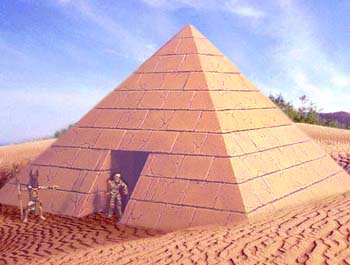
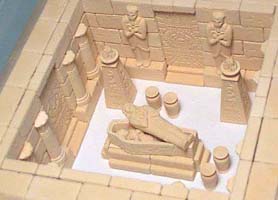
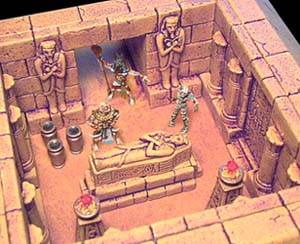
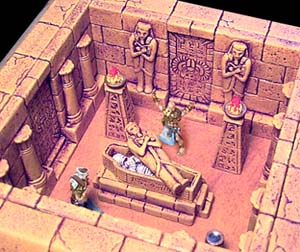
Sand Blasted Pyramid With Decorative Inner ChamberFor this project, you will need an additional mold. Mold #92 will give you the sloped pyramid blocks, but you will also need Mold #96 for the straight walls and decorative pieces for the inner chamber. Cast the #92 pyramid mold 19 times and cast the #96 basic block mold 10 times to build this pyramid. If you don't want to buy an extra mold, you can still build the pyramid without the inner chamber. Your pyramid would be hollow instead of having straight walls on the inside. To do this, just follow the instructions for the Easy Pyramid further down the page. |
|
 |
Mold #96 has blocks that can be used to make a secret door. Although this pyramid does not have a secret door shown on its construction, you can find out how to use the secret door blocks on the Tips & Tricks 17 page. For ideas on using mold #96 for tomb passages, please look at the Detailed Tomb pages. |
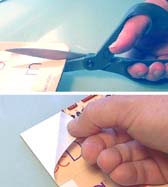
| 1. | For this pyramid, I decided to make mounting it as easy as possible. I went to Wal-Mart and looked for the thickest card stock item I could find to mount this on. In the office supplies section (where they have markers and poster board) I found a child's manuscript practice board. Children practice writing their letters on this board which can be wiped off and used again. It cost me $2.97 and is almost 1/8" thick solid pressed paper board (very sturdy). |
 |
|---|
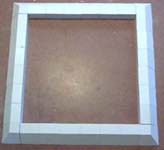
| 2. | You want to cut a 10" x 10" square out of the board. I used a large paperback book to help me draw a square line. Then I used a heavy pair of scissors to cut the board to size. If you don't have scissors, you may have to use a hobby knife and a ruler. Peel the thin top plastic coating off so the glue will stick. |
 |
 |
|---|
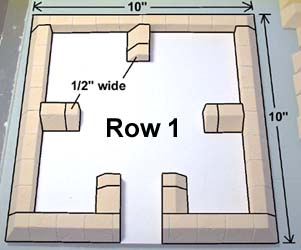
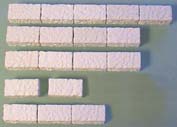
| 3. |
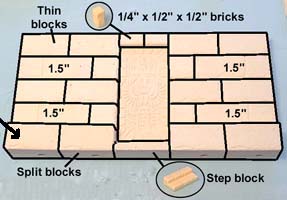
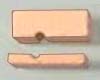
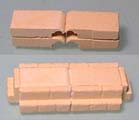
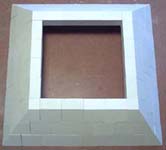
Glue 10 of the split blocks. These will be used for the base. Be sure the thick half is facing you (so the holes won't show). Glue the other pieces as shown. The step block goes on the bottom under the door. |
 |
 |
|---|
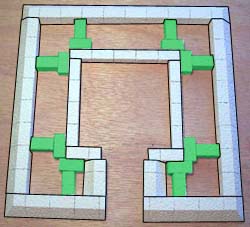
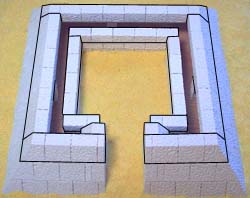
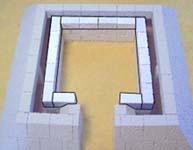
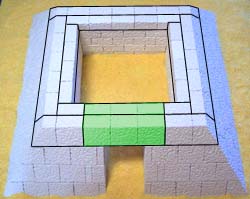
 We will start by making the inner chamber walls.
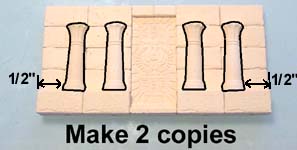
| 4. | Add the pillars onto the wall in the placement shown. Be sure you have at least a 1/2" between the pillar and the edge of the wall. Make 2 copies of this wall section. |
 |
|---|
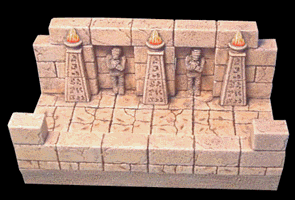
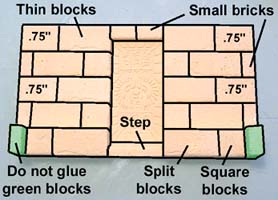
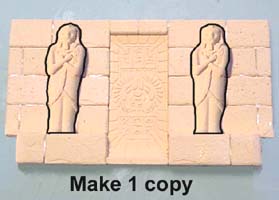
| 5. | The back wall uses the pieces shown. Do not glue the blocks shown in green! These are used as spacers. Afterward, remove the green blocks and add the two statues on either side. Make 1 of these. |
 |
 |
|---|
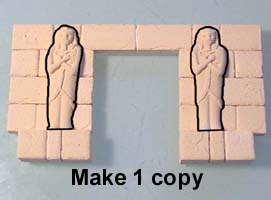
| 6. | The doorway wall uses the pieces shown. Do not glue the blocks shown in green! Afterward, remove the green blocks and add the two statues on either side. Make 1 of these. |
 |
 |
|---|
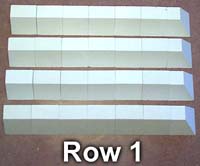
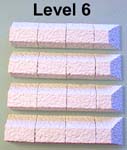
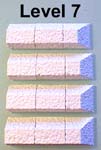
| 7. |
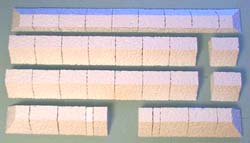
Here's what you need to glue for the first level. The first photo shows the pre-glued rows of pyramid blocks. The second photo shows the rows glued down to the paper board. |
 |
|---|
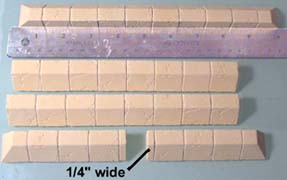 Next you will need to pre-glue several rows of blocks. You may want to pre-glue for all of the steps, then go back and assemble the whole pyramid at once.
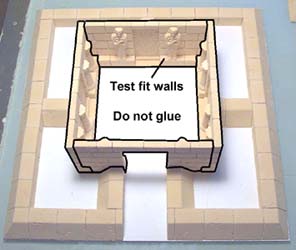
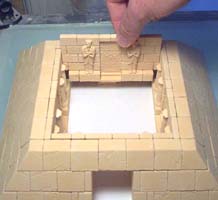
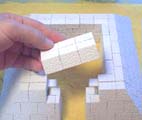
| 8. | At this point you want to test fit the inner chamber walls. The spacer blocks reaching in from the outside walls should butt right up against the chamber walls to keep them straight. Do not glue the inner chamber in place. Painting it will be very difficult later on if you glue it in. Leave the inner chamber in place while you glue on the remaining rows of blocks, but do not glue them to the chamber. It's a good idea to remove the chamber after each row is dry to be sure it will come out later on. |
 |
|---|
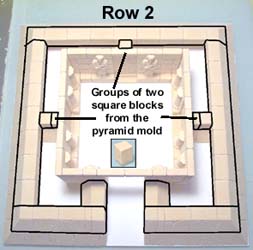
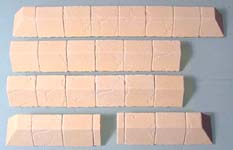
| 9. |
Be sure the blocks are completely dry before gluing them on top of the first row, otherwise the pyramid will sag. Also glue groups of two blocks from the pyramid mold around 3 sides. I'm using these blocks because there are an excess of them. Once again, do not glue them to the inner chamber! We want to remove the chamber later on for painting. |
 |
|---|
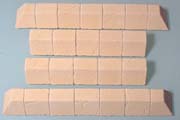
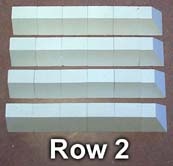
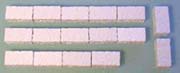
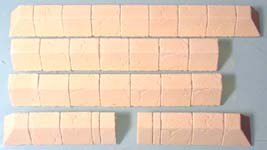 Pre-glue these blocks to form the second row.
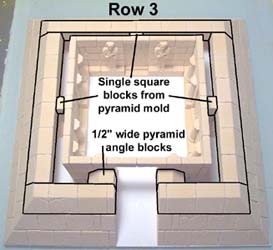
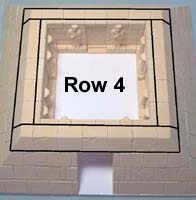
| 10. |
Be sure the blocks are completely dry before gluing them on top of the first row, otherwise the pyramid will sag. Also glue single square blocks from the pyramid mold around 3 sides. I'm using these blocks because there are an excess of them. Once again, do not glue them to the inner chamber! We want to remove it later on for painting. |
 |
|---|
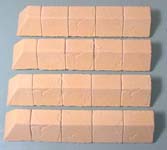
 Pre-glue these blocks to form the third row.
| 11. |
Once this row is dry, be sure you can remove the inner chamber. |
 |
 |
|---|
 Pre-glue these blocks to form the fourth row. This row will bridge over the doorway opening.
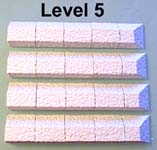
| 12. | Pre-glue these blocks to form the fifth row. Glue this ring together but do not glue it on top of the pyramid! You want this top section to lift off so you can see inside the pyramid. |
 |
 |
|---|
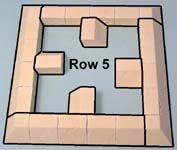
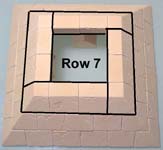
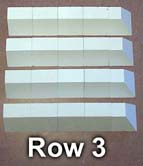
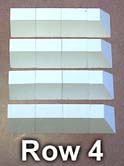
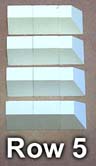
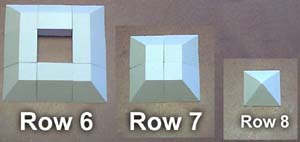
| 13. | Here is row 6 and row 7. Row 6 has square blocks from the pyramid mold on the inside. |
 |
 |
 |
 |
|---|
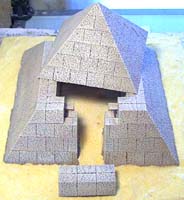
| 14. | Pre-glue the last rows together, let them dry, then glue them on top to finish the peak of the pyramid. Glue the decorations shown for the inner chamber. |
 |
 |
|---|
| 15. |
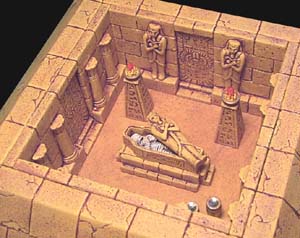
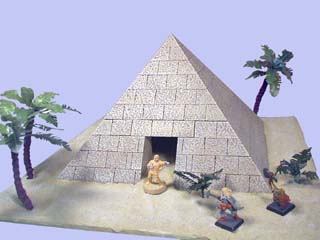
Place the pieces inside the tomb in whatever arrangement you think looks good, but do not glue them until the pyramid has been painted. Visit our Painting Instructions page for how to paint this pyramid. This was painted using yellow craft paint and brown shoe polish. |
 |
|---|
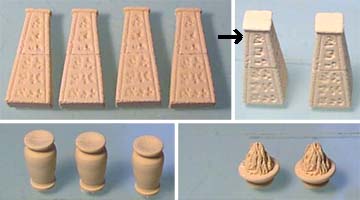
 The sarcophagus stand is made by gluing the blocks together shown in the first photo.
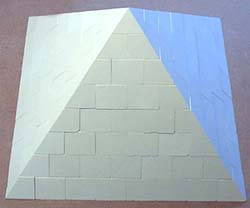
Here are a few photos of the inside of the pyramid. Mold #96 gives you all the pieces to finish the inside, except for the standing miniatures you see here. The standing miniatures are from www.crocodilegames.com. They have a very wonderful selection of Egyptian figures, both human and fantasy creatures. These miniatures were painted by Robert Sparenberg (aka Imahilus). Below is a photo of the outside of the finished pyramid. |
|
Smooth Block Challenges |
 |
Getting the smooth blocks to line up perfectly can be a challenge depending on how picky of a builder you are. For my standards, I feel the blocks line up just fine. I built the smooth pyramid with no sanding or special fitting whatsoever.
However, this section is directed to the perfectionist who wonders why gaps should exist at all. To begin with, the original block pieces are machined to exact standards and fit together with no gaps. During the molding and casting process, several things can happen.
 First of all, you are casting pieces with a flexible rubber mold. No matter how perfect the original is, the flexible rubber will move slightly when you set it on the table and pour plaster into it. Also, depending on how you scrape the mold, the blocks may vary in height slightly. Both of these factors will cause the pieces not to fit as perfectly as the originals they were made from.
Lastly, because the blocks are smooth, any defects or chips will be more noticeable. You also have to be much more careful not to chip the sharp edge of the blocks. A textured surface will hide defects and chips.
When the building is complete, all of these defects diminish when you look at the complete picture. I feel that the pyramid molds are the easiest to cast and are ideal for a beginner. They work great for school projects, and anyone 8 years old and up can easily make a pyramid any size they want.
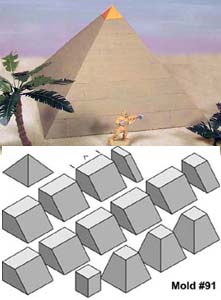
Quick Easy Pyramids
This pyramid is great for a school project! You will need to cast the #91 pyramid mold 11 times to make this model. Directions for making the base, sand and trees are on the Tips & Tricks 8 page.
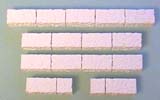
| 1. | To make the job go easier and faster, you need to pre-glue several strips of blocks together. This will ensure that your walls don't sag later on. When gluing each strip of blocks, place a straight edge behind them such as a ruler or a book. On row 1 you have 6 regular blocks and 1 corner block. On row 2 there are 5 regular blocks and 1 corner block. Each row will have one less block in it. |
|
|---|
| 2. | Here are the remaining rows to the pyramid. When they are dry, each of the four strips of blocks will be glued together to form each layer of the pyramid. |
 |
|---|
| 3. | Glue together row 1. You can use a book or square edge of some kind inside the pyramid to keep the angles at 90 degrees. Continue adding strips of blocks until you get 3 rows on the pyramid. If you want the top to come off (so you can look inside), don't glue any more rows on. |
 |
 |
|---|
| 4. | Now complete the top of the pyramid separately by gluing together rows 4, 5, 6, 7 and 8. This will set on top of the pyramid to complete it when it's dry. |
 |
|---|
| 5. | The last step is to paint the pyramid. Since this is the easy version, just use one color of paint - a dull mustard color with a touch of reddish brown to it. I painted the top block gold to add interest. Here's the finished pyramid. To see how to make the sand and trees, go to the Tips & Tricks 8 page. |
 |
|---|
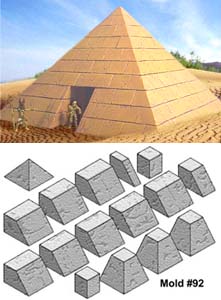
Chipped Pyramid With Simple Tomb Chamber
For this project, you will need an additional mold.
Mold #90 will give you the sloped pyramid blocks, but you will also need Mold #40 for the straight walls inside the chamber. Cast the #90 pyramid mold 18 times and cast the #40 basic block mold 6 times to build this pyramid.
If you don't want to buy an extra mold, you can still build the pyramid without the inner chamber. Your pyramid would be hollow instead of having straight walls on the inside. To do this, just follow the instructions for the Easy Pyramid in the article above. Directions for making the sand and trees are on the Tips & Tricks 8 page.
A Quick Note About These Instructions
The pyramid shown below was the first pyramid I had ever made and it uses the chipped stone blocks from mold #90. A few years after this I had made the sand blasted blocks for the pyramid at the top of this page which uses mold #92.
No one really uses these "chipped stone" instructions any more, but I'm leaving them here for reference.
Personally, most people like the look of the "sand blasted" pyramid better and use mold #92 instead. If you want to follow the instructions below for a simple pyramid with a plain inner chamber that's all sand blasted, then I would suggest getting molds #92 and #95.
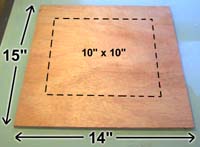
| 1. | You can download and print the plans to this pyramid from the Building Plans Page. The pyramid is pretty heavy so I decided to use plywood as the base to build it on. The base of the pyramid will be 10" x 10", so I made the plywood large enough to add a tree or two later on. |
 |
|---|
| 2. |
Here's what you need to glue for the first level. The first photo shows rows of regular blocks for the inner chamber. The second photo shows the pyramid blocks. Use a straight edge to help keep the rows straight. |
 |
|---|
 Next you will need to pre-glue several rows of blocks. You may want to pre-glue for all of the steps, then go back and assemble the whole pyramid at once.
| 3. | To keep the base of the pyramid square, you can place a book inside while gluing the sides down. Building a large corner out of Legos will also work. |
 |
|---|
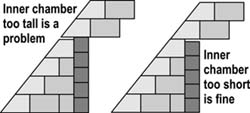
| 4. | Glue the first 2 layers of blocks for the inner chamber on their side! By now you probably know that the blocks are slightly taller than they are wide. I've made the height of 4 pyramid blocks to be the same as 5 regular blocks. However, there is a chance (depending on how you scrape the mold and stack) that the inside chamber wall would end up slightly taller than the pyramid wall. Stack the first 2 chamber layers with the blocks on their side to ensure that the chamber wall is shorter than the pyramid wall. |
 |
|---|
| 5. | Lay down and glue the blocks shown. Do not glue the blocks in green or you will need to cast extra basic blocks. The blocks shown in green allow you to space the inner chamber evenly inside the pyramid. Later on, these walls will have to match up to the sloping sides of the pyramid. |
 |
|---|
| 6. |
The second photo shows the pyramid blocks. Use a straight edge to help keep the rows straight. |
 |
|---|
 Here are the rows you want to pre-glue for the second level. The first photo shows rows of regular blocks for the inner chamber.
| 7. | Here I've added the sand texture to the base. You don't have to do this. However, if you would like to add this, it's best to do it while the pyramid isn't very tall yet. To see how to add sand, check out the Tips & Tricks 8 page. The blocks shown in green are the square blocks on the pyramid mold. These are 5/8" high and are used to support the pyramid blocks. Once again, lay the inner chamber blocks on their side so the height of the inner chamber will be slightly short. |
 |
|---|
| 8. |
The second photo shows the pyramid blocks. Use a straight edge to help keep the rows straight. |
 |
|---|
| 9. | This photo shows the third level in place. You will notice support blocks under this level as well. Simply stack 2 of the square pyramid blocks for these. This time you don't have to lay the inner chamber blocks on their side. Just stack them up normally. |
 |
|---|
| 10. |
Glue the regular blocks as shown and add them on. Now the inner chamber should stick up above the pyramid blocks slightly. |
 |
|---|
| 11. | Here are the rows you want to pre-glue for the fourth level. The first photo shows rows of regular blocks for the inner chamber. The second photo shows the pyramid blocks. |
 |
 |
|---|
| 12. | On the fourth level, the pyramid blocks and the inner chamber will meet. Hopefully, the inner chamber will be flush or slightly lower than the pyramid wall. Do not glue the blocks shown in green to the pyramid. Be sure to glue them to each other though. You need this section to be removed later so you can paint under the doorway easily. |
 |
|---|
| 13. | Glue these strips together to form the remaining levels of the pyramid. |
 |
 |
 |
|---|
| 14. | Assemble the strips to form the top of the pyramid (shown in the last photo). I painted the pyramid using the desert stone colors shown on our Desert Stone Painting Instructions page. If you would like a paint chip sample of the colors, send me a self-addressed stamped envelope with a note, or send me an e-mail when you place an order and I'll send you them with your molds. |
 
|
 |
 |
|---|
| 15. | Here's a few photos of the finished model. Directions for making the sand and trees are on the Tips & Tricks 8 page. All your pyramid needs now is some treasure and artifacts. | |
|---|---|---|
 |
 | |