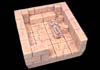
Detailed Egyptian Tomb Pieces
These tomb pieces use a variety of molds. To make all of the pieces shown you on these pages you will need mold #95, #290, #96, #97 and #99. Some pieces also use decorative floor tiles from molds #291 and #292, but these are optional because you can always use regular floor tiles instead.
To paint these pieces, please refer to the Painting Instructions page. Click on the photos below to see building instructions for each piece.
 |
 Construction Guidelines |
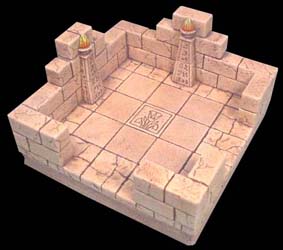
 Torch Corner |
 Mold #96 Doorway |
 Secret Mummy Door |
 Mummification Room |
 |
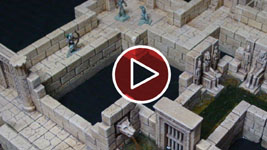
Click on the video to watch it on YouTube. This video shows the completed detailed tomb project. Every piece is shown in detail relating to the instructions below. This also includes the basic tomb pieces, shown near the end of the video. The end of the video also showns the completed tombs assembled into a tomb complex. |
 |
Construction Guidelines
There are many of you who will want to make your own custom pieces. If you follow these basic guidelines, all of your tomb pieces will line up exactly with the ones I show in this site.
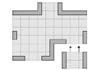
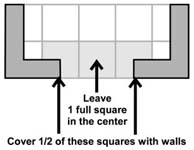
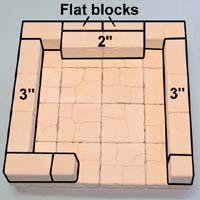
Rule #1 When you plan a new piece, lay out full square tiles to make the floor. When you place your walls on top of the floor tiles, you lose a 1/2" on each side. Three squares wide will make your average hallway. |
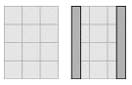 |
If you made a hallway only 2 squares wide, it wouldn't give you enough room to move your figures around and the floor tiles won't match up. Making your base grid over 3 wide is just fine. Here's an example of a grid that's 4 squares wide. |
 |
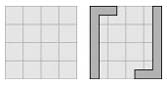 |
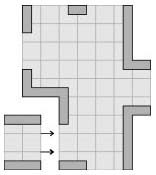
Rule #2 This will ensure that your hallway pieces will fit against your room openings correctly. This odd-looking room would still be functional because hallway pieces would fit into the openings. |
 |
 |
Rule #3
|
 |
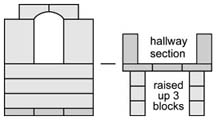 Occasionally you will want to add a higher level to your dungeon for bridges, pit traps and rivers that fall below the floor level. Landings and raised doorways will be 3 blocks above the floor tiles. Now you can use a hallway section as a bridge.
Torch Corner
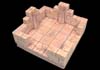
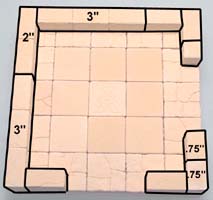
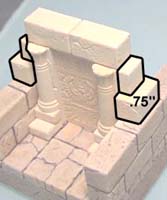
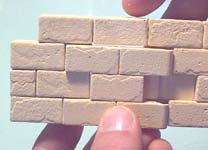
| 1. | To begin with, every tomb section shown on these pages, uses mold #95 (Egyptian Basic Block) and mold #290 (Egyptian Floor Tile Mold) as a base. Occasionally you will see some decorative floor tiles. These will be from either mold #291 or #292. You do not have to use any decorative floor tiles if you don't want to (so don't feel that you have to buy the other two floor tile molds). This first photo shows what pieces are used from mold #96 to complete this corner section. |
 |
|---|
| 2. | Glue a grid of 5 x 5 floor tiles onto a piece of foam (or whatever base material you are using). I am using a few decorative tiles from mold #292, but you can use all regular floor tiles if you do not have this mold. Glue the wall blocks around the outside as shown. |
 |
 |
|---|
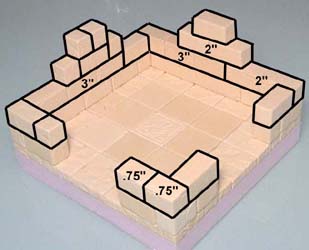
| 3. | Glue on the remaining blocks as shown. Add the torches to the tall sides and you're finished. To paint the piece refer to the Painting Instructions page. |
 |
 |
|---|
Mold #96 Doorway
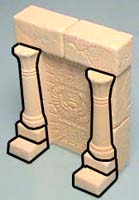
| 1. | Gather these pieces from mold #96 for the modular door. The blocks on the right are flat square blocks and 1/4" x 1/4" x 1/2" blocks. |
 |
|---|
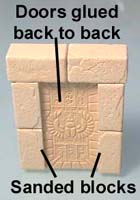
| 2. | Sand down two of the 2" long blocks. You want to do this so the doorway will easily fit into any hallway section. Glue the two decorative panels back to back and surround them with blocks as shown. Glue the pillars and small blocks onto the front of the doorway. |
 |
 |
 |
|---|
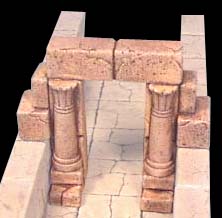
| 3. | Place it in a hallway section to make sure it fits loosely. Glue the blocks on the sides. You can make this with or without the door and place it anywhere in the tombs you like. |
 |
 |
 |
|---|
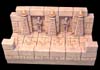
Secret Mummy Door
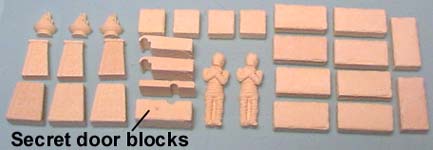
| 1. | Collect the pieces shown here from mold #96. The row of blocks near the center are the secret door blocks. For a complete explanation of how the secret doors work, please look at our Tips & Tricks 17 page. |
 |
|---|
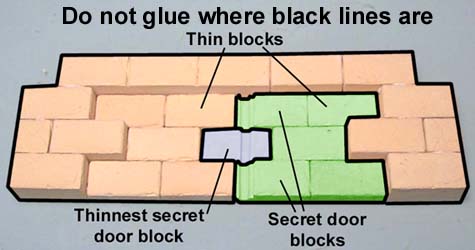
| 2. | Glue this wall section together but do not glue where the black lines are. The purple block in the center is the thinnest secret door block. The green section has 2 secret door blocks on the left side. Let the glue dry completely before you go any further. |
 |
|---|
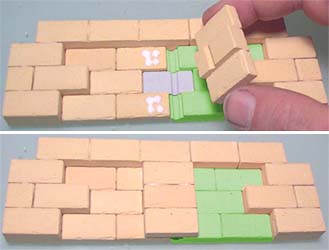
| 3. |
Once dry, glue it into the wall section, but only put glue where shown here! You do not want to glue to the colored sections underneath it. |
 |
|---|
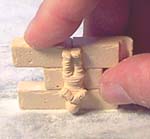
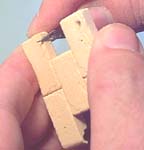
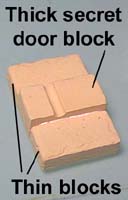 Glue together the thin wall blocks with a thick secret door block in between.
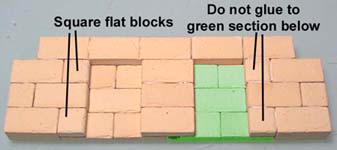
| 4. | Glue square flat blocks on each end of the recesses as shown. Do not glue these blocks to the green section beneath it. The green section is the secret door that will need to come out later on. |
 |
|---|
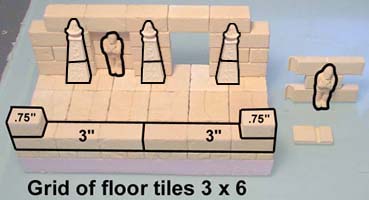
| 5. | Glue together a grid of floor tiles 3 x 6 onto foam board. Remove the secret door and the thin wall block. These were the pieces shown in purple and green above. Glue the wall section and new blocks shown on each side of the floor. Glue the mummies to the recess and secret door. |
 |
|---|
| 6. | You will need to sand down the secret door to make sure it fits loosely. I cannot stress this point enough! Sand down all the edges (except for the hook side where the rod goes). Use a hobby knife to scrape the inside edges of the door as well. |
 |
 |
|---|
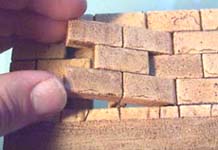
| 7. | Test fit the door by placing it in the wall. It should fit very loosely. This wall section will have a coat of varnish (or paint) on it that will add thickness to the blocks. What begins as a nice fit will bind severely when you add a coat of varnish and stain. Paint this hallway section before you glue the secret door in. |
 |
|---|
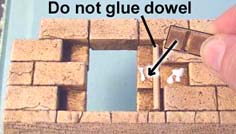
| 8. | Place an 1/8" dowel rod in the wall and glue the thin block on top of it. Do not glue the dowel in place. It must turn freely or the door will not work. |
 |
|---|
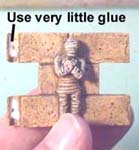
| 9. | Place a small amount of glue on the hinge part of the door and place it into the wall section. This will glue the door onto the dowel rod. |
 |
 |
|---|
| 10. | Here is the completed hallway with secret door. Be sure to not open the door too far. The secret door blocks with the "hook" on the ends are fairly delicate. These blocks will break if you open it too far. For a complete explanation of how the secret doors work, please look at our Tips & Tricks 17 page. |
 |
|---|
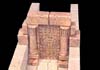
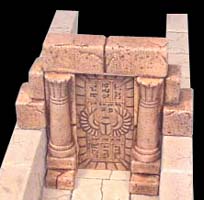
Mummification Room
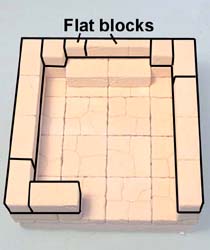
| 1. | Collect the pieces shown here from mold #96. 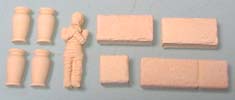 Glue down a 4 x 4 grid of floor tiles. Glue down the wall blocks shown. The two blocks on the top are flat blocks. |
 |
 |
|---|
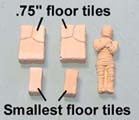
| 2. | The mummy table is made from floor tiles. Glue together two of the .75" floor tiles for the table and place two of the smallest floor tiles underneath for the legs. |
 |
 |
|---|
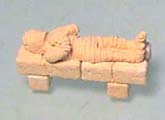
| 3. | Finish the room by gluing down the rest of the wall blocks. Once again, the flat blocks are used at the top for the thinner wall. Glue the two halves of the vases together and place them around the table. Here's a photo of the completed mummification room. |
 |
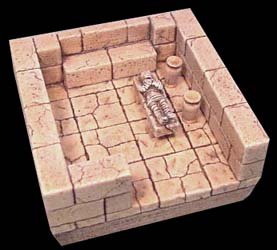 |
|---|