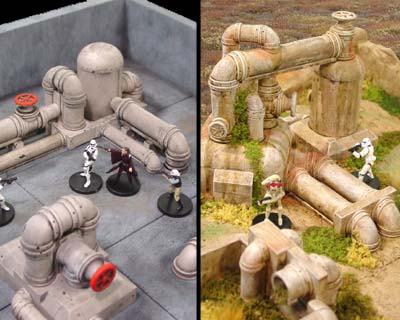
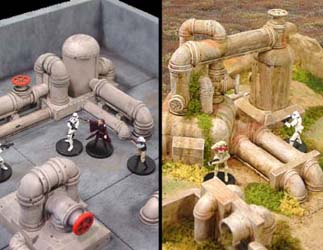
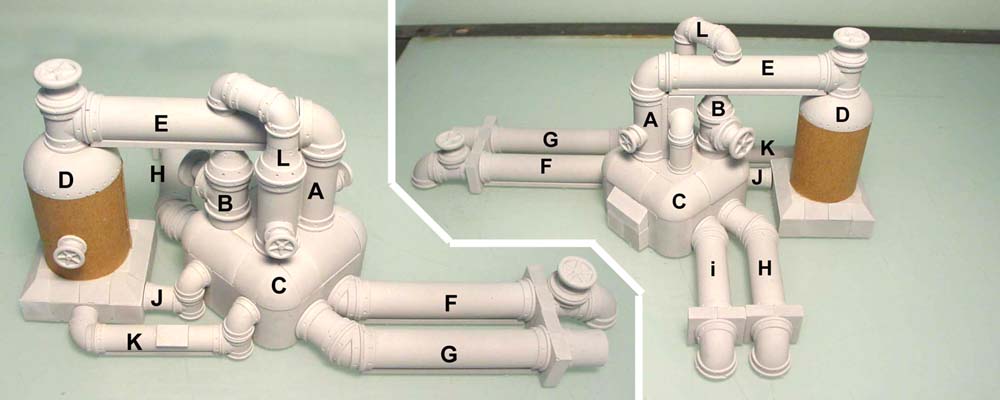
Chemical Plant Building Instructions
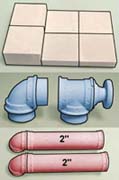
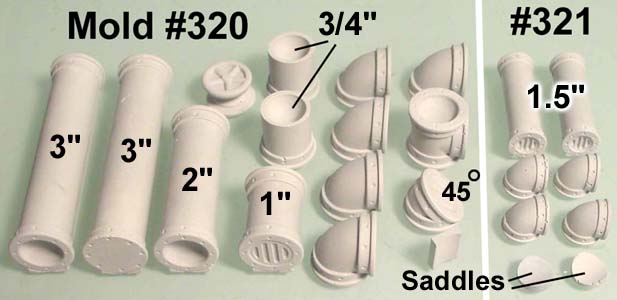
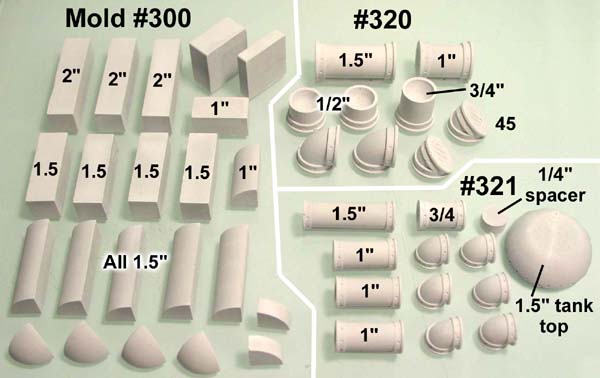
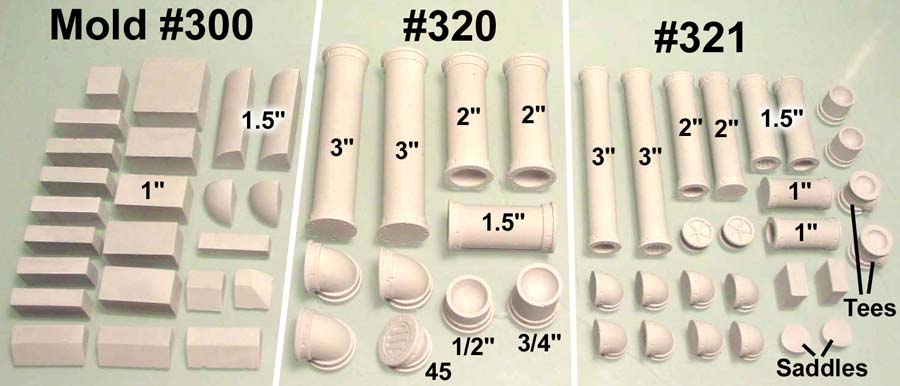
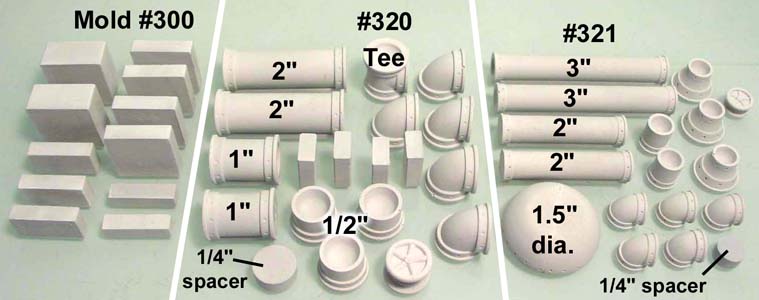
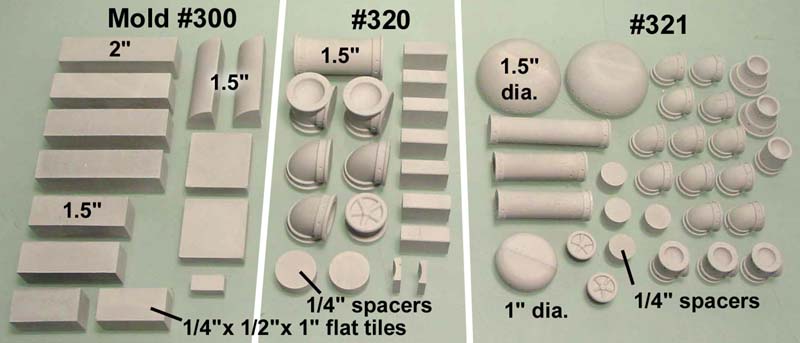
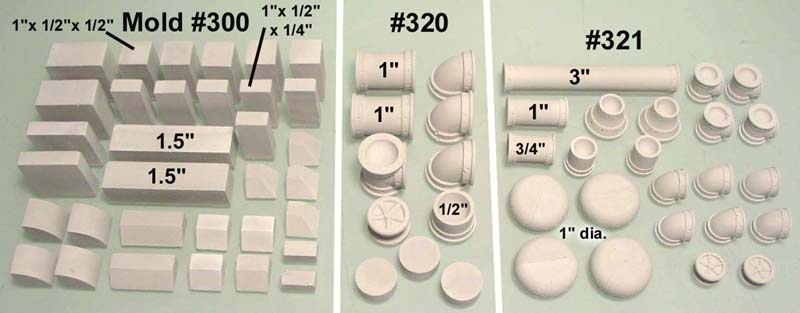
For either layout you will need to cast each of the following molds 10 times: the #300 Station Builder mold, the #320 5/8" Pipe mold, and the #321 3/8" Pipe mold. I cast these pieces out of gray dental plaster, but you can use white plaster instead if you like. The casting will take the average person about 1 full day and the pieces can be glued together in a few hours. After you complete these, feel free to make your own custom pieces any size you want. The beauty of casting pieces is that you can always make more and build whatever you want. At the end of this article are links on how to finish this layout in either the modern plant or the abandoned plant versions. |
 |
Building Tips
To build the chemical plant you will need to cast each of the following molds 10 times:
The #300 Station Builder mold, the #320 5/8" Pipe mold, and the #321 3/8" Pipe mold.
| 1. | Once cast, be sure to sort the blocks into piles. This photo shows what 10 castings of each mold will look like. You can click on the photo to see a larger version of the pieces. For these instructions, I'm going to show castings from each mold in different colors: Mold #300 pieces will appear in gray. Mold #320 pieces will appear in blue. Mold #321 pieces will appear in red. |
 |
|---|
| 2. | Be sure to check out the Tips & Tricks 26 page. This page gives you a lot of helpful tips on how to glue these pipes together accurately and how many of the pieces are used. |
 |
|---|
| 3. | I've used 2 different painting methods on these pipe pieces. The one on the left is a new chemical plant, and the right one is an old abandoned plant. For the new looking plant, do not glue the large sections together until after they are painted. These pieces will be spray painted, and getting the paint into the recesses of the pipes is difficult if you glue them all together. For the old abandoned plant, you can glue them together completely because these will be painted with a brush and reaching the recesses will not be as difficult. |
 |
|---|
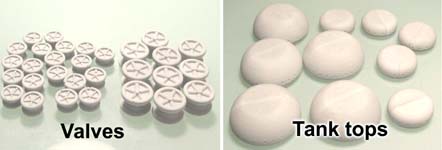
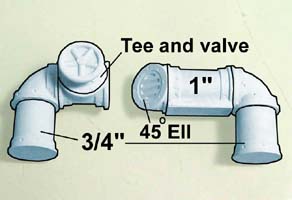
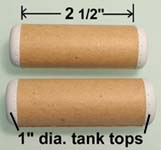
| 4. | You'll save yourself some time if you pre-glue the valve handles to the bases and also glue the tank top halves together. When finished, you'll have 20 small valves, 10 large valves, 5 large tank tops and 5 small tank tops. |
 |
|---|
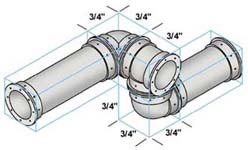
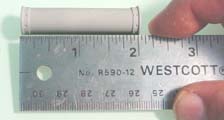
| 5. | Be sure to have a ruler on hand. Most of the pipes you will have to measure in order to be sure you are using the correct length of pipe. |
 |
|---|
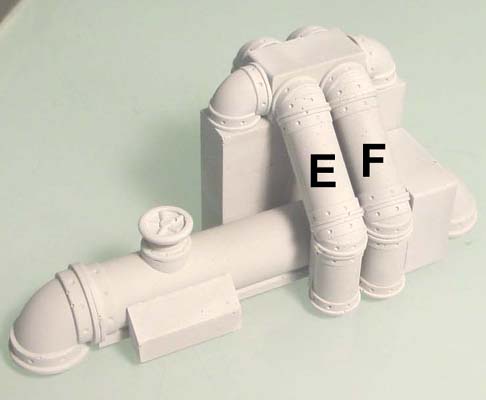
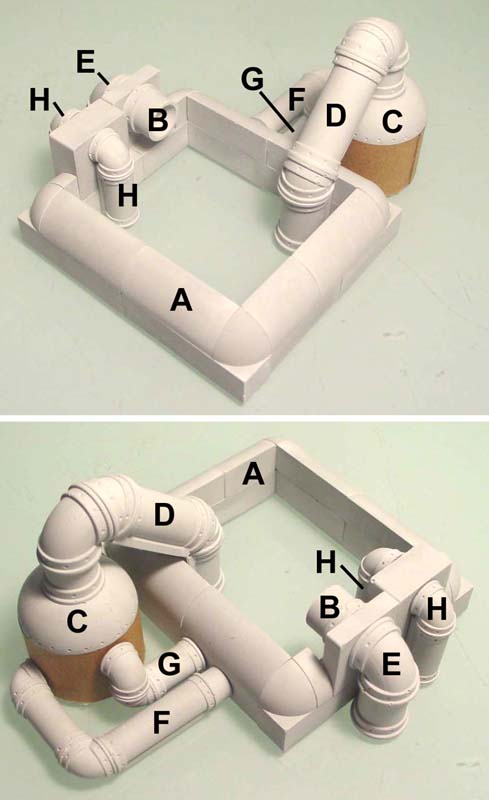
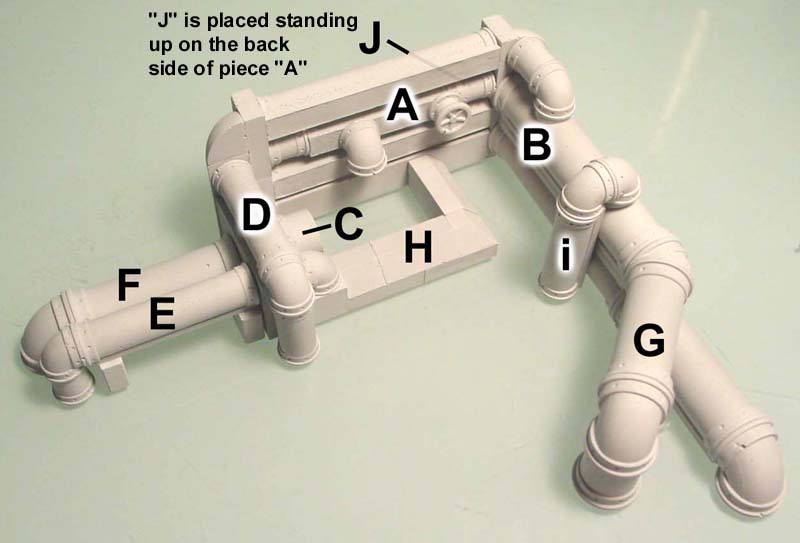
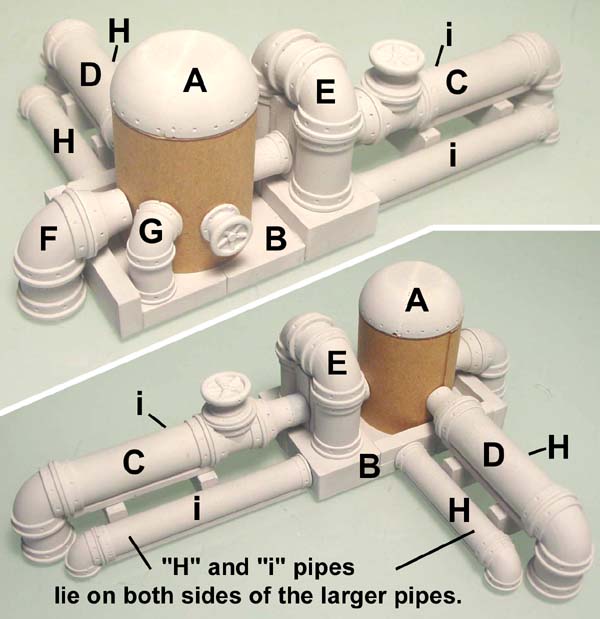
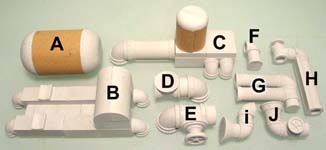
Coolant Control Station
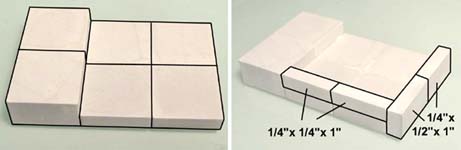
| Mold #300 pieces appear in gray. These are the basic block shapes. |
Mold #320 pieces appear in blue. These are the large pipe pieces. |
Mold #321 pieces appear in red. These are the small pipe pieces. |
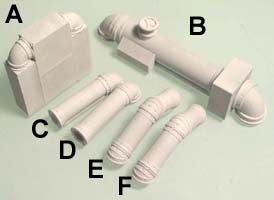
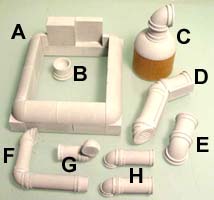
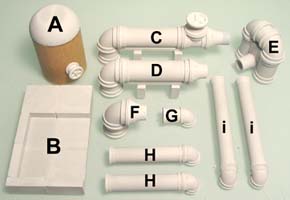
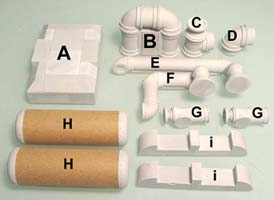
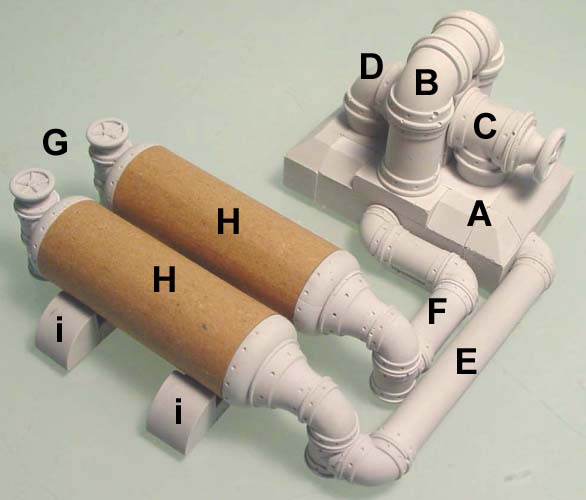
| 1. | Gather the pieces you see here. Click on the photo to see a larger version of which pieces you need. The pieces shown here are arranged by the mold they come from. Look at the mold number at the top of the photo to determine which mold each of the pieces is from. |
 |
|---|
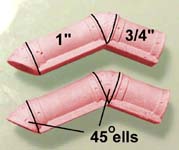
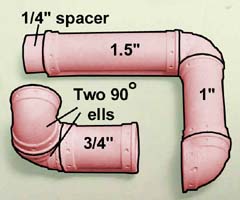
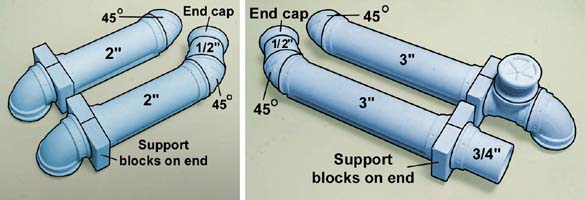
| 2. | Glue the basic blocks shown and add the small ells onto the corners. Glue two 1.5" pipes with ells on the ends. Glue two more leg sections using the 45 deg. ells in them. |
 |
 |
 |
|---|
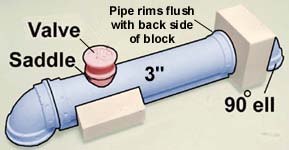
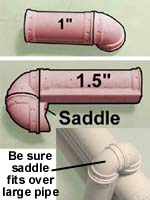
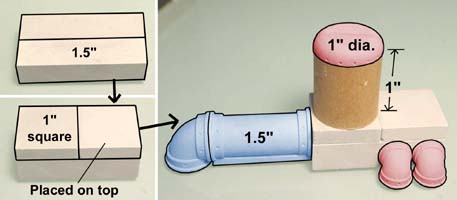
| 3. | Take a 1" square block and glue the 3" large pipe and 90 deg. ell on each side. Be sure that the pipe rims are flush with the back side of the square block. We want the whole pipe and block combination to fit against a flat surface. Add the small saddle and small valve onto the top along with the 1" long angled block on the side. |
 |
|---|
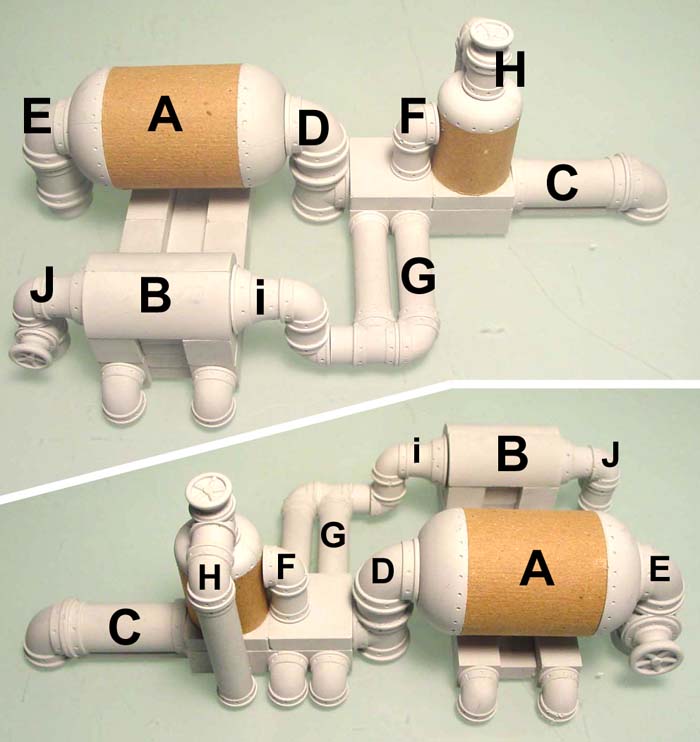
| 4. | These are all the pieces you need to assemble the first coolant control station. If you are going to spray paint the pieces, then do it now, before you glue the whole thing together. If you are going to paint them with a brush, then you can go ahead and glue the pieces together to form the completed item. |
 |
|---|
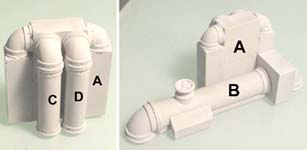
| 5. | Glue the pipe pieces onto the back side of "A". Glue the 1" square against the front side of "A" and add the two overlapping pipes to make the finished unit. |
 |
 |
|---|
Safety Shut-off
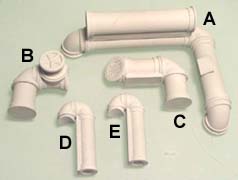
| 1. | Gather the pieces you see here. Click on the photo to see a larger version of which pieces you need. The pieces shown here are arranged by the mold they come from. Look at the mold number at the top of the photo to determine which mold each of the pieces is from. |
 |
|---|
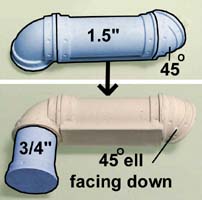
| 2. | Glue the large pipes shown. The 45 deg. ell and valve will be facing you. |
 |
 |
|---|
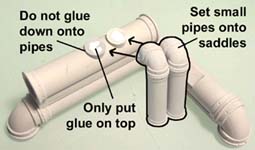
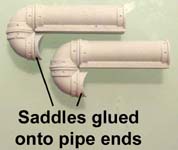
| 3. | Glue the small pipes shown. Use the steps shown to glue the saddles onto the small pipes. |
 |
 |
 |
|---|
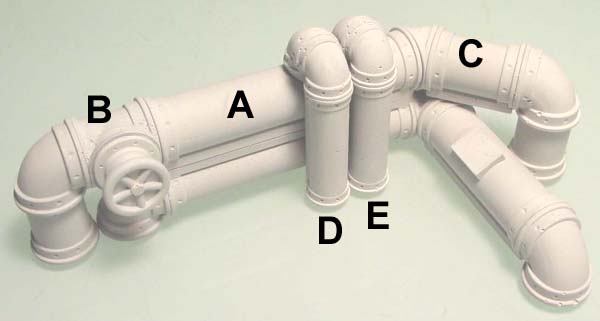
| 4. | These are all the pieces you need to assemble the safety shut-off. If you are going to spray paint the pieces, then do it now, before you glue the whole thing together. |
 |
 |
|---|
Sediment Tank
| 1. | Gather the pieces you see here. Click on the photo to see a larger version of which pieces you need. The pieces shown here are arranged by the mold they come from. Look at the mold number at the top of the photo to determine which mold each of the pieces is from. |
 |
|---|
| 2. | Glue the square blocks shown. Add the 1" squares onto the short side of the frame. Glue the rounded blocks around the top. |
 |
 |
 |
|---|
| 3. | Glue the large and small pipes shown. Make a 1" tall tank body following the tank top instructions with the other pieces glued on top. Glue the small pipe sections shown. |
 |
 |
 |
|---|
| 4. | Here's the final piece. 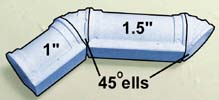 If you are going to spray paint the pieces, then do it now, before you glue the whole thing together. |
 |
 |
|---|
Testing Station
| 1. | Gather the pieces you see here. Click on the photo to see a larger version of which pieces you need. The pieces shown here are arranged by the mold they come from. Look at the mold number at the top of the photo to determine which mold each of the pieces is from. |
 |
|---|
| 2. | Glue the large and small pipes shown. Glue the small pipes onto the thick blocks. Glue the third large pipe section. |
 |
 |
 |
|---|
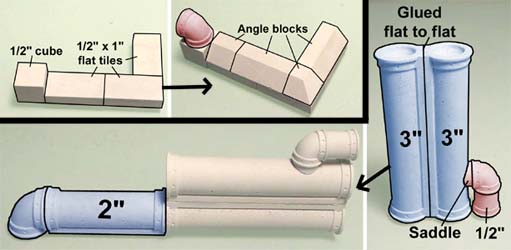
| 3. | Glue 3 flat tiles with a cube on the end. Add on the small ell along with angled blocks and an angle corner. Glue the large pipes flat to flat and add the small ell and saddle on the side. Lay it on its side and add the other large pipe and ell. |
 |
|---|
| 4. | Glue the small pipe sections. Be sure the saddle is positioned so the small pipe will hang over a large pipe. Assemble the large pipe section shown. The small pipes are glued with the scraped side resting against the table surface. |
 |
 |
|---|
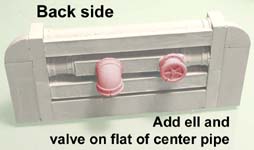
| 5. | Add the valve and blocks to the front side of the piece you had just made. Turn it around and add the ell and valve to the back side of it. |
 |
 |
|---|
| 6. | These are all the pieces you need to assemble the testing station. If you are going to spray paint the pieces, then do it now, before you glue the whole thing together. |
 |
 |
|---|
Main Pump
| 1. | Gather the pieces you see here. Click on the photo to see a larger version of which pieces you need. The pieces shown here are arranged by the mold they come from. Look at the mold number at the top of the photo to determine which mold each of the pieces is from. |
 |
|---|
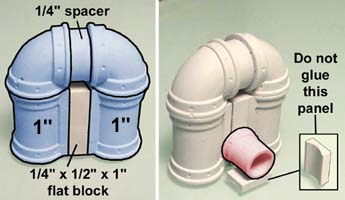
| 2. |
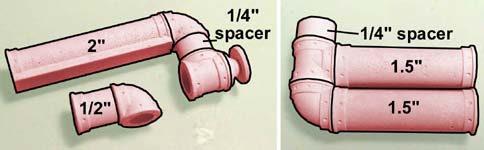
Glue the large pipes on each side of a 1" x 1/2" x 1/4" flat block. Glue a 1/4" spacer between the ells. Add the small pipe piece at the bottom. Lay down a panel piece to set the pipe on but do not glue the panel under it. The panel is there to space up the pipe piece to the correct height. |
 |
|---|
 Glue the small pipe section together.
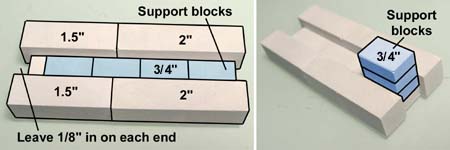
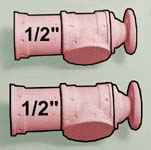
| 3. | These are two different pipe sections you need to assemble. Both use the 3/4" x 1/2" x 1/4" support blocks under them. The support blocks are turned on their side. It is very important that the support blocks are moved in 1/2" from the left edge on both pieces. These pipe sections will eventually have smaller pipes laid beside them and if you don't move the support blocks in from the edge, the smaller pipes will not lay against these properly. On the lower photo, be sure to move the support blocks in on both sides. |
 |
|---|
| 4. | This floor section is made with two 1" blocks and four 1" tiles. Then, add the skinny long blocks on the side and cap the end with the 1/2" wide tiles. |
 |
|---|
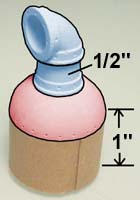
| 5. |
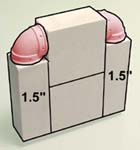
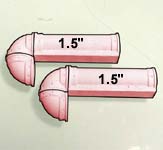
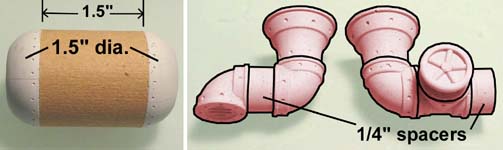
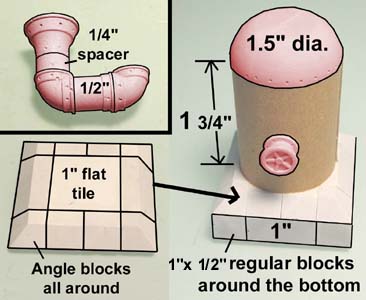
Make a 1.75" tall tank body following the tank top instructions. Be sure to use the 1.5 diameter tank top for it. |
 |
 |
|---|
 Glue the pipe sections shown.
| 6. | These are all the pieces you need to assemble the main pump. If you are going to spray paint the pieces, then do it now, before you glue the whole thing together. |
 |
 |
|---|
Compression Unit
| 1. | Gather the pieces you see here. Click on the photo to see a larger version of which pieces you need. The pieces shown here are arranged by the mold they come from. Look at the mold number at the top of the photo to determine which mold each of the pieces is from. |
 |
|---|
| 2. | Glue two 1.5" blocks side by side. Glue two 1" flat tiles on top of them. Add the large pipe and ell onto one end and add the small ells onto the side. The tank is centered on top of the left side. Follow the tank top instructions on how to make the tank. |
 |
|---|
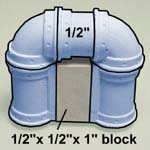
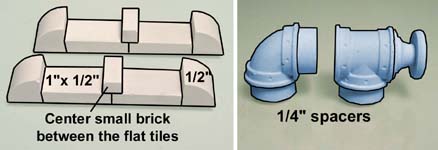
| 3. | Glue the 3/4" support blocks (plus a small brick) between the two square long pieces on each side. Be sure these are centered between the long blocks. Then add a stack of 3 additional support blocks on one end. |
 |
|---|
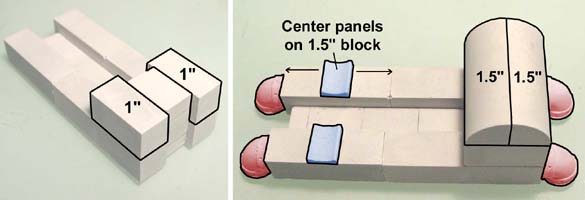
| 4. | Add 1" blocks on each side of the support blocks. Add the small ells and center the panels on the 1.5" blocks. Add the rounded 1.5" block across the top. |
 |
|---|
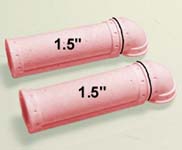
| 5. | Make a tank with two 1.5" tops on each end. Make the two pipe sections shown. The left piece should have the ells set facing opposite directions. |
 |
|---|
| 6. | Make all 3 of these pipe sections using the small pipe mold. |
 |
|---|
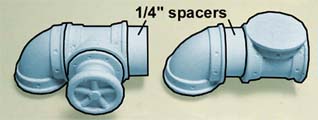
| 7. | Make these two pipe sections using the large pipe mold. Be sure that all of the ells and tees are set at right angles to each other. |
 |
|---|
| 8. | These are all the pieces. If you are going to spray paint the pieces, then do it now, before you glue the whole thing together. |
 |
 |
|---|
Mixing Unit
| 1. | Gather the pieces you see here. Click on the photo to see a larger version of which pieces you need. The pieces shown here are arranged by the mold they come from. Look at the mold number at the top of the photo to determine which mold each of the pieces is from. |
 |
|---|
| 2. | Make 2 tanks the size shown here. Follow the tank top instructions on how to make the tanks. Use the large pipe pieces to make the next piece. Glue them onto each side of a regular block and use a 1/2" pipe piece in between the top ells. |
 |
 |
|---|
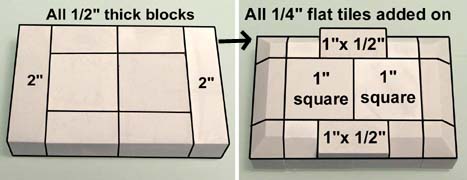
| 3. | The concrete base is made using the 1/2" thick blocks shown. Next, add the 1/4" flat tiles on top of the base. Angle blocks go half way around each side. |
 |
|---|
| 4. | Make 2 bases using the flat tiles and rounded blocks. Use the large pipe pieces to make the fittings as shown. |
 |
|---|
| 5. |
The last two pieces are kind of complicated. Be sure that all of the bends are at 90 degrees. Be aware that each piece has one tee in it. This helps the fittings stay flat against the ground. |
 |
|---|
 Glue the two tee and valve pieces on the right photo.
| 6. | These are all the pieces. If you are going to spray paint the pieces, then do it now, before you glue the whole thing together. |
 |
 |
|---|
Transfer Control Center
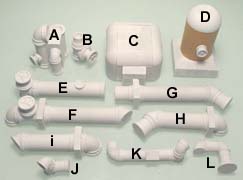
| 1. | Gather the pieces you see here. Click on the photo to see a larger version of which pieces you need. The pieces shown here are arranged by the mold they come from. Look at the mold number at the top of the photo to determine which mold each of the pieces is from. |
 |
|---|
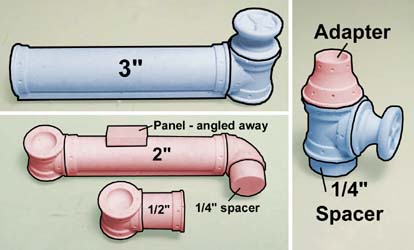
| 2. | Make the 4 pipe sections as shown. Two of the pipes have a 1/2" pipe section capped off with an end cap. Each pipe section has a 45 deg. ell facing left or right. |
 |
|---|
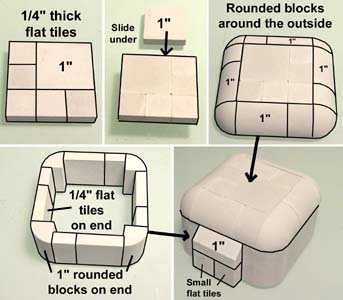
| 3. | The concrete tank is a little more complicated. Start by gluing together the 1/4" flat tiles in the first photo. Once the glue is set, slide a 1" flat tile under it, then add the rounded blocks all the way around it to make the top cap. The body of the tank is made from 1" and 1/2" flat tiles on end. The rounded corner blocks are also stood on end to make what you see in the fourth photo. Finish the tank by gluing the top onto the body of the tank. Add the 1" angle block onto the front placed on top of two 1/2" square flat tiles. |
 |
|---|
| 4. | Glue the small pipe fittings together first. It's helpful to glue the two ells on each side of the 1/2" pipe first, then glue the adapter on the end. The top of the tank base is made first. Use a 1" flat tile surrounded by angled blocks. Once dry, glue them onto a ring of 6 regular blocks. The tank uses the 1.5" diameter tank top. The paper strip for the body of the tank is 1 3/4" wide. Follow the tank top instructions on how to make the tank. |
 |
|---|
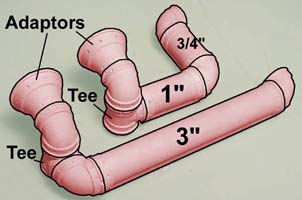
| 5. | The large pipe pieces are in blue, and the small pipe pieces are in red. Glue together the large pipe piece with tee and valve on one end. Glue together the two small pipe sections. The panel on the 2" pipe section is angled away from you slightly. Glue together the piece shown in the last photo using the large tee valve and spacer. Cap it with an adapter piece. |
 |
|---|
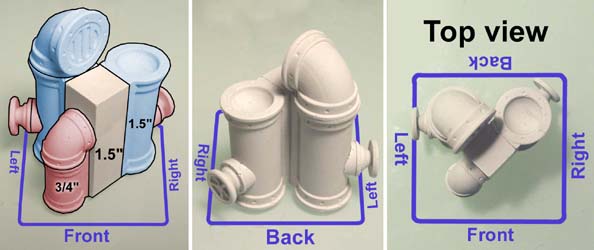
| 6. | This group of pieces is a fairly complicated one. I've put the same piece in 3 different views so you can see all around it. The small valves attach to the large pipes using the saddle piece. |
 |
|---|
| 7. | The final thing we have to do is glue the 3 final pieces in place. Start by positioning the cement tank next to the other tank with about 1/2" between them. Place the pipe assembly on top of it. |
 |
 |
|---|
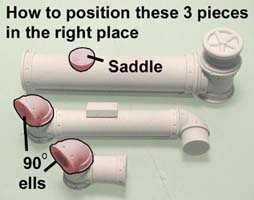
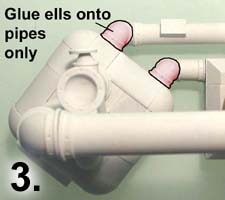
| 8. | Place the pipe sections and do not glue them. Center the large valve over the right tank. Glue the small ells onto the small pipes only. |
 |
 |
|---|
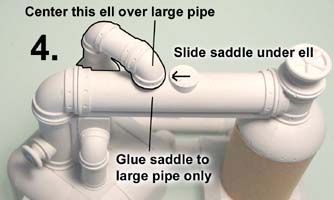
| 9. | On step 4 from the instructions above, we made a small piece with 2 small ells and an adapter. Take this piece and place it onto the large open pipe coming out of the cement tank. Center the small ell on the end of this piece over the large pipe. Do not glue it in place. Slide a saddle under this ell and glue the saddle to the large pipe only. Now we have all 3 pieces shown on step 7 completed. |
 |
|---|
| 10. | These are all the pieces. If you are going to spray paint the pieces, then do it now, before you glue the whole thing together. |
 |
 |
|---|
For instructions on how to paint and finish these pieces to make a modern chemical plant, go to our Modern Plant Finishing Instructions page.  |
For instructions on how to paint and finish these pieces to make an abandoned chemical plant, go to our Abandoned Plant Finishing Instructions page.  |