Fieldstone Octagon Tower Building Instructions
|
This page contains instructions on how to use mold #77 and mold #70 to build the fieldstone octagon tower. You will have to cast both of these molds 18 times to build the tower. This octagon tower is slightly more difficult to build than the average model. The pieces are easy to cast and the plans are easy to follow, but the difficulty lies in keeping the tower straight. To do this, be sure to print out the fieldstone octagon plans from our Building Plans Page and lay the blocks directly down on the plan when gluing. |

|
About Mold #77
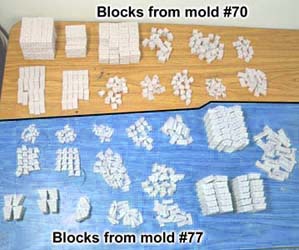
You cannot make an octagon tower using mold #77 alone. You need basic blocks from mold #70 also. Mold #70 gives you the main building blocks needed for the tower along with window arches.
Fieldstone Wall Mold #70Needed for the basic building blocks. 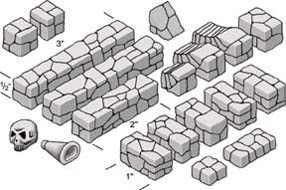
|
Fieldstone Octagon Mold #77Needed for the octagon corner blocks. 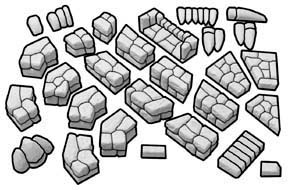
|
You need both molds to build the tower.
| 1. | Some of the pieces on mold #77 (such as the arrow slits) are difficult to cast without air bubbles in the pieces. The best method of casting these pieces is to use the "wet water" method shown on the Advanced Casting Instructions page. Using this method, most of the air bubbles will be eliminated giving you nearly perfect castings. |
 |
|---|
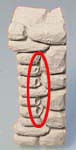
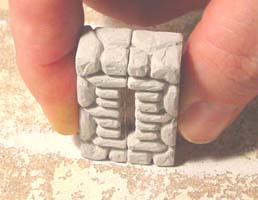
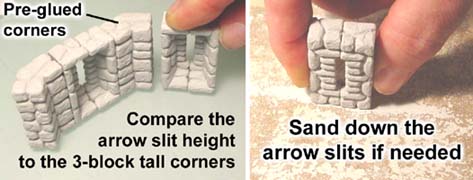
| 2. | Depending on how you scrape your molds and the casting material you use, the arrow slits may need sanding slightly. Scraping the blocks differently may result in the blocks being a different height. Since arrow slits span 3 rows of blocks, if you scrape your blocks short then the arrow slits may be too tall. I suggest gluing all of your arrow slits together first then comparing their height to a stack of 3 blocks. If they need sanding, place them on a sheet of coarse sandpaper and sand them down. |
 |
|---|
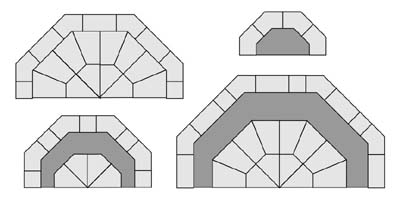
| 3. | Expander blocks are the small bricks you see on the mold. These are used to expand the floor beyond its original size. However, this can only be done in 1" even increments. The floor can continue to expand as large as you want but you must use 1" blocks between the octagon corners. Any other sized blocks will give you an odd dimension and the floor will not fill evenly. |
|---|
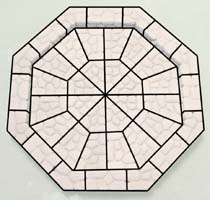
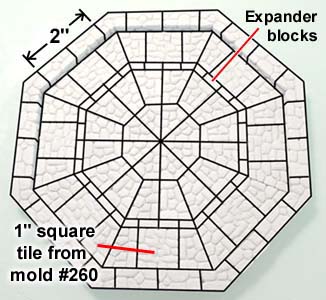
| 4. | This example shows how the expander blocks are used to expand the floor beyond its original size. This will work as long as you use 1" basic blocks between the octagon corner blocks on the sides. 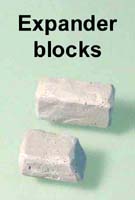
|
 |
|---|
How to Add Octagon Sections
| 1. | This mold is best used for a 5" outside diameter tower. If you use the pieces for any other size of tower, the floor tiles won't match up neatly and it won't mesh seamlessly into your existing floorplans. |
|---|
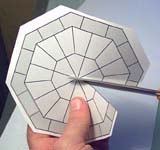
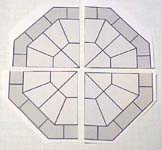
| 2. | Start by printing out a copy of the Octagon Tower building plans. You can find these on the Building Plans page. Use a pair of scissors and cut out the floorplan. If you want your octagon section to seamlessly fit into your existing floorplan, you must cut the plan as shown. As long as you have 1/4 or 1/2 pie shaped pieces, everything will work fine. |
 |
 |
|---|
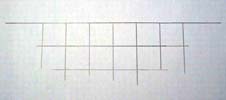
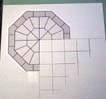
| 3. | For this first example, I'll add half of a tower onto the side of a building. Use graph paper to draw out your 1" square floor tiles first. Don't worry about the walls yet, just draw out the size of the floor. |
 |
|---|
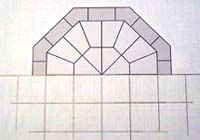
| 4. | Place 1/2 of the octagon floorplan on top of the graph paper and tape it into place. Be sure you line up the floor tiles as shown. Finally, draw the wall around the outside of the floor. Also note that one of the wall blocks on the octagon floorplan is cut in half. Continue the other half of that block when you draw out the wall around the floor. You can see from this that the octagon sections will blend seamlessly with your floor plan. |
 |
|---|---|---|
 |
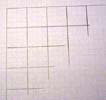
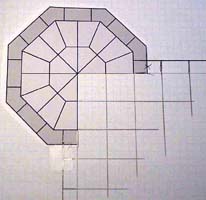
| 5. | For a corner tower, it's basically the same thing. Draw out the corner of floor you want to add the tower to. Don't add the walls yet. Cut 3/4 of the octagon floorplan and tape it on the corner. Finally, draw the outside walls around your floor. |
|
 |
|---|
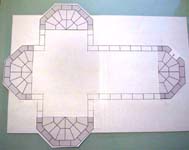
| 6. | These are examples of an inside corner, building end and a floorplan for a cathedral. |
 |
 |
 |
|---|
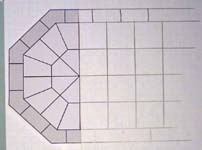
| 7. | If you make the wall using blocks other than 1" long, the floor will not fit evenly and you will have to custom cut pieces to fit. The first picture is a normal tower (with 1" blocks between the elbows). The dark gray areas represent what you would need to fill somehow. However, there are many experienced builders out there who won't have a problem with cutting floor tiles to fit. |
 |
|---|
Building Instructions
To build this octagon tower you will need to use mold #77 and mold #70. You will have to cast both of these molds 18 times to build the tower.
| 1. | You will need to cast molds #70 and #77 to build this tower. Cast each mold 18 times. Blocks shown in blue will be from the octagon mold #77.
Just save them for your next project (or use them to add a side building to the tower). |
 |
|---|
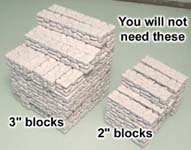 Sadly, you will not be needing the 3" and 2" long blocks from mold
 | 2. | Be sure to print out the building plans. You will find them on our Building Plans Page labeled "Fieldstone Octagon Tower". These will be very helpful in getting your octagon tower to be the correct shape. We will lay the blocks directly on the plan when gluing them. |
 |
|---|
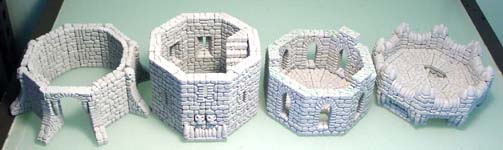
Pre-Gluing Sections
These next few photos will show sections that we will pre-glue. By gluing these sections together first, it will save you a lot of time during the whole building process. Further down the page I will show each row glued in its proper order.
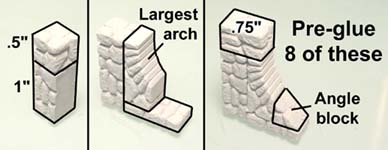
| 3. | Pre-glue the pieces shown here to form the legs. The blocks for these legs are from mold #70. You will need to pre-glue 8 of these legs. |
 |
|---|
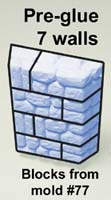
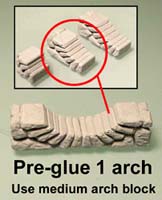
| 4. | Pre-glue 7 wall sections. These pieces (shown in blue) are from the octagon mold #77. Also glue one arch. Use the medium arch blocks from mold #70. This will end up going over the doorway. |
 |
 |
|---|
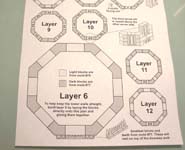
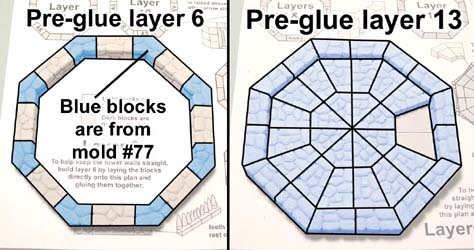
| 5. | Pre-glue layer 6 by setting the blocks directly on the plan. You will find the plans on our Building Plans Page labeled "Fieldstone Octagon Tower". The blue blocks are from mold #77. The gray blocks are from mold #70 Pre-glue layer 13. This layer has the floor tiles in it. All of these blocks are from mold #77. |
 |
|---|
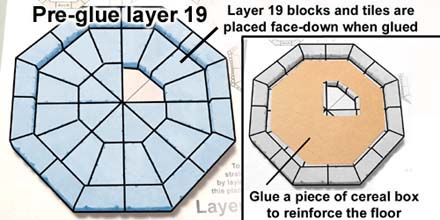
| 6. | Pre-glue layer 19 by setting the blocks directly on the plan upside down. This will make the top of the floor flush with the top of the blocks. To reinforce the floor, I've glued a piece of cereal box to the bottom of it. Feel free to do the same thing with layer 13 once it's dry. |
 |
|---|
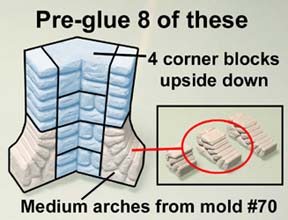
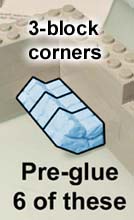
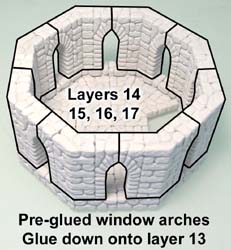
| 7. | Pre-glue 8 window arches upside down. These are using the medium arch from mold #70, the corner blocks and trim blocks from mold #77. Pre-glue 6 corner sections made from 3 corner blocks each from mold #77. We'll refer to them as 3-block corner pieces. |
 |
 |
|---|
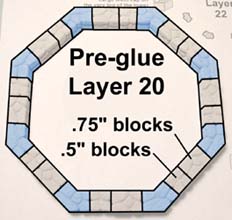
| 8. | Pre-glue layer 20. This layer uses the 1/2" and 3/4" blocks from mold #70 to make this ring a little larger in diameter than the rest.
Be sure to let all of these pre-glued sections dry completely before handling them. Also try to make sure the floor and wall sections are not glued down to the paper plan. |
 |
|---|
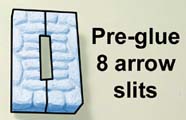 Pre-glue 8 arrow slits.
Assembling the Tower
Before you assemble the tower, be sure that you have pre-glued all of the sections shown above. The following instructions will not show the block-by-block makeup of each pre-glued section.
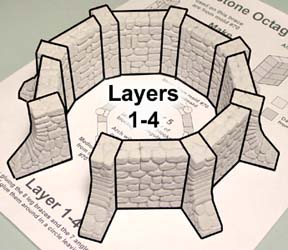
| 9. | Glue together the pre-glued legs and wall sections by setting them directly on the paper building plan. You will find the plans on our Building Plans Page labeled "Fieldstone Octagon Tower". On top of this layer you want to glue some skulls and small blocks on top of each leg (photo below). Make sure the smooth side of the block is facing against the skull back. |
 |
|---|
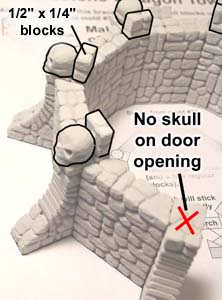
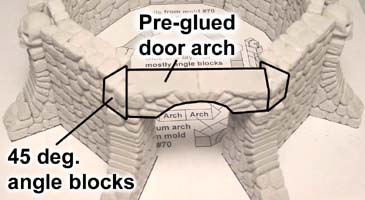
| 10. | Do not glue the skulls and blocks on each side of the door opening. We need to put the doorway arch there. Fill in the row between the skulls with angled blocks from mold #77. Near the door you'll need a 1" long and a square block. |
 |
 |
|---|
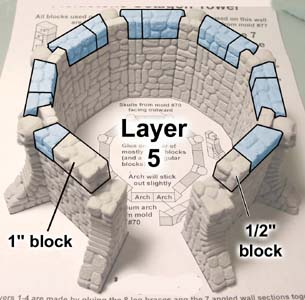
| 11. | We'll finish layer 5 by gluing the medium arch and 45 degree angle blocks on top of the doorway. These blocks are from mold #70. You'll notice that the doorway arch sticks out a bit. It's supposed to stick out around 1/8" resting on the protruding leg below it. Be sure the textured part of the angle block is facing outward. |
 |
|---|
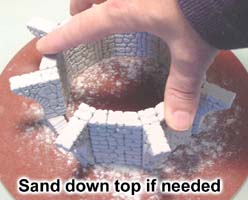
| 12. | Allow this base to dry. Afterwards, turn it upside down on some coarse sandpaper and sand the top flat if it's uneven. While upside down, glue in the long teeth on each side of the doorway. |
 |
 |
|---|
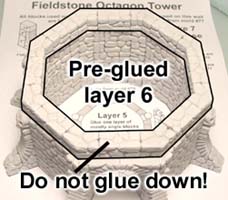
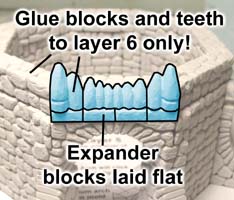
| 13. | Set your pre-glued layer 6 down onto the base. Do not glue it down! Now glue the expander blocks and teeth onto layer 6 only! Do not glue them down to the base. You will notice that layer 6 is slightly smaller than the base. |
 |
 |
|---|
| 14. | After the front teeth are glued on, remove layer 6 from on top of the base. From this point we will be building on top of layer 6. Glue a row of angle blocks to form layer 7. The next 3 layers will be made of arrow slits most of the way around. |
 |
|---|
| 15. | Gather your pre-glued arrow slits and 3-block corner pieces. Compare the height of your arrow slits to the corner pieces. If the arrow slits are taller (depending on how you scraped your molds), you may need to sand them down a little. |
 |
|---|
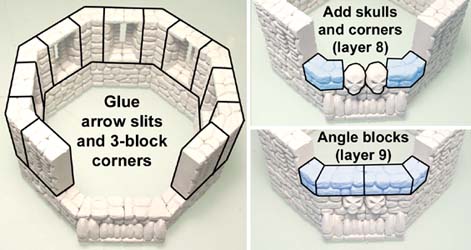
| 16. | Glue the pre-glued arrow slits and 3-block corner pieces on top of layer 7, leaving a gap in the front. Fill this gap (layer 8) with corner blocks and two skulls facing out. The skulls look better if they are looking off to the sides slightly. Add angle blocks on top of the skulls to finish layer 9. |
 |
|---|
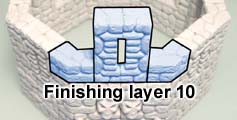
| 17. | Finish layer 10 by adding corner blocks and an arrow slit in the front. This will use up the last of the 8 pre-glued arrow slits. |
 |
|---|
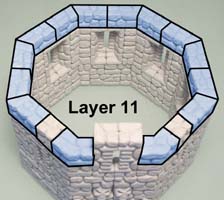
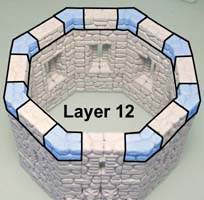
| 18. | Finish layers 11 and 12 by gluing down the rows of blocks shown. Blocks shown in blue are from mold #77. Blocks shown in gray are from mold #70. |
 |
 |
|---|
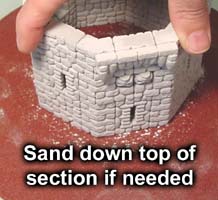
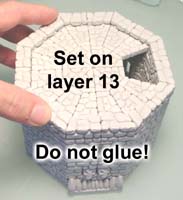
| 19. | This section of the tower is finished. To make sure it will set flat against the next part of the tower, you can sand the top using some coarse sandpaper. Now you can set your pre-glued layer 13 on top of this section. Do not glue it but just check to see how well it fits on top. The section below may need more sanding if it fits unevenly. |
 |
 |
|---|
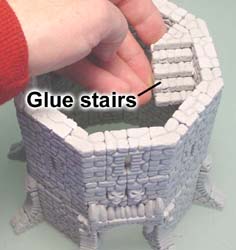
| 20. |
Glue the tiles together and let them dry. Then glue them on the inside of the tower under the hole in the floor located on layer 13. These stairs will not go all the way to the ground, but will go far enough to look like there is a complete stairway going down. |
 |
|---|
 Now we'll make a stair section from the flat tiles on mold
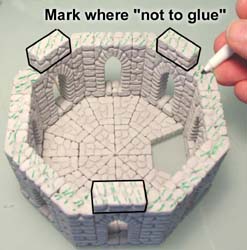
 | 21. | Glue the arch pieces on top of layer 13. Now glue the 3 blocks shown. Mark the whole top with a marker. These markings will tell you where not to glue later on. We want the tower to come apart at this division for easy painting and access to the second floor. |
 |
 |
|---|
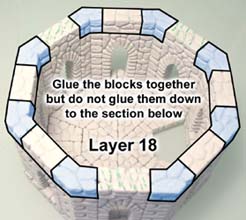
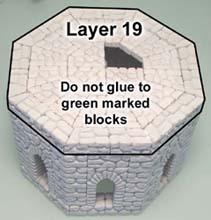
| 22. | Glue the remaining pieces to each other only! Do not glue them to the green marked areas. Glue layer 19 on top, but do not glue it to the 3 green marked blocks. Once dry, this should allow the very top section to be removed from the window arch section. |
 |
 |
|---|
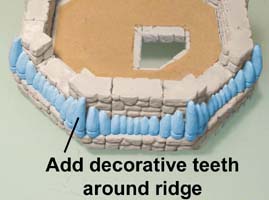
| 23. | Take the pre-glued layer 20 and glue it down. Center it as best you can. Flip the whole thing over and glue the decorative teeth around the outside of the edge. |
 |
 |
|---|
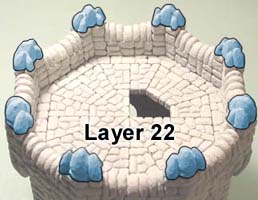
| 24. | The final rows use the large decorative teeth.
The last top layer is made using the largest teeth placed on top of the corner blocks. |
 |
|---|
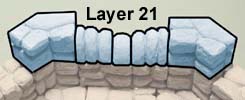 Layer 21 is made using the corner blocks filled in between with the rounded teeth. Do this all the way around.
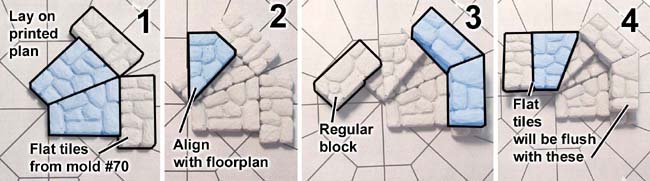
| 25. | Now we'll make a stairway for the very top platform of the tower. The stairway will not go all the way down, so we just need to make enough steps to look like they go all the way down. You will lay these blocks down on the printed plan which has the floor shown on it.
|
|---|---|
 |
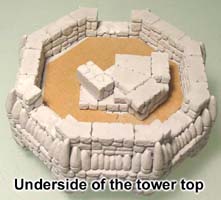
| 26. | This step section is glued under the tower top to give the appearance of steps going down. The animation helps to show how the steps are positioned. The last photo shows what the underside of the tower top will look like with the steps added. |
 |
 |
|---|
| 27. | Don't glue any of these sections together until you paint them first. I will paint them using the Earth Tone Painting Instructions. |
 |
|---|
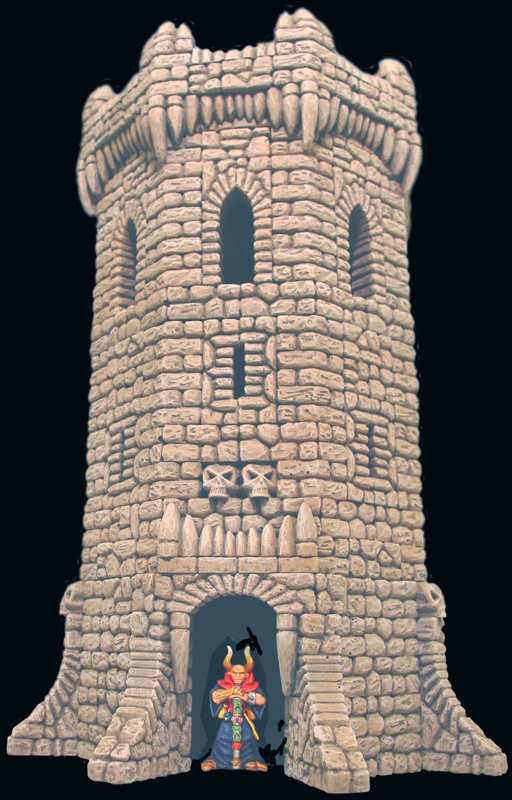
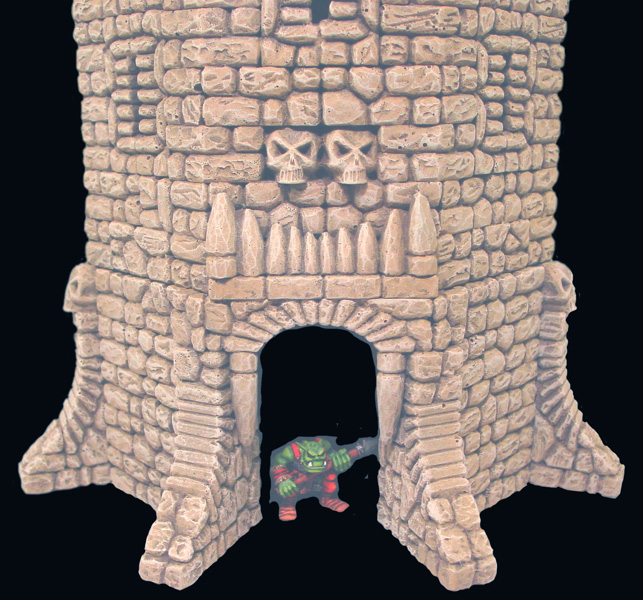
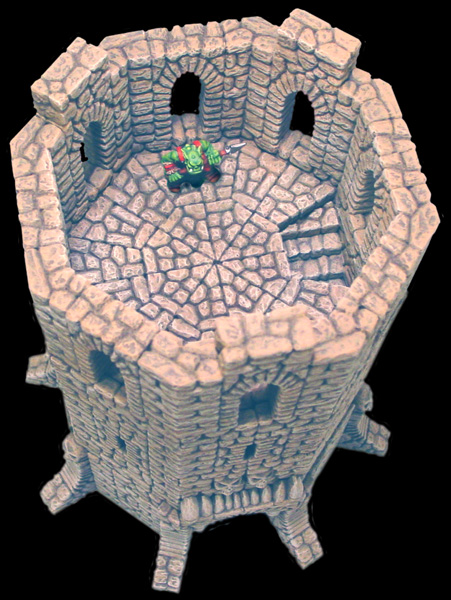
Here are a few photos of the finished tower. I glued the whole tower together except for the very top section. This allows you to take the top off and see the window arch room. No one will end up seeing that the stairs don't go all the way down. I thought this would make a great orc tower. The orc figures are from Games Workshop(TM). Click on the photos for a larger view. |
 | |
 |
 | |