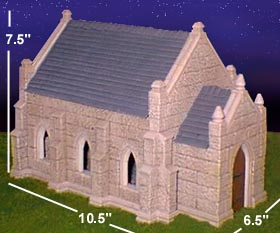
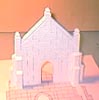
The Gothic Church |
|
Mold #54 does not contain all of the blocks to build this church.
You will need extra regular blocks (1/2" x 1/2" x 1") and square blocks (1/2" x 1/2" x 1/2"). These blocks can be found on any of these molds: Mold #40 (Basic Block Mold), #50 (Wizard's Tower), or on #51 (Dragon's Inn).
Most of my customers already have molds with enough basic blocks and didn't want me to use up valuable space on this mold for more of the same. If this is your first model, you will need to buy one of the molds listed above.
Casting Tips
For complete instructions on pouring the blocks, see the Casting Instructions Page. Below are a few tips to help you with the Gothic Church mold.
The gothic church has lots of small ornate pieces. When casting these pieces, the following tips will help you eliminate air bubbles.
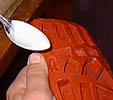
 The easiest way to get rid of air bubbles is to use the Wet Water method. If you use this method, then the other tips shown here aren't needed.
If you can't use the "wet water" method, then try to pour the smallest pieces first. When pouring plaster into small pieces with deep recesses, flex the mold to stretch out the area. This will leave fewer narrow crevices to form air bubbles.
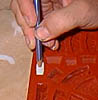
Also, after you pour the plaster in, use a toothpick or dull pencil and trace around the shape to release air bubbles. Mixing the plaster slightly thinner will also help. Be sure to tap the mold often to release air bubbles.
If small defects occur, don't worry; real stone buildings also have defects. Besides, when you put the whole building together you'll be so impressed with the result that you won't be able to find them anyway!
Building Instructions
Mold #54 does not contain all of the blocks to build this church. You will need 131 extra regular blocks and 54 extra square blocks. To make this model, fill the church mold 12 times and fill mold #40 (regular block mold) 12 times.
Be sure the blocks are completely dry before gluing them together. For detailed instructions on pouring the blocks, see the Casting Instructions Page.
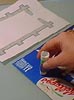
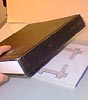
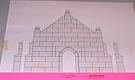
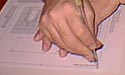
| 1. | You can download the plans shown here from the Building Plans Page and print them out yourself. If you're making your own design, draw it on graph paper and use it as your floorplan. Cut a side from a cereal box and glue the floorplan to it. For this example I'm using a glue stick. Place a heavy book on the plan to keep it flat while it dries. |
 |
 |
|---|
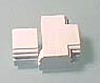
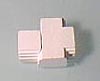
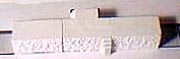
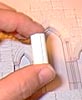
| 2. | You'll notice an odd looking block with the base trim pieces. I've designed this block to act as a corner piece and a tee piece depending on how you trim it. When forming a corner, notice that another trim piece doesn't fit against it well. Miter the edge of the trim piece so it fits together. |
 |
 |
|---|---|---|---|
 | |||
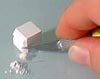
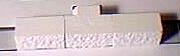
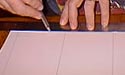
| 3. | We'll also use this same piece as a tee. When placed along the wall, you notice part of the block sticking out. Using a hobby knife, trim off the excess. Using the point of the knife, chip away at the flat surface to texture it. When placed back with the others, you wouldn't know the piece had been trimmed. |
 | |
|---|---|---|---|
 |
 | ||
 | |||
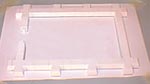
| 4. | Set the base trim pieces down and glue them together. For this example, I'm not gluing them to the floorplan. I want to paint the floor later without the blocks getting in the way. I've used a straight edge taped to the floorplan to keep the blocks straight. |
|
|---|---|---|
 |
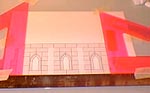
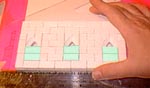
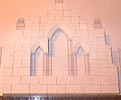
| 5. | Next we'll work on the 2 sides of the church. Here I've taped the wall plan down to the table and taped straight edges on 3 sides of the plan. Lay the blocks down on the plan to make sure they all fit together nicely. You may have to lightly sand a block or two. Glue the blocks together but don't glue them to the paper! Do not glue the blocks shown in green! These blocks are used to hold the place where the windows will go. |
 |
|---|---|---|
 |
| 6. | When you remove the blocks from the windows you will be able to place smooth trim on the insides. Assemble the decorative braces and glue them to the wall. You will assemble 2 of these wall sections, one for each side of the church. |
 |
|---|---|---|
 |
| 7. | We'll assemble the door side of the church in the same manner. Be sure to place blocks temporarily in the open doorway to keep the door opening straight. |
 |
|---|
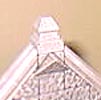
| 8. | The smooth trim that goes along the roof line will need to be mitered to fit correctly. Use a piece of sandpaper to bevel the edge at a 45 degree angle. Glue the smooth trim along the roofline. When you get to the peak of the roof, use a hobby knife to miter the top edge as well. |
 |
 |
|---|---|---|---|
 |
 |
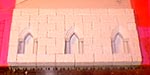
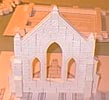
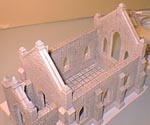
| 9. | The finished wall should look something like this. The little brace shown is used to hold the peak of the roof in the right place. Simply sand down one of the angled roof pieces to make this. |
 |
 |
|---|
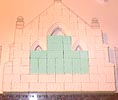
| 10. | The window side of the church is assembled the same way as the others. Do not glue the blocks shown in green. They are there to hold the place for the windows. |
 |
 |
|---|
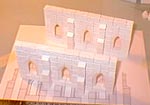
| 11. | Make the pillars by gluing two halves of the smooth window trim together. The finished window side of the church should look like this. |
 |
 |
|---|
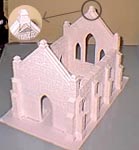
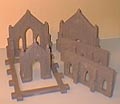
| 12. | Assemble all of the finished sections on top of the base and see what you've got. By the way, don't glue them together at this point! We still have to paint the model, which is much easier to do in individual sections. Don't forget to glue an angled piece for the peak of the roof. |
 |
|---|
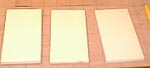
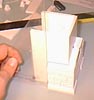
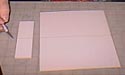
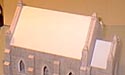
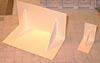
| 13. | You don't have to build this form! If you do, it will help the walls line up nice and straight. You can use cardboard, matt board, or foamboard (my favorite). For this form, cut 3 pieces 2 1/2" x 5". Glue them together and add a few angle braces to keep the sides at right angles. Be sure the front face measures 2 1/2" wide when you're done. |
 | ||
|---|---|---|---|---|
 | ||||
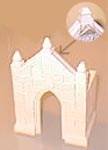
| 14. | Make sure the back edge of the wall is straight. It will end up butting against the church. Once again, don't glue the blocks shown in green. |
 |
 |
|---|
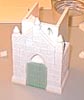
| 15. | Remove the door blocks and glue on the smooth trim. Don't forget to place a roof angle on the backside of this piece as well. When you set the foyer in place, the church structure is complete! Do not glue it together until after it's painted! |
 |
 |
|---|
Painting Instructions
For information on types of paint and supplies you will need, refer to the Painting Instructions.
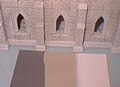
For the gothic church I wanted to match a stone color found on actual churches and cathedrals. I looked through several books until I found the color I liked which was a gray-brown with a little tan added.
To mix the color, I used half straight gray (mixture of black & white) and half brown. The lighter colors were light gray mixed with tan (about half and half). For an exact recipe of what I use, look at the Earth Tone Painting Instructions.
| 1. | For complete instructions on painting, visit the Painting Instructions page. What's shown here is a short, quick version. The first coat of paint is the darkest color. Be sure to mix this first coat thin (about the consistency of milk). If you're using house paint, it's about 1 cup paint to 1/4 cup water. If you're using a tube of paint, add more water. Using a 1 inch brush, drench the paint on so it runs into all the cracks. If you used water based glue be careful! The paint will soften the glue. Once the first coat is on and dry, you don't have to worry about the glue softening again. |
 |
|---|---|---|
 |
| 2. | Now it's time for the medium brown gray. If it's the consistency of house paint, do not thin it down! Using a dry brush, dip it in the paint and try to wipe all of the paint off onto a paper towel. Brush over the surface with a light to medium pressure. This is called dry-brushing. The paint will stick to the highlights of the stone and all of the texture will show up. It works the best if you have almost no paint in the brush and use more strokes to cover the area. The last coat is light tan gray (4 shades lighter than the medium color). For this coat, wipe the brush completely dry and barely touch the surface when you brush over it. |
 |
|---|---|---|
 |
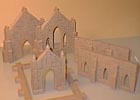
| 3. | Here's the completed structure glued together. For this example, the floor tiles were painted on the floorplan. If you want to see how it's done, check out the Tips & Tricks page. If you have a floor tile mold, you could tile the floor, or just paint it a solid color of tan gray. |
 |
|---|
Making The Roof
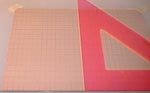
| 1. | When you buy the gothic church mold, one of the sheets will have a roof template. Lay this down on top of some thick card stock or matt board. On the template, small circles are marked. Using a ballpoint pen, press hard on the marks to leave a depression on the card. Remove the plan. Using a ruler and ink pen, connect the dots to form the two roof sections and their center fold marks. |
 |
|---|---|---|
 |
| 2. | Using a hobby knife, cut the roof sections out. Score the crease lines so the roof sections will fold cleanly. Lay the sections over the model to make sure they fit correctly. Slight trimming may be necessary. |
 |
|---|---|---|
 |
| 3. | Use some scraps of matt board cut at right angles to brace up the inside of both roof sections and glue into place. |
 |
|---|
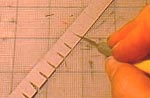
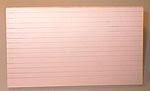
| 4. | For a different way to make a shingled roof, check out the Tips & Tricks page. Cut out a large section of cereal box. Draw a grid on it using 1/2" spaced horizontal lines, and 3/8" spaced vertical lines. The larger you draw your grid, the larger the shingles will be (and the less work it takes). I'm using a small grid because it's more in scale with the church. Cut the sheet into strips (vertically). Using a hobby knife, cut gaps in the strips as shown. The gaps should reach about halfway up. |
 |
|---|---|---|
 |
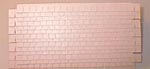
| 5. | I've drawn lines 1/4" apart on the roof. Starting at the bottom, start gluing strips down. Stagger the gaps between the strips and make the shingle strips overlap each other all the way up the roof. |
 |
|---|---|---|
 |
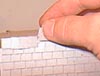
| 6. | For the peak of the roof, cut small pieces, fold them over, and glue them down. Be sure you overlap the strips slightly. When finished with the peak, trim the excess shingles hanging over the sides of the roof. |
 |
|---|
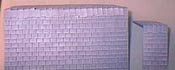
| 7. | To paint the roof, I used 3 shades of blue gray. These are applied in exactly the same way as you painted the rest of the model; a layer of thinned dark gray paint, a dry brushed layer of medium gray, and a lightly brushed layer of light gray. |
 |
|---|
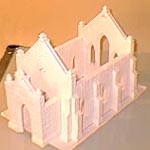
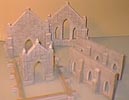
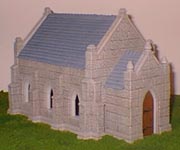
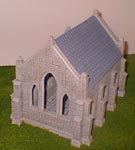
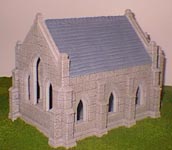
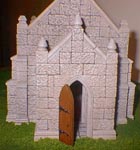
| 8. | Here are some pics of the finished church from different angles. Keep in mind that you can build anything you want using these gothic styled blocks. |
 |
 | |
|---|---|---|---|---|
 |
 | |||