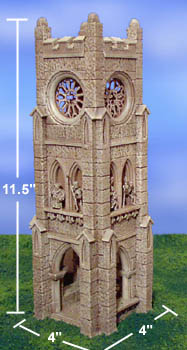
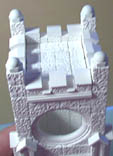
The Bell Tower
|
Mold #55 does not contain all of the blocks to build this tower. You will need extra regular blocks (1/2" x 1/2" x 1") and square blocks (1/2" x 1/2" x 1/2"). These blocks can be found on any of these molds: Mold #40 (Basic Block Mold), #50 (Wizard's Tower), or on #51 (Dragon's Inn). Most of my customers already have molds with enough basic blocks and didn't want me to use up valuable space on this mold for more of the same. If this is your first model, you will need to buy one of the molds listed above. |
|
Casting Tips
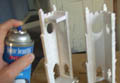
For this mold, I suggest using harder material than regular plaster, such as hydrocal, hydrostone or dental plaster when casting blocks in this mold! For these examples, I'm using Die-Keen dental plaster. I've listed a place you can buy Die-Keen from, as well as complete casting instructions on the Casting Instructions Page.
You will get the best results from using the wet water method found on the "Advanced Casting Instructions" page. If you follow these, most of the pieces will come out perfectly. Below are a few tips to help you with the Bell Tower if you still have problems casting some of the pieces.
|
|
|
|
|
|
|
|
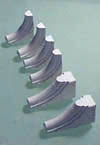
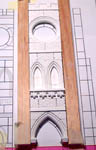
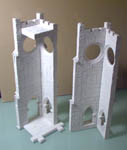
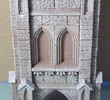
 This piece is the most difficult to remove the air bubbles from. From this photo you can see the air bubbles along the bottom edge.
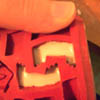 The best way to remove air bubbles is to spread the mold wide open when pouring the plaster in. Only fill the pocket 1/4 full and tap the mold sharply.
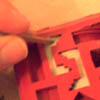 Next take a toothpick and poke it down into the recesses and work it around. You should see an air bubble or two come to the surface. Fill the pocket up the rest of the way.
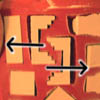 After the plaster sets (about 25 minutes) carefully spread the mold in the direction of the arrows, otherwise you will break the pieces. These pieces are so small and delicate, I hesitate to thin the plaster down any. Using a tougher material like hydrocal or dental plaster also works well, but is more difficult to find.
If small defects do occur, don't worry; real stone buildings also have defects. Besides, when you put the whole building together you'll be so impressed with the result that you won't be able to find them anyway!
Building Instructions
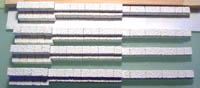
Mold #55 does not contain all of the blocks to build this tower. You will need 84 extra regular blocks and 44 extra square blocks. To make this model, fill the tower mold 16 times and fill mold #40 (regular block mold) 10 times.
Be sure the blocks are completely dry before gluing them together. For detailed instructions on pouring the blocks, see the Casting Instructions Page.
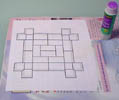
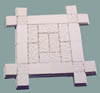
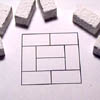
| 1. | You can download the plans shown here from the Building Plans Page and print them out yourself. If you're making your own design, draw it on graph paper and use it as your floorplan. Cut a side from a cereal box and glue the floorplan to it. For this example I'm using a glue stick. Place a heavy book on the plan to keep it flat. When it dries, trim out the floor plan with a pair of scissors or hobby knife. |
 |
|---|---|---|
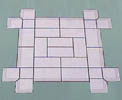 |
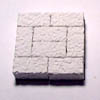
| 2. | Glue the blocks directly down to the floorplan. You will need to trim the corners of the decorative blocks at a 45 degree angle on the corners to fit together properly. A hobby knife will easily trim it. At this point, all of the floor blocks are glued down. |
 |
 |
|---|
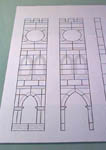
| 3. | Tape the wall plan down to the table. The sides of the walls need to be kept straight, so tape a straight edge (ruler, piece of wood, edge of a book) along both sides. Be sure to tape a straight edge along the bottom also. I usually lay out all of the blocks first to see how well they fit. If any blocks are too wide, you can sand them to fit better. |
 |
 |
|---|
| 4. | It will help to pre-glue some pieces together. Start with the window trim on the flat tile. The recessed arch blocks may be a little too wide depending on how you scrape off the mold. They will probably need sanding. Glue all of the arch pieces together also. |
|
 |
|---|
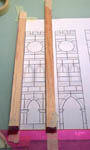
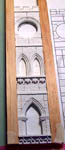
| 5. | Glue the blocks together but do not glue them down to the plan! Allow it to dry before you try to move it. Be especially careful with the large round window. If it comes apart in that area, don't worry about it. It will all be glued together eventually. You will assemble 3 copies of this wall section. |
 |
 |
|---|
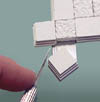
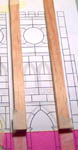
| 6. | Tape a straight edge on both sides of the door section and also across the bottom as shown. Since the very bottom of this section only has thin door trim, we will start building at the door arch and add the trim on later. You will have to split two corner trim pieces to go on the bottom of the arch with a hobby knife. Stack and glue the blocks together. Do not glue them down to the plan! |
 |
 |
|---|---|---|---|
 |
 |
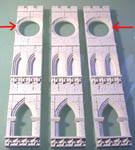
| 7. | New we'll assemble the corner pieces of the tower. Tape down a straight edge onto the plan. Glue the blocks together as shown. The plans also include a detailed drawing of the blocks for this corner section (it's hard to tell from this picture exactly what blocks go where). You will need to make four of these corner sections. |
|
|---|---|---|
 |
| 8. | You will place a corner section on each side of the door section and one of the window sections. Carefully align the bottom of the window section with the bottom of the corner sections. For the door section, you'll glue the door trim along the sides, then glue everything else together. You'll have to cut down two pieces of the door trim to 1/2" long since there wasn't any included on this mold (there wasn't room). |
 |
|---|
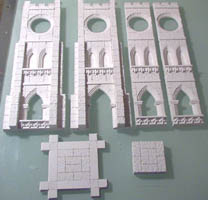
| 9. | Now for the small roof section. Glue some regular blocks together (it doesn't matter if you glue them down to the plan or not). At this point, you should have all of the sections glued together as shown. Be sure they are completely dry before going any further! |
|
 |
|---|
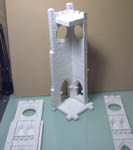
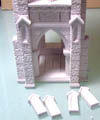
| 10. | Glue 2 sides together and onto the floor. Also glue the roof section onto these 2 sides. Now glue the last 2 walls against each other, but not to the rest of the model! Be sure you can remove them as the third picture shows. |
 |
 |
 |
|---|
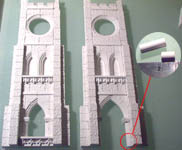
| 11. | You'll want to glue the decorative braces onto the corners. On the upper row, you'll have to miter the peaks slightly with a hobby knife to fit them together. Unfortunately, I didn't have enough room on this mold to put all of the decorative pieces I wanted. I was hoping to add relief statues to the recessed arches and decorative top spikes, but there simply wasn't enough room on the mold form. |
|
 |
|---|
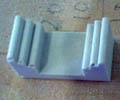
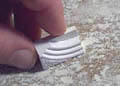
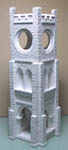
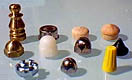
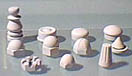
| 12. | The top caps can easily be made out of just about anything. Your local hardware store has tons of items that could work (I've displayed just a few). For this model, I'm using acorn nuts that cost about 10 cents each. Glue bottle spouts also work well for spikes at the top. |
|
 |
|---|
Painting Instructions
For information on types of paint and supplies you will need, refer to the Earth Tone Painting Instructions.
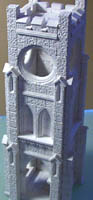
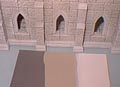
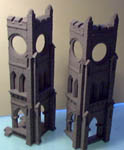
For the bell tower I'm going to use the same color of paints I used on the gothic church. I wanted to match a stone color found on actual churches and cathedrals, so I looked through several books. I found the color I liked which was a gray-brown with a little tan added.
To mix the color, I have the exact recipe on the Earth Tone Painting Instructions. Also, send me an e-mail when you order a mold and I'll send you color chips of what I use, or you can send me a self-addressed stamped envelope. Your local paint store can mix you up the exact color from these chips.
| 1. | Always test the colors of paint on a few extra blocks glued together. This example shows the colors I used compared to a finished painted model. For this project, many of the blocks have thin delicate detail. I wanted to protect the model from chipping and I didn't want the water base paint to soften the glue. To remedy this, I gave the model a coat of flat (or satin) varnish. Do not use gloss varnish! You want the paint to stick to the model after you coat it. |
 |
|---|---|---|
 |
| 2. | The first coat of paint is the darkest color. Be sure to mix this first coat thin (about the consistency of milk). If you're using house paint, it's about 1 cup paint to 1/4 cup water. If you're using a tube of paint, add more water. Using a 3/4 inch brush, drench the paint on so it runs into all the cracks. Since I coated this model with varnish, I don't have to worry about the glue softening. However, since the paint isn't soaking into the plaster, I'll have to give it 2 coats of this dark color. |
 |
|---|
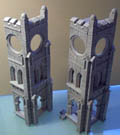
| 3. | Now it's time for the medium brown gray. If it's the consistency of house paint, do not thin it down! Using a dry brush, dip it in the paint and try to wipe all of the paint off onto a paper towel. Brush over the surface with a light to medium pressure. This is called dry-brushing. The paint will stick to the highlights of the stone and all of the texture will show up. It works the best if you have almost no paint in the brush and use more strokes to cover the area. The last coat is light tan gray (4 shades lighter than the medium color). For this coat, wipe the brush completely dry and barely touch the surface when you brush over it. Do not glue the 2 halves together until you have finished and glued in the round windows! |
 |
|---|---|---|
 |
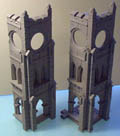
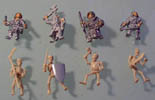
| 4. | You can leave the recessed arches empty if you want, but I specifically designed them to hold miniatures (sort of like statues along the tops of cathedrals). First I found some old miniatures. |
 |
 |
|---|
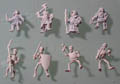
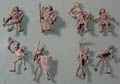
| 5. | To make them look like statues, I'm going to paint them with the same colors I used for the stone tower. I started by giving them a primer coat of white (flat spraypaint) just like you would before painting any miniature. When dry, I painted them solid with the darkest color (let it dry), and dry brushed them with the 2 successive lighter colors. Be sure to spray a flat varnish or sealant over them to protect the paint. |
 |
|---|---|---|
 |
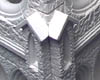
| 6. | As you can see, when glued in place under the arches, they look like stone statues. I left the arches intentionally darker behind the statues (I didn't drybrush any lighter color back there). This helps the statues stand out more. |
 |
|---|
Making Round Windows
I'm going to show you three different ways to make the fancy insides of the window. You can find the window templates on our Building Plans page. Look for the plans labeled "bell tower plans".
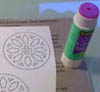
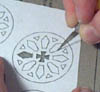
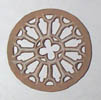
| 1. | The easier window. Glue the window template down to a piece of cereal box or thin card stock. When dry, use a hobby knife to cut out the sections. All of the sections on the easy windows are in straight lines. Paint the window with the medium stone color, and drybrush it with the lightest gray-brown. |
 |
 |  |
 |
|---|
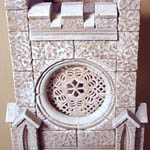
| 2. | Here's what the window looks like placed in the tower. To secure the window in place, put a bead of glue around the outside edge of the paper and secure it behind the round window. Be sure to get the window straight or it will look wrong. | 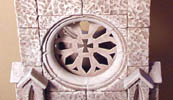 |
|---|
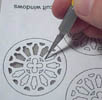
| 3. | The more difficult window. For this window, I didn't glue it to any stock. Cutting small detail on thick stock is too difficult. First cut the shapes out using a hobby knife. To give the paper some toughness, I'm going to spray paint it white on both sides. |
 |
 |
|---|
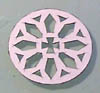
| 4. | Paint the window with the medium stone color. Using a small brush, paint the darker color around the holes in the window. Next paint the lightest stone color in the middle of the braces. Here's what this window looks like glued in. |
 |
 |
|---|
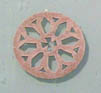
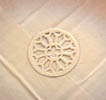
| 5. | The doily window. For this window I picked up some doilies at a craft shop. Cut out the window template and center it over a part of the doily you want. Draw around it and cut it out with scissors. Spray paint the piece white and paint it using the stone color. Since most doilies are embossed, they make a nice effect when you dry brush the lighter colors on. The doily window is the easiest (no cutting), but you might have a hard time finding some with the type of decoration you like. |
 
|
 |
|---|
One last suggestion for the round window: If you're a computer person, you might be able to color print a window from the internet and glue it into place. Find a rose window (use a search engine), and try to print it from your color printer. You'll have to experiment to get the size right. You can also buy clear plastic to put through your printer (it's special stuff - talk to your office supply store). It's used to print transparencies. By printing on clear plastic, you can make stained glass windows for your church or cathedral. While you're at it, get on the paint program on your computer and paint your own windows. |
|