Tips & Tricks 28
|
Instructions for painting space ship corridors is on our Ship Corridor Painting Instructions page. Instructions for building the ship corridors can be found on our Ship Corridor Building Instructions page. |
|
How to Use Mold #276
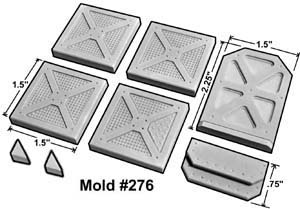
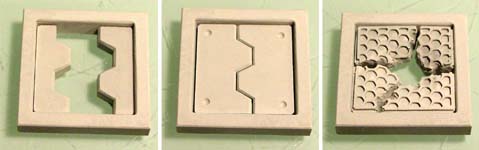
| 1. | Mold #276 is mainly a 1.5" floor tile mold with a couple of extra items. This mold also includes a door and a step section. There are also 2 small triangle blocks used to help frame the top of the door in case you wanted to use the door in the side of a building. |
 |
 |
|---|
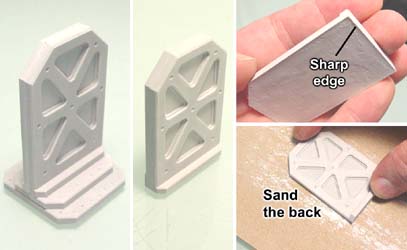
| 2. | To assemble a full door, glue 2 halves back-to-back. During casting, some of the doors may have a sharp edge around the back side that may keep the halves from gluing together properly. Sand the back lightly if needed. You can use the step pieces glued back-to-back to form a base for the door. However, the door does have a small base on its own so gluing it onto the step is optional. |
 |
|---|
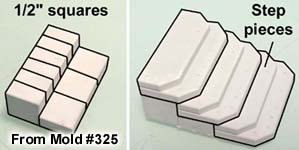
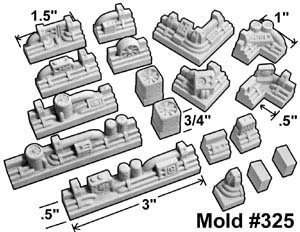
| 3. | You can also build stairs using the step pieces. However, you will need some extra blocks to fill in under the steps. Mold #325 has small square blocks that can be used for this. Take 9 of these square flat blocks and use them to fill under the steps. |
 |
|---|
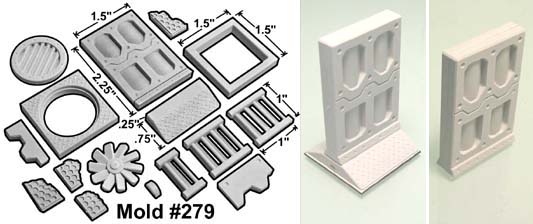
How to Use Mold #279
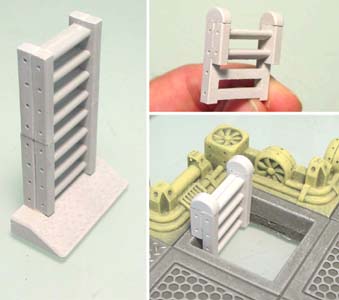
| 1. | The diagram shows all the pieces on the mold. The doors can be glued back-to-back. As with the doors (shown above) you may need to sand the backs in order for them to glue together well. You can glue 2 ramp sections under the bottom for a very sturdy base, or you can leave the ramps off and the door will still stand on its own. |
 |
|---|
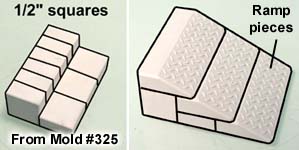
| 2. | You can also build ramps using the ramp pieces. However, you will need some extra blocks to fill in under them. Mold #325 has small square blocks on the mold that can be used for this. Take 9 of these square flat blocks and use them to fill under the ramp blocks. |
 |
|---|
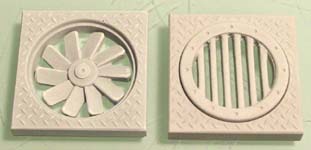
| 3. | The floor tiles with the round hole can be used in a couple of different ways. First, you can use the hole as an entryway for creatures or enemies. You can also place a fan in the hole or cover the hole with the grate piece. The fan is recessed, so you place both the fan and the grate on the tile at the same time. |
 |
|---|
| 4. | For the square opening, you can create either a partially opened hatch or a closed hatch. The small broken pieces are used to put around the outside edges to form a damaged floor tile. |
 |
|---|
| 5. |
By gluing 4 ladder sections together, you can make a tall ladder. Gluing it onto a ramp will help it stand up. By gluing a full section to a half section and adding the small rounded pieces on top, you can have a ladder descending down. The bottom half of the ladder is 1/2" deep, so you would need to mount your 1/4" floor tile on a 1/4" base material for the ladder to set properly. |
 |
|---|
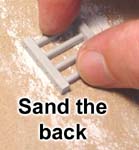 The ladder pieces can be used in a couple of different ways. To get the best result, lightly sand the back of the ladder to clean it up.
How to use Mold #325
| 1. | The diagram shows all the pieces on the mold. This mold is meant to be used as decorative edging pieces to frame the outside of a sci-fi game board. There is detail on both the front and back side of the pieces but the backs do not have as much detail as the front. The tallest points of all of the pieces is 3/4" tall. This allows you to easily stack the game board pieces after you have assembled them. All of the lengths are in increments of 1/2". |
 |
|---|
| 2. | Here are some examples of using this industrial edging on 1" square floor tiles. The figure placed on the board is a Star Wars miniature. The first example shows the edging used to make a 1" wide hallway section. The second example shows how to use the edging when making hallways that are 2" wide. |
 |
|---|
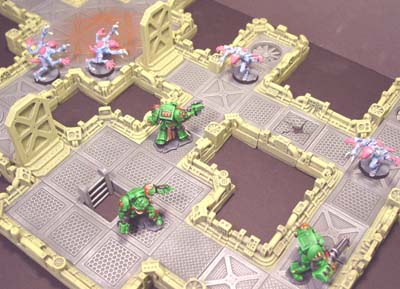
| 3. | Of course the main reason I created them was to be used with the 1.5" square floor tiles. If you use these with the 1.5" wide tiles, you can fit a figure on a 40mm base in the hallway. This photo is an example of a board used with Games Workshop miniature. For painting instructions, visit our Painting Instructions page. |
 |
|---|
Making Hazard Strips
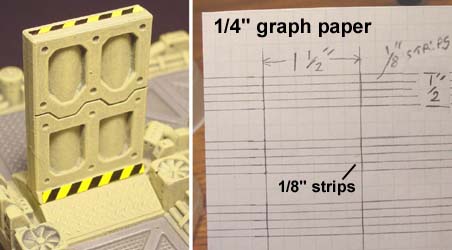
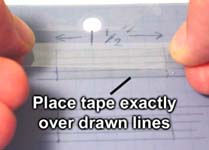
| 1. | These are the warning strips that go around the edges of hazardous areas. To make these the correct size, you will need to start with 1/4" graph paper. Using a ruler and pencil, draw the lines as you see them in the photo. Each hazard strip for this example will end up being 1/8" wide x 1.5" long. I'm going to use 1/2" wide tape cut into 4 strips - each strip being 1/8" wide. |
 |
|---|
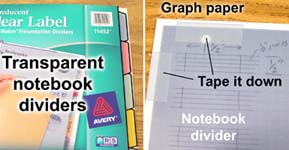
| 2. | Next you'll need some transparent notebook dividers. If you can't find them, then find some other kind of transparent plastic to use. Tape the divider down over the graph paper. Be sure that you can clearly see the lines through the plastic. |
 |
|---|
| 3. |
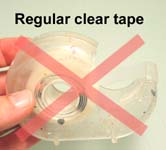
Do not use regular magic tape (frosted transparent tape). I did a test using this kind of tape and the painted stripes scratched off easily. The double sided permanent tape hangs onto the paint much better. Also, this kind of tape is thicker and you can peel it up and transfer it to your model much easier. |
 |
|---|
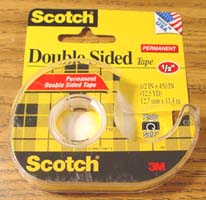
 I'm going to paint the yellow and black stripes onto Scotch Double-sided Permanent Tape. This tape is 1/2" wide and is sticky on both sides.
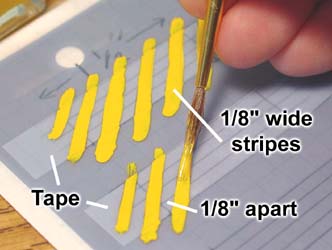
| 4. | Take a strip of double sided tape and place it exactly over the lines you had drawn. Do this for several strips of tape. When we paint the strips, you will probably mess up a few of them as you're getting started and get better the more you do. Making several more strips than you need will allow you to pick the best ones to use. |
 |
|---|
| 5. |
You will also need a paintbrush that can make a good 1/8" wide paint stripe. Start painting diagonal stripes across the tape leaving about a 1/8" gap between the stripes. The more stripes you paint, the better you will get at it. |
 |
|---|
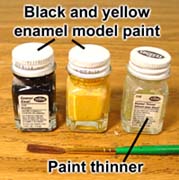 I'm using Testors enamel model paint for the stripes. You will need a bottle of black, yellow and some paint thinner to clean the brush.
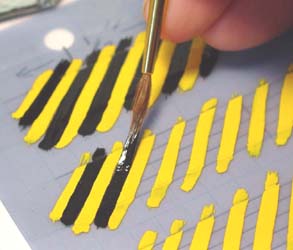
| 6. | Allow these to dry completely. Next take the black paint and fill in the gaps with black stripes. It's almost better to make the yellow stripes a little wider so you can overlap them with the black paint. Do not leave any gaps between the yellow and black stripes. If you do, there will be sticky tape exposed between the strips that will collect dirt. By this point, you will definitely understand about making lots of extra pieces. By my last few pieces I had gotten pretty good at making straight even stripes. Allow the paint to dry completely. |
 |
|---|
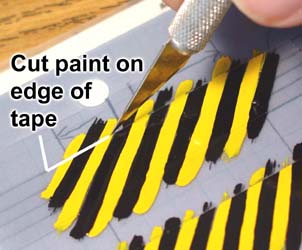
| 7. |
Be sure that you use a new sharp blade for this. Carefully find the edge of the tape with the side of the knife and gently cut along the edge of the tape. One advantage of using the double sided tape is it's thicker which makes it easier to find the edge of the tape. |
 |
|---|
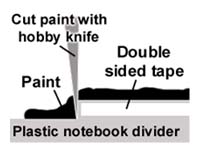 In order to peel the strips off cleanly you will need to take a hobby knife and cut the paint along the edge of the tape.
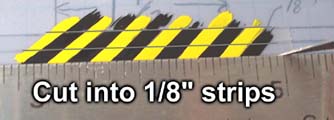
| 8. | Next, use this hobby knife to cut the tape into 1/8" strips. This is the reason we drew the 1/8" lines in pencil on the graph paper. You simply place your ruler on top of the lines. Press hard enough with the knife to cut through the tape but not the plastic backing you're working on. |
 |
|---|
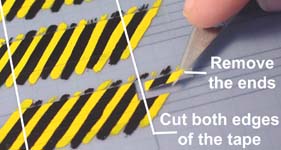
| 9. | Cut both ends of the tape to the length you need. Since our door is slightly less than 1.5" wide, I cut my strips about 1/8" shorter than the original 1.5" length I had drawn on the paper. Using a hobby knife, remove the excess ends from the strips and discard them. |
 |
|---|
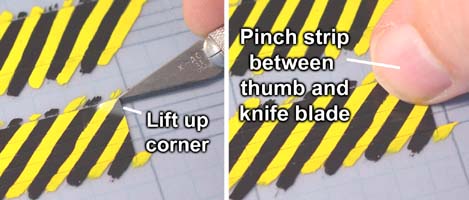
| 10. | To remove the strips, carefully slip your knife under the edge of the tape. Be sure the blade is pointing down so you don't cut the strips while trying to pick them up. Once you have the corner lifted up, place your thumb on top of the corner pinning the strip between your thumb and the flat side of the knife. |
 |
|---|
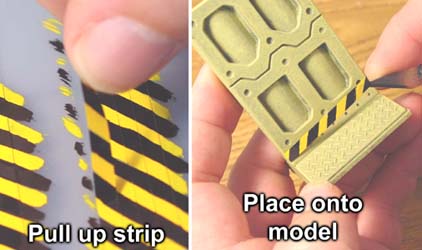
| 11. | Pull up the strip and carefully place it on the model where you want it. It's easiest to position the strip on the model if you leave the strip stuck to the knife blade. You can use this method to make any thickness or length of hazard tape you want. It's especially useful to line the outside of holes or hatches in your sci-fi layouts. |
 |
|---|
Making a Game Table Top for about $59
| 1. |
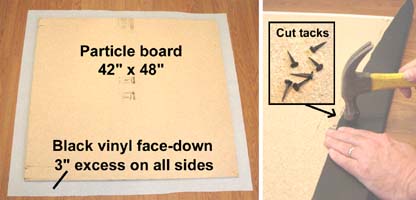
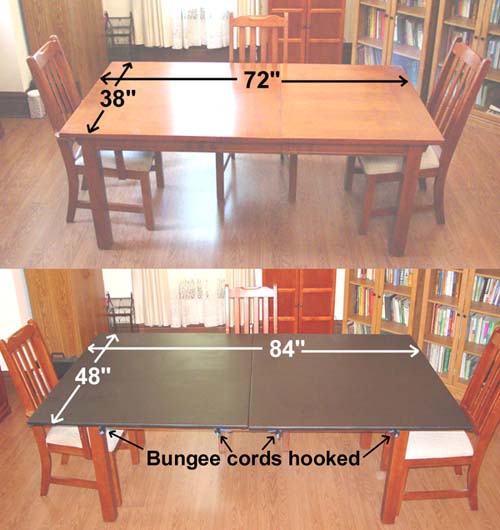
To start with, you will need some 5/8" particle board. I purchased one 4' x 8' sheet for $12.99 at my local lumber yard. Most places will be able to cut it for you. I would have had them cut it directly in half (into two 4' square sections) but my gaming area just couldn't take something that large. Instead I had them cut it into two pieces measuring 48" x 42". You can find other kinds of wood to use. I chose this because it was very stiff so that when its edge extended past the end of my dining room table, it would not bow if someone leaned on the edge of it. It is fairly heavy but not horribly so. Moving and storing it one half at a time makes it easier to manage. |
|---|
 This article shows how to make a removable gaming table top that can give you more playing area on a standard sized dining room table.
| 2. |
|
|---|
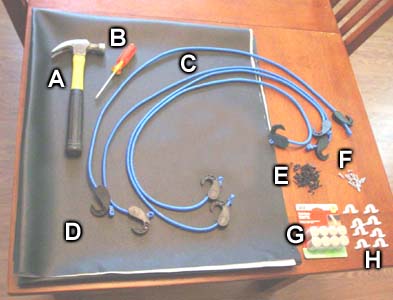 You will also need some additional tools and materials. These include:
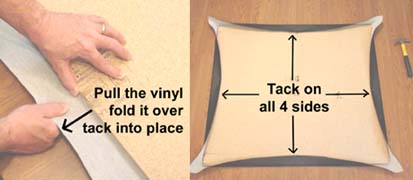
| 3. | Place the vinyl on the floor face down and center your particle board on top of it. Fold over the middle of one side and nail a cut tack into the vinyl to hold it down. Cut tacks are small sharp black colored tacks that are almost wedge shaped. However, you can also use a heavy duty staple gun instead if you like. |
 |
|---|
| 4. | Go to the opposite side of the board, pull the vinyl tight, and tack the center into place. Do this for the other two sides as well so the center is tacked down on all four sides. Be sure to pull the vinyl tight when tacking down the opposite side. |
 |
|---|
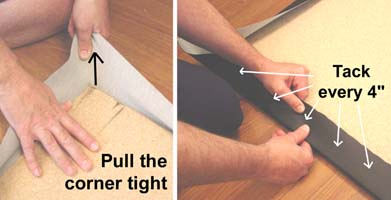
| 5. | Start at one corner and pull the vinyl tight around the corner. Fold the vinyl over and nail in a tack every 4" on each side. Be sure you stretch the vinyl before folding it over and nailing it. Nail the vinyl fairly close to the corners. |
 |
|---|
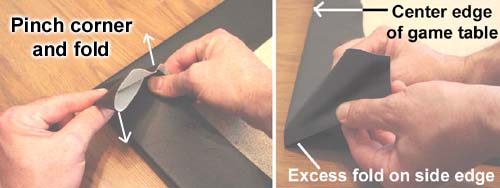
| 6. | Pinch the corner and fold it as shown. The center edge is where the two board halves will meet in the middle of your table. Try not to have any excess folds of material on the center edge or the two halves will not butt flat together in the center of your table. |
 |
|---|
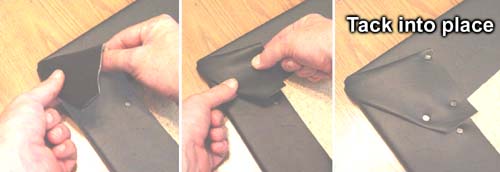
| 7. | I'm moving the fold in my right hand upwards and the fold in my left hand downwards. Then I collapse it down onto the board and tack it into place. |
 |
|---|
| 8. |
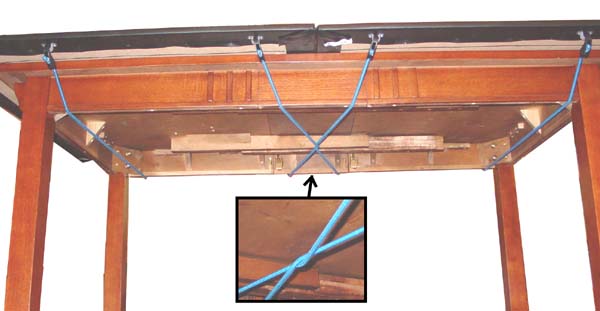
Since two of these boards will cover the table top, I've drawn with a magic marker where one half of the dining room table will sit once this board is on top of it. You want the pipe straps to be located well under the dining room table because we're going to hook bungee cords to these straps, and these bungee cords should reach well under the table in order to work correctly. Finally, place the felt pads around the surface that will set against the dining room table. These felt pads will keep the boards from scratching up your table surface underneath. I originally was looking for some non-skid pads but I couldn't find any that were not awfully expensive. |
|---|
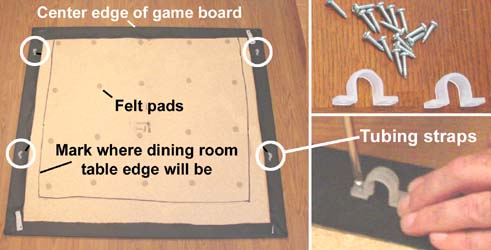 After the edges are all tacked down, screw down the pipe straps near the edge of the table on both pieces.
| 9. |
Click on the photos for a larger view. These boards extend my game table about 6 inches on every side. You may not think that's a lot but it really helps when you have a large game to spread out. The boards are easy to store, the black surface is easy to clean, dice roll better on the surface and it really sets the mood for your dungeon. You can also lean on the edge of the table without fear of the boards moving or tipping the top over. |
 |
|---|