The Signal Tower Building Instructions
|
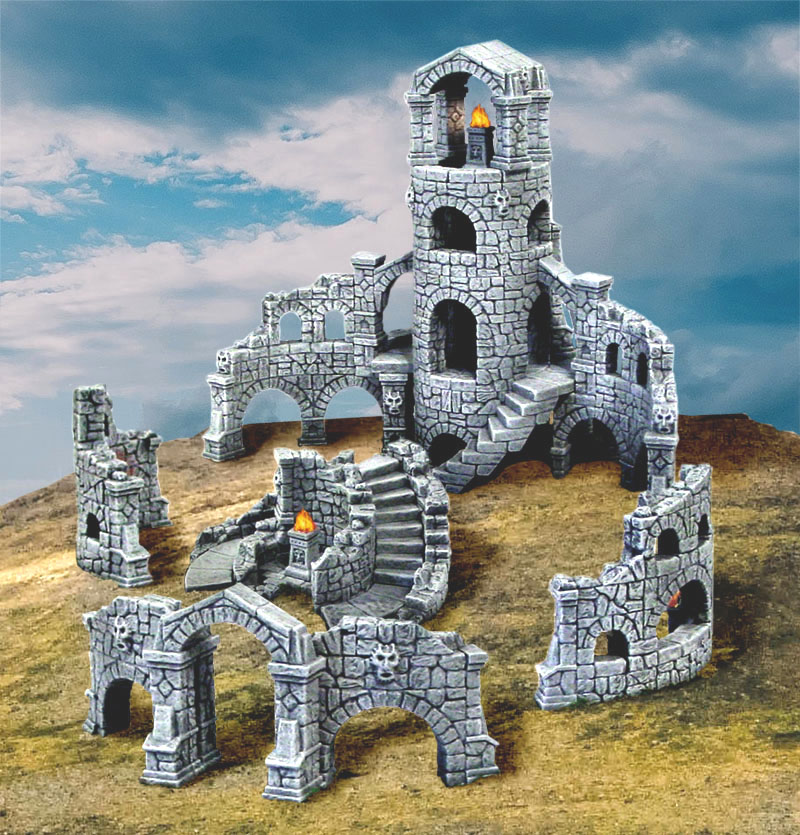
To build all of the ruined tower pieces shown here, you will need 12 castings of mold #703 (3" Ruined Fieldstone Mold) and 12 castings of mold #706 (6" Ruined Fieldstone Mold). Click the photo for a larger view. |
|
Pre-Gluing Blocks
To build the tower shown here, you will need:
12 castings of mold #703 (3" Ruined Fieldstone Mold)
12 castings of mold #706 (6" Ruined Fieldstone Mold)
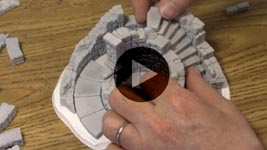
Finished Model Video This shows what the finished signal tower will look like and shows model with 25mm scale figures. |
 |
| 1. | Pre-gluing Video This shows what the finished ruins will look like, describes how the blocks are labeled and also shows what blocks need to be pre-glued together before starting to build the ruins. |
 |
|---|
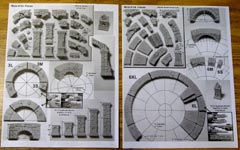
| 2. | Print out the building plans. You can also find them on our Building Plans page labeled as "Signal Tower Plans". Two of these sheets will have the floor plans that you will glue your ruins upon. The other two sheets will be reference sheets telling you the how each block will be referred to in the instructions below. |
 |
|---|
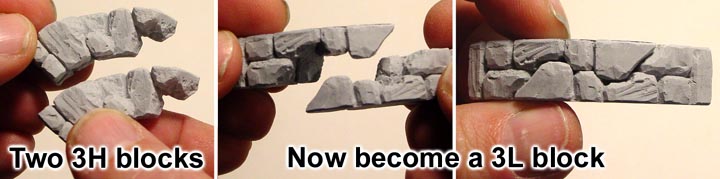
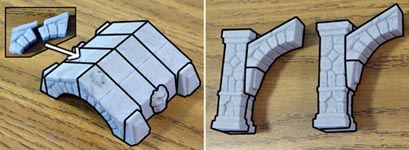
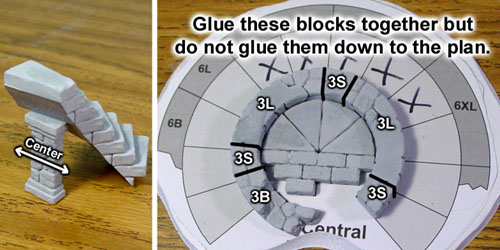
| 3. | Two identical blocks can be put together to make a full block. This only works for the regular ruined blocks and not the arch blocks.
The photo below shows how two of the 3H blocks can be put together to make a 3L block. The smallest blocks shown below (3S, 6M and 6S) are full blocks on their own and do not need to be assembled. |
|---|---|
 |
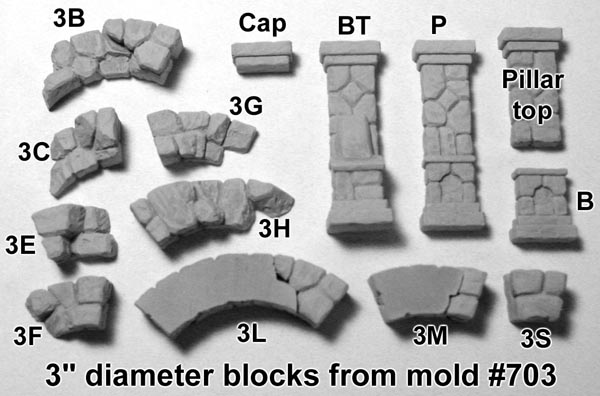
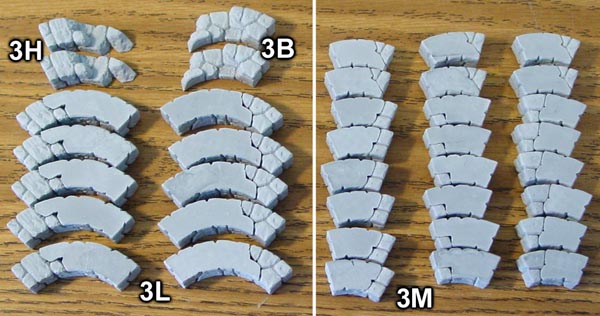
| 4. | This is a quick reference chart for blocks from mold #703. You will also find letter references to these blocks on the building plans. Note that the larger ruined blocks 3B and 3H will be used to make the 3L blocks shown at the bottom of the photo. The 3C, 3E, 3F and 3G blocks are used to make the 3M blocks shown. |
 |
|---|
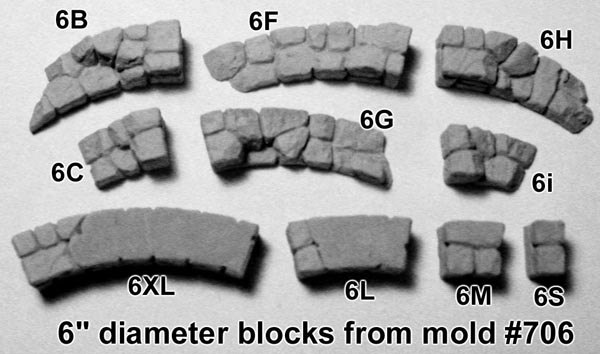
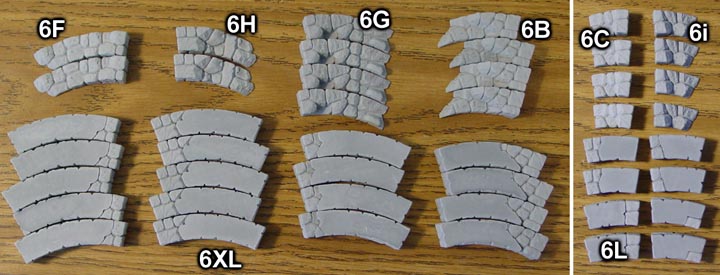
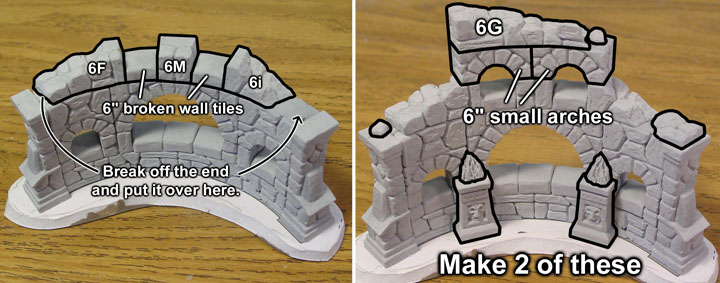
| 5. | This is a quick reference chart for blocks from mold #706. Note that the larger ruined blocks 6B, 6F, 6G and 6H will be used to make the 6XL blocks shown at the bottom of the photo. The 6C and 6i blocks are used to make the 6L blocks shown. |
 |
|---|
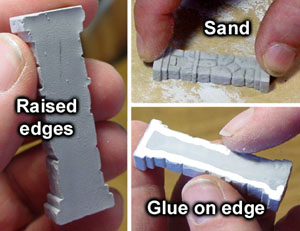
| 6. | Many of your castings may have raised edges around the scraped side of the block. This seems to happen more on the pillar and buttress pieces. Since these need to be glued back to back in most cases, you will get a better glue bond if you lightly sand the backs of these pieces. Afterwards, be sure to spread the glue around the edges of the block to get the best adhesion. |
 |
|---|
The pieces pre-glued below are all from mold #703, the 3" diameter ruin mold.
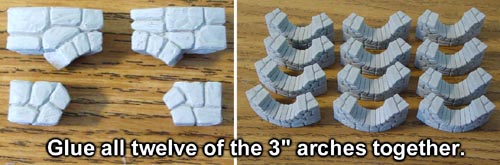
| 7. | These four blocks will make the 3" diameter arch. Glue together all 12 of these arches. |
 |
|---|
| 8. | Glue together all but 2 each of the 3H and 3B blocks. Glue together all of the 3C, 3E, 3F and 3G blocks. Your blocks should look like what you see in these photos. The glued blocks will now become the 3L and 3M blocks. |
 |
|---|
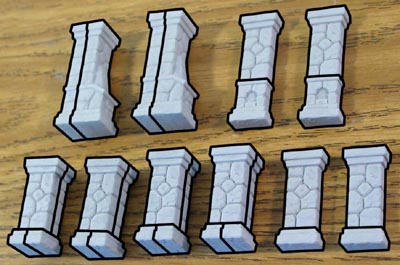
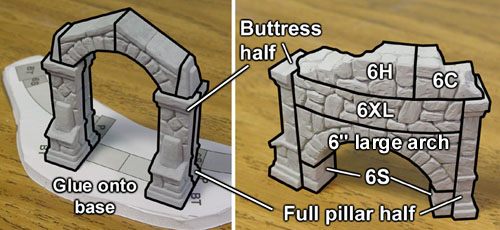
| 9. | Make the roof using 8 of the buttress arches along with the wedge decorations and faces. Make 2 of the buttresses on the right using four pillar halves. |
 |
|---|
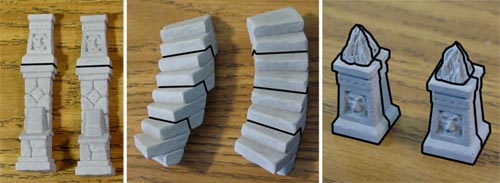
| 10. | Assemble all of the pieces you see here. The two in the upper left are made using full pillar halves and buttress halves. The next two on the top row are full pillar halves made from smaller pieces. The bottom row has four full short pillars and two half short pillars. |
 |
|---|
The pieces pre-glued below are all from mold #706, the 6" diameter ruin mold.
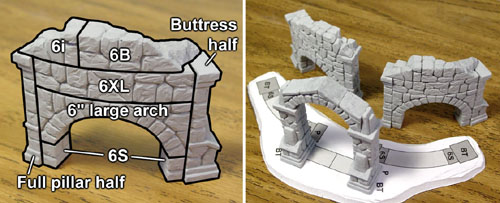
| 11. | Glue together all of the 6" diameter large arches. Leave one of the large arches in two halves (shown on the lower right). |
 |
|---|
| 12. | Glue together all but 2 each of the 6F and 6H blocks. Glue together all but 4 each of the 6G, 6B, 6C and 6i blocks. Just try to make your pile of blocks look exactly like what you see in the photos below. The glued blocks have now become the 6XL and 6L blocks. |
|---|---|
 |
| 13. | Glue together all of the 6" diameter large arches. Leave one of the large arches in two halves (shown on the lower right). |
 |
|---|
Tower Building Instructions
| 1. | Tower Building Video This shows how to prepare the bases of the ruins and what blocks to use when building the main signal tower. |
 |
|---|
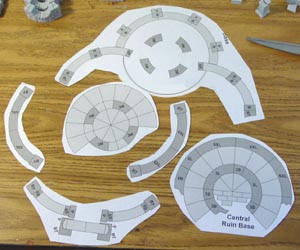
| 2. | Print out the building plans. You can also find them on our Building Plans page labeled as "Signal Tower Plans". Two of these sheets will have the floor plans that you will glue your ruins upon. Cut these apart on the dotted lines. Then trim the paper pieces down but leave about 1/4" of white around the outside of each floor plan. Be careful with the large tower base plan. Cut around the large thin line circle in the center. |
 |
|---|
| 3. | I'm going to use white foam core board as a base to glue the plans and ruins down onto. Foam core board is has a foam center sandwiched between two layers of paper and is just a little under 1/4" thick. You may also use other materials as a base such as cardboard or MDF (medium density fiberboard). Just be sure the material you use will be strong enough for the larger signal tower. The tower will end up weighing about 5 pounds when finished. |
 |
|---|
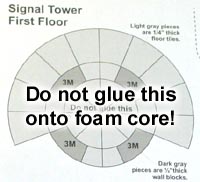
| 4. | Do not glue this particular floor plan This plan is labeled "Signal Tower First Floor". You don't want to glue it down because it will make the upper floor too thick if you do and the tower will not fit together correctly. |
 |
|---|
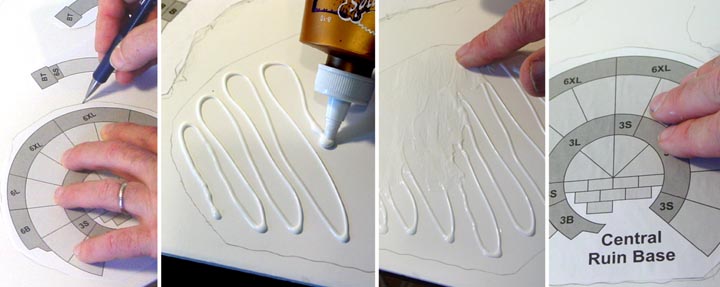
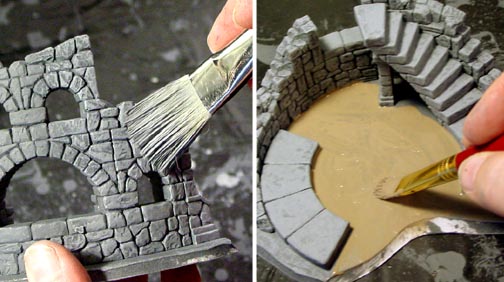
| 5. | Place each of the remaining floor plans down onto the foam core and draw around the outside of the plan. Then remove it and cover the area with white glue. I'm using Aleene's Tacky glue but any PVA glue will do. Spread the glue around with your finger and then lay the plan back down onto the glue and spread the plan out flat. Let each of these dry completely. |
|---|---|
 |
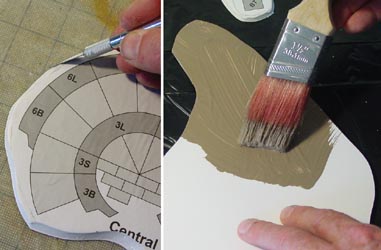
| 6. | Use a hobby knife to trim off the edges at a bevel so it looks like the ground slopes down at the edges. After the glue had dried, it looks like the glue had warped the foam core slightly. To fix this, I'm going to paint the bottom of the foam core to straighten it. It doesn't matter what color of paint you use so I'm using dirt colored paint since it's handy. |
 |
|---|
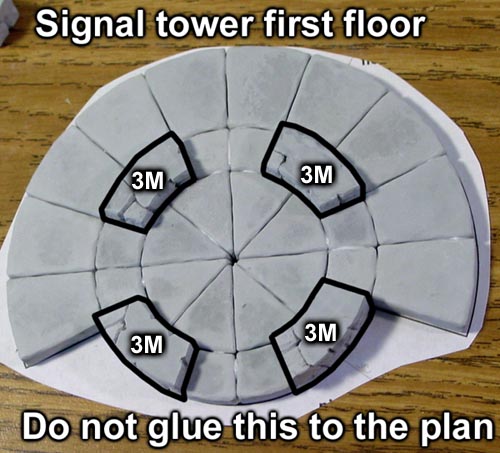
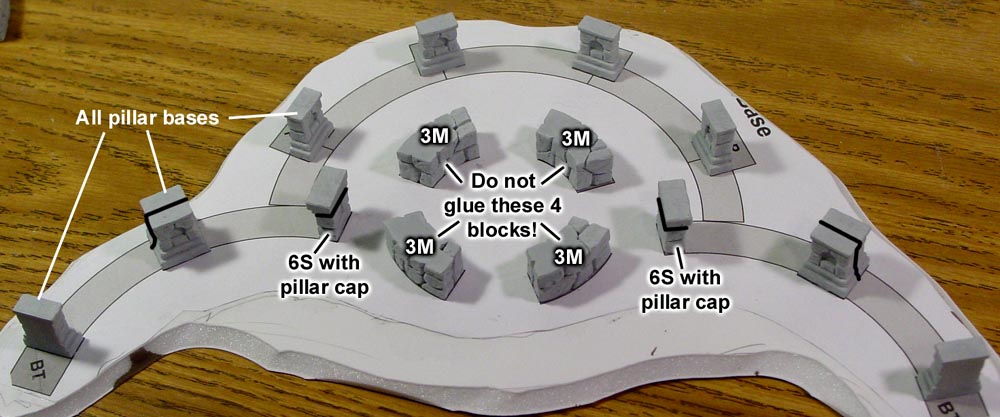
| 7. | In the first photo, glue together the blocks for the signal tower first floor but do not glue them down to the plan! Just glue the tiles and blocks together by gluing their sides. the next photo shows the first layer of the signal tower. Do you see the 3M blocks in the center of the tower? Do not glue these four blocks down to the plan! We will need to remove this center tower section later on for painting. Click on the photos below for a larger view. | |
|---|---|---|
 |
 | |
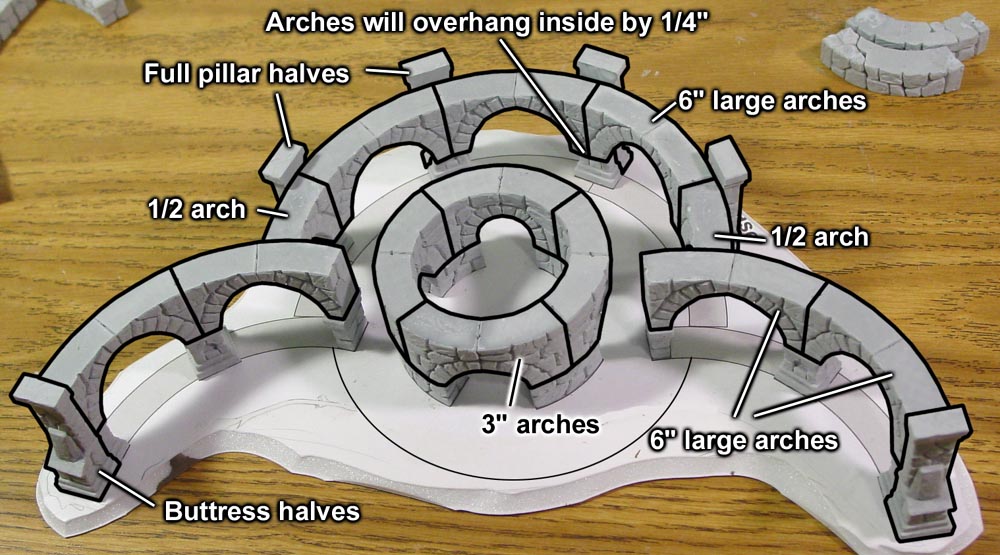
| 8. | Click on the photo for a larger view. Glue the 3" arches onto the center circle blocks. Be sure that this central tower can be removed from the base. The back row of 6" large arches will overhang inside by 1/4". This is so the full pillar halves can glue onto the outside of the arches and the bases will meet up. |
 |
|---|
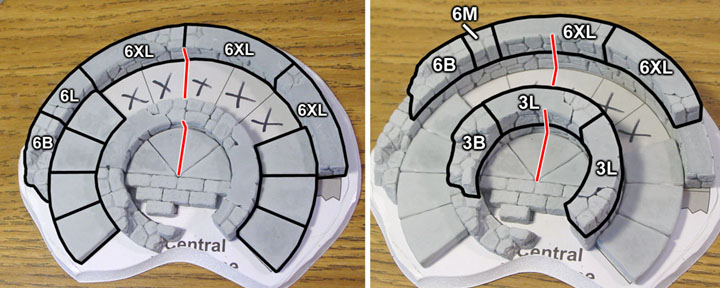
| 9. | Click on the photo for a larger view.
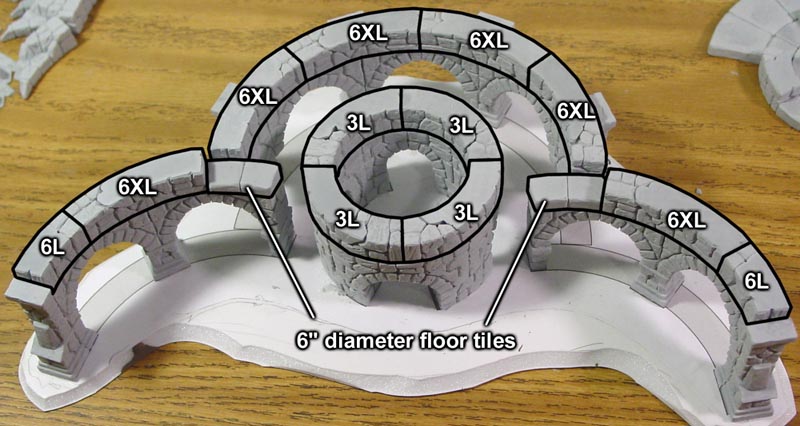
Glue the 3L blocks onto the center tower. The outside uses the 6XL and 6L blocks. The two floor tiles are the 6" diameter wall tiles which are 1/4" thick. Keep in mind that this will not be a perfect fit where the large diameter circles meet at the inside corners. You will need to adjust the blocks somewhat to make them fit as best you can. |
 |
|---|
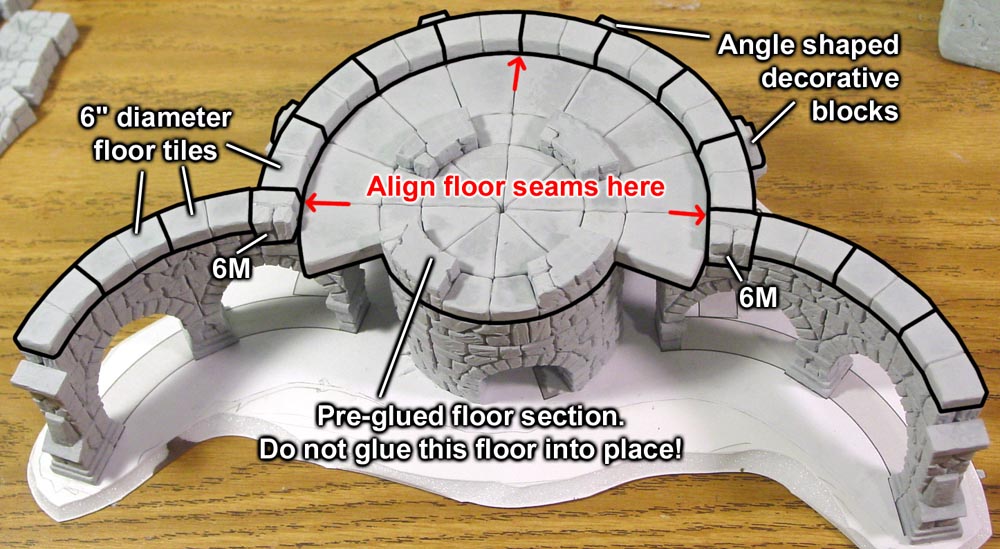
| 10. | Click on the photo for a larger view. Set the upper floor in place but do not glue it in place! It must be removed later on for painting. The next row of blocks are the 6" wall tiles. These tiles are 1/4" thick and set directly on top of the 6" diameter wall. In the corners where the two circles meet, place 6M blocks. Be sure that the floor section fits loosely. If it's too tight, it will not fit later on after pieces are painted. |
 |
|---|
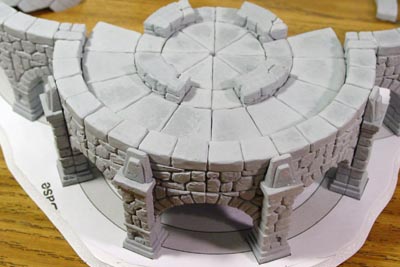
| 11. | Here's a back view of the tower at this point. I've added on the angle shaped decorative pieces on top of the pillars. You can also see how the large arches fit with the pillars at the bottom. From this angle, no one will be able to tell that the arches overhang 1/4" underneath of the structure. Do not glue this upper floor into place. |
 |
|---|
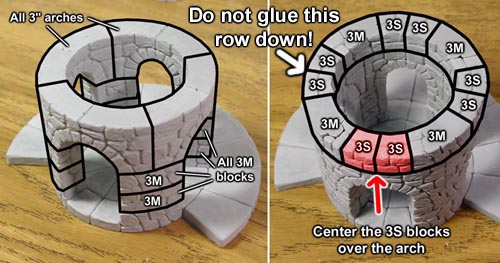
| 12. | Remove the upper floor and start adding blocks to it. Glue down eight of the 3M blocks and cap them off with four 3" arches. Do not glue the next row down! Only glue the sides of the blocks. Center the 3S blocks over the doorway. These 3S blocks will form a window sill for the window above |
 |
|---|
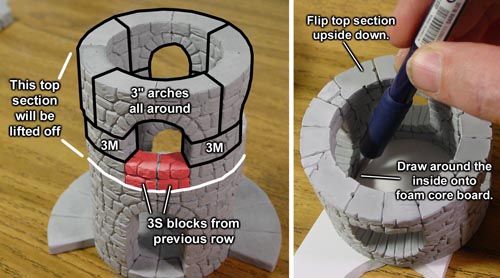
| 13. | Glue the blocks shown and be sure the arch is centered over the 3S blocks on the row below. When dry, this top section will be lifted off and flipped upside down so we can add a floor into the top. Place a piece of foam core under the tower top and draw around it with a pencil. |
 |
|---|
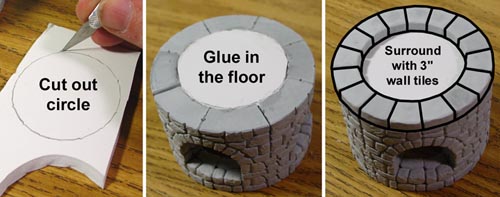
| 14. | Cut out the circle and glue it into the top of the tower. Finish the top by gluing a ring of the 3" wall tiles all around. |
 |
|---|
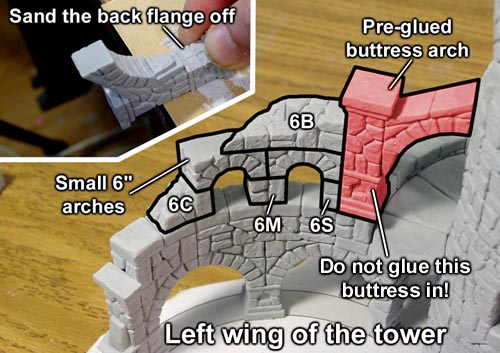
| 15. | Remember the two buttress arches we pre-glued? What we need to do is sand the back bottom flanges off of them. If we don't sand the bottom back flat, the 6S block shown will not set flat against the back of the buttress. Do not glue the buttress in! Just place is there so you know where the rest of these blocks should be glued in. |
 |
|---|
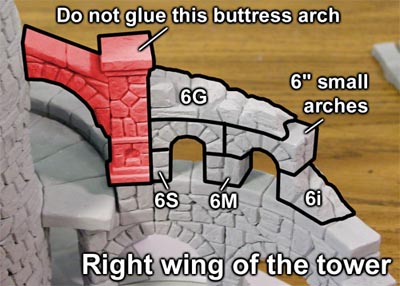
| 16. | The right side of the tower is pretty much the same as the left, only different ruined blocks are used. Do not glue the buttress arch in place! This buttress arch will also need to have the lower back flange sanded off. |
 |
|---|
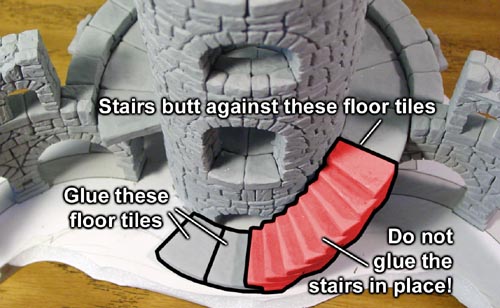
| 17. | The stairway is not glued into place. But you will need it in order to determine the position of the two floor tiles in the front. Be sure that the central tower is rotated to center. Butt the stairway against the top floor tile of the upper level. Then you will know where to glue down the two floor tiles at the bottom. |
 |
|---|
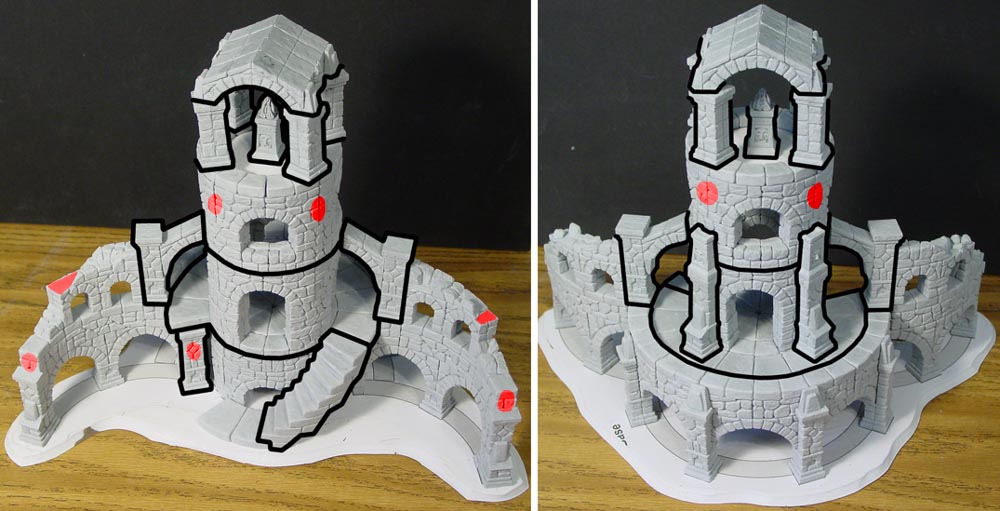
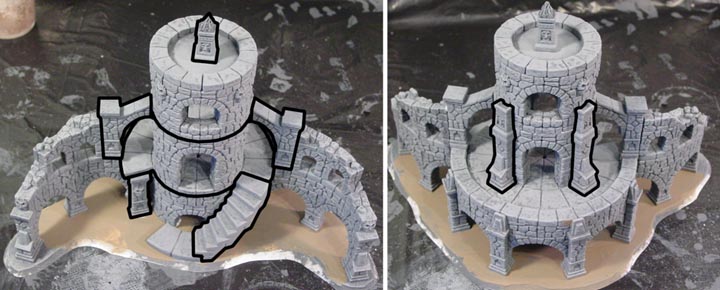
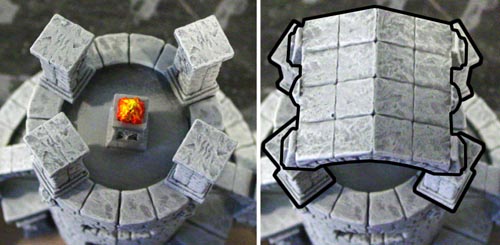
| 18. | Click on the photo for a larger view. The dots you see in red are places where I've added faces or small rocks to the tower. You may go ahead and glue these extra decorative bits on now. The black lines denote the separate pieces that make the tower. Do not glue these pieces together yet. |
 |
|---|
Building the Remaining Ruins
| 1. | Assembling The Rest This video shows what blocks are used to build the remaining ruined pieces of the set. |
 |
|---|
| 2. | Glue the short pillar half under the stairway as shown. This half pillar is only 1.5" tall and was one of our pre-glued pieces. Glue the center part of the central ruin together but do not glue it down to the plan! We need to remove it later on for painting. The small bricks across the center will make the inside circle slightly wider than it should be. |
 |
|---|
| 3. | In the bottom left photo, glue the floor tiles and blocks down to the floor plan. Then glue the next rows of blocks onto the previous rows. The red lines shown are for reference so that each ring of blocks will be positioned correctly. Remember, the center 3" circular section should lift out for easy painting. Be sure that it fits loosely in the center. It will fit more tightly after painting. |
|---|---|
 |
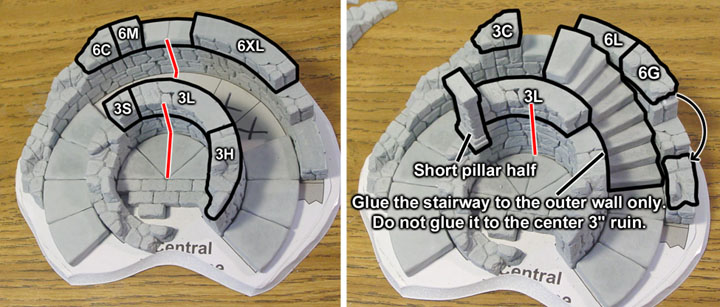
| 4. | Glue the next layers on. Notice the 6" wall tile used for a window sil in the bottom left photo. On the bottom right photo, the 6G block is broken in half and part of it is placed on the smooth shelf below. Glue the stairway onto the outer wall but do not glue it to the center tower. We will need to remove the center tower later on for painting. The short pillar half shown here is 1.5" tall and was one of our pre-glued pieces. |
|---|---|
 |
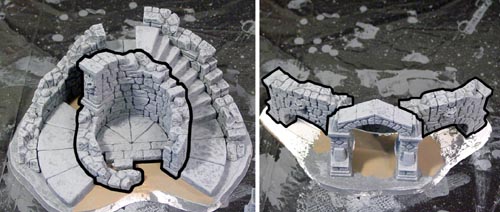
| 5. | Finish the ruin by gluing on the remaining blocks and the decorative bits. The 6H block is broken and part of it is placed at the very bottom. Do not glue the torch stand in. When finished, you should have the three separate pieces shown here ready for painting. |
|---|---|
 |
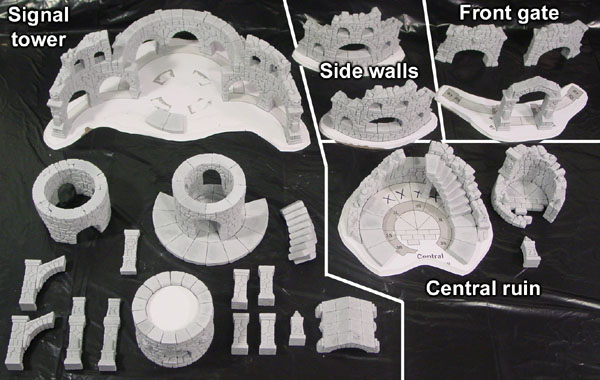
| 6. | Now for the front gate. This is made of three separate pieces; a center doorway and two side wings. Glue the center doorway down to the base floor plan. Do not glue down either of the side wings. |
 |
|---|
| 7. | Do not glue these two side wings down to the base. These will need to be painted separately, then glued down afterwards. |
 |
|---|
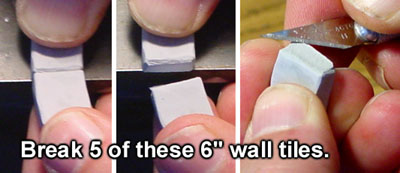
| 8. | For the final ruins, we will need to break 5 of the 6" wall tiles in half. These already have a seam down the middle which makes them easier to break. Place them on the sharp edge of a table to help break them. Then clean up the broken edges using a hobby knife. |
 |
|---|
| 9. | These broken wall tiles will be used on the side walls below. Glue these tiles down to the base. |
|---|---|
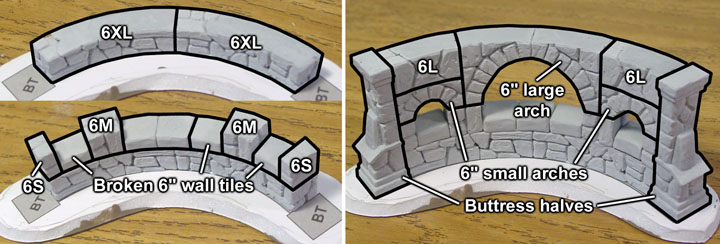 |
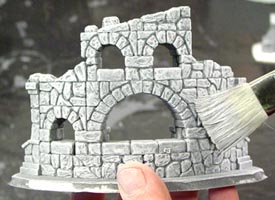
| 10. | Make 2 of these ruined side walls. This will finish all of the pieces needed for this project. |
|---|---|
 |
Painting Instructions
| 1. | Painting the Stone Towers This video shows what colors of paints and the painting method used to paint the stone of the towers. |
 |
|---|
| 2. | The colors used and the exact painting method is detailed on the Painting Instructions page. What you see here are all of the separate pieces to the project. These pieces will all be painted with the dark and medium stone grays before gluing them together. |
 |
|---|
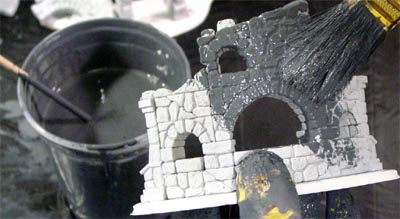
| 3. | Here I am applying the Castle dark gray color of paint. This paint is fairly thin so it will get down into all the cracks. Wearing a glove on the hand holding the piece is helpful. I also paint the piece while holding it over the paint container when possible. That way the drips go back into the container instead of all over the table. Be sure to wipe up the drips as the paint pools at the bottoms of the pillars and base. |
 |
|---|
| 4. | Next I am applying the Castle medium gray color of paint. This color is dry brushed on with a medium pressure. Since many places under the castle are hard to reach, I'm going to paint the ground a dirt color under these hard to reach areas. You can find the recipe for the dirt color of paint on the Outdoor Areas Painting Instructions page. |
 |
|---|
| 5. | Glue together the parts of the tower shown. Notice that I did not glue on the top columns or roof section. Those will be dry brushed with the light gray separately. |
|---|---|
 |
| 6. | Glue the 3" round tower into the central ruin. Do not glue the torch stand in place yet. Also glue the left and right wings onto the main gate. For this, I didn't paint all of the dirt color on the base so I could still see where to place the wings on the floor plan. |
 |
|---|
| 7. | Finally, apply the castle light gray color of paint. This color is very lightly dry brushed onto the surface. At this point, if you do not want to try and paint the flames of the torches, you can go ahead and glue the roof onto the signal tower. How this is positioned is covered further down below. |
 |
|---|
Finishing the Ruin
| 1. | Finishing the Ruin This video shows how to paint flames and apply ground cover to the ruin. |
 |
|---|
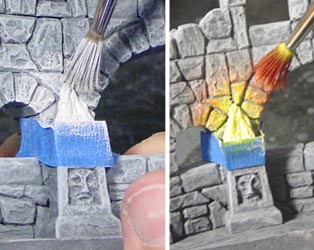
| 2. | I'm starting by painting the flames white. This is because yellows and reds are usually transparent colors. I'm also going to mask off the fronts of the torch stands because I want to put a glow on the wall as well without highlighting the fronts. |
 |
|---|
| 3. | Using a small soft brush, gently dry brush the white paint around the outside of the flame. Do this very lightly because the wall may already have a bit of white on it from the gray dry brush we did on the stone. Next, gently dry brush the yellow around the flame, to completely cover the same area that you did with the white paint. Finally, dry brush a little bit of red around the outside of this. You may skip this if you don't think it looks right. I've never done this before so this way my first try at it. |
 |
|---|
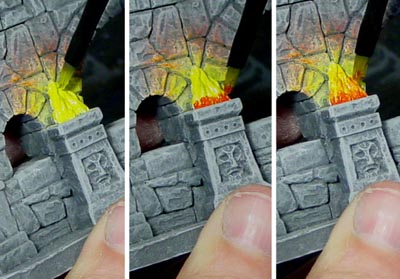
| 4. | Next, paint the flame solid yellow. Then, while the paint is still wet, paint some red down at the bottom of the flame and blend it upwards. While the yellow is still wet, it will turn the red paint orange where the two colors meet. The red will have a tendency to overpower the yellow, so you may have to wipe the excess red out of your brush occasionally. Reapply more red paint at the very bottom of the flame. Also, try to get the blend of orange to hit mostly on the outside tendrils of the flame and not down into the recesses. |
 |
|---|
| 5. | With the flames painted, you can now glue the rest of the tower together. Place the four full short pillars on top of the tower as shown. This is not a perfect "X" shape but instead is a bit short and fat x. Be sure that the decorations on the corners of the roof set completely on the pillar tops. |
 |
|---|
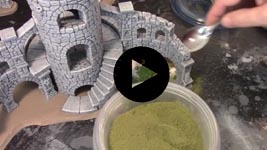
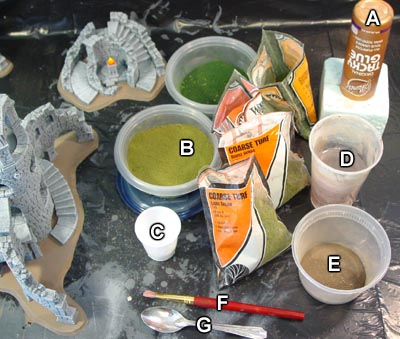
| 6. | To apply the ground cover, I'm going to use these supplies:
|
 |
|---|
| 7. | Paint any remaining base area a dirt color. This includes the sloped edges of the bases and any areas that have light gray dry brushed on them. You can find the recipe for the dirt color of paint on the Outdoor Areas Painting Instructions page. |
 |
|---|
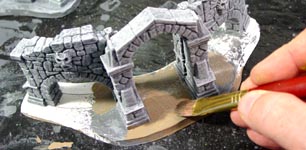
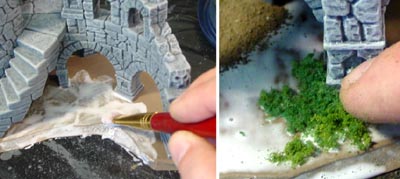
| 8. | Once the paint dries, I'm painting on Aleene's Tacky glue thinned with water. However, any type of PVA glue will do, such as Elmer's white glue. Onto that I'm sprinkling on the more coarse ground foam scenic materials. These can represent bushes and shrubs. |
 |
|---|
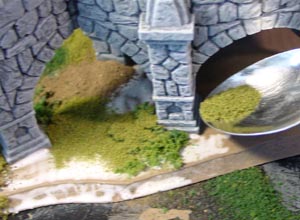
| 9. | Around that, I'm sprinkling the finer ground foam. Try to apply it in a camouflage pattern for a more natural look. Use a spoon to help reach under arches and hard to reach places. Any places that would have a walking path should have dirt sprinkled on them. If you prop up the edge of the base (place something under it to lift it up), it will be easier to paint on the glue without getting it all over your table surface. |
 |
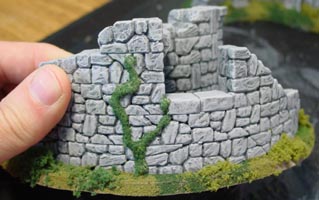
|---|
| 10. | If you want vines running up the side of a wall, simply apply a bead of glue straight from the bottle and then sprinkle on some of the fine ground foam. Try to get the bead of glue to follow the cracks in the stone as it moves upwards. Try not to put too many vines on as this may be distracting to the eye. |
 |
|---|
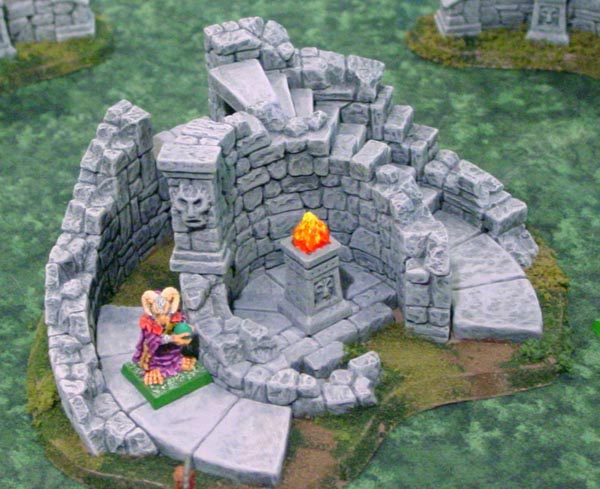
Finished Photos
| Click on the photos to see a larger view.
The miniatures shown in the photos are 28mm figures Games Workshop Warhammer Fantasy. I painted these myself back in the 90's. The ruins can be rearranged and used for blocking terrain for various games. |
 |
 |
 |