Sculpting
Page 1
Borrowing Items to Mold
You may not need to sculpt it if you can borrow it. I'm talking about basic stuff that doesn't have a copyright on it. You would be surprised at the wealth of items that can be found at a hardware store.
Here's an example: You need lots of tall spikes for your tower. Don't buy lots of caulking tubes for the spouts; buy one caulking tube, make a mold of the spout, and casts hundreds of spikes for your tower.
Be careful if you intend to borrow sculpted pieces such as miniatures and game pieces and incorporate them in your model. These pieces are copyrighted.
If you're making something for your own personal gaming, I doubt if anyone will care. In fact, I've seen a lot of miniature sites who encourage you to cut up miniatures to add to the scenery or make conversions with. However, if you intend to sell the projects you make you could wind up in trouble.
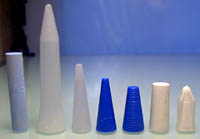 |
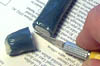
Here are a number of spouts from various tubes of glue. This caulking tube spout was used to make a mold for the "Tower of the Teeth" model. Pieces of chalk or twisty candles can make excellent pillars. Once again, don't buy a box of candles for pillars, buy one and make a mold of it. |
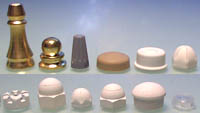 |
Here's a number of pieces collected from the hardware store. These can be used to decorate the tops of your bridge or towers. The first two decorative pieces are electric lamp parts. The wire nut can be used as a torch base. |
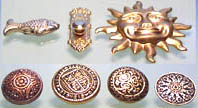 |
These pieces are from the craft and sewing department. The buttons have excellent designs - I even found one with a shield. There are also charms for charm bracelets that work. |
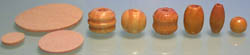 |
Wooden disks and beads can also be found in the craft department. The disks can be used as pillar bases. The beads can be used for a pillar base, a decorative rail for a stairway, or the legs of a table. |
Get into the habit of saving odd bits and place them in a box to be used later. Pieces could include: glue caps, paint brush handles, chain from old necklaces, watch parts, odd bits from models, etc.
Using Sculpey Polymer Clay
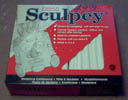 |
Polymer clay is one of the best modeling clays I've ever used. After you make an item with it, you bake it in the oven to harden it. Its two best qualities are that when it hardens, it doesn't shrink and you can carve it easily! |
The brand of polymer clay I'm using is called "Sculpey". This company has several kinds available, including colors. The clay costs about $10 for a 2 pound box, which will last a long time. You can purchase this product as well as other polymer clay products at Polymer Clay Superstore.
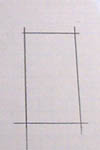
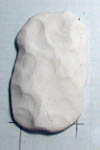
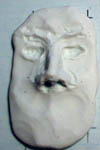
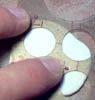
| 1. | I want this face to be 1" wide by 2" tall. It will be placed on the walls of a dungeon. After I draw a box this size on graph paper, I cover the paper with a piece of glass to work the clay on. Since you have to bake the clay on a non-metallic surface, glass works great. Spread an 1/8" layer of clay over the box. |
 |
 |
|---|
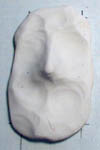
| 2. | Pinch up a middle section to form the bridge of a nose. Using a smooth paintbrush handle, poke it in the clay to make nostrils. Also use the paintbrush handle to form the nose more clearly. |
 |
 |
|---|
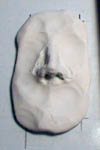
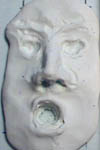
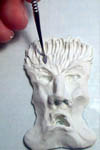
| 3. | Use the paintbrush handle to form the eye sockets, eyebrows and mouth. Don't worry if it doesn't look too good at this point. All you want to do is give the impression of a face. |
 |
 |
 |
|---|
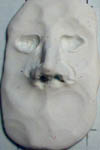
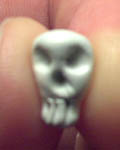
| 4. | At this point, pinch up the clay to make cheekbones. The mouth is changed also. Feel free to twist and distort the shape. The more distorted the face, the more nightmarish and bizarre it looks. Don't worry if the face doesn't look professional. Once the face is placed on the wall and painted to blend in, it will look just fine. |
 |
|---|
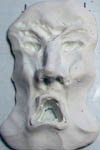
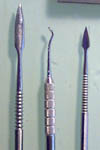
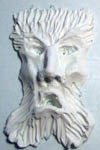
| 5. | I'm going to use dental tools to finish the texture. You can get dental tools from model and hobby shops. If you have trouble finding these types of tools, try www.micromark.com. They have lots of good modeling tools. |
 |
 |
 |
|---|
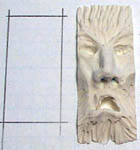
| 6. | The last step is to trim the face down to the size you want. I was originally going to trim the height down to 2", but decided to let the texture taper off on the top and bottom instead. To see how to make a mold and casts of this item, check out the moldmaking page. |
 |
|---|
Epoxy Putty Pillar and Base
 Milliput is one of my favorite epoxies. It's a 2 part, epoxy putty that molds like clay and cures to the hardness of porcelain. You can roll it as thin as 1/64 inch for making super detailed scale parts.
One big advantage of this stuff is you can smooth it with a wet finger or tools and it cleans up with water before it cures. It gets leather hard in about 90 minutes and fully cures in 5 hours without heat (or sooner with a hair dryer).
Carving this stuff is extremely difficult after it dries. You can get 4 ounces of putty for around $12. You can purchase some at www.micromark.com. I highly recommend it.
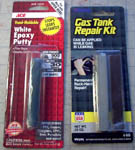
The other kind of epoxy putty you can get at your local hardware store. It's used to repair pipes, gas tanks, and fill cracks in just about anything. This putty doesn't hold fine detail as good as Milliput, but it cures much quicker. It gets leather hard in about 15 minutes and cures in an hour. Carving this stuff is also difficult after it dries. You get one ounce for about $3.50. |
 |
For this project, I'm going to make a spiral column with a decorative capital and base.
| 1. | Epoxy putty comes in 2 parts. The kind shown here has one part around the outside of another. You simply cut off the amount you need and mix it up. Mix it using a wooden stick on a piece of scrap card stock. When the two colors mix completely, you'll know that it's ready. This epoxy gives off a little odor when mixing. |
 |
|---|---|---|
 |
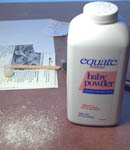
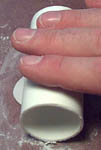
| 2. | I'm going to use talcum powder to keep the putty from sticking to the table. Sprinkle a little powder down and spread it around with your fingers. Now roll out the clay using a dowel rod or piece of pipe. Continue flipping over the putty into new powder to keep it from sticking. |
 |
 |
|---|
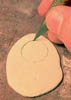
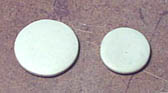
| 3. | Press a circle template over the putty (whatever size you need). Let the putty sit for about 10 minutes. This will make it firm enough to cut without distorting badly. Use a hobby knife to cut circles out of the putty and let the putty sit for another 10 minutes. Now work the edges with your fingers to smooth them. Patience is the key here. Allow the putty to firm up enough so it won't get your fingerprints or accidentally get pushed out of shape. |
 |
 |
|---|---|---|---|
 | |||
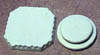
| 4. | Roll out another piece a little larger and thicker. This will form the plinth (square block that the base of the pillar sets on). |
 |
 |
|---|
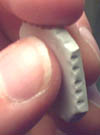
| 5. | Using a hobby knife I trimmed off the corners of the square to make an octagon shape (sort of). Allow the putty to harden up for about 15 minutes before you try to impress any designs in it. I used a dental tool to form the pattern around the edge. I've stacked the two circles on top of each other and superglued them together. The next step will be to make the decorative skulls that go on top of the plinth to form the base. |
 |
|---|---|---|
 |
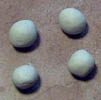
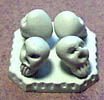
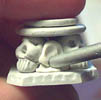
| 6. | To make the decorative skulls, take a ball of clay and roll the palm of your hand over it to form a cane. Cut four pieces off and roll each piece into a ball. |
 |
 |
|---|
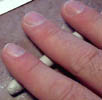
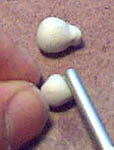
| 7. | Roll the handle of a paintbrush over one edge of each ball to form a mushroom shape. Use a sharp pencil or dental tool to form the eye sockets and nose. A hobby knife can make slots for the teeth. Allow the skulls to harden. |
 |
 |
|---|
| 8. | Sand or carve the bottom edge of each skull so it will lean back slightly. Superglue the skulls onto the plinth. Superglue the two circles onto the top of the skulls. |
 |
 |
|---|
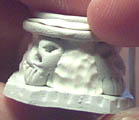
| 9. | Roll up a small bead of clay and thread it into the hole between the skulls. Use a paintbrush handle to press the clay in and fill the gap. The paintbrush handle is also used to texture the clay between the skulls. |
 |
 |
|---|
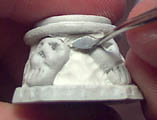
| 10. | All of the deep horizontal cracks and crevices need to be filled in. A small bead of putty is placed around the top edge and a dental tool is used to scrape the excess off. The area above the top of the skulls also needs to be filled. | ||
|---|---|---|---|
 |
 |
 | |
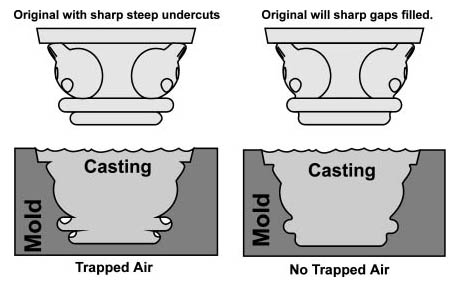
| 11. | This diagram shows how steep horizontal undercuts can trap air in your casting. Demolding (removing the cast from the mold) can also be difficult with steep undercuts. |
|---|---|
 |
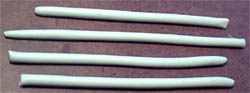
| 12. | I'm going to use polymer clay for the spiral pillars. It's cheaper than epoxy putty and not as sticky. Since I need to trim the ends when I'm finished, epoxy putty would be very difficult to trim. Start by rolling out four canes. Try to get them as even and smooth as possible. Place all four canes in a bundle, as straight and even as you can. Gently twist both ends. Place the twisted pillar on a piece of glass and bake it in the oven at 275 degrees for about 1/2 hour and then trim it to the finished size. |
 |
|---|---|---|
 | ||
 |
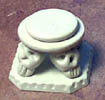
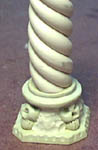
| 13. | Here's the finished pillar and base. I didn't make the pillar any particular length. I'll cut it to length depending on where I need it. Please note that the mold of this piece will not be available for sale. It would take a lot more time and precision to make this workable for a production mold (I have very high standards). To see how to make a mold and casts of this item, check out the moldmaking page. |
 |
|---|
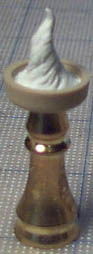
Making a Large Floor Torch
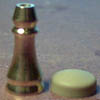
| 1. | This torch will be made from a brass lamp decoration and a plastic screw cap. I started by sanding the top of the screw cap flat so it will meet flat against the brass piece. I glued the two together with super glue. |
 |
 |
|---|
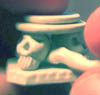
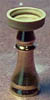
| 2. | I decided to use epoxy putty for the flame. I didn't want to use polymer clay because you have to bake it (and that would melt the screw cap). I filled the cap part way with clay. There's a ridge on the inside of the bowl that needed covering. I then formed a pinch of clay into a cone shape and stuck it on. The last step was to shape the cone into a sharp point and twist it around. I used a dental tool to add some texture as well. To see how to make a mold and casts of this item, check out the moldmaking page. |
  
|
 |
|---|
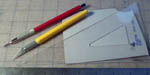
Making an Iron Door
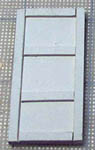
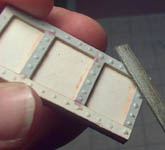
| 1. | I'm making this iron door out of matt board. It's the same stuff you matt pictures with. Any frame or craft shop should have some scraps you can get for cheap. I started by cutting a piece for the door (1" x 2"), and several strips 1/8" wide. You'll also notice that I'm cutting on a special cutting matt. These will keep you from cutting up your table and also keep your blades sharp longer. |
 |
|---|---|---|
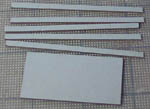 |
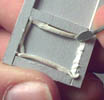
| 2. | Glue and cut the strips to fit around the door as shown. Try to get them flush with the outside edge of the door. Be sure to do this on both sides of the door. You'll notice several gaps between these strips. These will have to be filled for the casting to come out good. |
 |
 |
|---|
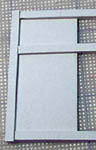
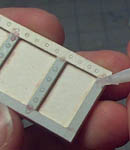
| 3. | I'm using polymer clay to fill in all the gaps. If you don't fill them, they'll form pockets for air bubbles later on. Fill in the edges of the door as well. Since I used polymer clay, I'll need to bake the door to harden the clay. |
 |
 |
|---|
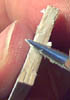
| 4. | Add dots of superglue gel for rivets. When they dry, file down the sharp points or they will be difficult to cast. The door is finished! To see how to make a mold and casts of this item, check out the moldmaking page. |
 |
 |
|---|