Ruined Fieldstone Tower Building Instructions
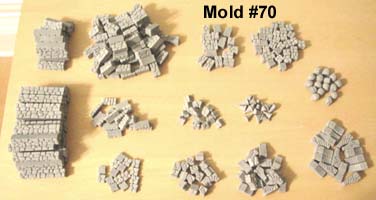
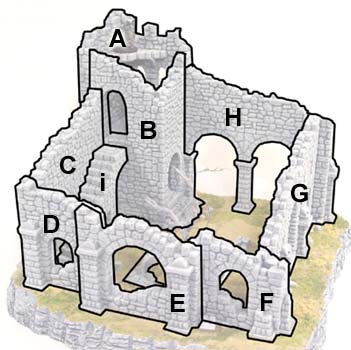
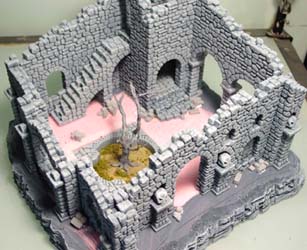
This page will show how to use Mold #70 and Mold #75 to build the ruined tower shown here. To make this tower, you will need to cast mold #70 16 times and mold #75 12 times. It probably wouldn't hurt to cast mold #75 a couple more times (since you're already casting mold #70 more times anyway). That way if you have any miscasts you won't have to use them on the tower. To build this tower, you may want to print out the ruined fieldstone tower plans found on the Building Plans Page. It's also quite helpful to look over the section on What is on Mold #75. This article shows how to identify the ruined fieldstone pieces and how they are used. |
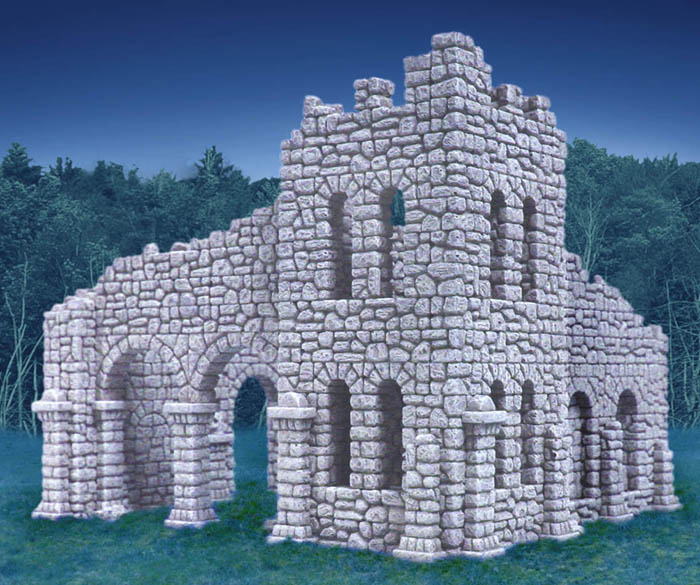 |
Finished Model Video This shows what the finished ruined tower will look like and shows it with a 28mm scale figure. |
 |
Building The Ruined Fieldstone Tower
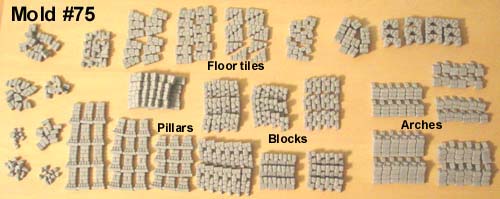
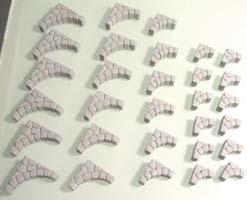
| 1. | To make this tower, you will need to cast mold #70 16 times and mold #75 12 times. I'll start by sorting the blocks from mold #75. To recognize each type of block, refer to the section on What is on Mold #75. |
 |
|---|
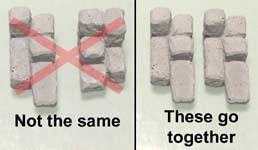
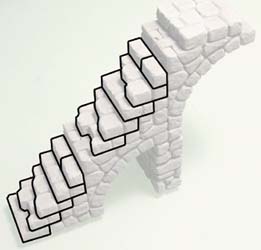
| 2. | Start by gluing the arch pieces together. You will only be able to glue two duplicate pieces together to make a full arch. |
 |
 |
|---|
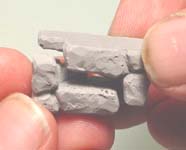
| 3. | I'm using Legos to help me glue the arches together nice and straight. Glue all of the arches that you have cast. This will save you a lot of time later on. |
 |
 |
|---|
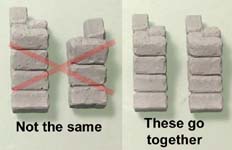
| 4. | The ruined blocks work much the same way as the arches. Simply take two duplicate pieces and put them together to make a full block. |
 |
 |
|---|
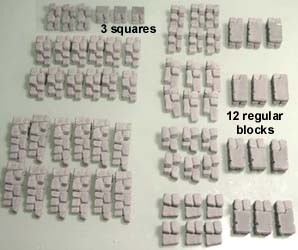
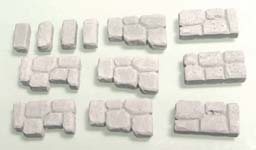
| 5. | Here are all the ruined blocks that you have cast. You want to glue together 24 of the ruined blocks to make 12 additional basic blocks to build with. You also want to make 3 square blocks (in the upper left). |
 |
 |
|---|
| 6. | Here I've sorted the blocks from mold #70. Be sure you take the basic blocks you've glued together (above) and sort them into these piles as well. |
 |
|---|
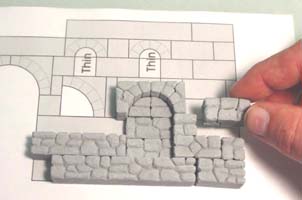
| 7. | Next you want to print out the building plans from the Building Plans page. These are the plans labeled Ruined Fieldstone Tower Plans. These will help you build because you can lay the blocks directly on the plans. Be sure that you do not glue them to the paper but only glue the blocks together. |
 |
|---|
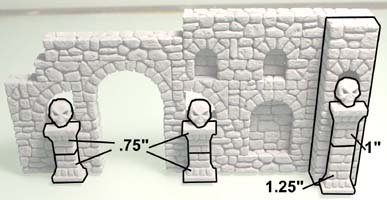
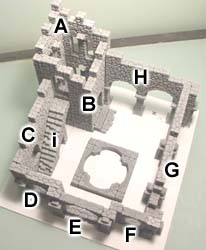
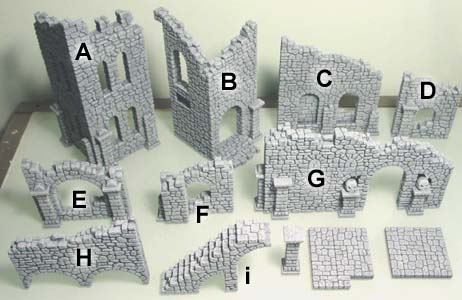
| 8. | Here is a layout of the completed tower. This shows how all of the wall sections fit together. Each wall section is labeled, and the printed plans also have the same letters corresponding to each part.
However, you can skip this piece if you do not want the hole or tree there. |
 |
|---|
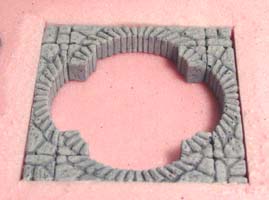
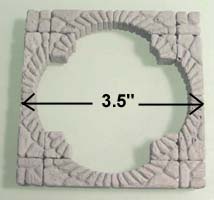 Assemble and glue the pieces shown here. These form the hole in the ground in the center of the courtyard.
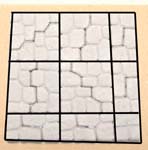
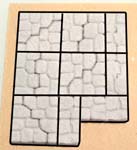
| 9. | Assemble and glue these floor sections. These are made from the ruined floor tiles.
|
 |
 |
|---|
 You may have to use thin wall blocks for a few of the narrow tiles. I've glued these onto a piece of cereal box. Once the glue dries, trim them out with scissors.
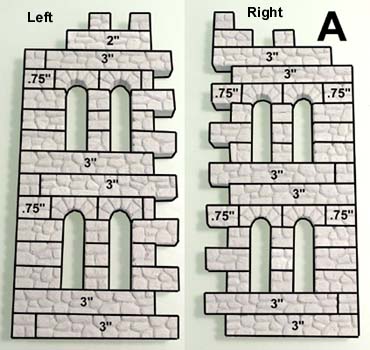
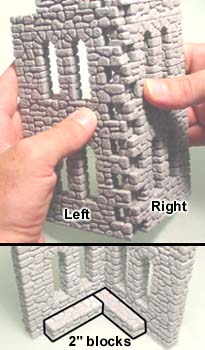
| 10. | Assemble and glue together these two sides of part "A". Once dry, glue and interlock them to make a 90 degree corner. Be sure to fold the outside edges away from you. Glue a couple of 2" blocks on the inside. These will support the floor. |
 |
 |
|---|
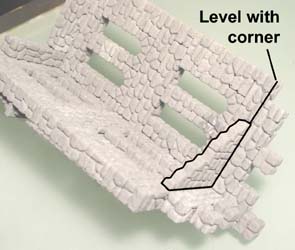
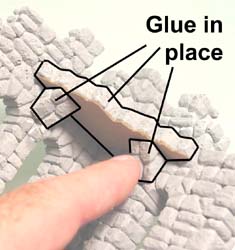
| 11. | When the corner is dry, lay it down and glue the top floor in the place shown here. The exact location is also indicated on the printed plans. Also glue some of the small angle pieces on the underside of the floor. Place them far enough under the floor so they cannot be easily seen. |
 |
 |
|---|
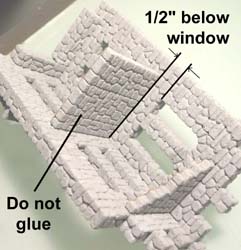
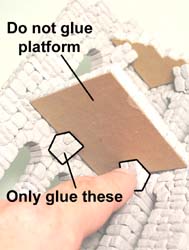
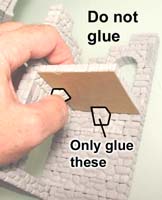
| 12. | Position the middle floor as shown but do not glue it in place. We also need to use it for position on the other sides of the tower. The top of the floor goes 1/2" under the bottom of the windows. Position the angle blocks under the floor and glue them into place. Do not glue the floor in place. |
 |
 |
|---|
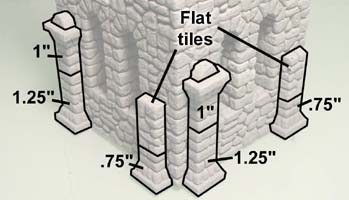
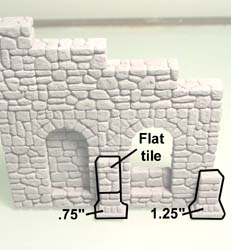
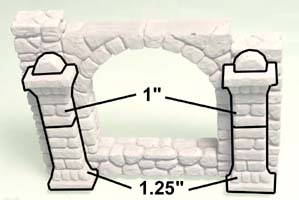
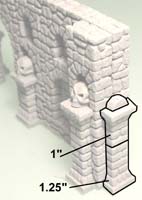
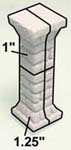
| 13. | Finish this corner piece by adding the pillar pieces on the outside. The exact location of the pillar pieces is shown on the printed plans. Two of the pillars are capped with the flat tiles from mold #70. These flat tiles are 1" long x 1/2" wide x 1/4" thick. |
 |
|---|
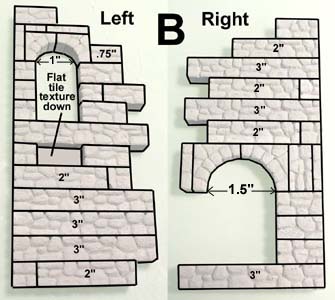
| 14. | Assemble and glue together these two sides of part "B". Once dry, glue and interlock them to make a 90 degree corner. Be sure to fold the outside edges away from you. Glue the edge of the pillar flush with the edge of the wall (the flare slightly overhangs). |
 |
 |
|---|
| 15. | Position the middle floor as shown but do not glue it in place. We need to paint it separately before gluing it in. The top of the floor is flush with the doorway bottom. Position the angle blocks under the floor and glue them into place. Do not glue the floor in place. |
 |
 |
|---|
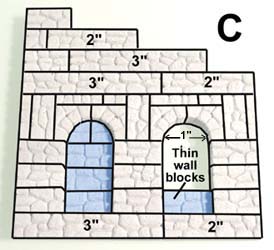
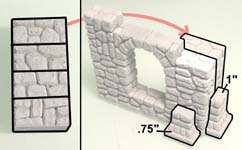
| 16. | Assemble and glue section "C" shown here. The blocks shown in blue are the 1/4" thin wall blocks used to fill in one arch and part of the other. When dry, stand the piece up and add the pillars on the front in the position shown. |
 |
 |
|---|
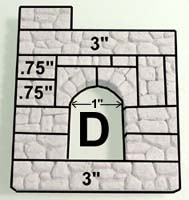
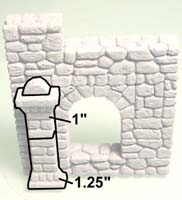
| 17. | Assemble and glue section "D" shown here. When dry, stand the piece up and add the pillar on the front in the position shown. |
 |
 |
|---|
| 18. | Assemble and glue section "E" shown here. When dry, stand the piece up and add the pillars on the front in the position shown. |
 |
 |
|---|
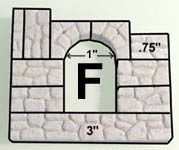
| 19. | Assemble and glue section "F" shown here. Glue together the stack of blocks shown. When dry, stand the piece up and glue the block stack to the back of the arch piece and add the pillars on the front in the position shown. |
 |
 |
|---|
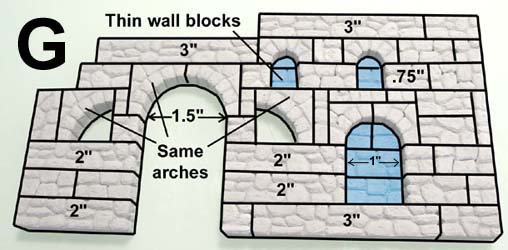
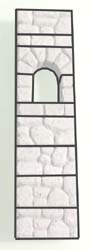
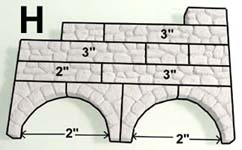
| 20. | Assemble and glue section "G" shown here. The blocks in blue are thin wall blocks used to fill the arches. Glue together the stack of regular blocks with the small arch shown. |
 |
 |
|---|
| 21. | Glue the strip of blocks onto the right edge of the wall. Then glue the pillars and skulls onto the wall as shown. |
 |
 |
|---|
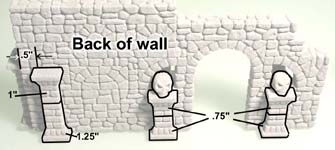
| 22. | On the back side of the wall, glue the pillars and skulls shown. The flat part of the left pillar is 1/2" inch away from the edge of the wall. |
 |
|---|
| 23. | Assemble and glue section "H" shown here. Afterward, assemble and glue the full pillar shown. This pillar will eventually go under the center of the large arches on piece "H". However, we'll leave it separate until after it's painted. |
 |
 |
|---|
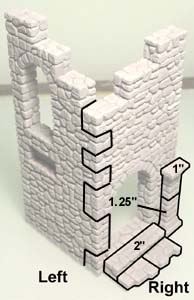
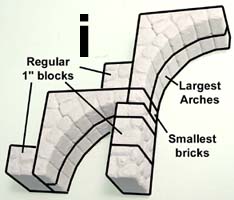
| 24. | Assemble and glue stair "i" shown here. This piece uses the largest arches that are on the mold. Once dry, stand it up and add the small bricks onto one side of the stairs along with the floor tile on the very top. |
 |
 |
|---|
| 25. |
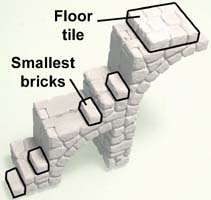
Glue the tiles and blocks down as shown here. Alternate between using the good steps and the ruined steps as you go along. You'll notice that the unshown side of the stair case will have some holes in it. Don't worry about these because that side of the stairs will go against a wall. |
 |
|---|
 Gather the small bricks, floor tiles and thin wall blocks shown here. These will be used for the steps.
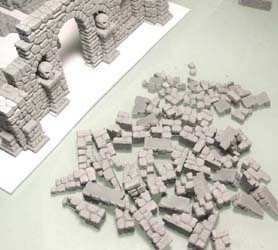
| 26. | That should be all of the pieces for the ruined tower. Spread out the printed floorplan, set the pieces on it and make sure they fit properly. The printed plans are found on the Building Plans page labeled Ruined Fieldstone Tower Plans. Gather the remaining ruined blocks. These will be set on top of the walls next. |
 |
 |
|---|
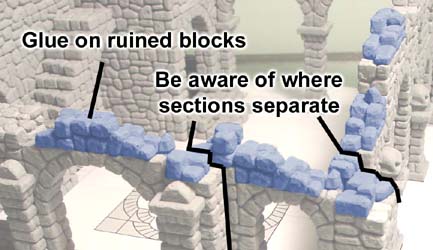
| 27. | Start placing and gluing the ruined blocks on top of the walls. I prefer to place all of the ruined blocks on first, see how it looks, then go back and glue them in place afterwards. Be sure that you keep in mind where the sections separate. You don't want to accidentally glue two sections together by bridging them with a ruined block. Add ruined blocks to any surface that looks too flat or clean. Don't forget to scatter a few small stones around! |
 |
|---|
| 28. | Here are all of the pieces to the ruined fieldstone tower. You can see all of the tops have the ruined blocks glued on them. At this point you want to paint the sections completely before assembling them. For this tower I've used the castle gray color scheme. You can find these colors on our Painting Instructions page. The remainder of the instructions on this page will show how to make a rock base for the tower to set on. |
 |
|---|
Making a Rock Base
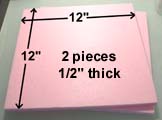
| 1. | The rock will be made of polystyrene foam insulating board. This is the stuff they use for insulating houses before they put siding on. You can get it at most lumber yards and it usually comes in pink or blue in thicknesses of 1/2", 1", 2" and even 3". For this project we're going to use two pieces of 1/2" thick board that are 12" square. |
 |
|---|
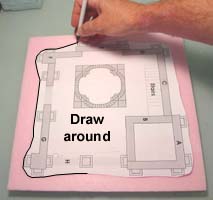
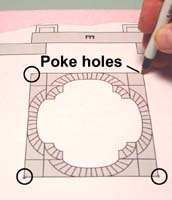
| 2. | Using a pair of scissors, trim around the floor plan as you see here. The printed plans are found on the Building Plans page labeled Ruined Fieldstone Tower Plans. Lay the plan down on the foam and draw around the outside of it with a pen. Poke 4 holes around the outside edges of the square in the center of the courtyard. |
 |
 |
|---|
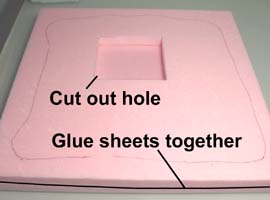
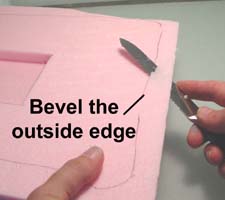
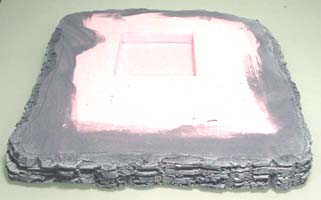
| 3. | Connect the 4 dots and cut a square hole in the center of the foam with a hobby knife. Afterwards, glue the two foam sheets together. Use a knife to bevel the outside edge of the foam slightly. Don't go past the line! |
 |
 |
|---|
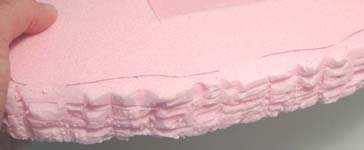
| 4. | Using a hobby knife, carve the edge of the foam to look like rock. For detailed instructions on how to do this, look at our Tips & Tricks 9 page. |
 |
|---|
| 5. | I painted the rock edge using the same Castle Gray colors used on the tower. Next, I glued the block edge down into the square I had cut. |
 |
 |
|---|
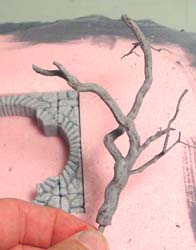
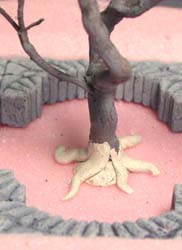
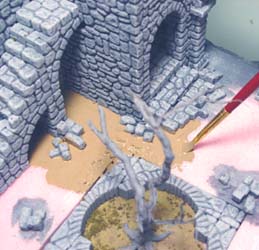
| 6. | I made the tree using roots as shown on my Tips & Tricks 13 page. I drilled a hole in the bottom of the tree and glued in a pointed stick. The roots I made using epoxy putty rolled into thin cone shapes. They were painted afterwards. |
 |
 |
 |
|---|
| 7. | I added ground cover around the tree before I glued the ruined tower walls on (it was easier to reach that way). To add the ground cover, start by painting the foam with dirt colored latex paint. |
 |
 |
|---|
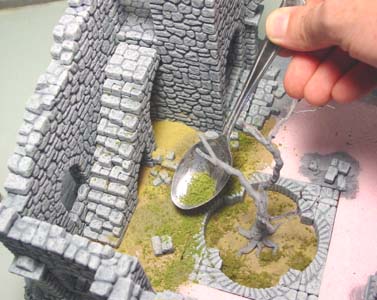
| 8. | While the paint is still wet (paint it on thick), sprinkle different colors of ground foam on top. I'm using Woodland Scenics products here. A spoon will make it easier to reach into the corners. I'm using dead colors (yellow and muted green) to give the ruin more of an abandoned look. You'll also notice that I've placed a few broken stones on the ground and painted them gray before adding the ground cover. Once the paint is dry you can turn the whole thing upside down and give it a good shake to remove the excess ground cover. |
 |
|---|
Click on a photo to view a larger version of it. Since the ruined fieldstone pieces interlock to make full blocks, these pieces can also be used to make removable sections. Imagine a building that is whole, but when you lift off the top you're left with a ruin. To learn how to make removable sections like this, visit our Tips & Tricks 23 page. |
 |
 |
 |