Building the Octagon Tower
|
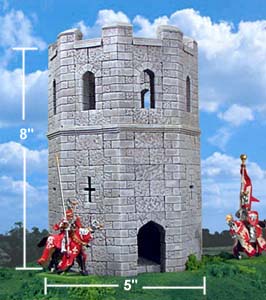
Octagon Tower Building Instructions
You will need to cast the octagon tower mold (#63) 16 times. You will also need 22 basic blocks to complete the tower. You can find these basic bocks on mold #40 or mold #50.
The first instructions shown here do not include a spiral staircase. If you want to add a spiral staircase to the tower, look further down in the instructions before you start to build the tower. You will have to alter the plan slightly.
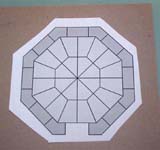
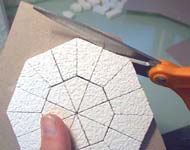
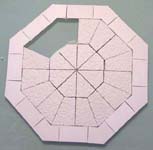
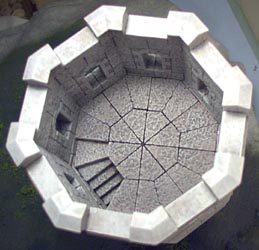
| 1. | You can download the plans shown here from the Building Plans page. Start by cutting out the floorplan of the tower and gluing it to a piece of cereal box. Next trim away the outside and trim off the black outline also. Glue the floor tiles down to the center of the plan. |
 |
 |
|---|
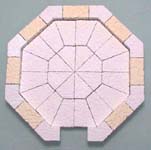
| 2. | Place a row of blocks around the outside. Glue them together but don't glue them down to the plan or the floor tiles! You'll want to remove the building from the floor later on to paint the thing. You'll also notice that some of the blocks are yellow. These represent basic blocks (1/2" x 1/2" x 1") that you can find on molds #40, 50 or 51. |
 |
|---|
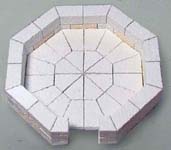
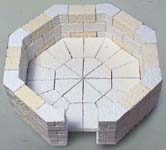
| 3. | Here are the next two rows of blocks on the tower. Be sure to keep the rows straight. Use a flat piece of cardboard to push up against the sides of the tower to straighten it. |
 |
 |
|---|
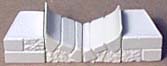
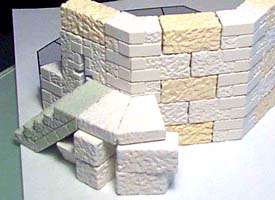
| 4. | For the fourth row, glue the pieces shown to make the top of the doorway (this is put together upside-down). It's made of two angle pieces and two arch pieces. I made these arch pieces especially for times when you only have a 1" gap and don't have room for decorative side trim. The lower photo shows the fourth row of blocks with the doorway pieces shown in red. |
 |
|---|---|---|
 |
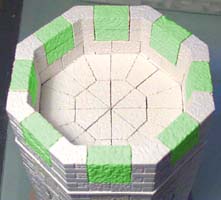
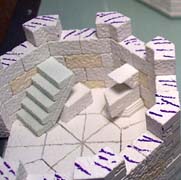
| 5. | For the next row, just glue the elbow blocks down (plus the one regular block in the front). We want to make a removable layer at this point. Mark the tops of this layer (I used a black marker) because you don't want to glue it to the layer above. It will serve as a reminder not to put glue there. Later you will be able to lift off that section. This will make it easier to paint the inside and also place miniatures in the building when finished. |
 |
|---|
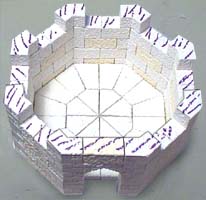
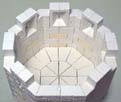
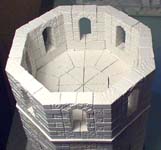
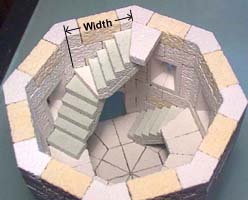
| 6. | Next, place the arrow slits between the blocks. Glue the two halves together but don't glue them down to the layer below! You'll want to remove the arrow slit layer later on. Place the next row of blocks down, gluing them to the arrow slits but not to the layer below! Now glue the final layer of blocks shown. These rows take a whole lot of elbow blocks. |
 |
|
|---|
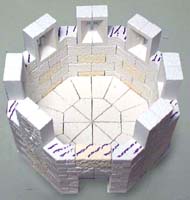
| 7. | Here are the next two rows glued on top. The second floor will go on top of this last layer. Once again, mark this layer so that you don't glue the second floor onto it. |
 |
 |
|---|
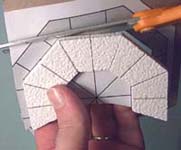
| 8. | For the second floor, start by gluing a set of floor tiles down to a piece of cereal box. If you want to be sure it's straight, print out a copy of the floorplan from the Building Plans page and glue it down first. When dry, cut the excess cereal box off with a pair of scissors. Be sure to cut really close so there's no overhanging paper. |
 |
 |
|---|
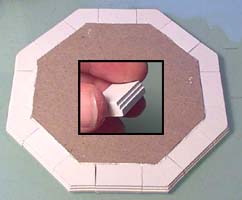
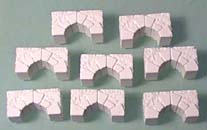
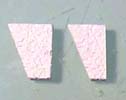
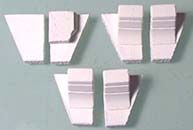
| 9. | Turn this piece upside-down. We're going to glue some decorative trim around the outside. The center photo shows what the trim pieces look like. Lay them around the outside of the floor so the scraped side of the block faces down. Glue these pieces around the outside. |
 |
|---|
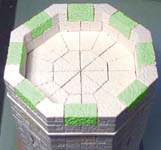
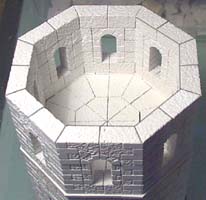
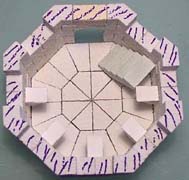
| 10. | Place the floor on the tower but don't glue it down! On the last row shown here, don't glue the blocks shown in green! These will act as spacers for the windows to come next. |
 |
 |
 |
|---|
| 11. | For the next row, also do not glue the blocks shown in green. Glue together 8 arches as shown. Be sure to get them going the right way. It's a little hard to see at first, but they should form a peak at the top. |
 |

|
|---|
| 12. | Remove the spacer blocks (in green above) and glue the trim blocks along the sides of the window as shown. You will notice there's a pattern to the blocks. I placed the solid brick pattern towards the bottom on all of the blocks, and the half brick towards the top. |
 |
|---|
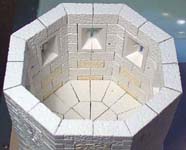
| 13. | Glue on the next row which includes the window arches. At this point, you may want to flip the whole thing over and sand the top. The next row will need a fairly flat surface to look good. |
 |
 |
|---|
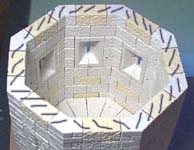
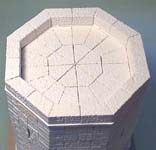
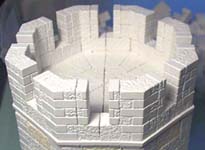
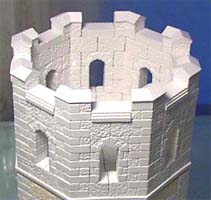
| 14. | On top of the windows, add the row of blocks shown. To finish the very top of the tower, place on the elbow blocks with the straight trim pieces in-between. Cap the elbow pieces off with the beveled elbow pieces as shown. |
 |
 |
|---|
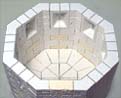
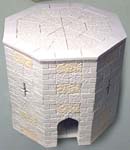
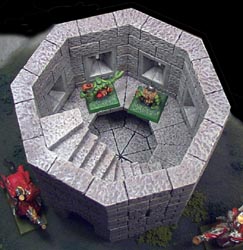
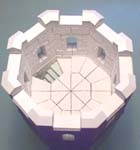
| 15. | To paint the model follow the instructions on the Painting Instructions page. Here's a finished photo of the tower. If you would like to add a spiral staircase (as shown in the second photo), follow the directions below. You will also need the Prison Tower mold #60 to add the stairway. | 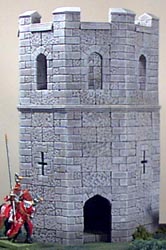 |
 |
|---|
Adding a Spiral Staircase to the Tower
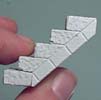
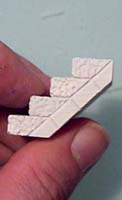
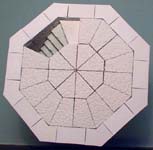
| 1. | For this spiral stairway, you will need mold #60 the Prison Tower. You will need the stair sections and the flat tiles 1/2" x 1/2" x 1/4". Start by gluing a flat tile to the bottom of the stair piece. You may still have to sand the bottom of the stair piece a little so it will sit flat. |
 |
|---|
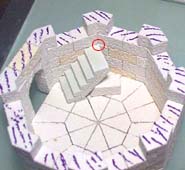
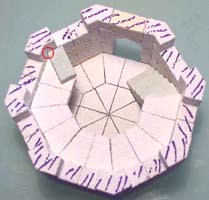
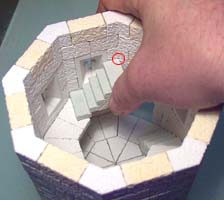
| 2. | Glue the stair piece against the wall as shown. Brace it temporarily with a spare block while the glue dries. Be sure that the top edge of the stair fits into the corner circled in red. Also be sure that the top of the stair meets exactly on the block line (where the rows of blocks meet). |
 |
|---|
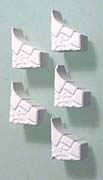
| 3. | We'll use 5 of the door arch pieces next. For temporary support, stack a flat trim piece and a regular block. Then glue the door arches against the side walls as shown. Do this for the next 5 sides next to the stairs. |
 |
 |
 |
|---|
| 4. | Next we'll make a walkway for the archers (who will want to use the arrow slits). Print out an extra copy of the floor plan found on the Building Plans page. Glue the floor plan down to a piece of cereal box. Then glue 10 floor tiles to it as shown. After the floor tiles dry, cut around them with scissors to remove the excess cereal box. |
 |
|---|
| 5. | Glue the walkway on top of the supports. It should overlap the top stair. Take a flat tile from the Prison Tower and glue it down as shown. Make sure that the corner of the tile sets into the corner of the tower (circled in red). Be sure that the top of the tile meets exactly on the block line. Next, take a stair section and sand the bottom corner off as shown. |
 |
 |
|---|
| 6. | Place the next level of the tower on. Glue the stair section against the wall only! If you glue it to the step below, you won't be able to remove the top section later on. Make sure that the corner of the stair sets into the corner of the tower (circled in red). Be sure that the top of the stair meets exactly on the block line. You'll have to hold this here a while until it dries (unless you can stack up enough blocks to support it). |
 |
|---|
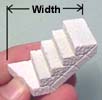
| 7. | Take the floor tile shown and sand off about 1/4" off the square side. Fit it under a stair piece from the prison tower. The outside width of the stair should be the same width as a wall on the octagon tower. |
 |
 |
|---|
| 8. | Glue the stair section against the wall, making sure the top corner of the stair meets with the inside corner of the tower. You may have to hold it a while until it dries. Now glue a floor tile from the tower on top of the stair as shown. Be sure the top of the tile lines up with the top of the wall, and fits in the corner also. The second floor will set on top of this section, but we will have to alter it by leaving some tiles out to form a stairwell. |
 |
|---|
| 9. | Make the second floor, but leave out the 3 floor tiles as shown. Set it on the tower and place the rest of the tower on top. Don't glue any of these pieces on until after you have painted the model! |
 |
 |
 |
|---|
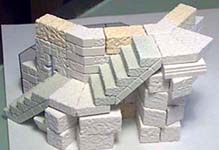
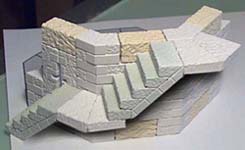
| 10. | The first photo shows the top section removed (so you can see people standing in front of the arrow slits). The second photo shows the top of the tower added on. The next section shows you how to add a stairway spiraling around the outside of the tower. |
|
 |
|---|
Other Ways to Add a Staircase
On the Inside
| 1. | If you don't have a Prison Tower mold, you can still add a staircase by gluing doorway arches onto the bottom of the floor tiles. Note that the second step has a flat piece under it because it only needs to be off the ground by 1/4".
Lay the tower on its side and glue the steps, slowly rising as it goes around the tower. Allow the glue to dry well before rotating the tower and gluing more steps on. |
|
 |
|---|
On the Outside
| 1. | You will need a stair piece from the Prison Tower mold, with a flat tile placed in the bottom to form a full 5 step piece. You also need 2 floor tiles from the octagon mold. Glue them together and glue a doorway arch on the bottom for support. |
 |
 |
|---|
| 2. | Glue the stair piece along the wall as shown. You will have to put a spare block under the stair to hold it in place temporarily. The floor tile piece goes next. Once again, temporarily place blocks under the pieces to hold them in place while the glue dries. Be sure that your steps line up with the block lines on the tower (where the blocks meet at the seams). |
 |
|---|
| 3. | The next row of steps goes the same way: Use a 5 step piece along with the floor tile piece to continue around the tower. When you finish, remove the temporary blocks to see your stairway. |
 |
 |
|---|
Various Ways to Use Octagon Pieces
| 1. | This mold is best used for a 5" outside diameter tower. If you use the pieces for any other size of tower, the floor tiles won't match up neatly and it won't mesh seamlessly into your existing floorplans. |
|---|
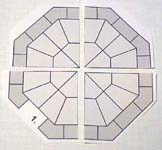
| 2. | Start by printing out a copy of the Octagon Tower building plans. You can find these on the Building Plans page. Use a pair of scissors and cut out the floorplan. If you want your octagon section to seamlessly fit into your existing floorplan, you must cut the plan as shown. As long as you have 1/4 or 1/2 pie shaped pieces, everything will work fine. |
 |
 |
|---|
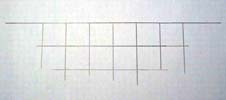
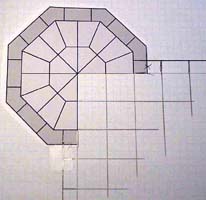
| 3. | For this first example, I'll add half of a tower onto the side of a building. Use 1/4" graph paper to draw out your floor tiles first. Don't worry about the walls yet, just draw out the size of the floor. |
 |
|---|
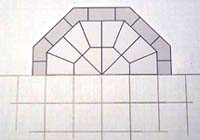
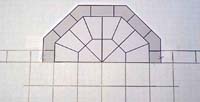
| 3. | Place 1/2 of the octagon floorplan on top of the graph paper and tape it into place. Be sure you line up the floor tiles as shown. Finally, draw the wall around the outside of the floor. Also note that one of the wall blocks on the octagon floorplan is cut in half. Continue the other half of that block when you draw out the wall around the floor. You can see from this that the octagon sections will blend seamlessly with your floor plan. |
 |
|---|---|---|
 |
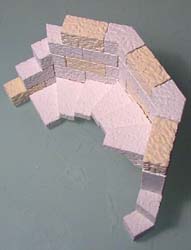
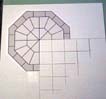
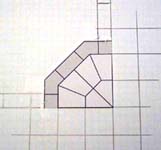
| 4. | For a corner tower, it's basically the same thing. Draw out the corner of floor you want to add the tower to. Don't add the walls yet. Cut 3/4 of the octagon floorplan and tape it on the corner. Finally, draw the outside walls around your floor. |
|
 |
|---|
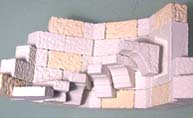
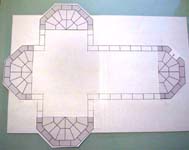
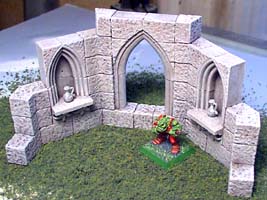
| 5. | These are examples of an inside corner, building end and a floorplan for a cathedral. |
 |
 |
 |
|---|
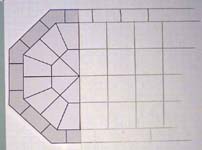
| 6. | You can also add different windows, and add different lengths of sections between the elbow pieces of the octagon. For this example, I used pieces from the bell tower with the octagon pieces. If you look closely at the window, you'll see that it's wider than the other 2 sides. Once you start adding more wall length between the elbows of the octagon, the floor tiles will have to be custom cut to fit. |
 |
|---|
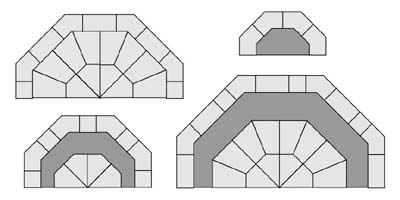
| 7. | To show this, the first picture is a normal tower (with 1" blocks between the elbows). If you change the size of blocks between the elbows, the floor tiles no longer work and you will have to custom cut pieces to fit. The dark gray areas represent what you would need to fill somehow. However, there are many experienced builders out there who won't have a problem with cutting floor tiles to fit. |
 |
|---|
| 8. | Overall, I think this is a very useful mold and fairly easy to use. It can be used for balconies, wells, bunkers and dungeon hallways that need to be placed at angles. |
|---|