Egyptian Tower Mold

|
|
How to Use Mold #93
| 1. |
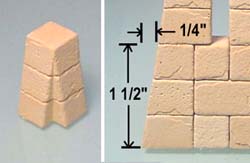
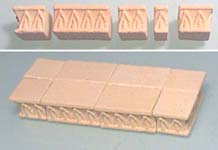
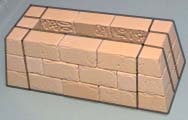
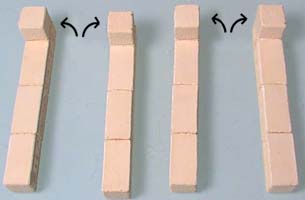
Stack the 3 blocks shown to make a full corner piece. When the corner blocks are used in a wall section, the walls will slope in 1/4" for every 1.5" in height. |
 |
|---|
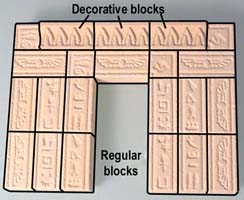
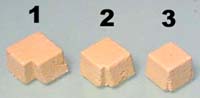 The first blocks to identify are the corner blocks. These are used to join the sloping walls together at an angle.
| 2. |
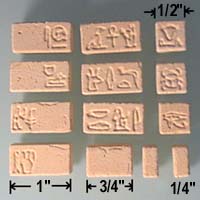
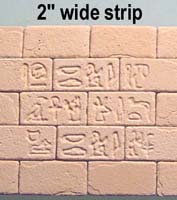
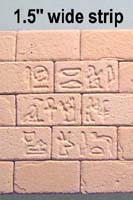
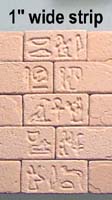
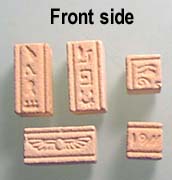
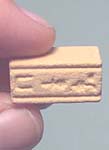
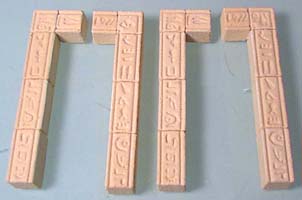
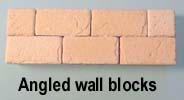
On one side of the sloped wall blocks, I've engraved some hieroglyphic symbols. That way you can rotate the block if you want the symbols to show. The photo shows the different lengths of the angled wall blocks. The 3/4" and 1/4" wall blocks do not have any symbols on them. |
 |
|---|
 The angled wall blocks that go against these corners form the sloping walls of the tower. The first photo shows how the edge of these blocks matches the slope of the corners.
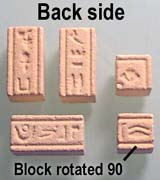
| 3. | You'll notice that some of these blocks only have symbols on half of the block. I've done this so that you can make the hieroglyphs in straight vertical rows down the side of a wall. The disadvantage is that the back side of these wall sections would have random symbols in odd places. However, since the walls slope in, you don't really notice it on the inside of the wall. Also, many times the back side of the wall is encased inside a tower so you never see it. |
 |
 |
 |
|---|
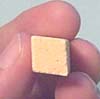
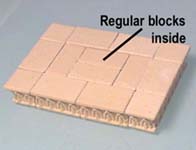
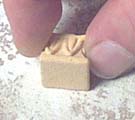
| 4. | I've also added some regular blocks to this mold. These blocks do not have the angle to them, so they can be used for straight square doorways and windows. These photos show the front and back sides of the blocks (except for the small square block at the bottom, which has the design on 2 adjacent sides). |
 |
 |
|---|
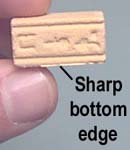
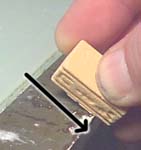
| 5. | Because of the sand-blasted texture, the scraped side of the block may have a sharp edge. To remove this edge, I would scrape the block across the sharp edge of a hard surface. I used the metal edge of my light table. If you don't have a sharp edge, a quick swipe on a piece of sandpaper will do just as good of a job. |
 |
 |
 |
|---|
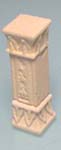
| 6. | The top decorative blocks are used to finish off the tops of the towers, and as caps for pillars. Use regular blocks to fill the inside of large flat roof sections. |
 |
 |
 |
|---|
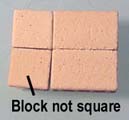
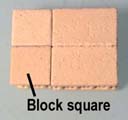
| 7. | Because the blasting process is hard to control, the side of one corner block is not square. To fix this, a couple of swipes on a piece of sandpaper will straighten it up enough that it won't be noticed. |
 |
 |
 |
|---|
| 8. |
Every wall section you add will end up being 1/2" shorter in width than the previous section. Eventually the tower will meet at the top in some way. |
 |
|---|
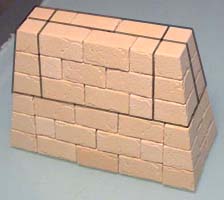
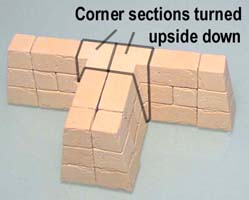
 It's easiest to create a tower in rows of 3. Place a set of 3 corner blocks on each corner and add wall sections in between.
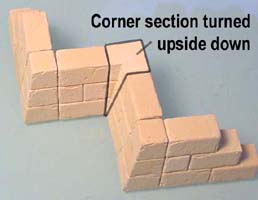
| 9. | For interior corners, simply turn the corner section upside down. Once again, it's best to create wall sections 3 rows tall so things will work out evenly. |
 |
 |
|---|
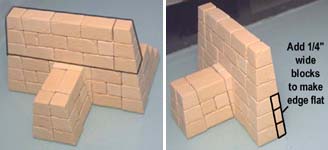
| 10. |
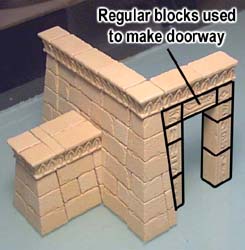
To add a flat doorway to this example, I'll have to use some 1/4" wide blocks to flatten out the side. I've used regular blocks to make a straight doorway in the side of a wall. I've finished the tops by adding the decorative top blocks on the walls and doorway. |
 |
|---|
 I've taken the "T" shape above and added another row on top of it.
Egyptian Pylon Building Instructions
This Egyptian pylon is made using mold #93. You will need to cast this mold 18 times to have enough blocks to build the pylon. There are no printable building plans for this model. Instead, print out this instruction page which shows the placement of each block. The slope of these pieces makes it so that drawing building plans would have been extremely time consuming.
| 1. | Make the doorway sides as shown. This close-up shows how I've arranged the symbols. Rotate the pieces outward for the next step. |
 |
 |
|---|
| 2. | 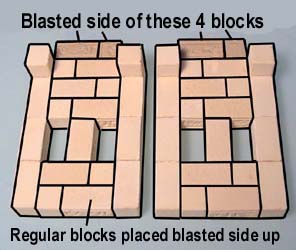 |
Fill in between these doorway sides using regular blocks. Be sure to position the blocks blasted side up so you can see the grainy texture towards you.
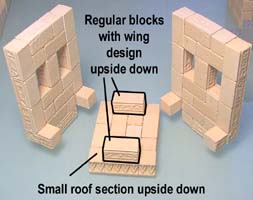
Make the small roof section (on the right) from regular and decorative blocks. |
|---|
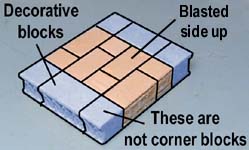 However, the very top row of blocks should have the blasted side facing upward (away from you).
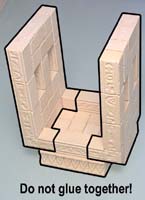
| 3. | Position the small roof upside down and place the two side pieces on either side as shown. Glue a regular block onto the underside of the roof section, with the winged design facing towards the outside and upside down. Then place each side together but do not glue them! This will help the winged blocks to be positioned correctly. |
 |
 |
|---|
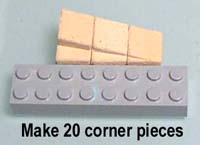
| 4. | Glue together 20 copies of this corner section. I'm using a Lego as a guide to keep the edges straight as I glue the corner sections together. Having these pieces pre-glued will save you a lot of time later on. |
 |
|---|
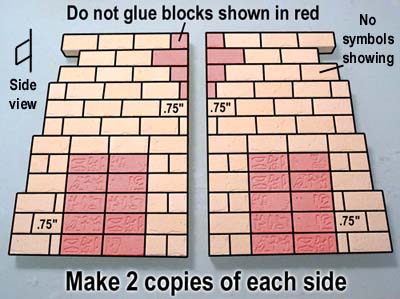
| 5. | Make 2 copies of each piece shown here for a total of 4 slabs. Do not glue the blocks shown in red. These are placed to help keep the walls square when you build them. To keep the walls straight, I used a large "L" shape of Legos as a right-angle guide when gluing these slabs. For this version, I did not show any symbols on the front faces of the slabs. The side you are seeing here is the front side (outside) of the pylon. If you stood this wall up, it would lean back away from you. |
 |
|---|
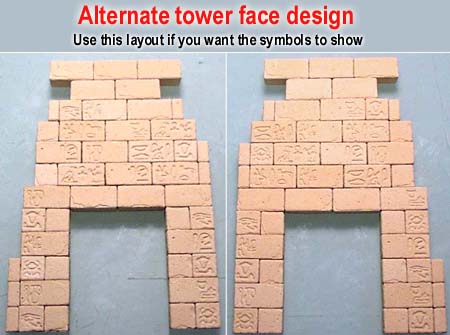
| 6. | If you want the symbols to show on the outside of the tower, here is an alternate design for the pieces above. At this point, I already removed the blocks in red so this shows what the finished face will look like. I tried to keep the symbols in straight vertical rows, which means I needed to use a lot of the 1/4" pieces. |
 |
|---|
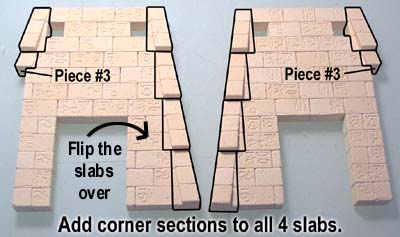
| 7. | Flip the slabs over. Glue the corner sections onto the outside edges all 4 slabs as shown. Piece #3 is the top block from a corner section. Position it in the same direction as the other corner pieces. You'll notice that there will be random symbols on the back side of the slabs. Since these will end up inside the towers, you'll never see them. |
 |
|---|
| 8. | 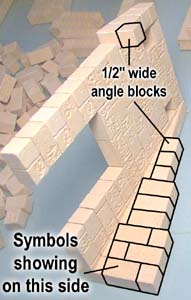 |
Be sure the symbols are on the inside of the tower as you add these blocks. Otherwise they'll show up on the outside of the tower. |
|---|
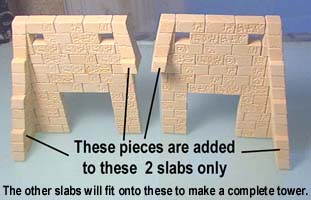 Add the angled blocks shown to only 2 of the slabs. The 2 remaining slabs will sandwich against these to make complete towers.
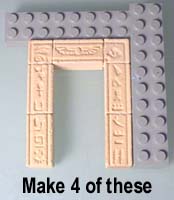
| 9. | Using the regular blocks, create 4 doorways as shown. Use the decorative top blocks to make 4 doorway tops and 2 tower tops. |
 |
 |
|---|
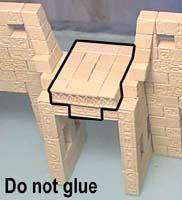
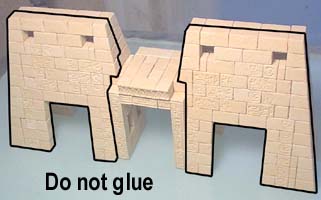
| 10. | Now we'll do a test fit of the pieces so do not glue these! Put the slabs on each side and place the doorway sides centered under them. If the doorway sides are too tall, you may have to sand the bottom of them. Place the small roof section on next. |
 |
 |
|---|
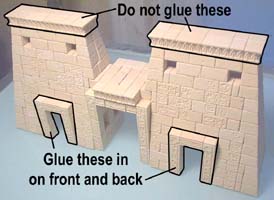
| 11. | Set the front side of the slabs on and place the decorative roof pieces on top. Glue the doorways in on all 4 slabs. |
 |
 |
|---|
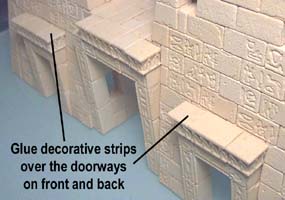
| 12. | You will need to sand the decorative tops that go above the doorways if you want them to set flush against the side of the towers. You don't have to get the angle perfect, just close enough so the pieces set above the doorways fairly close. Glue these into place. |
 |
 |
|---|
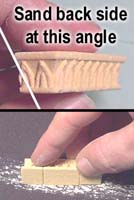
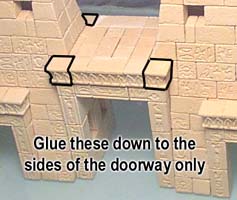
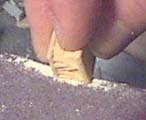
| 13. |
To get these to fit right, you'll have to sand the back at an angle so it will lay flush against the towers. Glue these 4 blocks down to the doorway sides only, otherwise you'll end up sticking the roof onto the doorway accidentally. |
 |
|---|
 The very last pieces to glue are the decorative corner blocks.
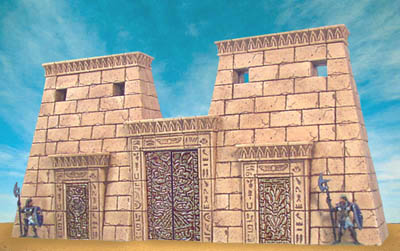
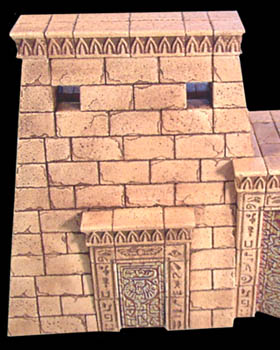
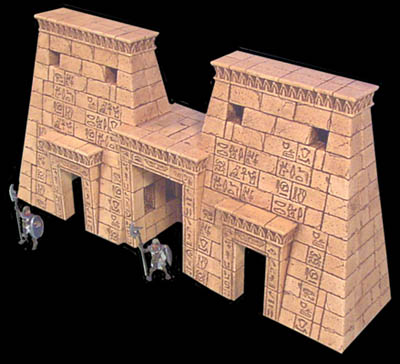
Here are finished photos of the Egyptian Pylon. The last photo shows what the pylon looks like if you use the alternate tower face design which has the symbols turned out where you can see them. For instructions on painting this model, refer to the Antiquing Method shown on the painting instructions page. Instructions for making the doors are found on the Tips & Tricks 16 page. They're made of aluminum foil which is embossed with an ink pen and antiqued using brown shoe polish. |
|
 |
 |
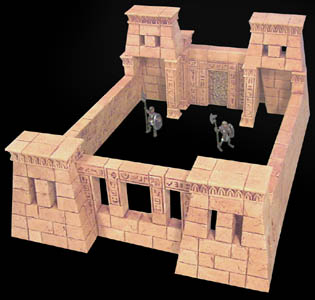
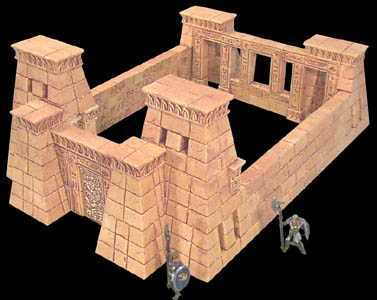
Pylon Temple Building Instructions
This Pylon Temple is made using mold #93. You will need to cast this mold 17 times to have enough blocks to build this. There are no printable building plans for this model. Instead, print out this instruction page which shows the placement of each block. The slope of these pieces make it so that drawing building plans would have been extremely time consuming.
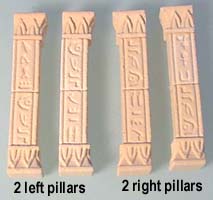
| 1. | We'll start with the main doorway. Use regular blocks for this, and be sure and use 3 decorative blocks on the top row. Each of the pillars is made from regular blocks and decorative corner blocks. The only difference between the left and right pillars is the direction the decorative corner block is facing. |
 |
 |
|---|
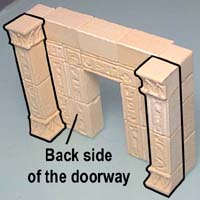
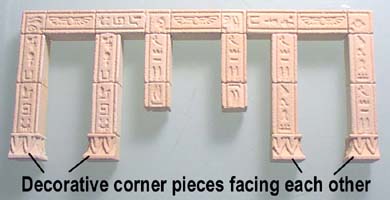
| 2. | Glue one of each pillar on the back side of the doorway. Glue together the frame shown out of regular blocks and decorative corner blocks. |
 |
 |
|---|
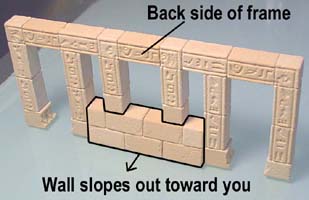
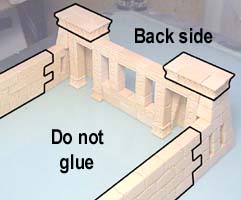
| 3. |
Turn the frame around and glue this wall section between the pillars as shown. The wall section would slope towards you and the top of the wall section should fit exactly under the 2 short pillars coming down. |
 |
|---|
 Glue together the small wall section out of angled wall blocks.
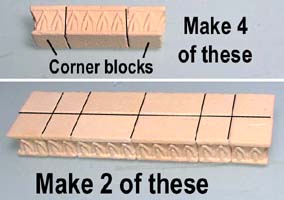
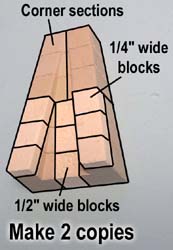
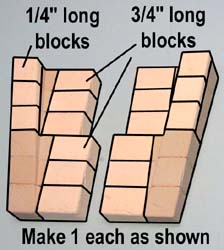
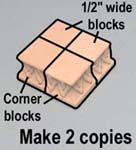
| 4. |
Make 2 copies of the piece shown in the second photo. It uses 1/4" wide pieces on the top. For the last photo, place the corner pieces upside down and glue on 3/4" and 1/4" wide pieces as shown. |
 |
 |
|---|
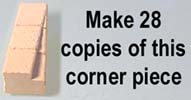 Glue together 28 corner sections. These will appear darkened for the next few photos.
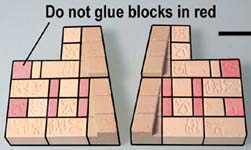
| 5. | Make the pieces shown here but do not glue the blocks in red. Be sure that the symbols are on the side facing you. That way they won't appear on the outside of the towers. |
 |
 |
|---|
| 6. | Glue the 3 pieces (from step 4 and 5) together as shown. Switch their places and glue the square and decorative blocks on. |
 |
 |
|---|
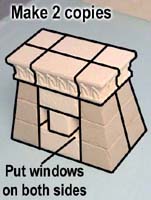
| 7. |
The second piece uses four corner sections, the top decorative blocks and some angled wall blocks. Repeat the windows on both sides of the piece. Make 2 of these pieces. |
 |
|---|
 The first piece shown is made from two decorative corner blocks and two 1/2" wide decorative blocks. The back side will be flat so it can set against the side of a tower. Make 2 of these.
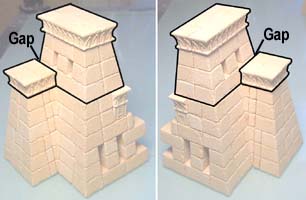
| 8. | Add these pieces to the tops of the towers. When you place the small decorative tops against the angled towers, you'll notice there will be a gap between top and the towers. You can sand the back of the top piece if you want it to fit better, but I didn't think it was all that noticeable. |
 |
|---|
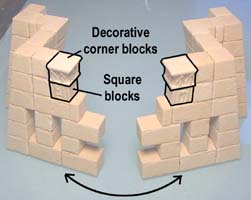
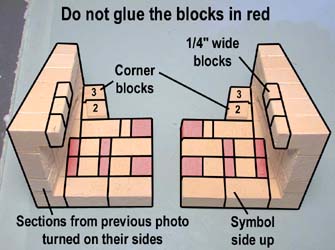
| 9. |
When dry, turn these on their sides and add the other blocks shown. Do not glue the blocks shown in red! To see what corner blocks are used here, scroll up to the top of this web page. |
 |
|---|
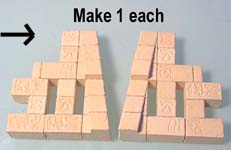
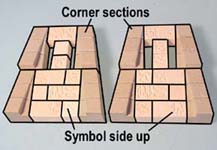 Make the two sections shown here using corner sections and angled blocks. Be sure the angled blocks are symbol side up (unless you want them to show).
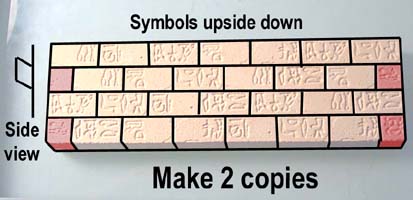
| 10. |
Make two copies of the wall section shown. Do not glue the blocks shown in red! If you don't want the symbols to show on the outside of the wall, be sure they are facing up and placed upside down as the photo shows. |
 |
|---|
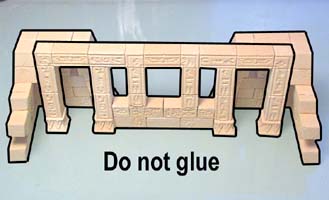
 Make two copies of the decorative top section shown.
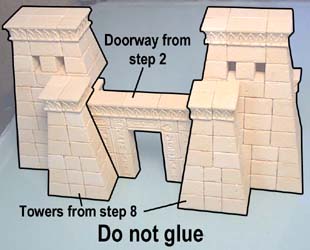
| 11. | Now that the pieces are finished, we'll do a test fit before the pieces are painted. Place the frame between the towers made in step 9. Now add the caps and wall sections. |
 |
 |
|---|
| 12. | For the front side of the temple, place the doorway between the towers. Turn the towers around and add the pillars underneath (you may have to sand them). Join the wall sections to complete the temple. |
 |
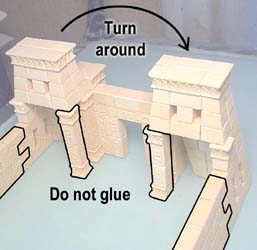 |
|---|
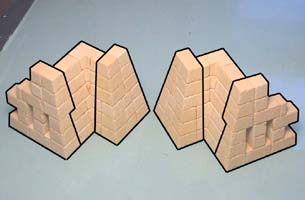
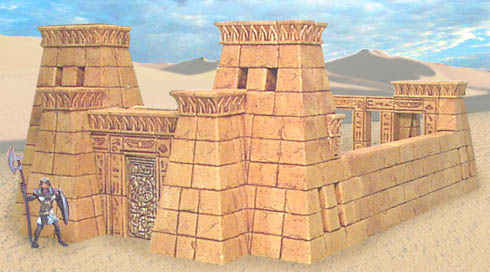
Here are finished photos of the Pylon Temple. For instructions on painting this model, refer to the Antiquing Method shown on the painting instructions page. Instructions for making the door are found on the Tips & Tricks 16 page. They're made of aluminum foil which is embossed with an ink pen and antiqued using brown shoe polish. |
 |
 |
 |