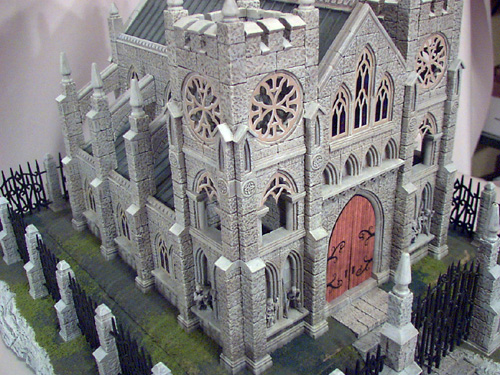
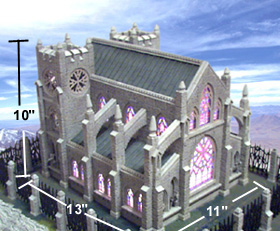
The Cathedral
Please note that the cathedral is a fairly difficult and time consuming project. I strongly suggest building one or two easier models before tackling this one!
|
Four molds are needed to complete this project:
Mold #40 Basic Blocks. Cast this mold 24 times.
Mold #54 Gothic Church. Cast this mold 18 times.
Mold #55 Bell Tower. Cast this mold 21 times.
Mold #56 Tomb mold. Cast this mold 18 times.
Even after you finish casting these, several blocks will still need additional casts! I suggest you sort and count the blocks according to the parts list on the cathedral plan. Certain blocks may need an additional 20 casts or so.
Building Instructions
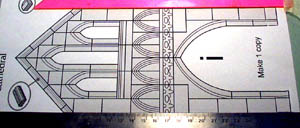
To complete this project you will need to download and print a copy of the Cathedral plans from the Building Plans Page.
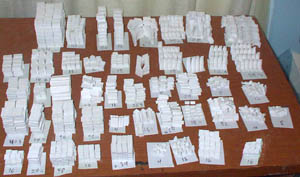
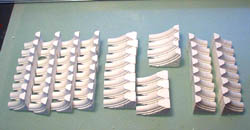
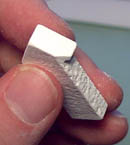
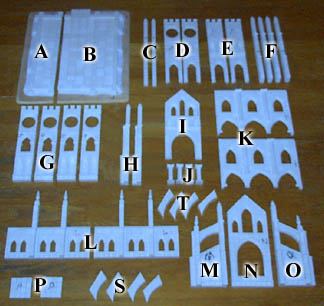
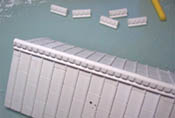
| 1. | Be sure the blocks are completely dry. Sort and count them. Be sure you have all the blocks needed as shown on the cathedral parts list (on the building plans page). Casting all of the blocks will take a while. Be prepared to spend a couple weeks casting them. I placed a piece of paper under each group of blocks showing how many I needed of each. |
 |
|---|
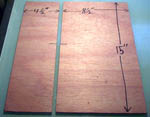
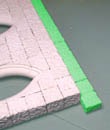
| 2. | The cathedral will be fairly heavy (maybe 15 pounds) so you'll need something durable to build it on. I took a two foot square piece of 1/4" plywood and cut it down to two pieces: 4 1/2" x 15" and 8 1/2" x 15". These will form two halves which fit together. When finished, you will be able to open the cathedral like a dollhouse. I placed the two halves together and sanded the edges of the plywood so it will look more natural when covered with grass (ground foam). |
 |
|---|---|---|
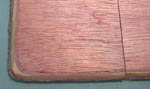 |
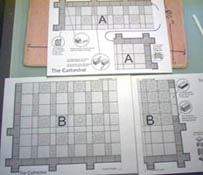
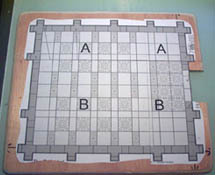
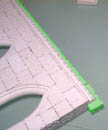
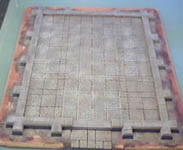
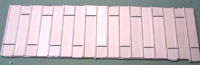
| 3. | The two halves of the floor plan were too big to print on a regular size sheet of paper, so you'll have to piece them together. You'll notice I cut a notch in the plywood for steps. You don't have to do this! I was going to place a walkway in front of the cathedral as opposed to stepping out on the grass. Glue the floor plan directly down on the plywood. Half "A" goes on the smaller piece of plywood and half "B" goes on the larger. They fit together to make the whole floor. Notice that part of the floorplan (last photo) will extend over the edge of the plywood. | ||
|---|---|---|---|
 |
 |
 | |
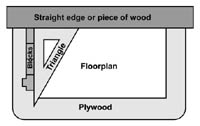
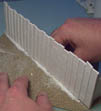
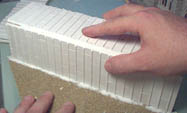
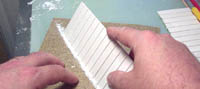
| 4. | It's always best to place all of the blocks down first so you can see how they fit. A few edge blocks will need to be trimmed (as shown on the floorplan). You may also need to sand an occasional block so they'll line up correctly. To help me get the blocks straight, I placed a straight edge along the top of the plywood (a 1x2 board works nicely) and used a triangle as a guide while placing the outer ring of decorative blocks down. Once the outer ring was glued down, I glued and placed the floor tiles inside. The same was done for the opposite half of the floor plan. |
 |
|---|---|---|
 |
| 5. | To make things quicker and easier, go ahead and pre-assemble all of the arches including the circular windows. There are lots for this project. |
 |
|---|
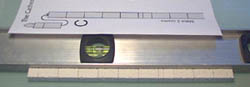
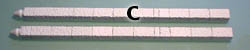
| 6. | To build item "C" place a straight edge on the table (I used a carpenter's level). Simply follow the plan to make this tall and thin piece. Make two of these. Label them with a permanent marker. |
 |
|---|---|---|
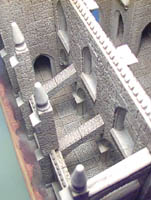
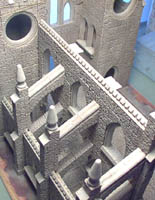
 |
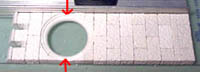
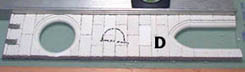
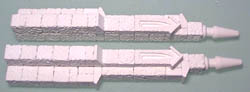
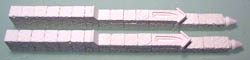
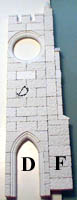
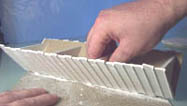
| 7. | To build item "D" follow the plan and line up the blocks against a straight edge. Place another straight edge on the other side and press together while the glue is still wet. Pre-glue the decorative trim onto blocks (center photo) for the inside of the doorway. When dry, finish the doorway at the bottom. The piece will be especially weak at the red arrows! Be sure to handle it carefully. If it breaks here, just leave it in two pieces and wait until assembling the main pieces before gluing it back. Make two of these. Label them with a permanent marker. | ||
|---|---|---|---|
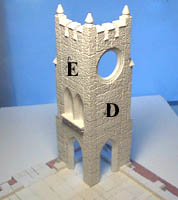
 |
 |
 | |
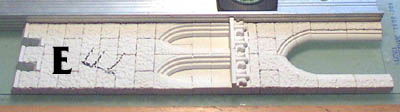
| 8. | Use the same method to build item "E" shown below. |
|---|---|
 |
| 9. | To build item "F" follow the plan and build it on its side. Now turn it on its back and add the decorative piece and top cap. Make four of these. Label them with a permanent marker. |
|---|---|
 | |
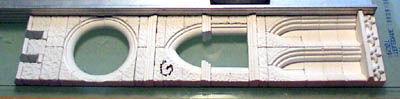
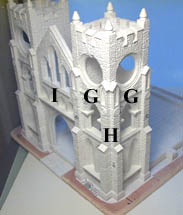
| 10. | Follow the plan to build item "G" shown below. |
|---|---|
 |
| 11. | Building item "H" is a little trickier. Build the main part according to the plan. Before you can add the decorative pieces, you need to miter the edge of each roof so they'll fit together. The last photo is rotated (just so it will fit) showing the finished piece. Make two of these. Label them with a permanent marker. | |
|---|---|---|
|
 | |
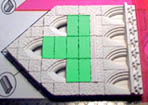
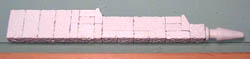
| 12. | For item "I", build directly over the plan. Tape straight edges along the sides to keep them straight. Do not glue the blocks in green, they are used to hold the place for the window columns. Place a straight edge along the middle as you are building to keep it level. The top decorative edging will have to be mitered to make the roof peak. Use sandpaper to do this, then glue the top edging on. The last photo shows this piece complete. Make one of these. Label it with a permanent marker. |
 | ||
|---|---|---|---|---|
 |
 |
 | ||
 | ||||
| 13. | On the backside of this piece we need some roof supports. You can make them out of any extra blocks you want. I ended up using the ones in the top photo. I sanded them at an angle (I thought it looked better that way). |
 | |
|---|---|---|---|
 |
 |
 | |
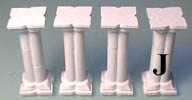
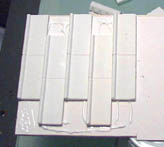
| 14. | Items "J" are fairly simple to build. They are made of long and short column pieces plus the decorative top and bottom pieces. Make four of these. Label them with a permanent marker. |
 |
|---|
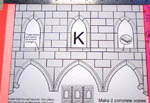
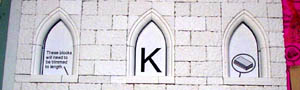
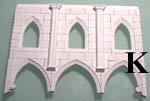
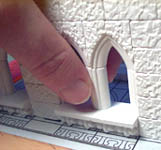
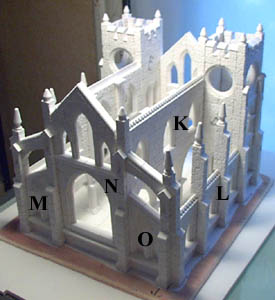
| 15. | For item "K", build directly over the plan. Tape straight edges along three sides to keep them straight. Do not glue the blocks in green, they are used to hold the place for the window edging. The finished windows are shown here. |
 |
 |
|---|---|---|---|
 | |||
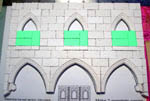
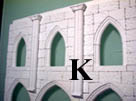
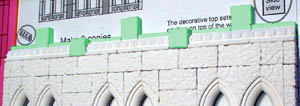
| 16. | Place floor tile blocks against the top edge (shown in green). Do not glue them. Place and glue the decorative edging along the top of the wall. Do not glue it to the green blocks! |
 |
 |
 |
|---|
| 17. | Flip the piece over and glue the decorative pieces onto the back side. Make two of these. Label them with a permanent marker. |
 |
 |
|---|
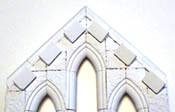
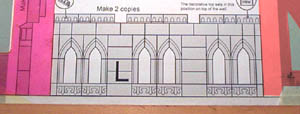
| 18. | For item "L", build directly over the plan. Tape straight edges along three sides to keep them straight. Do not glue the blocks in green, they are used to hold the place for the window edging and columns. |
 |
|---|---|---|
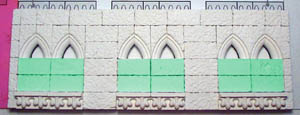 |
| 19. | The decorative top trim on this is tricky. Place some floor tiles and square blocks as shown in green. Do not glue these. Place and glue the decorative top trim in the open areas that are left. You will have to trim a few pieces down to fit. |
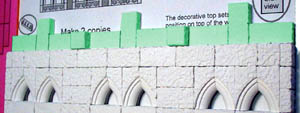 |
|---|---|---|
 |
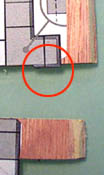
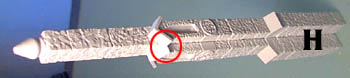
| 20. | The plan shows what the decorative strips should look like. It's best to make them in two separate pieces and glue them together. Trim down the block in the red circle. Make four of these. |
 | |
|---|---|---|---|
| 21. | Finally, glue the window edging and columns in. Then glue the decorative strips on. Make two complete sections. Label them with a permanent marker. |
 |
 |
|---|
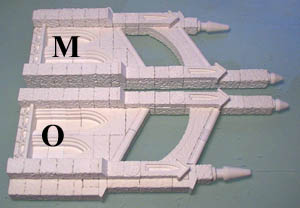
| 22. | To make pieces "M" and "O" we'll start with the decorative side bars. Build what's in the first photo. Then add on the pieces to the side. Since M and O are mirror images of each other, you also need to make a mirror image of this piece. |
 |
|---|---|---|
 |
| 23. | The other side of the piece requires a different side bar. Make two copies of this (one for the mirror image also). |
 |
|---|
| 24. | The center pieces are mirror images also. Be sure to use straight edges on the side so they'll line up straight. You might even place a straight edge across the slanted top where the decorative edging goes. |
 |
|---|
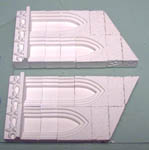
| 25. | You need one each of pieces "M" and "O". The decorative side bars are added. You will have to miter (sand) the trim pieces that go on the sloped angle. The buttress arch is made from two pieces glued back-to-back with trim along the sloped angle. Label the pieces with a permanent marker. |
 |
|---|
| 26. | To create piece "N", place straight edges on three sides and build directly on the plan. Do not glue the blocks in green, they are used to hold the place for the window edging and columns. | |
|---|---|---|
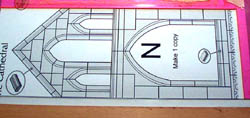 |
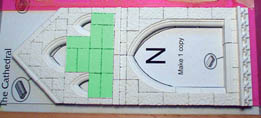 | |
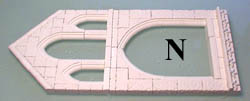
| 27. | Here is the completed piece. Be sure to add the decorative top cap on the sloped roof. It will need to be mitered (sanded) on the edges and peak. Make only one of these and label it with a permanent marker. |
 |
|---|
| 28. | Don't forget to add the roof supports on the backside of this piece as well (just like on piece "i"). |
|
|---|
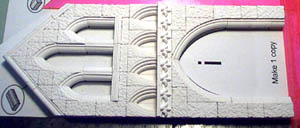
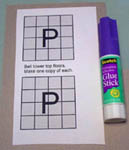
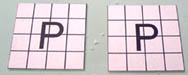
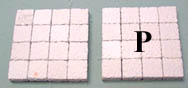
| 29. | For pieces "P", glue the plan down to a cereal box and cut the pieces out. Then glue the blocks on. Make two of these and label them with a permanent marker. |
 |
|
|---|
| 30. | We will do sections "Q" and "R" (the roof sections) later on, after the cathedral is assembled. |
|---|
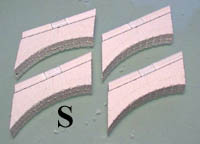
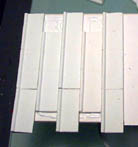
| 31. | Sections "S" are fairly simple. Glue two halves of the buttress arches together and add the decorative top edging on. The top edging will have to be mitered (sanded) on the ends. Make four of these and label them with a permanent marker. |
 |
|---|
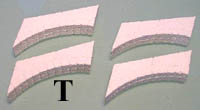
| 32. | Sections "T" are exactly like sections "S" but without the decorative top edging. Make four of these and label them with a permanent marker. |
 |
|---|
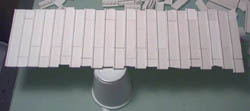
| 33. | Here are all the sections that are made so far. The only things missing are "Q" and "R" which are the roof sections. The next step is to glue specific pieces together and make sure everything fits correctly. You don't want to glue the whole thing together or you can't reach the inside to paint it. A few of the large sections will need sanding to make them fit properly. A nice flat sanding block works best. |
 |
|---|
Fitting the Pieces
This section shows you how to assemble the separate pieces and fit the cathedral together.
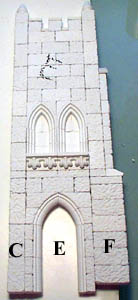
| 34. | We'll start by assembling pieces "C", "E" and "F". The decorative piece (circled in the upper left) will make it difficult to lay the piece flat when gluing. Place cardboard or thick stock under the pieces and let the decorative part hang over the side. Please note the bottom left circle! Piece "F" must be up 1/4" higher. Place a floor tile temporarily under it when gluing. Also make a mirror image copy of this piece. |
 |
 |
|---|
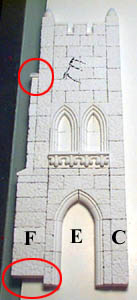
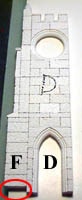
| 35. | Now assemble pieces "F" and "D". Once again, let the decorative part hang over the side. Please note the bottom left circle! Piece "F" must be up 1/4" higher. Place a floor tile temporarily under it when gluing. Also make a mirror image copy of this piece. |
 |
 |
|---|
| 36. | Glue pieces "E" to "D" together for each side, but do not glue them down to the floor! Arrange the other pieces as shown and make sure they fit properly. The decorative tips (circled in red) break very easily! Be especially careful with them. Lastly, glue pieces "G", "H" and "G" together for both sides. Do not glue them to the floor and do not glue any other pieces! |
 |
 |
|---|---|---|---|
 |
 |
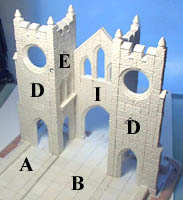
| 37. | Now assemble the rest of the pieces without gluing anything else! Several pieces will have to be sanded, primarily pieces "L" and "K". They seemed to be about 1/8" too long, so sand a little off each end until it fits. Get a friend to help you set it together. Piece "K" is tricky to hold in place because it rests on the pillars "J". Once you're satisfied with the way it fits, you can start painting the separate pieces. |
 |
|---|
Painting Instructions
For information on types of paint and supplies you will need, refer to the Earth Stone Painting Instructions. I'm not putting too much detail into this section. I assume anyone building a project this complicated should have some experience painting the buildings.
For the cathedral I'm going to use the same color of paints I used on the gothic church. I wanted to match a stone color found on actual churches and cathedrals, so I looked through several books. I found the color I liked which was a gray-brown with a little tan added. You can find the exact recipe on the Earth Stone Painting Instructions page. Always test the colors of paint on a few extra blocks glued together.
Spray a coat of flat (or satin) varnish over the plaster pieces before you paint them. This will seal the plaster and will keep the glue from softening (if you use water based glue). Do not use gloss varnish! You want the paint to stick to the model after you coat it.
Final Assembly
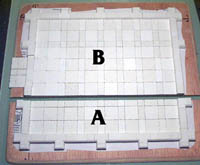
| 1. | Lay the floor sections A & B together (don't glue them). Start by placing and gluing the pieces shown here. Since you've already done a pre-fit of the model, the pieces should fit together alright. |
 |
 |
|---|
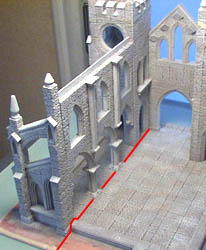
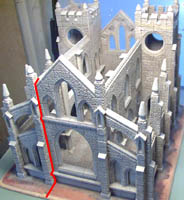
| 2. | Glue the center doorway "I" to the floor and the left tower. Do not glue it where the red line is! You want your model to come apart in the middle. Glue the tower floors "P" onto the towers. |
 |
 |
|---|
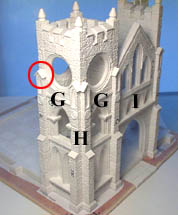
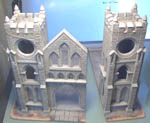
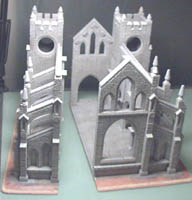
| 3. | Place and glue the remaining tower pieces "G" and "H". Be especially careful with the small roofed decorations. They're very easy to knock off. Once glued, hold the towers together with thin wire wrapped around or a rubber band. A slow drying glue is sometimes a good idea. It will give you time to push and shove the pieces into alignment. A little bit of give in the pieces is needed sometimes. The lower photo shows how the two halves of the cathedral can still come apart to view the inside. |
 |
|---|---|---|
 |
| 4. | Spin the model around 180 degrees. Place and glue the pieces "J, K, L, M" on the small floor section "A". Please notice that the pillar bases overlap onto the other half of the floor. Do not glue them to the other half of the floor accidentally. When you open the model up and put it back together, you will have to be careful not to chip the pillar bases. |
 |
|---|
| 5. | Set in and glue the buttress arches "T" (the ones with no decorative top trim). These will support the roof over the gallery. Now place and glue the top buttress arches "S". Don't be afraid to push on the tall supports on piece "L". You will have to push and twist the wall section slightly to get the buttress arches to fit right. |
 |
 |
|---|
| 6. | Place and glue all of the same pieces on the opposite side of the cathedral with the addition of piece "N". Do not glue piece "N" on the red line! Your cathedral should open up in the middle. |
 |
 |
|---|
Building and Painting the Roof
| 1. | Using the roof template on the Building Plans Page, cut the roof pieces out of thick card stock or matt board. Even if you cut them to the exact size shown on the plan, they'll still need a little trimming. Cut two pieces to form the main roof, and cut two smaller pieces to form each of the smaller side roofs. |
 |
|---|
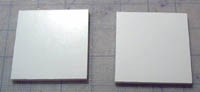
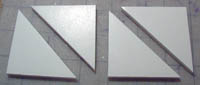
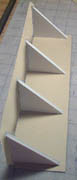
| 2. | For the main roof, we're going to glue the two separate roof sections together with some 90 degree angled pieces. I'm using foam core board for these pieces. Cut two 2" squares (make sure they're actually square). Split them down the middle and glue the triangle pieces on each side to form the main roof. |
|
 |
|---|
| 3. | Take the small roof sections and split several with a hobby knife. Place something under the roof so that one side stays flat where you can work on it. Spread glue on part of the roof. Place large roof tiles staggered along the roof as shown. Now place small roof tiles on the ends. To fill the remaining area, use the split pieces to fill in. When finished the roof tiles should overlap both edges slightly. |
 |
 |
|---|---|---|---|
 |
 |
| 4. | You'll need to sand it down at the peak so you can do the other side. Lay a piece of sand paper flat on the table and gently sand the peak. |
 |
 |
|---|
| 5. | Glue roof tiles on the other side of the roof and let it dry completely! When dry, flip the roof completely upside down and sand the peak flat. If you're not sure how far to sand it, place a roof peak block on it and see how it looks. The only reason you sand it is so you can glue the peak on easily. Sand both sides flat along with the ends that will need some sanding too. |
 |
|---|---|---|
 |
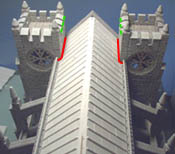
| 6. | This part is a little time consuming. The area marked in red must be sanded down carefully to fit between the towers. Each time you try to fit the roof on, you'll have to spread the cathedral apart, otherwise you'll end up knocking off the tips of the towers (marked in green). Once you are satisfied with the fit, glue the roof peak blocks on the peak. The very last one you place will need to be shortened (sanded) slightly to fit. The top roof is complete. |
 |
|---|---|---|
 |
| 7. | For the two smaller outer roofs, cut two pieces of matt board the size shown on the Building Plans Page. Glue the roof tiles on as shown in the photo. Be sure they hang over slightly on both sides. Let the glue dry completely! When dry, sand the edges of the roof section to fit. Try to picture how the roof will set against the building and sand the edges of the roof at an angle that will fit nicely against the building. The roof should set under the window sills as shown. |
 |
|---|---|---|
 | ||
 |
| 8. | When painting the roof sections, start with a dark grey. Then gently dry-brush a lighter gray over the top to accent the seams of the roof. I used greys to simulate a lead color (although I'm not really sure what color a lead roof is). Notice that the decorative stone roof peak blocks are painted the same color as the rest of the cathedral. |
 |
|---|
Adding Statues
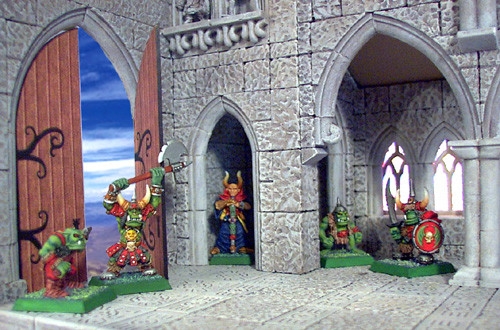
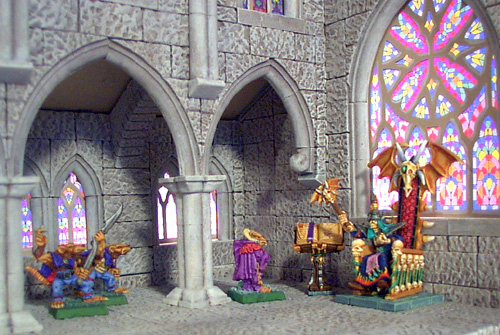
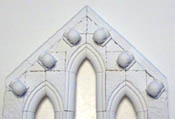
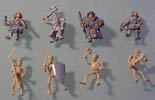
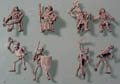
| 1. | You can leave the recessed arches empty if you want, but I specifically designed them to hold miniatures (sort of like statues along the tops of cathedrals). First I found some old miniatures. |
 |
|---|
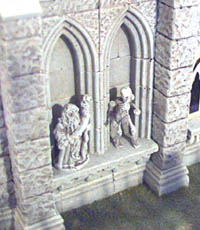
| 2. | To make them look like statues, I'm going to paint them with the same colors I used for the cathedral. I started by giving them a primer coat of white (flat spray paint) just like you would before painting any miniature. When dry, I painted them solid with the darkest color (let it dry), and dry brushed them with the 2 successive lighter colors. Be sure to spray a flat varnish or sealant over them to protect the paint. |
 |
|---|---|---|
 |
| 3. | As you can see, when glued in place under the arches, they look like stone statues. I left the arches intentionally darker behind the statues (I didn't drybrush any lighter color back there). This helps the statues stand out more. I glued them down with superglue. It's helpful if you can find a place on the back of the statue that touches the back wall. Glue that part against the wall to help secure it. |
 |
|---|
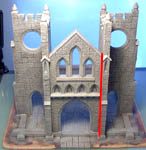
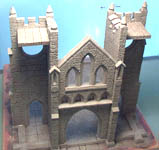
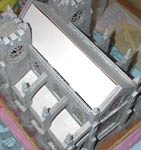
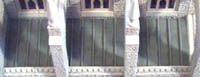
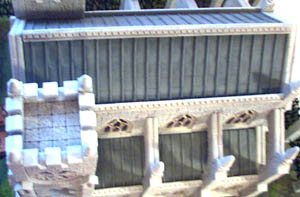
The Finished Cathedral
Here are a few photos of the finished cathedral. To find out how to do the stained glass windows, tracery, doors and wrought iron fence, check out the Tips & Tricks 3 page.
|
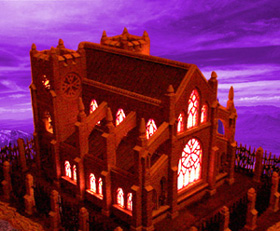 |
Here is the same photo with different lighting effects. The red photo was taken with the room lights real dim (I added the sky using Adobe Photoshop).
The photos below show Warhammer(TM) miniatures. Warhammer(TM) is a trademark of Games Workshop. The site and its contents are not affiliated or endorsed by Games Workshop.