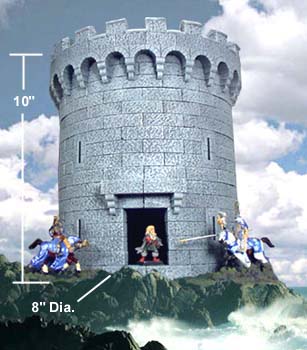
8" Round Tower Building Instructions
|
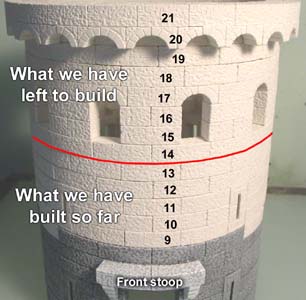
This page contains instructions on how to use mold #64 to build the round tower. You will have to cast the mold 24 times to build the tower. This round tower is slightly more difficult to build than the average model. The pieces are easy to cast and the plans are easy to follow, but the difficulty lies in keeping the tower round. Since this tower takes so many basic building blocks, there wasn't room for any floor tiles on this mold. However, I do show instructions on how to make floor sections on this page. |
|
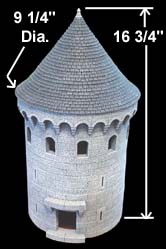
If you want to create a tower with a conical roof, you will need to cast the #64 8" Round Tower mold 36 times. You will also need the Slate Conical Roof Mold #87 and you will need to cast it 12 times to make the conical roof. Instead of following the building instructions directly below, skip down to the Conical Roof Building Instructions section near the bottom of this page. |
 |
About Mold #64
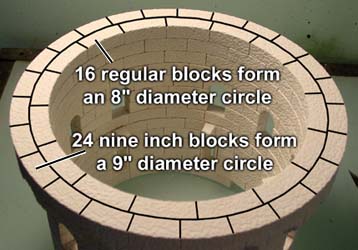
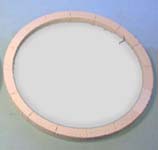
| 1. | Mold #64 has several types of rounded blocks. The 4 basic types are shown here. Regular blocks form an 8" ring if you glue 16 of them together in a circle. |
 |
|---|
| 2. | 16 regular blocks will form an 8" round circle (the inside ring shown in the photo). 24 nine inch blocks will from a 9" round circle (the outside ring shown in the photo). There is only one 9" block on the mold so if you want to make a complete 9" ring, you will have to cast the mold 24 times. You will need to be careful and not mix up the 8" and 9" blocks while building the tower. If you accidentally use a 9" block while building, your current ring of blocks will have a huge gap in it. |
 |
|---|
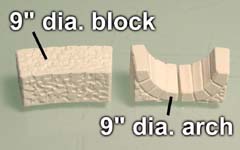
| 3. | The arch on mold #64 is a 9" arch. You can see that a complete arch is the same size as a 9" diameter block. This arch is used for the decoration under the 9" ring of blocks. However, by cheating a little bit I was able to use this arch on the 8" diameter tower wall. A combination of odd blocks plus some creative sanding made this possible. So even though you may see these arches on the 8" tower wall, don't be confused. These arches were designed for a 9" diameter ring. |
 |
|---|
| 4. | Sorting the arches can be a bit tricky. Even though all the arch blocks look similar, you must separate the "left hand" and "right hand" sides of the arch to make a complete proper arch. The best way to do this is to first locate the scraped side of the arch block. This is the only smooth side you will see. Place the scraped side of the blocks down on the table surface. Be sure that you can see the textured side on all of the arch backs just to be sure. Now look straight down at the arch blocks. You will notice that the blocks all have a slight bend to them. Three of these arch halves are identical but the third block in this row bends the other way. |
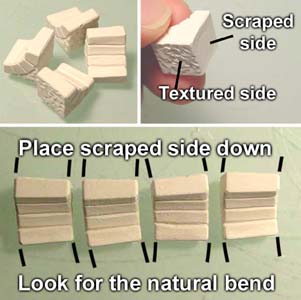 |
|---|
| 5. | Only by pairing up a proper "right hand" and "left hand" side of each arch can you make the arches become the proper shape to fit around a 9" diameter circle. |
 |
|---|
Regular Tower Building Instructions
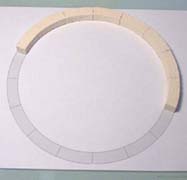
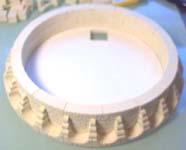
| 1. | You will need to cast the #64 8" Round Tower mold 24 times to have enough blocks to build the tower. I know that sounds like a lot of casting, but this is a really big tower. You can download the plans shown here from the Building Plans page. Look for the plans labeled 8" Round Tower Plans. Start by gluing a ring of blocks together as you lay them on the floor plan. Do not glue them to the plan! We will need to use this floor plan several times. |
 |
|---|
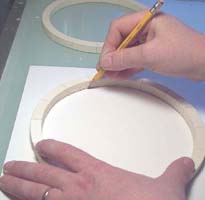
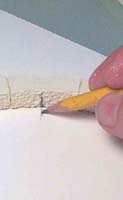
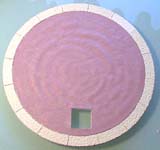
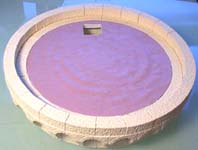
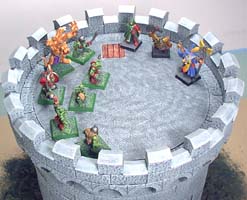
| 2. | Every ring you make will be used as a floor section. Since I'm only going to put 2 floors in this tower, I'm only making 2 rings. Feel free to add more floors if you like. When the rings are dry, place them onto a piece of cardboard or foam core board (I'm using foam core). Take a pencil and trace around the inside of the ring. Since the ring of blocks may not be perfectly round, put a pencil mark on the blocks and the board. This will help you get the board in the exact same position later on. |
 |
 |
|---|
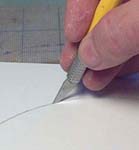
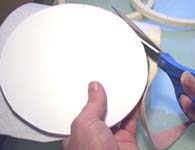
| 3. | Using a hobby knife, cut exactly on the line all the way around. Test fit the floor inside the ring of blocks (lining up the pencil mark). It should gently touch the blocks on all sides and not be too tight or it might break the ring. Trim it further if needed. |
 |
 |
|---|
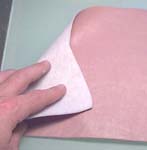
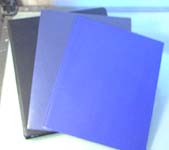
| 4. | For the stone texture, I'm going to use a piece of vinyl. You can find it anywhere that sells fabric. This vinyl has a leather type of texture to it. The color I got was horrible, but I'm going to paint it anyway so it doesn't matter. You can also use the vinyl from notebooks. |
 |
 |
 |
|---|
| 5. | Glue the vinyl onto the board. Spread the glue around with your finger before laying the vinyl down. Use scissors to trim off the excess. Don't use paper notebooks. I tried out a couple of paper notebooks that had a cracked leathery texture to see if it would work. The paper soaked up the glue and paint, forming uneven bubbles and warps under the surface. |
 |
|---|
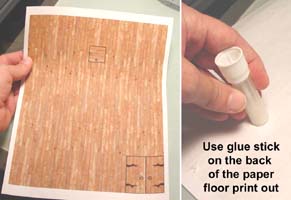
| 6. | Alternate Floor MethodA second method to adding a floor is to print out the wood texture found on our Building Plans page. Look for the plans labeled "Wooden Plank Floor", open it and print it out on your color printer.Next, use a glue stick and cover the back completely with glue. Then stick the wood textured paper onto a piece of cardboard or foam core and smooth it down. |
 |
|---|
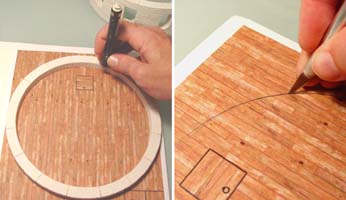
| 7. | Lay a pre-glued stone ring on top of the wood grain and draw around it with a pencil. Then use a hobby knife to cut out the circle floor. If you choose to use the wooden floor, you will not be able to glue the floor in until the whole tower is painted, otherwise you will accidentally paint over the floor print. For the remainder of these building instructions, I am going to use the vinyl method above and not use the wood plank floor. |
 |
|---|
| 8. | We're going to make the top of the tower first. Place the ring of blocks upside down. Now glue the board in the ring vinyl side down and push it all the way down. When you flip it over, the vinyl will be flush with the top of the blocks. Now is a good time to cut an opening for a trap door. I screwed up because I didn't spread the glue out with my finger and it left ridges under the vinyl. |
|
 |
|---|
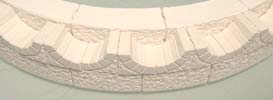
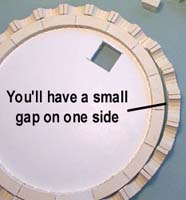
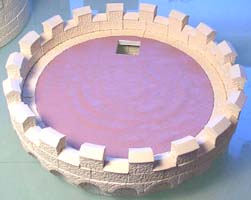
| 9. | Next, place this ring upside down. Take the arch pieces and place them around the outside of the ring. You'll notice that the ring of arch blocks is just a bit too large and there is a gap on one side. Follow the directions in step 10 below to bring the ring closer together. Glue the arches around the outside once the gap is removed. I knew getting the arches to fit perfectly would be nearly impossible. Since you repeat the same arch 24 times, the slightest error when making the original block would be compounded 24 times. I was pleased to get them as close as they are. |
 |
|---|
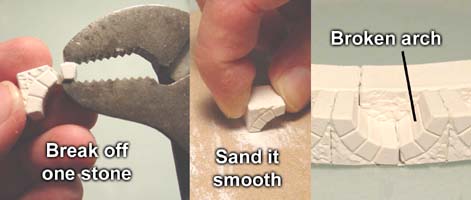
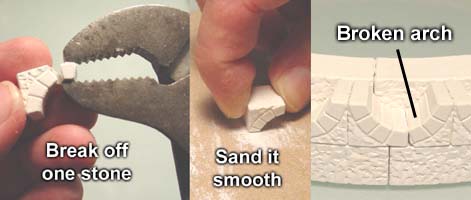
| 10. | To get the ring of arches to fit properly, simply break one stone off of one arch tip. Sand it smooth. The broken arch will be slightly smaller than the rest but you will not notice it. |
 |
|---|
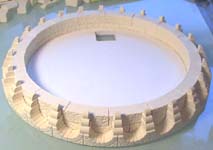
| 11. | Add a ring of blocks and the decorative pieces that go around the outside. Next, add one more ring of blocks and let this dry completely. |
 |
 |
|---|
| 12. | Flip the piece over so we can finish the top. Add a ring of 9" blocks around the top. These blocks are specially made to fit this diameter of circle. It will take 24 of these blocks to go completely around. |
 |
|---|
| 13. | Finish the top by adding the smaller pieces and the decorative top caps. Please notice that these top pieces aren't meant for the 9" diameter but they'll work in this case. Place all of the blocks down before you glue them so you can see how they fit. They're actually made for the 8" diameter tower, so it's really nice that you can use them for both diameters. That finishes the top of the tower. |
 |
|---|
| 14. | Now for the bottom of the tower. Start with a pre-glued ring of blocks and add a floor to it as shown in steps 2 through 5. For this floor I used a piece of blue vinyl from a notebook. Glue the board (with the vinyl) down into the ring of blocks.
Be sure to push the board all the way down when you glue it. This will leave an edge of blocks sticking up that we can use later. |
 |
|---|
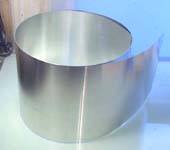
| 15. | I'm using a piece of 8" wide aluminum flashing as a guide to keep the tower round. You can buy it at most hardware stores by the foot. It's used in roofing for sealing around chimneys. You'll need about 5 feet of flashing and it will cost you around $2.50 for a piece this size. This aluminum is thin enough that you can cut it with a pair of scissors. |
 |
|---|
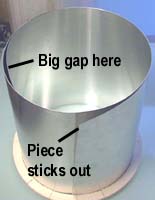
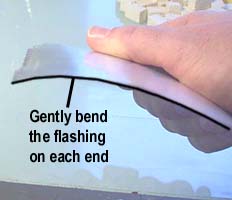
| 16. | Roll up the flashing and set it into the ring of blocks. Spread out the flashing so that it completely fills the ring. You'll notice that there are a couple of things that keep it from being round - the piece that sticks out and the big gap on the inside. To fix this, bend the flashing on each end to form a gentle curve. |
 |
 |
|---|
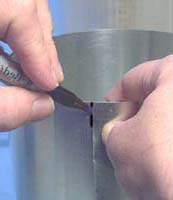
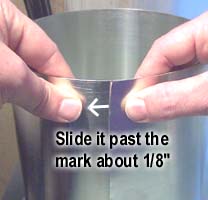
| 17. | Place it back inside the ring of blocks. Use a marker to place a mark where the edge meets. If we taped the flashing together at this point, it would be too tight to remove from the tower after it was built. To give yourself a slight bit of room, slide the edge past the mark about 1/8". That should shrink the diameter of the circle just enough. |
 |
 |
|---|
| 18. | Place pieces of tape across the seam and over the edges. You'll notice that after it's taped securely that it still may not be round. To fix this, take the ring of flashing and gently bend it back to a rounded shape as best you can. |
 |
 |
|---|
| 19. | As you build the tower, leave the flashing inside. I've removed the flashing for the next few photos so you can see which blocks are used. As you add more layers to the tower, occasionally remove the flashing just to make sure it didn't get glued in accidentally. |
 |
|---|
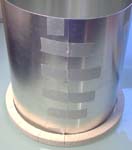
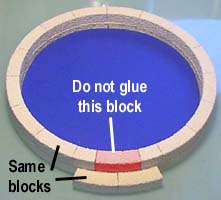
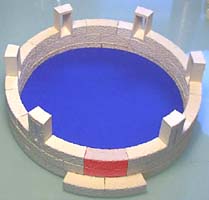
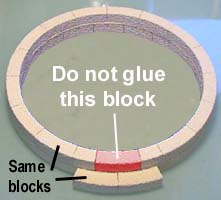
| 20. | Add a ring of blocks on top of this first ring. Keep in mind that the flashing should be inside the tower so you can build around it. The front step is made from the same blocks you're using on the walls. They don't fit exactly, but they'll do well enough. If you want to use the 9" blocks instead (the ones actually meant to go around the outside of this tower) then you'll have to cast the mold a few more times. Do not glue the block shown in red! It's used to hold the place for the doorway. |
 |
|---|
| 21. | Depending on how you scrape your blocks, your arrow slits may be a little tall. Place an arrow slit next to a stack of 3 blocks and compare the heights. If the arrow slits seems a bit too tall, you will need to sand them slightly. You may want to pre-glue 12 arrow slits together before you start building. |
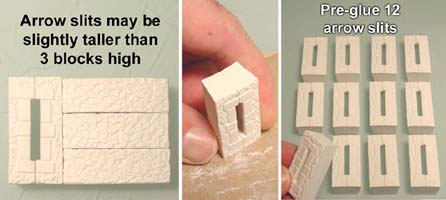 |
|---|
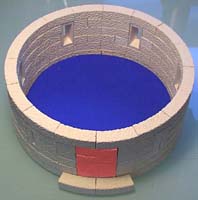
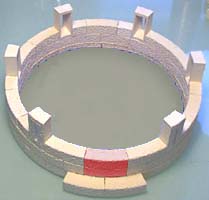
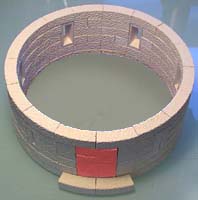
| 22. | The third row of blocks has the arrow slits. It's helpful to glue the arrow slits together beforehand. Continue adding blocks according to the building plans found on the Building Plans page. Once you reach the 6th row you can remove the blocks holding the place for the door (shown in red). |
 |
 |
|---|
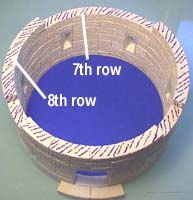
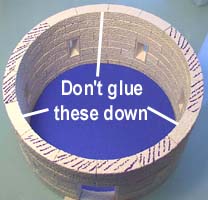
| 23. | Glue down all of the 7th row, but only glue a few blocks on the 8th row. Mark the top of the blocks with a marker. From now on, do not glue to the marked area. If you do this, the tower will come apart in the middle so you can paint it easily. Finish the 8th row, but don't glue to the marked area. |
 |
 |
|---|
| 24. | Continue gluing rows of blocks but do not glue to the marked area. Continue all the way up to finish row 14. Remember that the flashing has been inside the tower the whole time, and that you should remove it occasionally so it doesn't get accidentally glued into the tower. |
 |
|
|---|
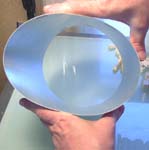
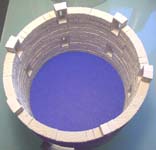
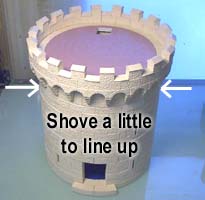
| 25. | Remove the flashing and glue on the top of the tower. This is the reason I made the top of the tower first. Since the glue on the walls below is still a little wet, you can gently push them to line up with the top of the tower. |
 |
|---|
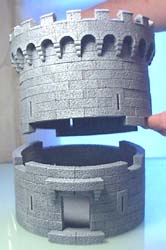
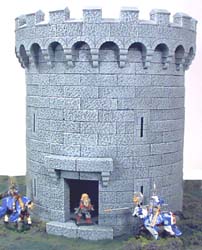
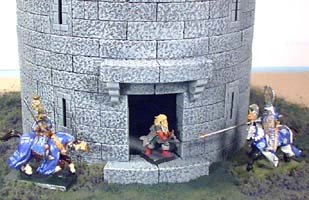
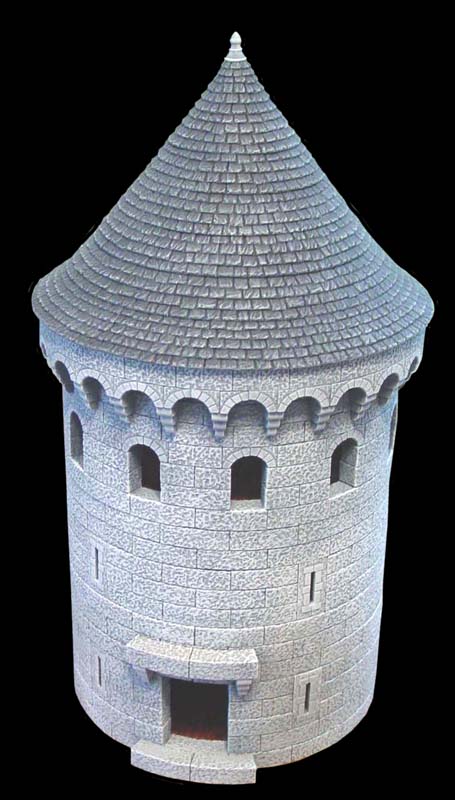
| 26. | For instructions and colors used to paint the tower, refer to the Painting Instructions page. The top half of the tower comes off to make painting easier. It's also used to set miniatures inside. Feel free to add more floors and make the tower separate wherever you want. Here's a photo of the finished tower. |
 |
 |
|---|
| 27. | The top can hold a lot of miniatures. I added the trap door using the wooden plank mold. |
 |
 |
|---|
Conical Roof Tower Building Instructions
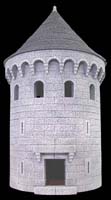
| 1. | This version of the tower is slightly different because it is taller and has windows at the top. You will need to cast the #64 8" Round Tower mold 36 times and you will also need to cast the #87 Slate Conical Roof Mold 12 times in order to build the roof. You can download the plans shown here from the Building Plans page. Look for the plans labeled 8" Round Tower Plans. The building plans are also used for this tower, but only until you reach row 13. After that, this tower is built much differently than the printed plans show. |
 |
|---|
| 2. | Start by gluing a ring of blocks together as you lay them on the floor plan. Do not glue them to the plan! We will need to use this floor plan several times. Let this ring dry completely and glue together another ring. I would suggest that you glue at least 4 rings beforehand. These pre-glued rings will be useful in a lot of ways. You can always print out additional copies of the building plans to glue onto so you can glue more rings at one time. Be sure these rings are completely dry before you use them. |
|
|---|
| 3. | These pre-glued rings will be a great help in keeping the tower circular. While building the tower, occasionally place a pre-glued ring on top of the blocks you just glued to check and see if your tower is still round. At this point you can push and move the blocks until they match up with the pre-glued ring. Afterwards, remove the ring and continue gluing the next row. Since you have extras of these pre-glued rings, occasionally glue one down to keep the tower circular. |
 |
|---|
| 4. | We'll now start the tower by making the bottom floor. To do this, print out the wood texture found on our Building Plans page. Look for the plans labeled "Wooden Plank Floor", open it and print it out on your color printer. Next, use a glue stick and cover the back completely with glue. Then stick the wood textured paper onto a piece of cardboard or foam core and smooth it down. |
|
|---|
| 5. | Lay a pre-glued stone ring on top of the wood grain and draw around it with a pencil. Then use a hobby knife to cut out the circle floor. If you choose to use the wooden floor, you will not be able to glue the floor in until the whole tower is painted, otherwise you will accidentally paint over the floor print. Make two of these floor disks that will be inserted into the floor after the tower is completely painted. |
|
|---|
| 6. | I'm using a piece of 8" wide aluminum flashing as a guide to keep the tower round. You can buy it at most hardware stores by the foot. It's used in roofing for sealing around chimneys. You'll need about 5 feet of flashing and it will cost you around $2.50 for a piece this size. This aluminum is thin enough that you can cut it with a pair of scissors. |
|
|---|
| 7. | Roll up the flashing and set it into the ring of blocks. Spread out the flashing so that it completely fills the ring. You'll notice that there are a couple of things that keep it from being round - the piece that sticks out and the big gap on the inside. To fix this, bend the flashing on each end to form a gentle curve. |
|
|
|---|
| 8. | Place it back inside the ring of blocks. Use a marker to place a mark where the edge meets. If we taped the flashing together at this point, it would be too tight to remove from the tower after it was built. To give yourself a slight bit of room, slide the edge past the mark about 1/8". That should shrink the diameter of the circle just enough. |
|
|
|---|
| 9. | Place pieces of tape across the seam and over the edges. You'll notice that after it's taped securely that it still may not be round. To fix this, take the ring of flashing and gently bend it back to a rounded shape as best you can. |
|
|
|---|
| 10. | As you build the tower, leave the flashing inside. I've removed the flashing for the next few photos so you can see which blocks are used. As you add more layers to the tower, occasionally remove the flashing just to make sure it didn't get glued in accidentally. |
|
|---|
| 11. | Add a ring of blocks on top of this first ring. Keep in mind that the flashing should be inside the tower so you can build around it. The front step is made from the same blocks you're using on the walls. They don't fit exactly, but they'll do well enough. If you want to use the 9" blocks instead (the ones actually meant to go around the outside of this tower) then you'll have to cast the mold a few more times. Do not glue the block shown in red! It's used to hold the place for the doorway. |
 |
|---|
| 12. | Depending on how you scrape your blocks, your arrow slits may be a little tall. Place an arrow slit next to a stack of 3 blocks and compare the heights. If the arrow slits seems a bit too tall, you will need to sand them slightly. You may want to pre-glue 12 arrow slits together before you start building. |
|
|---|
| 13. | The third row of blocks has the arrow slits. It's helpful to glue the arrow slits together beforehand. Continue adding blocks according to the building plans found on the Building Plans page. Once you reach the 6th row you can remove the blocks holding the place for the door (shown in red). |
 |
 |
|---|
| 14. | Glue down all of the 7th row, but only glue a few blocks on the 8th row. Mark the top of the blocks with a marker. From now on, do not glue to the marked area. If you do this, the tower will come apart in the middle so you can paint it easily. Finish the 8th row, but don't glue to the marked area. |
 |
 |
|---|
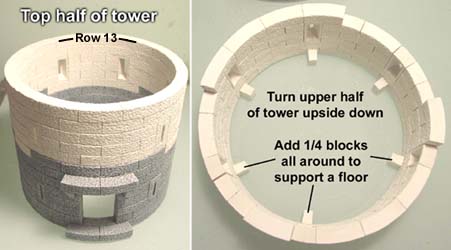
| 15. | Continue gluing rows of blocks but do not glue to the marked area. Continue all the way up to finish row 13. Stop after you finish row 13. From this point on, we will not follow the building plans any longer! |
 |
|
|---|
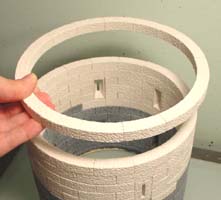
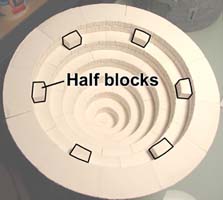
| 16. | After you stop at row 13, you should be able to lift off the top half of the tower. I've colored the bottom different so you can see where it divides. Turn the top of the tower upside down onto your table surface and add several 1/4 blocks around the inside. These blocks will be used to support a floor under the windows (which we will make next). |
 |
|---|
After you complete row 13, we will no longer be following the printed plans to complete the top of the tower. Instead, follow the block-by-block instructions listed below to finish the very top of the tower. |
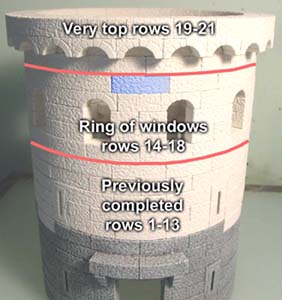
| 17. | This is a photo showing what rows will finish the top of the tower. You may use this as a guide to help you keep track of what rows we're working on and to help you figure out what's next. You will notice we have a row of windows. The arches on these windows are actually meant for a 9" outside diameter and not for the 8" diameter tower at all. In the next few steps, I'm going to show you how to cheat and use the 9" diameter arches for an 8" tower instead. Also keep your eye on the front stoop at the bottom of the tower. The position of the front doorway will be important when lining up the top of the tower so that the top windows are centered evenly with this doorway. |
 |
|---|
| 18. | The next step will be to assemble the row of windows that go along the top of the tower. Start by taking a pre-glued ring and placing it upside down on the table top. This ring will end up being row 18 when we're finished. Keep in mind that the arches we're going to add are 9" diameter arches but we're making them fit an 8" diameter wall. This means that the blocks will not fit properly. Since they will not fit properly, do not glue any of these blocks down! Instead, just place them so we can see how they will fit. |
 |
|---|
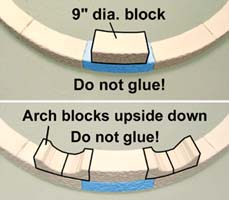
| 19. | Start by placing a 9" diameter block (upside down) centered directly over a block in the ring below. The block shown in blue will represent where the front door will be located. In other words, this blue block will sit directly in line with the front door in the front of the tower. Set arch blocks on both sides of this first one. Do not glue any of these blocks yet! |
 |
|---|
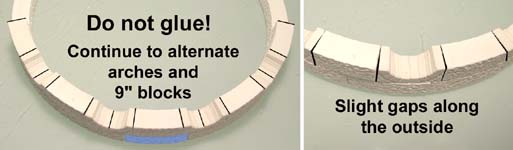
| 20. | Continue to alternate arches and 9" blocks evenly on both sides until they attempt to meet at the back of the ring. You will notice a slight gap between the blocks on the outside of the ring. |
 |
|---|
| 21. | When you reach the back end of the ring, you can almost fit a 9" and an 8" block in the remaining gap. To make it fit, sand the inside corners off some of the 9" blocks until you can get the ring of arches to fit nicely on top of the pre-glued ring. |
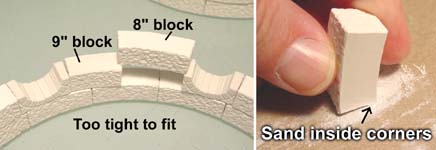 |
|---|
| 22. | Now glue the blocks in place once they fit properly. Be sure to center the first 9" block over the blue block as shown. Click on each photo for a larger version. Now glue the next row (row 16) in between the arches. This row is made out of 8" blocks and half blocks. |
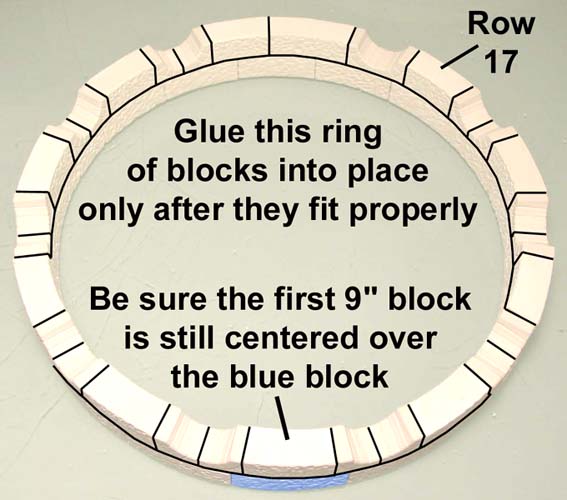 |
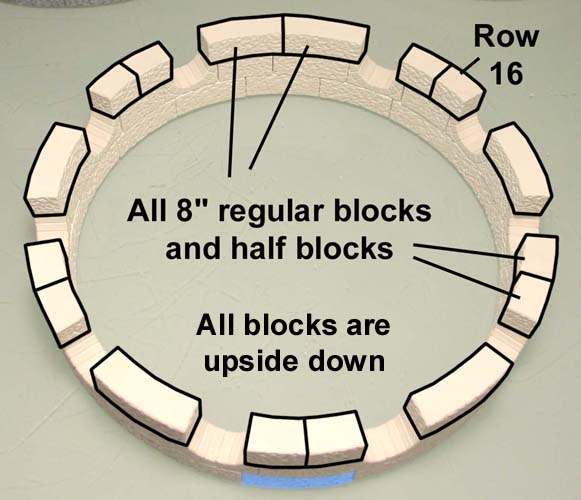 |
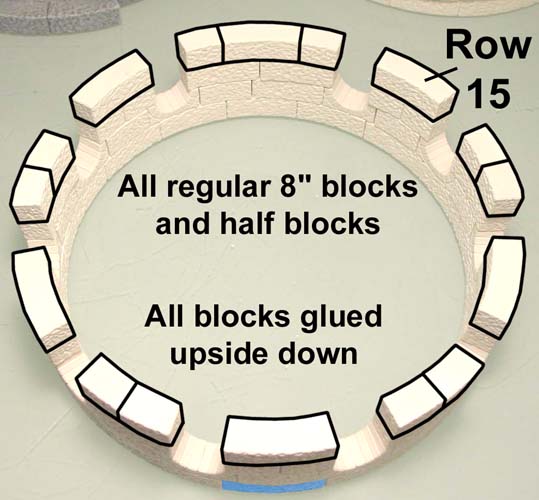
|---|
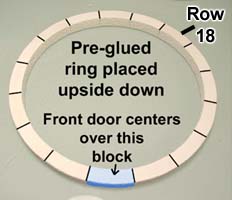
| 23. | Continue gluing 8" and half blocks, alternating them to complete row 15. Click on the photo for a larger view. For row 14, use a pre-glued ring of blocks. Be sure to place this ring of blocks upside down or the bottom of the window will not have texture. Center the block seam over the doorway (block shown in blue). |
 |
 |
|---|
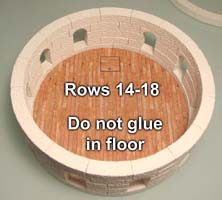
| 24. | Once you flip this completed ring of windows right side up, it should look like this. Test fit the floor into the ring but do not glue it in until after the tower is painted. Next we will start working from the very top of the tower (row 21) down until it meets the windows. |
 |
|---|
With the ring of windows completed, the next major section will be the tower top. |
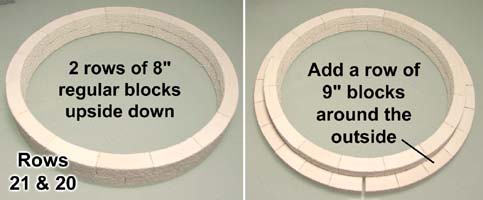
| 25. | Glue 2 rows of regular blocks upside down. This will form rows 21 and 20. Next, glue a row of 9" block around the outside, upside down. |
 |
|---|
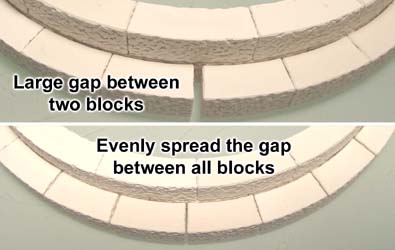
| 26. | When you place the ring of 9" blocks around the outside, you will notice that there will be a gap between 2 blocks somewhere. This is because the 9" blocks are slightly smaller than they should be. To fix this, simply spread all the blocks out so there is an tiny equal gap between all blocks in that ring and you will never notice they are off slightly. |
 |
|---|
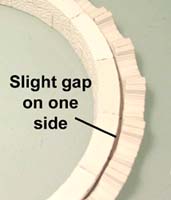
| 27. | Next you will place arches on top of the 9" ring of blocks. You'll notice that the ring of arch blocks is just a bit too large and there is a gap on one side. Follow the directions below to bring the ring closer together. Glue the arches around the outside once the gap is removed. I knew getting the arches to fit perfectly would be nearly impossible. Since you repeat the same arch 24 times, the slightest error when making the original block would be compounded 24 times. I was pleased to get them as close as they are. |
 |
|---|
| 28. | To get the ring of arches to fit properly, simply break one stone off of one arch tip. Sand it smooth. The broken arch will be slightly smaller than the rest but you will not notice it. |
 |
|---|
| 29. |
Glue together the 3 major chunks we have created so far. These include the second row of arrow slits, the ring of windows and the tower top. Remember the blue block on the ring of windows? Be sure this block is centered over the doorway. |
 |
|---|
 Finish this tower top by adding one more ring of blocks upside down.
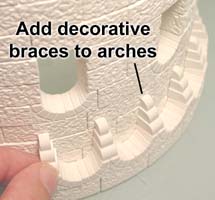
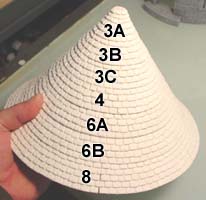
| 30. | When the top half of the tower is completely dry, flip it upside down and glue the decorative braces under each of the arches. Also, go ahead and assemble the roof. You can find instructions on the Conical Roof Building Instructions page. This roof will use all of the diameters of conical roof blocks. |
 |
 |
|---|
| 31. | Flip the roof upside down and glue half blocks around the inside of the roof. You will notice that these half blocks will be recessed slightly down in the roof. This is because the rows of roof blocks are 3/4" deep, and the tower building blocks are only 1/2" deep. Since the interior diameter of the roof is 7", and the interior diameter of our tower is also 7", I'm going to add braces that will let this roof nest inside the tower and hold it in place. |
 |
|---|
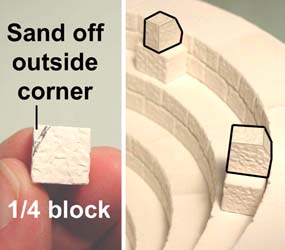
| 32. | Collect several 1/4 blocks and sand off the outside corners as shown in the photo. After the outside corners are sanded slightly, glue these 1/4 blocks on top of the blocks already in the roof. These blocks will partially set down inside the tower. If you do not sand the corners off of these blocks, the fit would be too tight and these small blocks might not nest down inside the main tower. The sanded angles help guide the roof into place when you set it down onto the tower. |
 |
|---|
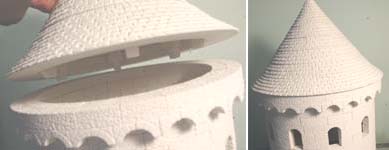
| 33. | Here is a side view of how the roof fits onto the tower. You can see that the sanded 1/4 blocks will fit down into the top opening of the tower and guide the roof into place. I took these photos before I glued the decorative braces under the arches. |
 |
|---|
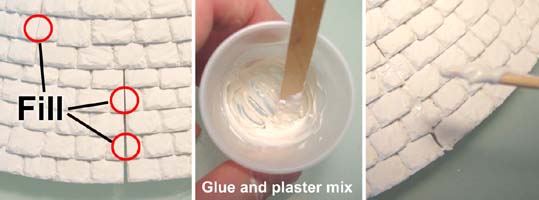
| 34. | On the bottom row you may need to fill in the split shingles. Just mix up a tiny amount of glue and plaster and fill these gaps using a toothpick. |
 |
|---|
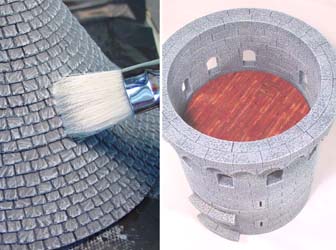
| 35. | For instructions and colors used to paint the tower, refer to the Painting Instructions page. After painting, glue in the floors, one on the very bottom and one on the second floor under the windows. For instructions on painting the slate roof, visit our Conical Roof Painting Instructions page. The slate roof tiles were painted using solid black paint as an undercoat and then dry-brushing with light gray just enough to pick up the edges of the shingles. |
 |
|---|
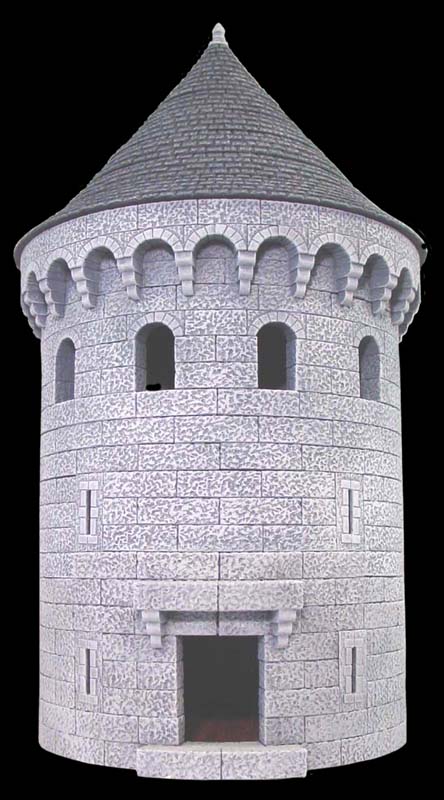
| 36. | For instructions and colors used to paint the tower, refer to the Painting Instructions page. For instructions on painting the slate roof, visit our Conical Roof Painting Instructions page. Click on the photos for a larger view of the tower. |
 |
 |
|---|