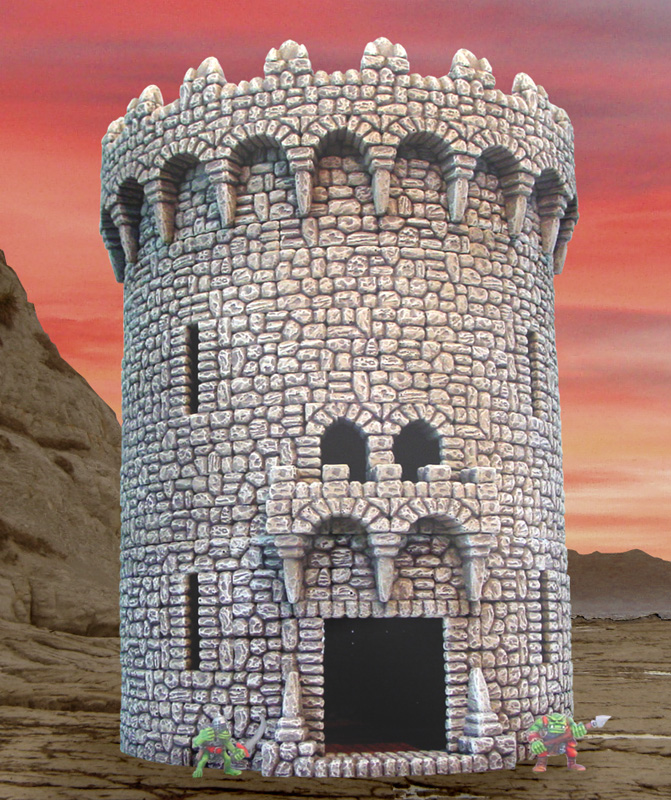
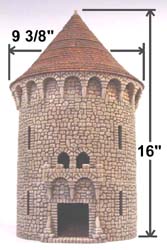
8" Round Fieldstone Tower Building Instructions
This page contains instructions on how to use mold #78 to build the 8" round fieldstone tower. You will have to cast this mold 26 times to build the tower. This round tower is slightly more difficult to build than the average model. The pieces are easy to cast and the plans are easy to follow, but the difficulty lies in keeping the tower circular.
|
You will need to print out the 8" fieldstone plans from our Building Plans Page and lay the blocks directly down on the plan when gluing. If you would like to add the conical roof onto the tower, you will need an additional mold #86 and you will need to cast this mold 12 times. |
|
About Mold #78
| 1. | Some of the pieces on mold #78 (such as the arrow slits) are difficult to cast without air bubbles in the pieces. The best method of casting these pieces is to use the "wet water" method shown on the Advanced Casting Instructions page. Using this method, most of the air bubbles will be eliminated giving you nearly perfect castings. |
 |
|---|
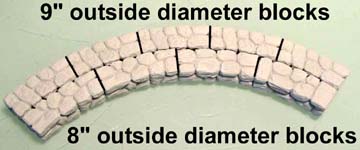
| 2. | It takes 16 of the 8" blocks to make a full circle (inner row shown). It takes 20 of the 9" blocks to make a full circle (outer row). Mold #78 has mostly 8" blocks, because you need so many to build the tower. It has only one 9" block, since you only need one row at the top of the tower. |
 |
|---|
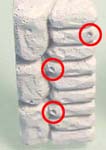
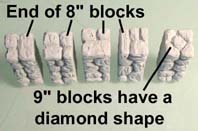
| 3. | Since these different diameter blocks look so similar, I marked the 9" blocks with a diamond shape on both ends so you could tell the difference. When sorting the blocks, simply look at the ends to see which block it is. |
 |
|---|
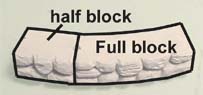
| 4. | As for the 8" diameter blocks, I have 3 types on the mold. The first type is a full block, which there are many of.
Finally, there is also a quarter block. Four of these add up to the same length as a full block. |
|---|
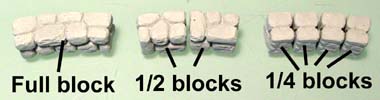 The second is a half block. Two of these half blocks put together will add up to the same length as a full block.
| 5. | Depending on how you scrape your molds and the casting material you use, the arrow slits may need sanding slightly. Since arrow slits span 3 rows of blocks, if you scrape your blocks short then the arrow slits may be too tall. The difference in height should be very slight and you may not notice it until after your tower is uneven several rows later. Just compare the height of the arrow slit with a stack of 3 blocks to see if it needs sanding. |
 |
|---|
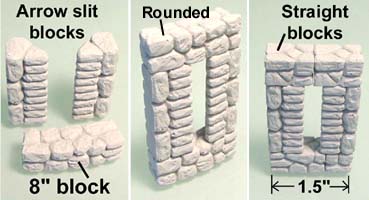
| 6. | The arrow slit blocks are simply angled straight strips of blocks. For a rounded arrow slit, take a couple of 8" blocks and place one on the top and bottom. You can also make a straight arrow slit by putting a 1.5" block on the top and bottom. |
 |
|---|
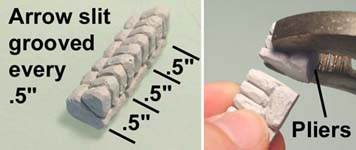
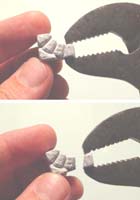
| 7. | The arrow slit blocks are deeply grooved in 1/2" segments. This allows you to break them fairly easily with pliers to make different heights of arrow slit. |
 |
|---|
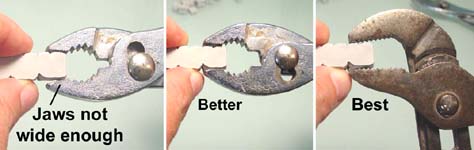
| 8. | Use a pair of pliers that can open up wide. I prefer to use channel lock pliers. It works best if the jaws can open up slightly wider than the width of the block or you'll break the corners off. |
 |
|---|
| 9. | Once broken, these arrow slit pieces can also be used for decorations on the tops of walls. You may need to sand the edges of the broken ends. Otherwise they may not be the exact height you need. |
 |
|---|
Building Instructions
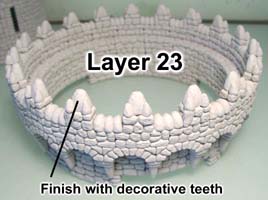
To build this tower you will need to use mold #78. You will have to cast this mold 26 times to build the tower. I know that is a lot of casting, but this is a very large tower.
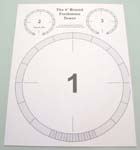
| 1. | You will need mold #78 to build this tower. Cast this mold 26 times. Be sure to print out the building plans. You will find them on our Building Plans Page labeled "8" Round Fieldstone Tower". I strongly suggest printing out several copies of page 1 of the plans. These will be very helpful in getting your tower to be the correct shape. We will lay the blocks directly on the plan when gluing them. |
 |
|---|
Pre-gluing Sections
These next few photos will show sections that we will pre-glue. By gluing these sections together first, it will save you a lot of time during the whole building process. Further down the page I will show each row glued in its proper order.
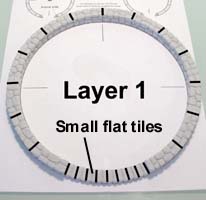
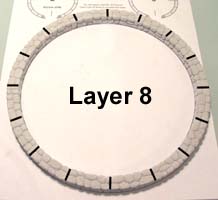
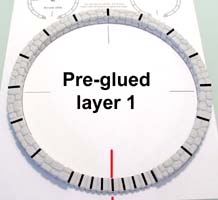
| 2. | Pre-glue layers 1 and 8 by laying them directly on the plan. Be sure you do not glue them to the paper! These rings of blocks will help us keep the tower the proper roundness as it continues upward. Layer 1 uses eight of the small flat tiles along the front. |
 |
 |
|---|
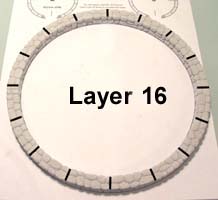
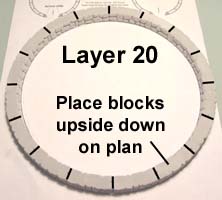
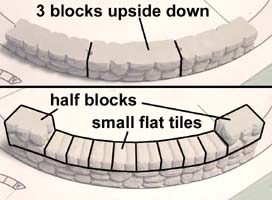
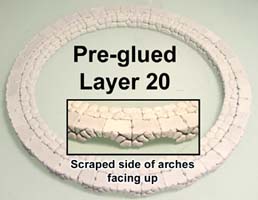
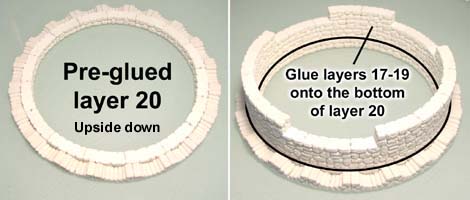
| 3. | Next, pre-glue layers 16 and 20. Layer 20 will have the 9" diameter arches added on around the outside edge (more on this continued below). To make this easier, we will place the blocks for layer 20 on the plan upside down. |
 |
 |
|---|
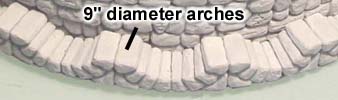
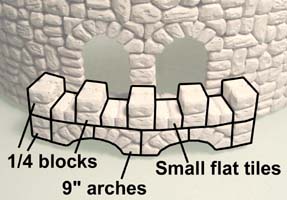
| 4. | Around the outside of layer 20 we will add a row of 9" diameter arches. This is a close-up of what they will look like from the side. |
 |
|---|
| 5. | When you place the row of arches (upside down) around layer 20, you will find that the ring is too large to fit properly. I carved these blocks several times but the slightest inaccuracy becomes multiplied x 40 (since there are 40 blocks around the outside). To solve the inaccuracy problem, you will need to break the tips off one side of 3 arch pieces. |
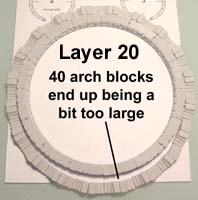 |
 |
|---|
| 6. | Place these 3 broken arch pieces spaced far apart around the outside of layer 20. This will mean that 3 arches around the outside will be slightly shorter than the other arches. However, they will be lost among all the other arches and no one will notice them. Layer 20 is now finished. |
 |
 |
|---|
| 7. | The next piece to pre-glue is the top of the main doorway. Lay 3 full 8" blocks on the plan upside down and glue them together. On top of them, glue 8 small flat tiles in the center (right side up) and 2 half blocks on each end (upside down). You want the flat tiles right side up because when this piece is flipped over, these tiles form the inside top of the large doorway. |
 |
|---|
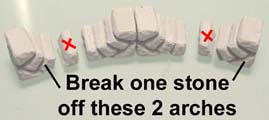
| 8. | For the double window arch, start by placing a half block and a full block side by side. We will need the double arch to end up exactly this size when finished, so we'll use these blocks as a guide. |
 |
|---|
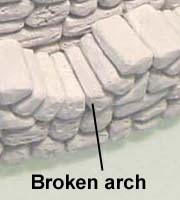
| 9. | Next we'll set up 2 full arches. Since these will be much too long to fit evenly on top of the 2 bocks (above), we need to break off one stone on the two outside arch blocks. Set these broken arches on top of the blocks on step 8 but do not glue them. |
 |
|---|
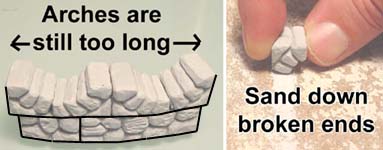
| 10. | Even with these stones broken off, the arches are still too long to fit the blocks below. To fix this you need to sand the broken part of the arches down until they fit properly on top of the blocks. |
 |
|---|
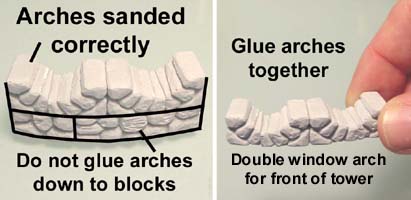
| 11. | After sanding, these arches should fit properly. Do not glue these arches to the blocks beneath them. Instead, only glue the two full arches to each other. This completes all of the sections that need to be pre-glued. |
 |
|---|
Assembling the Tower
Before you assemble the tower, be sure that you have pre-glued all of the sections shown above. The following instructions will not show the block-by-block makeup of each pre-glued section.
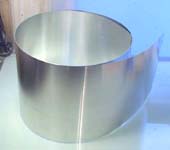
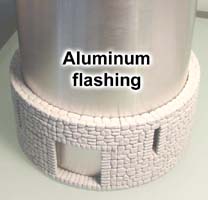
| 12. | I'm using a piece of 8" wide aluminum flashing as a guide to keep the tower round. You can buy it at most hardware stores by the foot. It's used in roofing for sealing around chimneys. You'll need about 5 feet of flashing and it will cost you around $2.50 for a piece this size. This aluminum is thin enough that you can cut it with a pair of scissors. |
 |
|---|
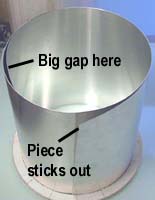
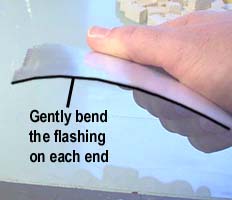
| 13. | Roll up the flashing and set it into the first ring of pre-glued blocks. Spread out the flashing so that it completely fills the ring. You'll notice that there's a couple of things that keep it from being round - the piece that sticks out and the big gap on the inside. To fix this, bend the flashing on each end to form a gentle curve. |
 |
 |
|---|
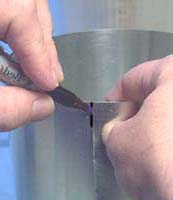
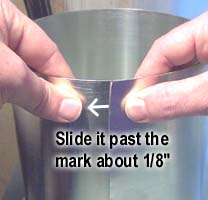
| 14. | Place it back inside the ring of blocks. Use a marker to place a mark where the edge meets. If we taped the flashing together at this point, it would be too tight to remove from the tower after it was built. To give yourself a slight bit of room, slide the edge past the mark about 1/8". That should shrink the diameter of the circle just enough. |
 |
 |
|---|
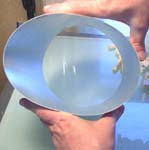
| 15. | Place pieces of tape across the seam and over the edges. You'll notice that after it's taped securely that it still may not be round. To fix this, take the ring of flashing and gently bend it back to a rounded shape as best you can. |
 |
 |
|---|
| 16. | As you build the tower, leave the flashing inside. I've removed the flashing for the next few photos so you can see which blocks are used. As you add more layers to the tower, occasionally remove the flashing just to make sure it didn't get glued in accidentally. |
 |
|---|
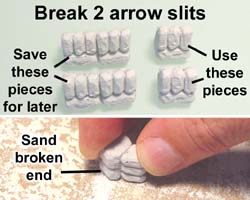
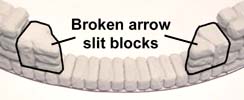
| 17. | Lay down pre-glued layer 1. Break 2 arrow slit blocks as shown. We will use the shorter pieces. The longer pieces will be used later on the double arch window. You may need to sand the broken ends so they end up being 1/2" tall. |
 |
 |
|---|
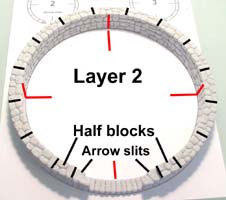
| 18. | Glue on the blocks to form layer 2. To make this row alternate with the one below, you will place 2 half blocks on each side of the doorway (right photo).
|
 |
|---|
 Glue the broken arrow slit blocks on each side of the doorway as shown in this small photo. This will dress up the sides of the large doorway.
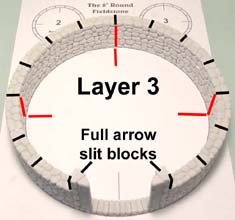
| 19. | Glue on the blocks to form layer 3. I added the red lines as reference points so you can see how the rows of blocks alternate. This time glue full arrow slit blocks on each side of the doorway. This will dress up the sides of the large doorway. You will notice that the flat tiles on the very bottom row force the arrow slit blocks up 1/4" so they don't line up flush with the rows we are working on. Don't worry about this because it will work out when we reach the top of the doorway. |
 |
|---|
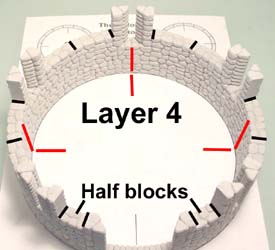
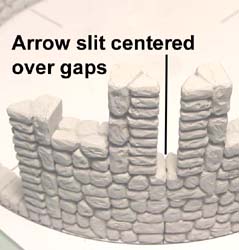
| 20. | Layer 4 has 5 full arrow slits with 2 full blocks spaced between each. Each side of the doorway has half blocks. Be sure to center the arrow slits over the seams on the row beneath them. |
 |
 |
|---|
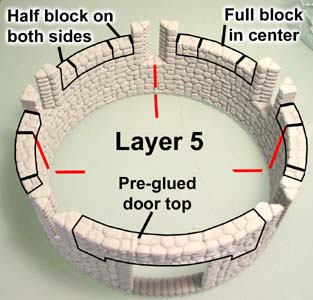
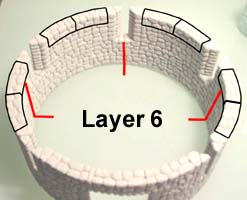
| 21. | For layer 5 you will need to fill in between the arrow slits with a full block in the center and 2 half blocks on each side.
Layer 6 is finished by adding the full blocks between the arrow slits. |
 |
|---|
 To fill in on top of the doorway, you need to glue in the pre-glued doorway top assembled in step 7 above.
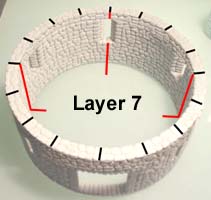
| 22. | Layer 7 has a complete row of full blocks all the way around. Be sure to use the flashing while you are gluing on the rows of your tower. I have removed it to take photos of each row but you will probably leave it in the whole time. |
 |
 |
|---|
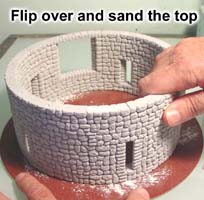
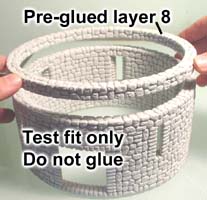
| 23. | Let layers 1-7 dry completely. Then flip this section over and sand the top. This will level the top so that pre-glued layer 8 will fit properly. Do not glue layer 8 down. Just see that it fits properly. From here on we will start building using layer 8 as the base. |
 |
 |
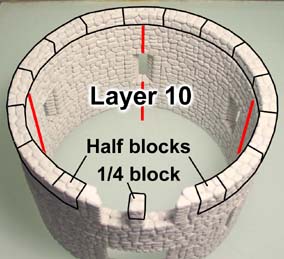
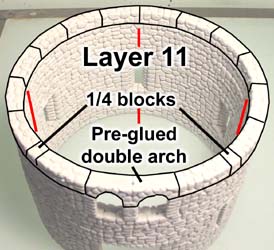
|---|
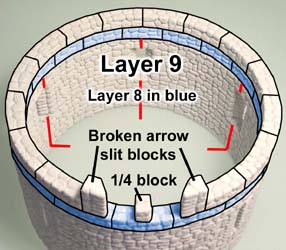
| 24. | Position layer 8 (shown in blue) over the previous layer but do not glue it down. Position it so that the blocks alternate from the row below it. Layer 9 is glued on top of layer 8. Layer 9 uses broken arrow slit blocks on each side of the front window. Remember the left over pieces from step 17? We are using the left over 1" long pieces here. The center block on the front window is a 1/4 block. |
 |
|---|
| 25. | Layers 10 and 11 are shown here. Layer 11 uses the pre-glued double arch shown on step 11. |
 |
 |
|---|
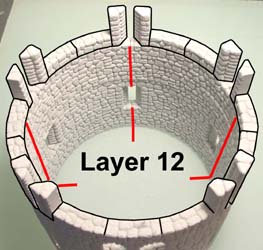
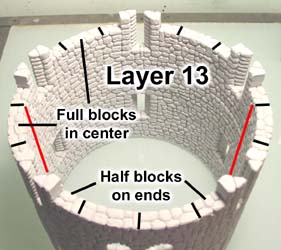
| 26. | Layers 12 and 13 are shown here. Layer 12 uses full blocks between all arrow slits. The arrow slits are centered over gaps in the row below. Layer 13 uses half blocks against the arrow slits. |
 |
 |
|---|
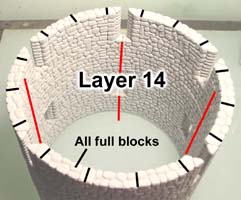
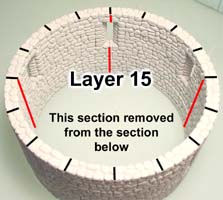
| 27. | Layers 14 and 15 are shown here. These layers use all full blocks. For the photo of layer 15 I've removed the bottom section (the tower separates at row 7). |
 |
 |
|---|
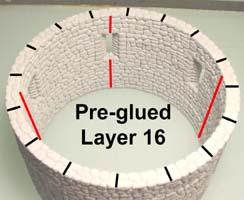
| 28. | Layer 16 is one of our pre-glued layers. Position it so the rows of blocks alternate. On top of this row, only glue down the blocks shown here. We want this tower to separate after this point. |
 |
 |
|---|
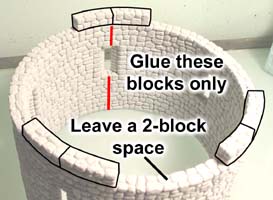
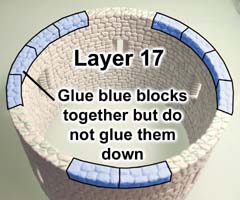
| 29. | Mark the top of these blocks with a magic marker. This marking will tell us where not to glue when we put on the next row so our tower will come apart. Finish Layer 17 by filling in the blocks. Glue these blocks together but do not glue them down to the rest of the tower. |
 |
 |
|---|
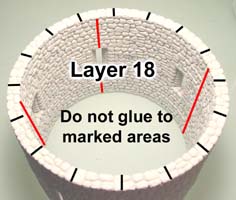
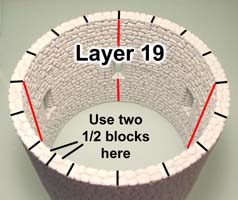
| 30. | When gluing layer 18, Do not glue to the marked area on the row below. If you do then your tower will not come apart as it should. Next glue layer 19 on top. Since you will run out of regular blocks, use two 1/2 blocks on the area shown. |
 |
 |
|---|
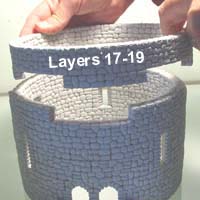
| 31. | If glued correctly, the top of the tower should lift off as shown, On the bottom of this section, in front of the double arch window you need to glue these blocks on the front. |
 |
 |
|---|
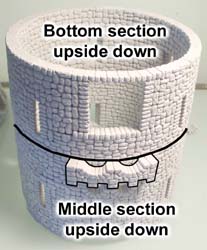
| 32. | Once the arch above is dry, flip this middle section upside down and place the bottom section on top of it (upside down as well). Glue the teeth onto the side wall only and do not glue it to the arches below it. Otherwise you will end up gluing the bottom and middle sections together. |
 |
 |
|---|
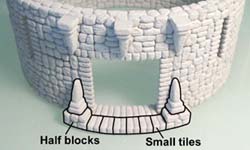
| 33. | Once dry, flip the bottom section right-side up again. Now glue the blocks onto the front to finish the doorway. There are six small tiles along the front with two half blocks on each end. Then add a tooth on top of each half block. |
 |
|---|
Do not follow the rest of these instructions, but instead skip down to the Adding a Conical Roof instructions below. |
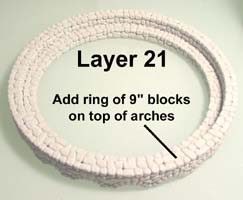
| 34. | Place pre-glued layer 20 on the table with the scraped side of the arches facing up. Glue a row of 9" blocks on top of the arches for layer 21. |
 |
 |
|---|
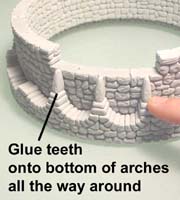
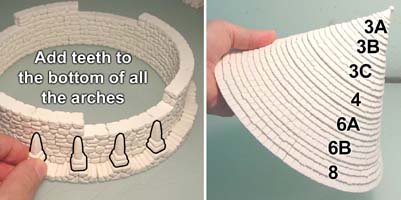
| 35. | Turn layer 20-21 upside down on the table. Glue layers 17-19 onto the bottom of it. Now glue the teeth all around the outside, centering them over the arch ends. If you remember from step 6, we had 3 broken (shorter) arches. Space the teeth evenly to cover this problem. |
 |
 |
|---|
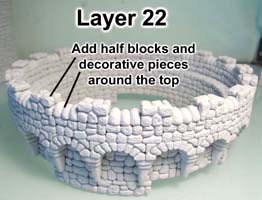
| 36. | Turn the tower top over again and add the half blocks and decorative pieces to complete layers 22 and 23. |
 |
 |
|---|
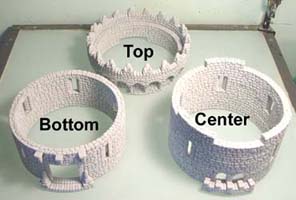
| 37. | When finished, you should have the 3 sections shown here. Paint the separate sections using the Earth Tone Painting Instructions. 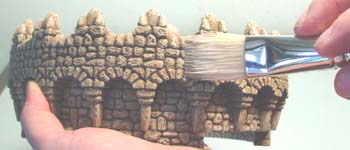 |
 |
|---|
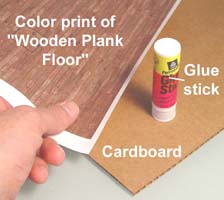
| 38. | After painting, I am going to add the floor onto the tower. I have created a wood plank flooring file that you can print out from your printer at home. You will find this file on my Printed Plans Page labeled as "Wooden Plank Floor". Open this file and print it out on a color printer. To make this floor you will also need a piece of corrugated cardboard and a glue stick. |
 |
|---|
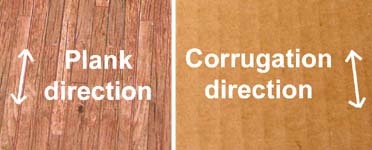
| 39. | Glue the color floor print down to the cardboard using the glue stick. Be sure that the corrugation direction ends up going the same way as the floor plank direction. That way if the corrugation shows through, it will still look natural. |
 |
|---|
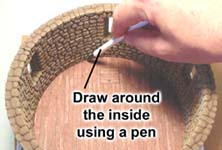
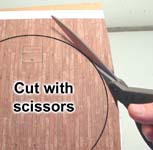
| 40. | Set the bottom tower section on top of the glued floor. Make sure the trap door is in the position you want it. Take an ink pen and draw around the inside of the tower. Use scissors to cut out the floor. Cut slightly outside the line you drew for a tighter fit. |
 |
 |
|---|
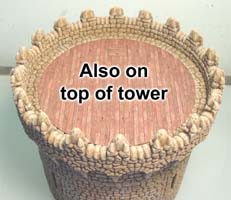
| 41. | You will want to make at least two of these floors. Push these floors up into the tower. This first floor will be on the very bottom of the middle tower section. The second floor will be on the very top of the tower. |
 |
 |
|---|
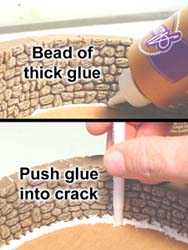
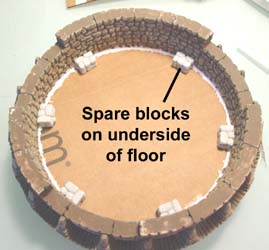
| 42. | To secure the floor in place, flip each section over and put a bead of thick glue around the outside. Spread the glue into the crack using the back end of an ink pen or a paint brush handle. Finally, secure the floor in place using some spare blocks glued around the outside edge under the floor. |
 |
 |
|---|
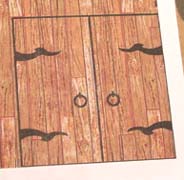
| 43. | The plank floor print will also have a door on one corner of it. Glue this door to a piece of cardboard as well and cut it out. This door should fit tightly inside the wide door opening. |
 |
 |
|---|
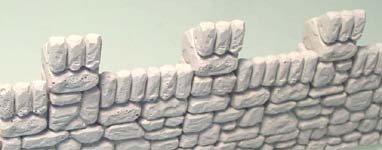
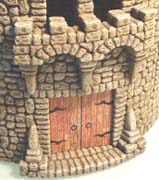
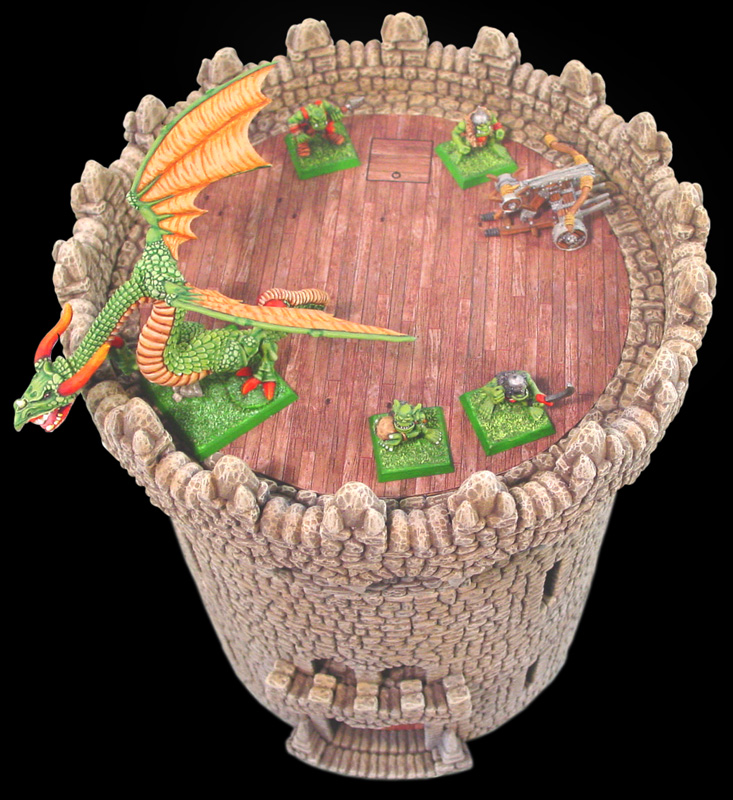
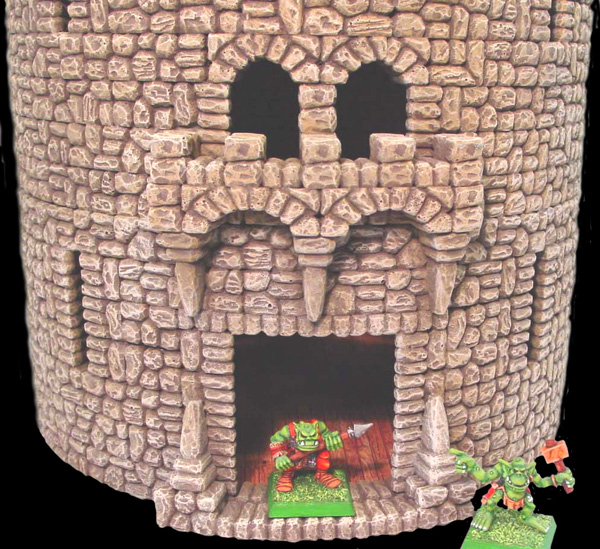
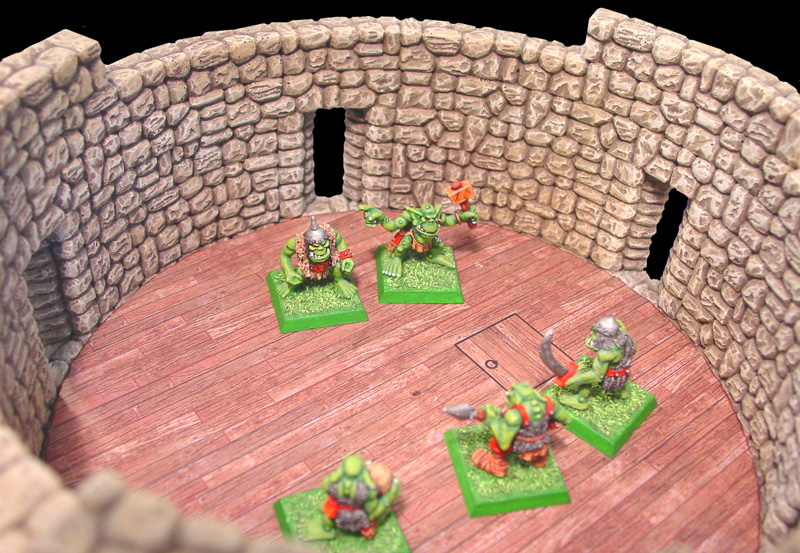
I thought this would make a great orc tower. The orc figures are from Games Workshop(TM). Click on the photos for a larger view. The top of the tower can come off to allow access to the arrow slits. |
 |
 | |
 |
 | ||
Adding a Conical Roof
To add a conical roof to your tower, you will need to use mold #86. You will have to cast this mold 12 times to build the conical roof.
| 1. | Start by following the building instructions shown above. Follow this until you reach step 33. After you stop there, come back down to these instructions to finish the top of the tower. To add a conical roof to your tower, you will need to use mold #86. You will have to cast this mold 12 times to build the conical roof. This version of the tower is slightly different because it is taller and does not have the decorative crenellations around the top. |
 |
|---|
| 2. | We will start at the top of the tower and work down. Place pre-glued row 20 upside down on a flat surface. This is the row that has all of the arches glued around it. Glue rows 17-19 on top. You can see what rows 17-19 look like from step 31 above. |
 |
|---|
| 3. | Glue the large teeth all the way around the top of the tower. Each tooth will support the bottom of each arch. The top of the tower is now finished! Next assemble the roof. You can find instructions on the Conical Roof Building Instructions page. This roof will use all of the diameters of conical roof blocks. |
 |
|---|
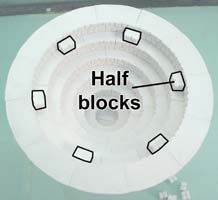
| 4. | Flip the roof upside down and glue half blocks around the inside of the roof. You will notice that these half blocks will be recessed slightly down in the roof. This is because the rows of roof blocks are 3/4" deep, and the tower building blocks are only 1/2" deep. Since the interior diameter of the roof is 7", and the interior diameter of our tower is also 7", I'm going to add braces that will let this roof nest inside the tower and hold it in place. |
 |
|---|
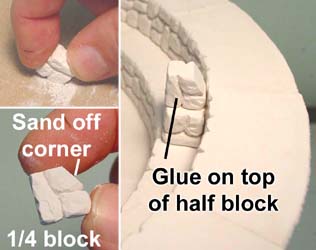
| 5. | Collect several 1/4 blocks and sand off the outside corners as shown in the photo. After the outside corners are sanded slightly, glue these 1/4 blocks on top of the blocks already in the roof. These blocks will partially set down inside the tower. If you do not sand the corners off of these blocks, the fit would be too tight and these small blocks might not nest down inside the main tower. The sanded angles help guide the roof into place when you set it down onto the tower. |
 |
|---|
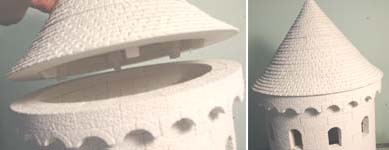
| 6. | Here is a side view of how the roof fits onto the tower. You can see that the sanded 1/4 blocks will fit down into the top opening of the tower and guide the roof into place. These are photos of a different tower but you get the idea of how the roof fits. |
 |
|---|
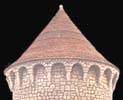
| 7. | For instructions and colors used to paint the tower, refer to the Earth Tone Painting Instructions page. For instructions on painting the wood shingle roof, visit our Conical Roof Painting Instructions page. Click on the photos for a larger view of the tower. |
 |
 |
|---|