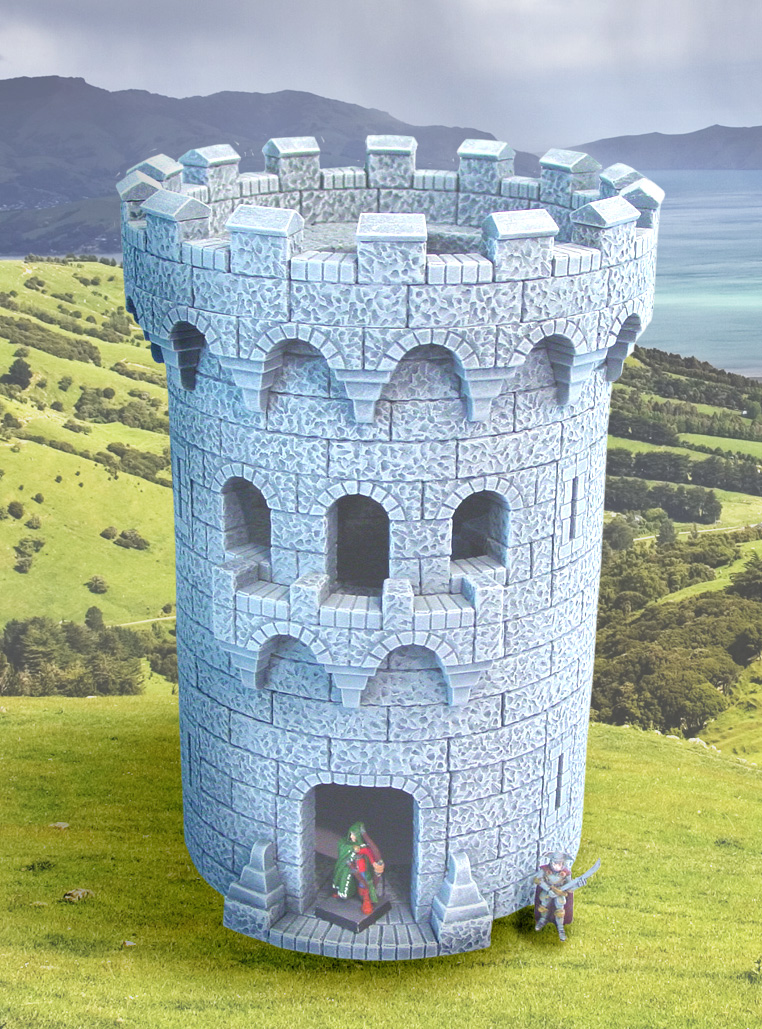
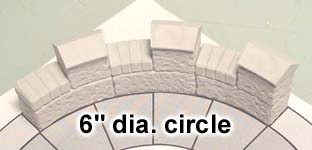
6" Round Tower Building Instructions
|
This page contains instructions on how to use mold #66 to build the 6" round tower. You will have to cast the mold 26 times to build the tower. I know that sounds like a lot of castings but this is a big tower. |
| |
|
If you want to build the tower with the conical roof, you will need 26 castings of mold #66 and 12 castings of mold #87 for the roof. |
| |
About Mold #66
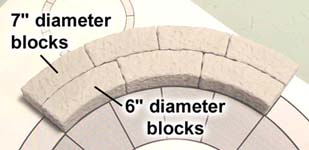
| 1. | Most of the blocks on this mold are the 6" diameter blocks. But there is one 7" diameter block as well. It takes 12 of the 6" diameter to make a full circle and it takes 16 of the 7" diameter blocks to make a full circle. You will notice that the 7" blocks are slightly smaller in size than the 6" blocks. |
 |
|---|
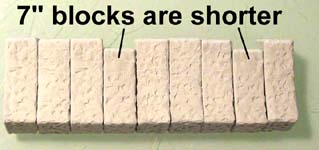
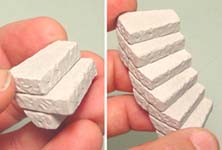
| 2. | If you accidentally use a 7" block in a 6" circle, that row of the tower will not come out right. An easy way to sort these blocks is to lay them on their back and compare their length. In this photo, you can see that the 7" blocks are a bit shorter than the 6" blocks. |
 |
|---|
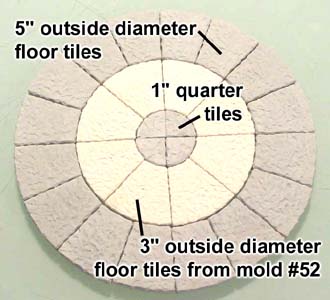
| 3. | If you want to make a solid tiled floor as shown in the photograph, then you will also need the floor tiles from mold #52. I'm sure some of you will be disappointed that these tiles were not on this mold. I really tried but there was no extra space on the mold for them. Since you need very few center tiles (compared to the rest of the blocks), people would have had lots of these center tiles left over if I had added them. My assumption was that if anyone wanted to use the mold for a variety of other projects, they would most likely have mold #52 as well. The very center tiles (forming the 1" round circle) are on mold #66. I added this since the center circle block on mold #52 is not very easy to use for a floor. |
 |
|---|
| 4. | There is also a circular stair block on the mold. This block will stack up to make a circular stairway that fits inside of the 6" round tower. This block can also be used to make a circular stairway that wraps around the outside of the 3" round tower (from mold #61). |
 |
|---|
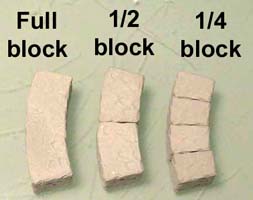
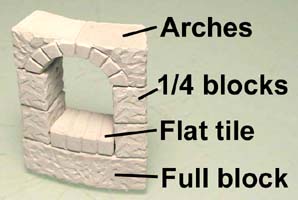
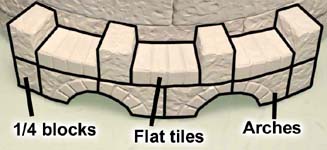
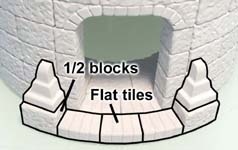
| 5. | While building the tower, the plans will sometimes tell you to use a half block or quarter block in certain areas. This is what they look like. Two 1/2 blocks will equal one full block. Four 1/4 blocks will also equal one full block. |
 |
|---|
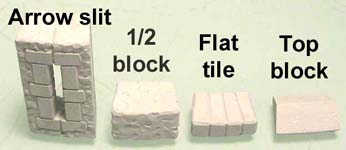
| 6. | To make a complete arrow slit, you will need to glue two halves together. All of the blocks shown on the right take up the same amount of room as a 1/2 block. |
 |
|---|
| 7. | If you want to add crenellations to the top of a 6" diameter circle of blocks, you can simply alternate the flat blocks and top blocks. The top blocks each have a 1/2 block under them. |
 |
|---|
| 8. | To add crenellations to the top of a 7" diameter circle, you can also alternate the flat blocks and top blocks. You will notice that you can fit one extra block on this quarter circle. The fit is not a perfect fit (there will be a slight gap between blocks) but it will work good enough. |
 |
|---|
| 9. | The arch blocks on this mold are actually meant to make windows for the 6" round tower. In this photo you can see that a full arch takes the same amount of room as a full block. It just so happens that the arch was a close enough in size that it can also be used for the decorative arches that go under the 7" ring of blocks at the top of the tower. |
 |
|---|
Building Instructions
You will need to cast this mold 26 times to have enough blocks to build the circular tower. Be sure the blocks are completely dry before gluing them together.
You can download the plans shown here from the Building Plans Page and print them out yourself. You'll want the plans labeled "6" Round Tower Plans".
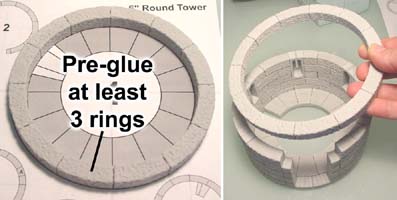
| 1. | Print the plans from the Building Plans Page labeled "6" Round Tower Plans". These plans will have a full-size layout that you can place the blocks directly on. Start by pre-gluing at least 3 rings together but don't glue them down to the plan! While building, you can occasionally glue these rings on the tower to help keep it perfectly round all the way up. |
 |
|---|
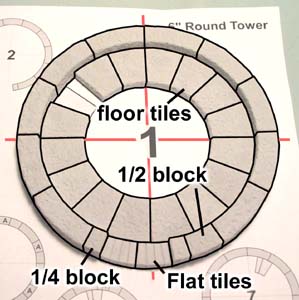
| 2. | Here's row 1. Lay the blocks directly on the plan but do not glue them to the paper. You will notice that I left out one of the floor tiles. I did this because one of the stair pieces will go into that spot later on when we add the stairway. I also put a red center line on these photos. These will line up to the seams between the full blocks on every other row. Although this throws the doorway off to the side slightly while building, the doorway will be in the exact center once the tower is completed. |
 |
|---|
| 3. | Here's row 2 and 3.
Do not glue the blue blocks! These are full blocks used to hold the place of the doorway and will be removed once the glue dries. The arrow slits are made by gluing two arrow slit blocks together. |
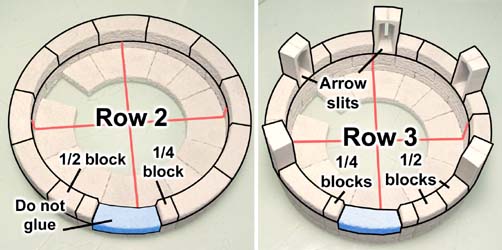 |
|---|
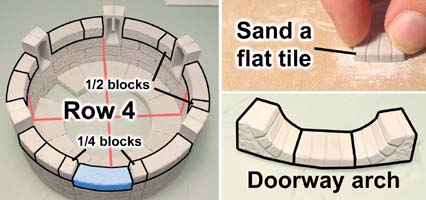
| 4. | Here's row 4. Once again, do not glue the block shown in blue. To make the doorway top arch, sand down one of the flat tiles until it matches the height of the top of the arch blocks on both sides. Then glue this together to make a complete arch top. |
 |
|---|
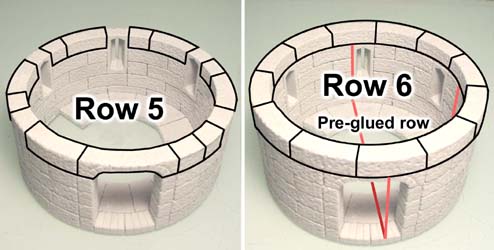
| 5. | Here's row 5 and 6. You will notice that I removed the blue blocks to reveal the open doorway. On row 6, I used one of the pre-glued rings that we had made is step 1 of these instructions. Using the pre-glued ring here will help keep your tower in a perfect circle as you are building it. |
 |
|---|
| 6. | Glue parts of the next row on, and then mark them with a magic marker. These marks will tell you where not to glue so the tower can separate at this point. Finish the row by adding the remaining blocks. Glue these blocks together but do not glue them to the marked areas. |
 |
|---|
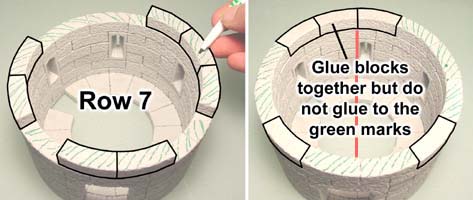
| 7. | Here's row 8 and 9. Do not glue row 8 to the green marks! Glue row 9 upside down on top of the building plan. Gluing it upside down will ensure that the top of the floor tiles are flush with the top of the blocks once you flip this layer over. The very bottom floor tile seam lines up with the bottom block seam. |
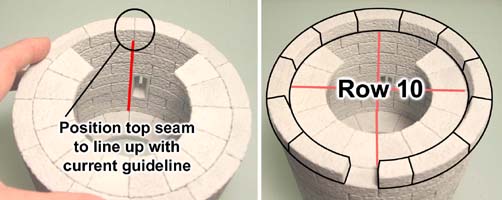
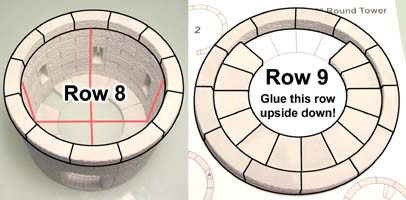 |
|---|
| 8. | Be very careful when positioning row 9. Be sure that the top seam lines up with the red reference line we have been using so far. Next is row 10. Leave out the 1/2 block shown at the bottom. |
 |
|---|
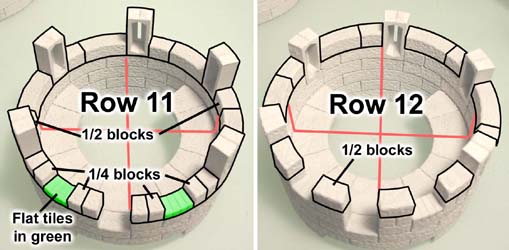
| 9. | Row 11 has the arrow slits on it. The blocks shown in green are flat tiles which form the bottom of the windows on each side. Check the printed plans to be sure where every block goes. Row 12 fills in blocks between the arrow slits. The front uses mostly 1/2 blocks. |
 |
|---|
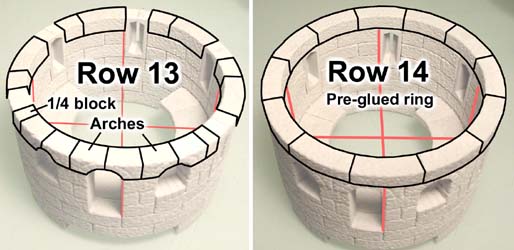
| 10. | This photo shows rows 13 and 14. Row 13 has all arch blocks in the front with a 1/4 block on each end. Row 14 is one of the pre-glued rings of blocks. |
 |
|---|
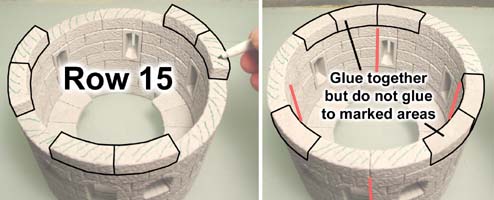
| 11. | This photo shows row 15. Glue parts of the next row on, and then mark them with a magic marker. Finish the row by adding the remaining blocks. Glue these blocks together but do not glue them to the marked areas. |
 |
|---|
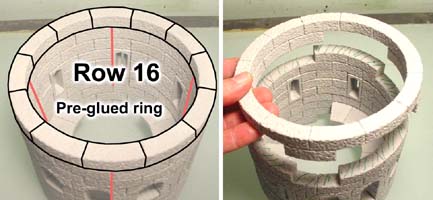
| 12. | This photo shows row 16. For this row use a pre-glued ring. Do not glue this ring to the marked areas! Once dry, you should be able to lift this ring off of the tower. |
 |
|---|
| 13. | Next we will make a decorative balcony for the front of the tower. Place the blocks shown against the side of the tower base. Glue them together but do not glue them onto the tower! Once dry, we will place this balcony under the front windows. |
 |
|---|
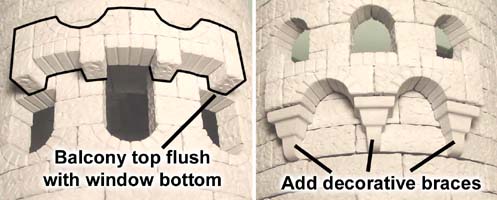
| 14. | Lay the tower on it's side and glue the balcony under the windows. The top of the balcony will be flush with the bottom of the side windows. Glue the decorative braces underneath each of the arches. |
 |
|---|
| 15. | Finish the front door by gluing 3 flat tiles down with 1/2 blocks on each side. Then place the decorative braces upside down on top of the 1/2 blocks. |
 |
|---|
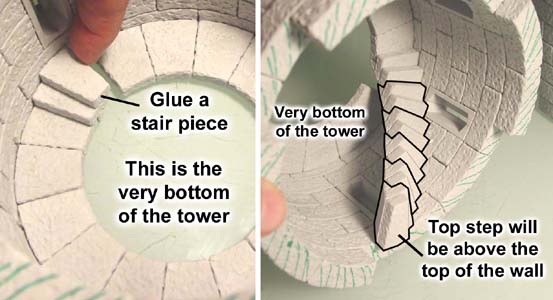
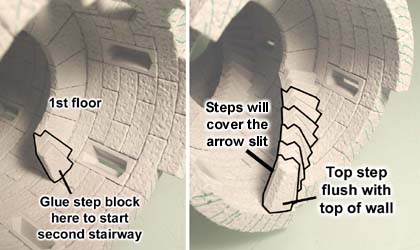
| 16. | We'll start the stairs by gluing them into the bottom of the tower. Lay the tower bottom on it's side and glue in the stair pieces. The top step should be 1/4" above the wall it is next to. |
 |
|---|
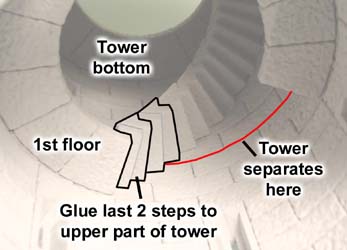
| 17. | Place the 1st floor of the tower onto the bottom section. If you remember, we had made the tower to come apart in sections for easy painting. The red line shows where the tower sections come apart Glue the last two step blocks in place but do not glue the steps together where the sections meet. If you do, then your tower will not come apart in the middle as planned. The top step will end up gluing under the first floor of the tower. |
 |
|---|
There will be no need to add steps going further on up. Do not follow the rest of these instructions, but instead skip down to the Adding a Conical Roof instructions below. |
| 18. | The second set of stairs will start at the first floor. Start by gluing one step block on the edge of the first floor. Continue gluing step blocks until the top of the last block is flush with the wall beside it. These steps will go right across the arrow slit but there's no help for it. |
 |
|---|
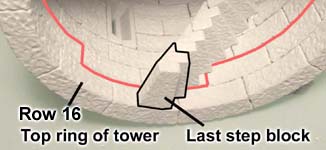
| 19. | Place the final top ring section (row 16) onto the tower and glue the last step to this ring. Do not glue the step block to the step below it! You will end up removing this top ring and gluing it to the next section we are making (row 17). |
 |
|---|
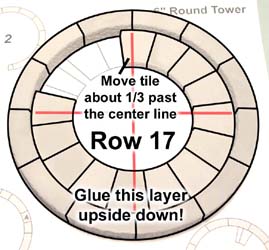
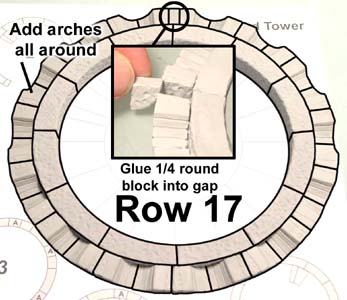
| 20. | This photo shows row 17. Glue this row upside down. You want the top of floor tiles to be flush with the top of the blocks when you flip this layer over. Set these blocks on top of the plan when you glue them together to help keep it round. Floor tile position is not critical here. I have them where they cross the center reference line by about 1/3 but the arches will go around the outside to cover up block seams anyway. |
 |
|---|
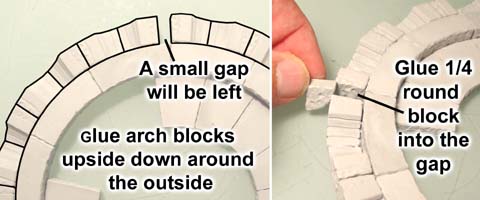
| 21. | Glue arch blocks upside down around the outside of this ring. You will notice that there will be about a 1/4" gap where the arches will not meet. To fill this gap, glue in one of the 1/4 round floor blocks here. |
 |
|---|
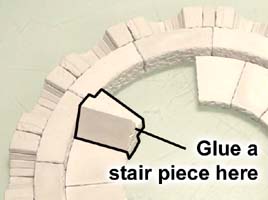
| 22. | Finish row 15 by gluing in the stair piece shown here. Make sure this layer dries completely before trying to move it. This stair block will glue on top of the stairs we have already put into the tower at this point. |
 |
|---|
| 23. | Now it's time to glue the top ring of the tower (row 16) onto row 17 that you have just made. It's easier to do this upside down. The top ring (row 16) should have a stair piece glued to it already. Be sure that this stair piece interlocks with the stair piece you glued onto row 17. |
 |
|---|
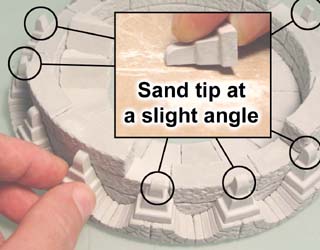
| 24. | Glue the decorative braces onto the bottoms of the arches all the way around the tower. Some of the decorative braces will hang over part of the tower what will be removed later on (I've circled these). You will want to sand the overhanging part of the braces so that the top of the tower will easily remove from the rest of the tower. Keep in mind that the tower will be painted later on. The top of the tower may lift off freely at this point, but after you paint the tower, the top will fit much more tightly so sanding will be necessary. |
 |
|---|
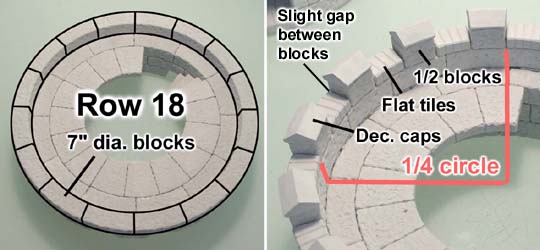
| 25. | For row 18, flip the tower top over and glue a row of 7" diameter blocks on top of the arches. Then add the decorative blocks around the top. You will need a slight gap between blocks for them to fit properly. |
 |
|---|
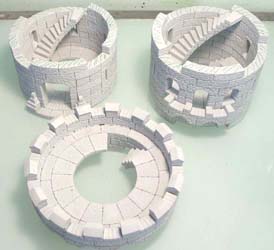
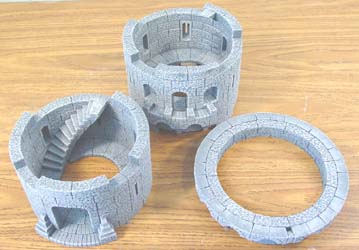
| 26. | Here is a photo of all 3 tower sections before painting. For complete painting instructions, visit the Painting Instructions page. Click on the second photo for a larger view of the tower. |
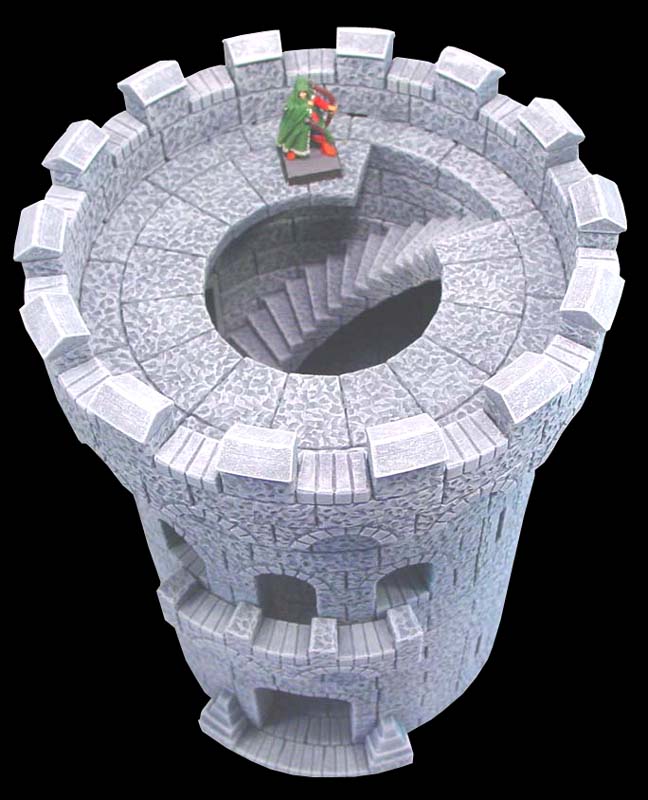
 |
 |
|---|
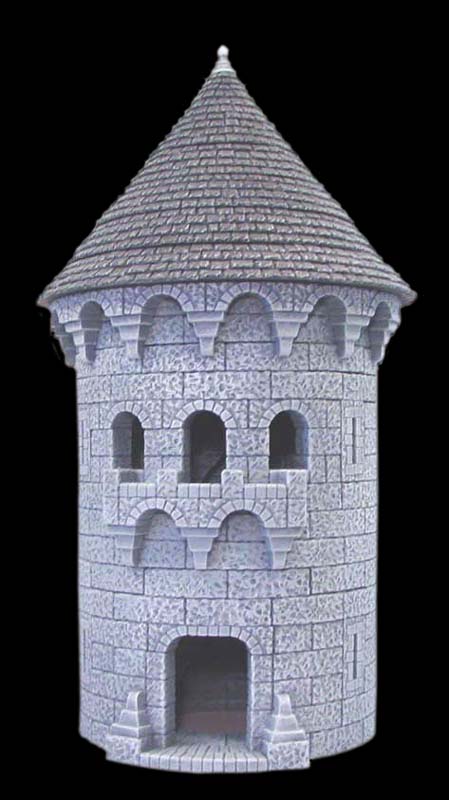
Adding a Conical Roof
To add a conical roof to your tower, you will need to use mold #87. You will have to cast this mold 12 times to build the conical roof.
| 1. | Start by following the building instructions shown above. Follow this until you reach step 17. After you stop there, come back down to these instructions to finish the top of the tower. To add a conical roof to your tower, you will need to use mold #87. You will have to cast this mold 12 times to build the conical roof. This version of the tower is slightly different because it does not have stairs going up to the very top or have the decorative crenellations around the top. |
|
|---|
| 2. | Start by following the building instructions shown above. Follow this until you reach step 17. After you stop there, come back down to these instructions to finish the top of the tower. We will continue with row 17. Lay the full blocks down on the plan and glue them together. Then glue arch blocks all the way around the outside. You will notice that there will be about a 1/4" gap where the arches will not meet. To fill this gap, glue in one of the 1/4 round floor blocks here. |
 |
|---|
| 3. | Glue row 16 upside down on top of row 17 that you have just made. Then glue the decorative braces around the outside. You will want to sand the overhanging part of the braces so that the top of the tower will easily remove from the rest of the tower. |
 |
|---|
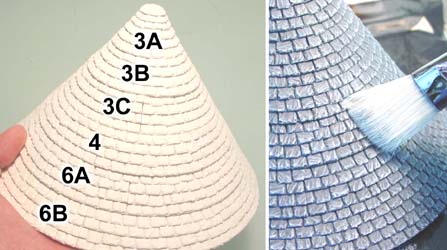
| 4. | Next assemble the roof. You can find instructions on the Conical Roof Building Instructions page. You will need to cast the #87 conical roof mold 12 times to make this roof. For instructions on painting the slate shingle roof, visit our Conical Roof Painting Instructions page. I glued the decorative cap on top of the roof after the roof was painted. |
 |
|---|
| 7. | Here are what the 3 main sections of the tower should look like after painting. Glue the slate roof directly onto the top of the tower. The roof and the tower top will come off as one piece. Click on the second photo for a larger view of the tower. |
 |
|
|---|