How to Use the 3" Fieldstone Tower Mold
|
About Mold #79
| 1. | Some of the pieces on this mold (such as the arrow slits) are difficult to cast without air bubbles in the pieces. The best method of casting these pieces is to use the "wet water" method shown on the Advanced Casting Instructions page. Using this method, most of the air bubbles will be eliminated giving you nearly perfect castings. |
 |
|---|
| 2. | Here are several different kinds of building blocks from the mold. It's important to know what each of these pieces are used for. They are shown here from the largest to the smallest. The 4" block is used to make a 4" outside diameter circle. All of the other blocks are used to create or extend a 3" outside diameter circle. |
 |
|---|
| 3. | The photo on the left shows how each of the smaller blocks add up to a full block. The photo on the right shows how 4 full blocks make a full 3" circle and how 8 of the 4" blocks make a 4" circle. |
 |
|---|
| 4. | The transition block is like adding a square block onto a 1/4 block. You can recognize it by the diamond patter on its end. It is used to smoothly join a curved wall to a straight one. |
 |
|---|
| 5. | The two strange looking blocks are balcony support blocks. These are used to fill in under (and support) the bottom of a 3" tower that starts higher up on a wall. |
 |
|---|
Making Turrets
| 1. | I'll show how to create corner turrets for your castle by doing one corner. Start by making the bottom of the keep with square corners. I used molds #70 and #260. We're going to add the turret to the second floor, so the second photo is how the second floor starts. The gray blocks are from mold #79, the white blocks are from mold #260 and the blue blocks are from mold #70. |
 |
|---|
| 2. | You can use the transition block to tie the turret into the square part of the castle. However, one of them will need to be placed upside down. Cover this upside down block with some decorative pieces at the top. |
 |
|---|
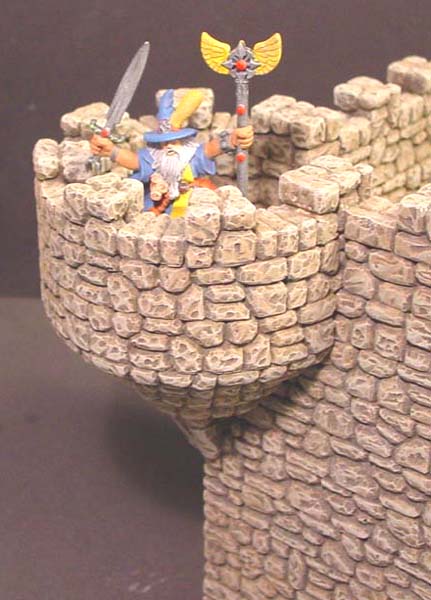
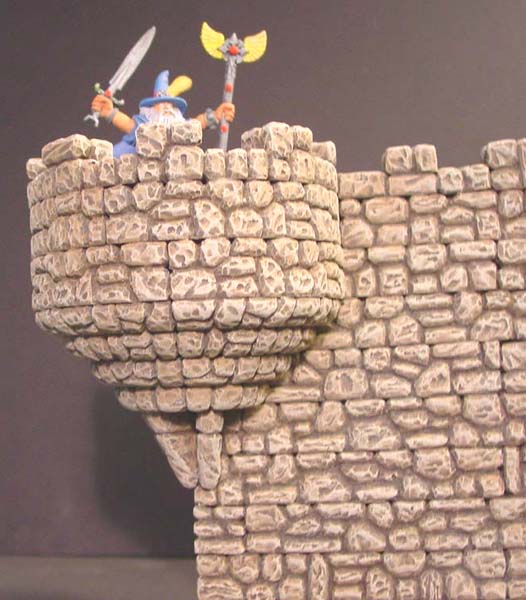
| 3. | Once the second floor is placed on top of the first, turn the whole thing upside down. The photo on the right shows the balcony support blocks placed in a semicircle under the turret to support it. The large teeth are used to help finish the design. |
 |
|---|
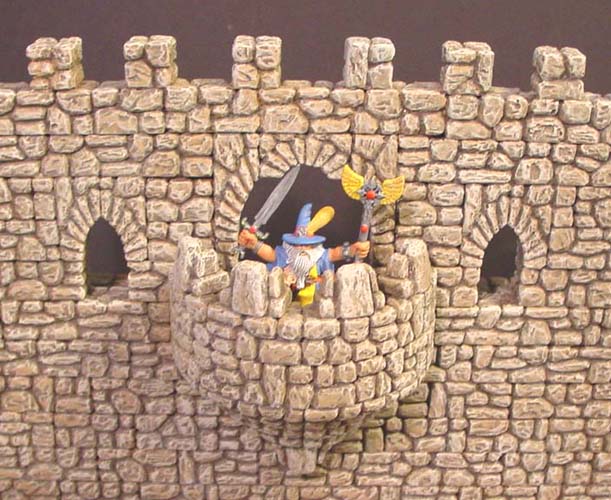
| 4. | Click a photo for a larger view. The turret could have extended further down into the first floor and included a window or the turret could reach all the way down to the base. Also, these turrets could attach to a flat wall (half circle), or they could be on an inside corner (quarter circle). They also make great circular staircases using the flat tiles as steps. The miniature was made by Games Workshop. |
 |
 |
|---|
Making a Balcony
| 1. | Here's how to make a balcony. I used molds #70, 79 and #260. This balcony will be on the second floor and come out from a flat wall. I'll start with what the second floor will look like. Notice that the transition block on the right will be placed upside down. |
 |
|---|
| 2. | The second row is much like the first, but this time we will not use the transition blocks. Simply set the round tower blocks against the regular wall blocks. This way the block seams overlap naturally. Add any decorative pieces to the top that you like. |
 |
|---|
| 3. | After you add this second floor onto the first floor, turn the whole thing upside down. To support the balcony, we'll use the balcony support blocks. Place them in a semicircle under the balcony. I finished the very bottom by using one of the decorative teeth. |
 |
|---|
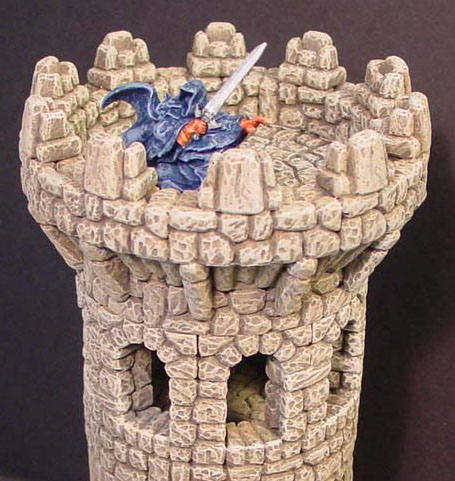
| 4. | Click on the photo for a larger view. The large arch behind the miniature is a combination of arch blocks from mold #70. The smaller windows were also arches from mold #70. The miniature was made by Games Workshop. |
 |
|---|
Building a Tower
To build the 3" fieldstone tower, you'll have to cast the #79 fieldstone tower mold 12 times.
| 1. | To build the tower, you'll have to cast the #79 fieldstone tower mold 12 times. You can print out a copy of the building plans from our Building Plans Page. Look for the plans labeled 3" circular fieldstone plans". Glue these blocks together to form row 1. You may need to sand the pointed tips of the floor tiles to get them to fit properly. |
 |
|---|
| 2. | To make an arrow slit, glue 2 arrow slit blocks together. Here are row 2 and 3. These rows are made of 1/2 blocks and arrow slits. Do not glue the blocks shown in blue! These blocks are holding the space for our doorway. |
 |
|---|
| 3. | Break one of the small arches in half. You may need to sand the broken edges if the arch does not break cleanly. Glue each half of the arch on either side of a flat tile. This will become the top of the doorway. |
 |
|---|
| 4. | Glue the remaining blocks between the arrow slits to finish row 4. This row includes the doorway arch in the step above. Glue the few blocks shown to start row 5. Once glued into place, mark the top of the blocks with a marker. This will tell you where "not to glue" the next blocks. We want this tower to come apart at this point so we can paint the inside of the tower. |
 |
|---|
| 5. | Fill in row 5 with the remaining blocks but do not glue them down. Glue row 6 onto the unmarked blocks only! If you glue to the marked areas then the tower will not come apart at this point. Glue row 7 onto row 6. |
 |
|---|
| 6. | Glue on row 8. Notice that you should be able to take the top of the tower off at this point so the inside can be painted. Just like step 1 in the instructions above, you may need to sand the tips on a couple of the wedge shaped floor tiles. I tried my best to get them to fit exactly but they are not perfect. |
 |
|---|
| 7. | Now we will pre-glue rows 9 and 14. For both of these you may need to sand the tips of the floor tiles slightly. For row 9, glue a ring of blocks around a group of floor tiles. The floor tiles will rest below the ring of blocks. For row 14, place all of the blocks upside down and glue a ring of blocks around a group of floor tiles. Here the floor tiles need to be flush with the top of the ring of stones around the outside. |
 |
|---|
| 8. | Glue row 9 onto the tower. Glue together two 1/4 blocks to form 8 window columns. Alternate these around the tower along with flat tiles for rows 10 and 11. |
 |
|---|
| 9. | For row 12, glue a few of the arch blocks down, leaving room for 3 arches to be added later on. Mark the top of the tower at this point so you know where not to glue. We want the tower to come apart in this area. Now place the remaining 3 arches on the top, but do not glue them in place. |
 |
|---|
| 10. | Glue on row 13 but do not glue it to the marked area. Remember that row 14 is a pre-glued section we did in step 7 above. Glue it on as well. Once dry, your tower should come apart at the arches. |
 |
|---|
| 11. | Turn the tower top upside down. Now glue the two kinds of tower teeth around the top of the tower, alternating between the large single teeth and the smaller groups of 3 teeth. |
 |
|---|
Do not follow the rest of these instructions because you will not need the last 2 rows. Instead skip down to the Adding a Conical Roof instructions below. |

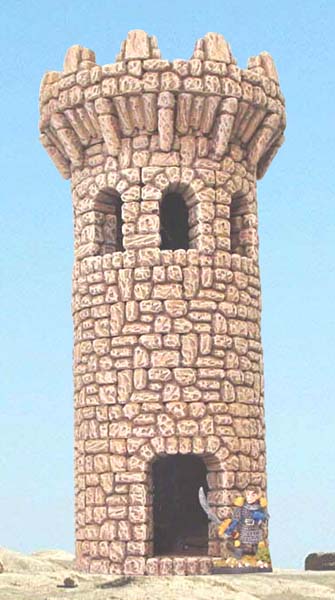
| 12. | Turn the tower top right side up and glue the 4" ring onto the top of the tower. Now add the decorative teeth around the top. I've put 10 blocks around the top. Just space then out as evenly as you can. |
 |
|---|
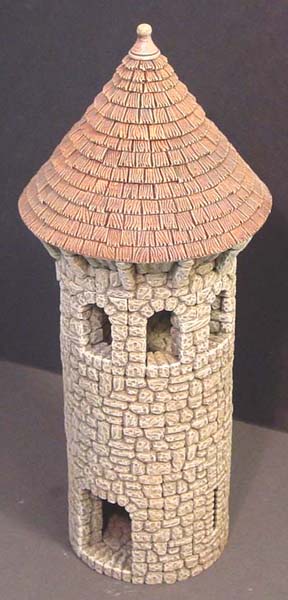
| 13. | Here are the 3 tower sections before painting. Look at the Earth Tone Painting Instructions to paint the tower. Click on the photos for a larger view. |
 |
 |
 |
|---|
Adding a Conical Roof
To add a conical roof to your tower, you will need to use mold #86. You will have to cast this mold 4 times to build the conical roof.
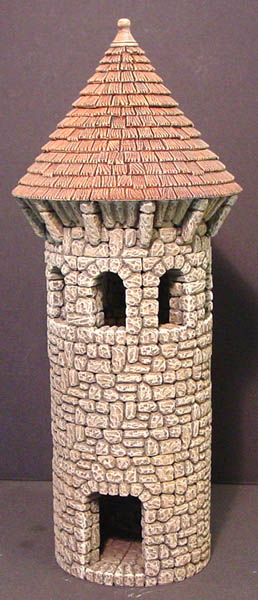
| 1. | Start by following the building instructions shown above. Follow this until you reach step 11, then stop. At this point you should have the 3 sections of the tower as shown here. To paint the tower, follow the instructions on the Earth Tone Painting Instructions page. |
 |
|---|
| 2. | You will have to cast mold #86 four times to build the conical roof. You can find instructions on the Conical Roof Building Instructions page. For instructions on painting the roof, visit our Conical Roof Painting Instructions page. Glue this roof directly onto the top of the tower after painting. |
 |
|---|
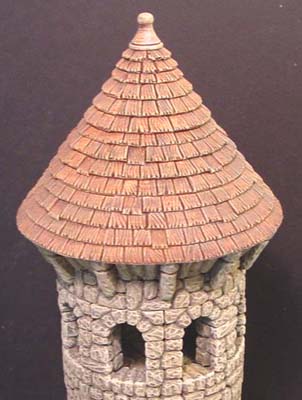
| 3. | With the wood shingle roof glued directly onto the tower top, the whole top will lift off, separating at the arches. Click on the photos for a larger view. |
 |
 |
 |
|---|