Making The Wayward Game
|
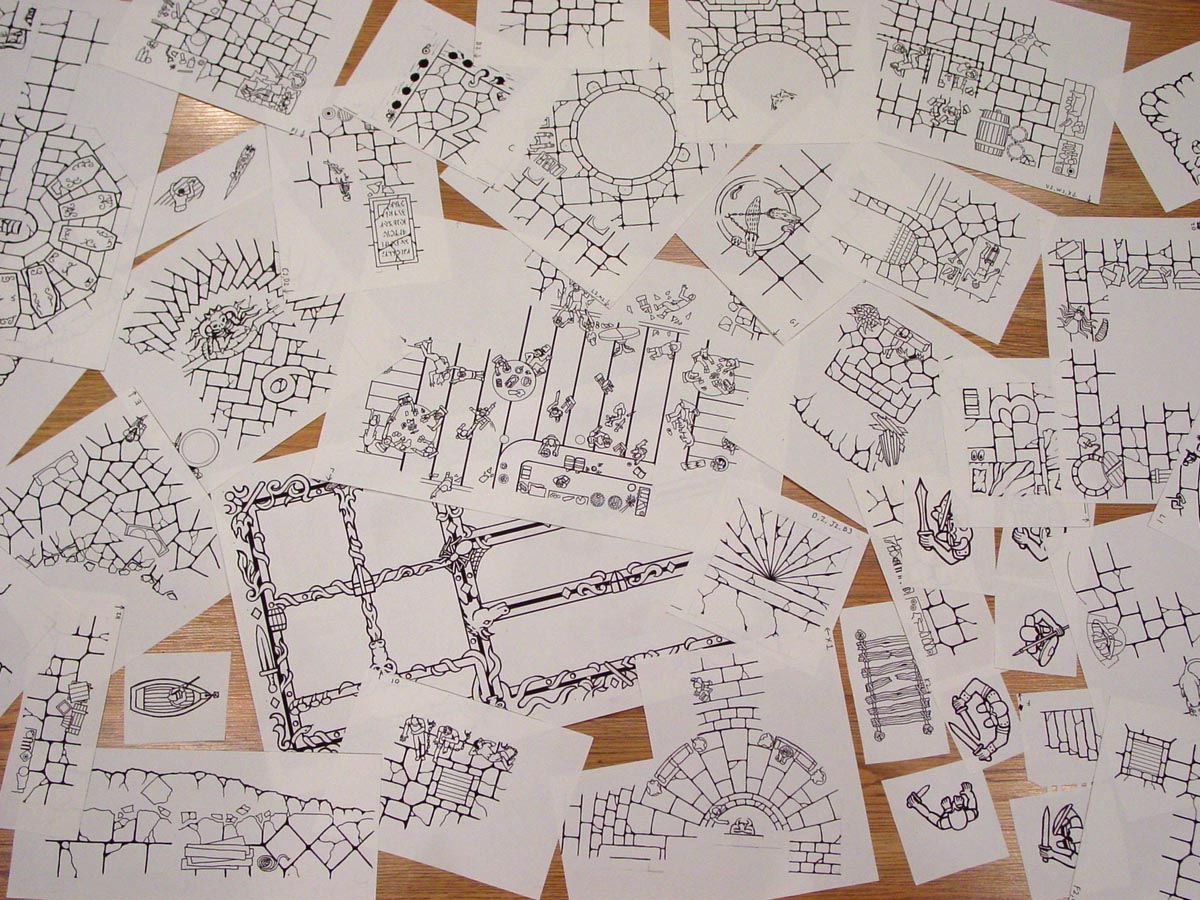
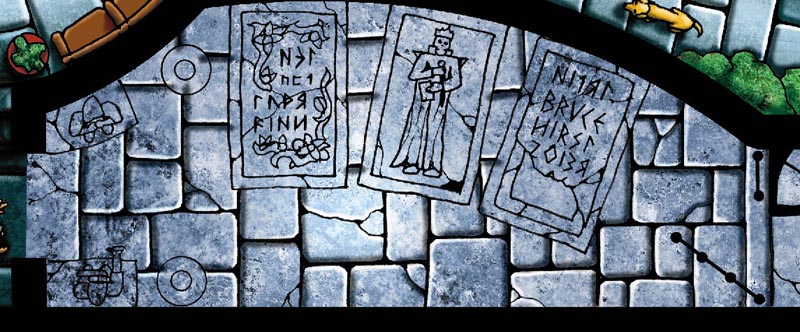
This photo shows a few of the over 250 drawings needed to make both of the game maps, items, guards and other bits that went into it. This article will show some of the basic steps that were taken in creating the maps and sculpted items. |
|
I have written this article specifically for those hobbyists who want to make a game for their own gaming group and have a limited amount of money to spend. Keep in mind that the game you create (both yours and mine) will probably never be successful and most likely disappear without anyone ever knowing they existed.
 I think the reason people do these sorts of things because we are compelled to do them. The idea of doing it just won't leave us alone and there is no satisfaction until we give it a try and see what happens. I find it helpful to write down ideas for rules, designs and game pieces that keep popping up in my head. Using a friendly gaming group to try out ideas is great if you can find one.
In my opinion, doing something is usually better than doing nothing. Writing rules, drawing game boards, sculpting pieces, trying to color things on the computer, making molds and casting are all parts of a hobby that I enjoy.
Any hobby is a learning process and with each small step you learn something new. I do not believe that any time you spend creating something is wasted, even if things don't work out the way you had planned.
I had several reasons for starting this project and writing this article:
I wanted to show examples of how an average person could create elements for a board game. I imagine there are several people out there who host games for their friends and would like to make special or new pieces (or a new board) for a game they usually play. Some may want to make elements for a game they have created themselves.
I wanted to see if a game we had created for our gaming group's needs could be popular with other gaming groups.
I wanted to find out how much work it would be to actually produce all the components to a working sellable game by myself. I would write and typeset the rulebook, create the game board maps on Photoshop, sculpt the game pieces and finally package and sell the finished game on my web site.
Deciding What the Game Would Be Like
Since the main reason to make the game was to have something our group would like the play (and didn't currently exist), the first thing we had to do was decide what things our group liked and disliked about the current games that are out there. This list led us to the things we wanted our game to have:
It should play from 1 to 6 players and last about an hour and a half. That's usually all the time we have on a game night. Having a game that works for 8 players would have been better, but it's kind of hard to fit that many around a table and have everyone reach.
We wanted a large colorful game board. Have you ever been to a gaming convention where they have enlarged copies of the games they are trying to sell? That's the version that I want to take home. They don't sell those because it's too difficult to package and market a board that large. However, since our game won't appear in stores and I'll sell it direct, I can break some of these rules to get what I want.
No one gets eliminated and has to sit out the remainder of the game.
I thought it would be better if the board never changed and you can use the "downtime" while other players are taking their turn to plan what you want to do. That's why our group likes the Formula D racing game. Since the track doesn't change, you have the chance to count squares and plan your turn while other players are moving. It's either that or have everyone move at one time like in the Robo Rally game.
I never liked games where 2 players can team up and make you lose or where 2 players can team up and get way ahead. What if no one wants to team up with me? I prefer a game where I win or lose by my own choices.
Our group really doesn't like card games with tiny print and tons of rules. This card has this effect and negates this other thing but can only be used in this situation unless four other things happen. Many people like these types of game (no offence) but our group usually doesn't.
We wanted a game where taking greater risks can lead to greater rewards - or losses.
We like dice games. When you draw a card, things can go good or bad depending on how someone shuffled the deck. When rolling dice, your fate is in your own hands.
When planning a game for your own group, be sure to have a very clear idea what your group likes and dislikes about the current games out there. This will help steer you away from a lot of dead ends.
Some Basics about Drawing
Two skills you should probably learn when drawing anything: |
|
|
 A basic knowledge of light and shadow. In other words, try to imagine where light would be hitting the object and make that a light color. Try to imagine where light can't reach and put shadows there. I know this sounds really simple (and it is) but it takes a bit of practice. If it doesn't look right, then try it again and get other people's opinion of why it doesn't look right. Later on I'll show some examples of this.
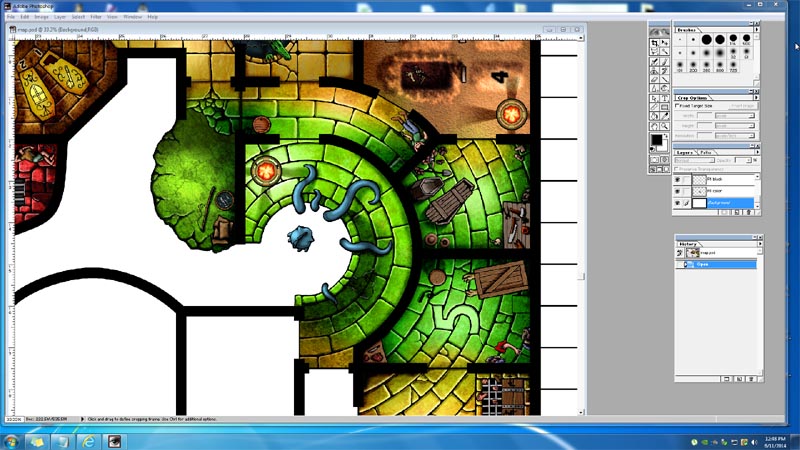
If you don't plan on getting your board printed and you're just making it for your own game group, you don't really need to learn Photoshop. All of my previous game boards were done in colored pencil, water colors or pastels. Here are two photos of previous game boards I had done several years ago for my gaming group. If you look closely, you can see that they're not very good. But since this was a hobby, I really didn't care how bad they were. They allowed our group to try out new gaming ideas and with each new board I got a little better each time.
|
|

I'm posting these not-so-good-looking photos to make a point. Just because your drawing isn't very good, don't let that stop you from creating something. It doesn't matter if it will never be accepted as great work. It doesn't matter if there are tons of people out there better at drawing than you are. If you enjoy coming up with gaming ideas and like trying to make board games then do it anyway!
Next, a basic rule of drawing things: "If you do your best to draw something and it looks sloppy, put it on a photocopier, shrink it down 50% and look at it again. It will look much better when you do." | |
 |
 |
Here is a close-up of one of my drawings. You'll notice that it is average at best. The magic happens when you shrink it down. You just have to remember to make the lines much thicker because the line thickness will shrink down also. Because of this I don't have to get depressed when my artwork is not at it's best. Instead I plan my project much larger and take my time to draw as neatly as I can. When it gets shrunk down, it looks acceptable (to me anyway).
Steps In Drawing The Game Boards
The amount I spent on drawing and coloring the Wayward game boards is kind of hard to say because it was spread over 4 years time. I would take a week off every couple of months to devote time to it again. I tried keeping track of time on the second game board since I was doing a big push to get the thing done and it ended up being about 2 months of work, 6 hours a day.
A professional artist would have been much faster at drawing since they know what they're doing and probably could have done it in half the time. However, since this was a learning process for me, I tried not to rush through things and enjoy coming up with various situations happening in each area.
I believe the best way to complete a project like this is to try and enjoy the small things you do for each little part of the board. Just focus on the one little section you are doing and try to make it look as good as possible. Of course this approach would not work in the business world which has deadlines - but I'm writing this for the hobbyists out there.
For these maps I used the "coloring book" approach. In other words:
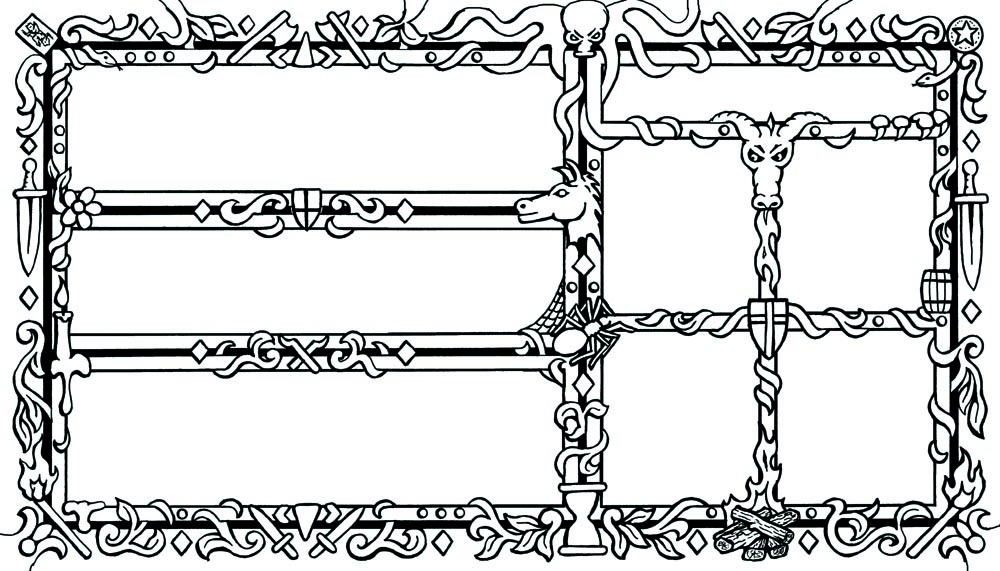
- I drew black ink line drawings on paper.
- I scanned the drawings.
- I colored them in using Photoshop.
Using this method, it's almost as if the black ink drawing is on a clear sheet of plastic and the color is on the paper underneath. Now for details about each step:
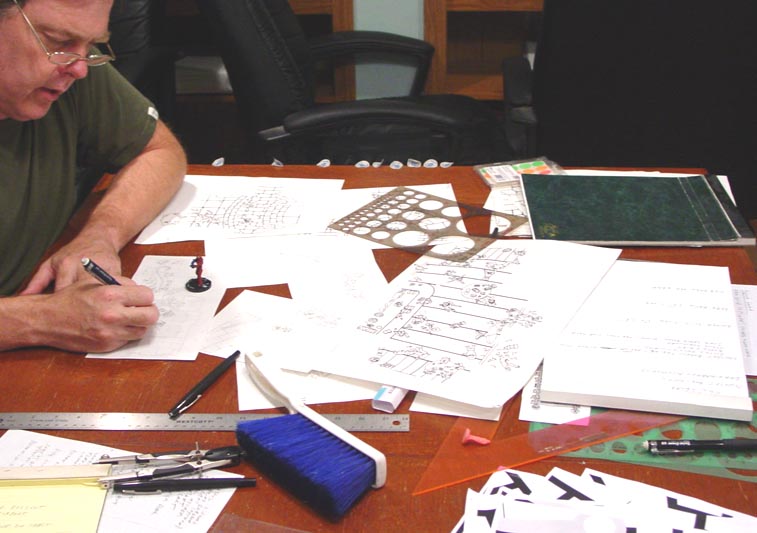
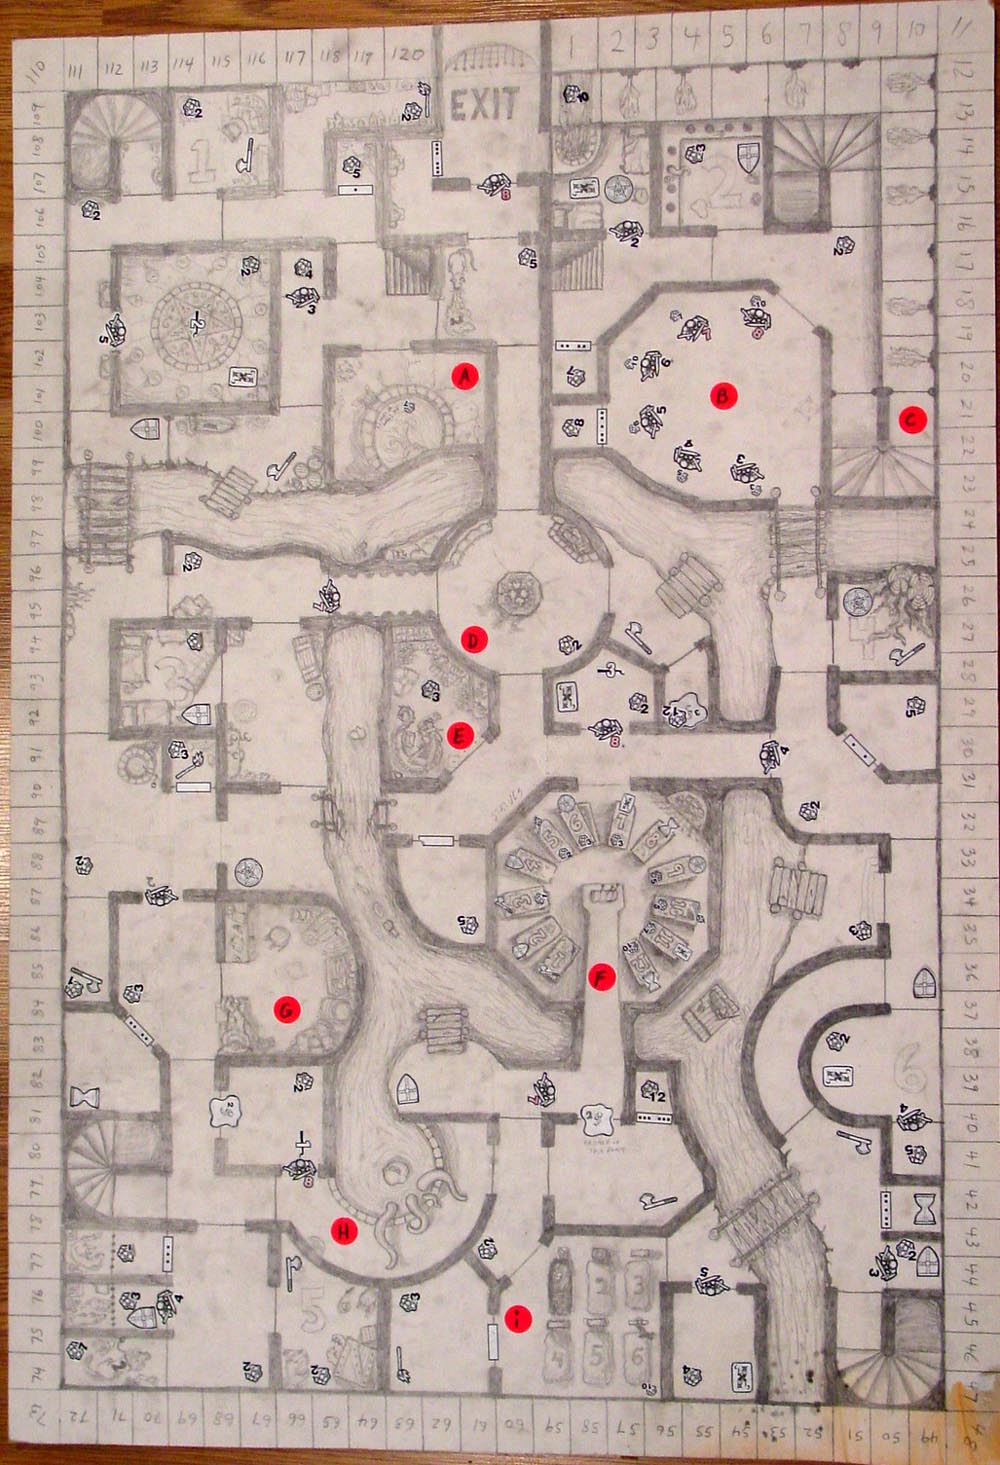
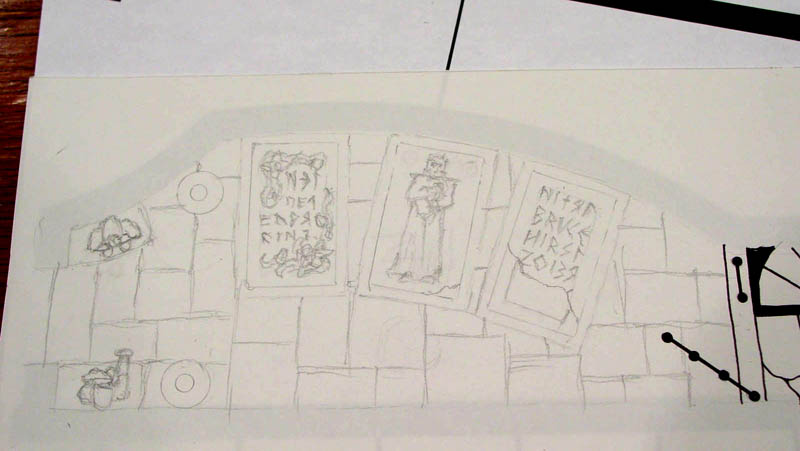
| 1. | I drew the complete game board out actual size in pencil. This pencil game board is what we used to play on when we were testing out our game. Pencil is nice because you can erase things and add new things when needed. I used stickers to represent guards and items since these things kept moving around as the map continued to change. That saved me from having to redraw all of these items as they moved around. The finished game board is a little different because things kept changing as new ideas were suggested for the game. I also tried to put a lot of detail into the pencil work just for my own practice and to help come up with ideas when I needed to draw the real thing. Drawing lots of detail in pencil was not a waste of time! Even though I had to redraw everything from scratch, many ideas would not have happened without changes and mistakes from this step. |
 |
|---|
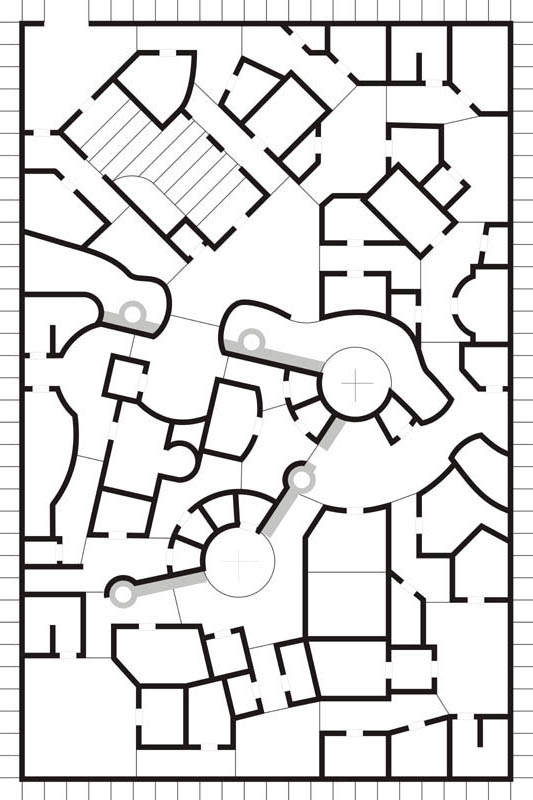
| 2. | I created a black line drawing in CorelDraw (which is similar to Adobe Illustrator). I suppose I could have done this on Photoshop instead but I already knew CorelDraw better. CorelDraw is a vector based program which is great for drawing lines, boxes and circles exactly. I would take a ruler, measure parts on my pencil drawing then draw them on the computer in approximately the same place. Since the computer program also has a ruler on it (and guidelines), this helped me to know where the lines would go. I exported this into Adobe Photoshop. The image was 300 dpi and measured 24" x 36" in size. The folks who are doing my printing told me that 600 dpi would have been better but my poor old computer simply couldn't handle a file that large. |
 |
|---|
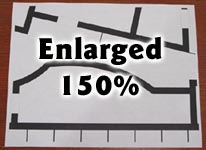
| 3. | While on CorelDraw, I took this drawing and enlarged it 150%. Then I would print out each room on a separate sheet of paper. In order to make an ink drawing of each room, I needed a guide to know what shape and size each room was. I would then take a piece of good drawing paper and tape it over this room outline (more detail about this on step 7 below). |
 |
|---|
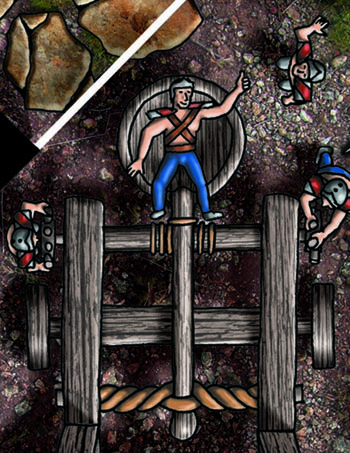
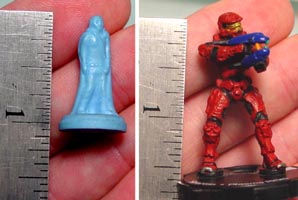
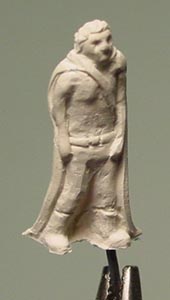
| 4. | In order to keep things the correct scale, I needed a model to set in the room. My finished sculpture that is included in the game measures about 1" tall. Since my drawing is going to be made 150% larger, I needed a model that was also 150% larger. That where this Halo figure comes in handy because he was just the right size. |
 |
|---|
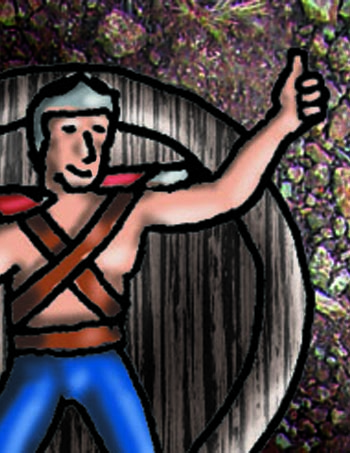
| 5. | Whenever I would draw a top-down view of a person, I would set him on my drawing to make sure it was the same size as him. This was especially handy when coming back to the drawing after 6 months of working on other projects. Not only did it help keep the size of the people I was drawing consistent but it also helped me with the scale of bookshelves, chairs, tables and all of the other "to scale" items that needed to be drawn. |
 |
|---|
| 6. | I would ink in the outlines of all the details using a "Flair" pen by Papermate. This is a water based felt tip pen so it doesn't soak into the paper and spread like a permanent marker would. The line width was also just about right for people and objects. |
 |
|---|
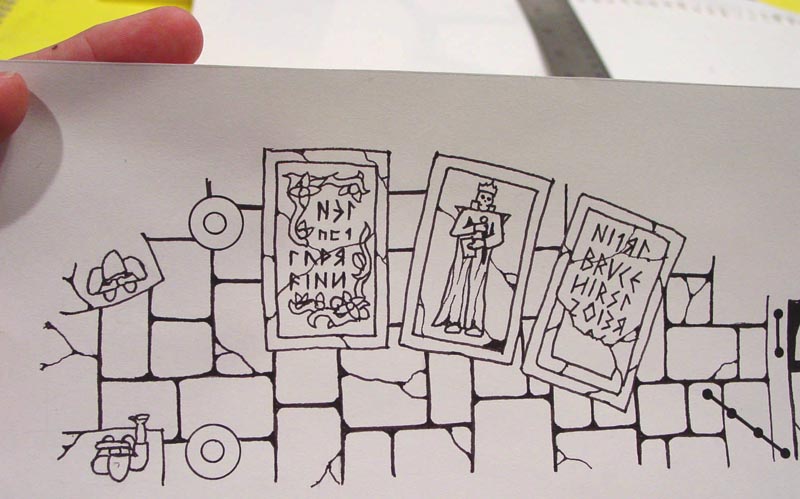
| 7. | The first photo shows a piece of drawing paper taped down over the printout from step 3 above. The second photo shows what it looks like after I had gone over all of the lines in black ink. Some lines I had to thicken up a bit. I had to remember that when this drawing would be shrunk down, the line thickness would shrink down also. | |
|---|---|---|
 |
 | |
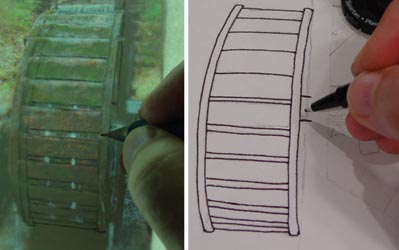
| 8. | Here is one neat trick that helped in a few places. I wanted a water wheel for the mill but was unsure how to draw one. I printed one off of the internet after enlarging it to the size I needed (another good use for Photoshop). Then I placed my drawing paper over it and traced the water wheel in pencil onto the good drawing paper. The first photo shows the drawing being traced on a light table (you could use a kitchen window instead). The second photo shows me going over it in ink. |
 |
|---|
| 8. |
Since I'm using a very old program (Photoshop 5.0), I'm not going into the specific tools used to make each step happen. Instead, I'll tell you what I'm doing on each step and you'll need to find where those tools are on your own program. The ink drawings would be scanned at 300 dpi in "grayscale". They will look a little rough but they will end up being shrunk down so I don't think you'll see it. There are 3 main layers to what I am working on. Think of these layers as if they are printed on clear plastic and laid on top of each other. The first layer is the main black outline that I drew on CorelDraw (from step 2 above). I exported it as a JPEG file, then opened it in Photoshop. This way all of the thick black wall lines were clean and smooth. I suppose you could simply draw these thick black lines in Photoshop to begin with. The second layer is the hand drawn black outline that I scanned. Since this drawing was 150% larger, I had to "shrink it down" to fit under the thick black wall lines from layer 1. Also you will need to select all of the black image and erase all the rest. That way the colors you paint underneath will show through. The third layer is the painted color, which I am going to show how to do next. This color layer is under the black layer. That way if I get a little sloppy while painting items, the black lines will cover where these sloppy colors meet. |
|---|
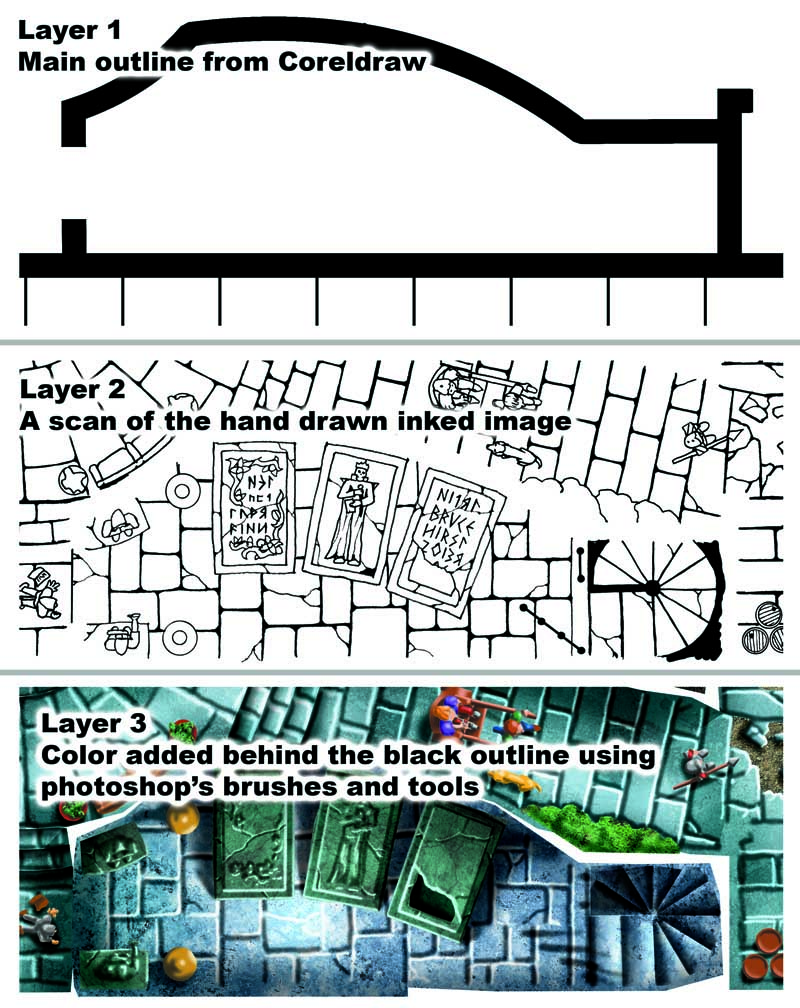
| 9. | What you see to the right are all 3 layers on top of each other. The very bottom layer is the color layer that has not been colored in yet. Just think of this like a coloring book. The only difference is that when we paint, the color will appear under the black, on the bottom layer instead of on top of the black. |
 |
|---|
| 10. |
An easy way to make large flat colored areas more interesting is to put a texture on them. Instead of stone being solid gray, you can put textures such as gravel, sand and marble on it instead. I'll show the basics of putting a texture down, but first you need to know where to get the textures. An easy (and copyright free) way of getting a texture is to take one with your camera. If you need gravel, go outside and take a photo of your driveway. You can get other textures such as carpet and wood grain easily around your own home. Even rough painted walls can be interesting. A second way to find textures is to do an internet search for "best free texture sites". Where ever you end up, be sure to read their "terms of use" to see how you are allowed to use their photos. Usually if they have lots of ads on the web site and they ask for donations, then they're one's which will most likely have "royalty free" photos you can use. With these types of sites, people donate their own photos for others to use on art projects and such. |
|---|
 Adding Stone Textures
| 11. |
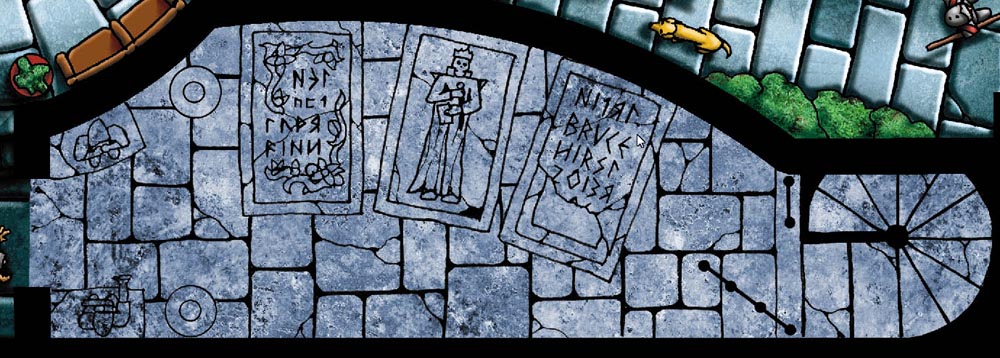
Since I only want to past this texture inside of the room (and nowhere else), I'll use the selection tool to pick around the outside of the room. Then I'll choose "edit - paste into". This will paste the texture only into the area I have selected. If your texture ends up on top of your black lines, then you need to rearrange your layers so the black will be on top. |
|---|
| 12. |
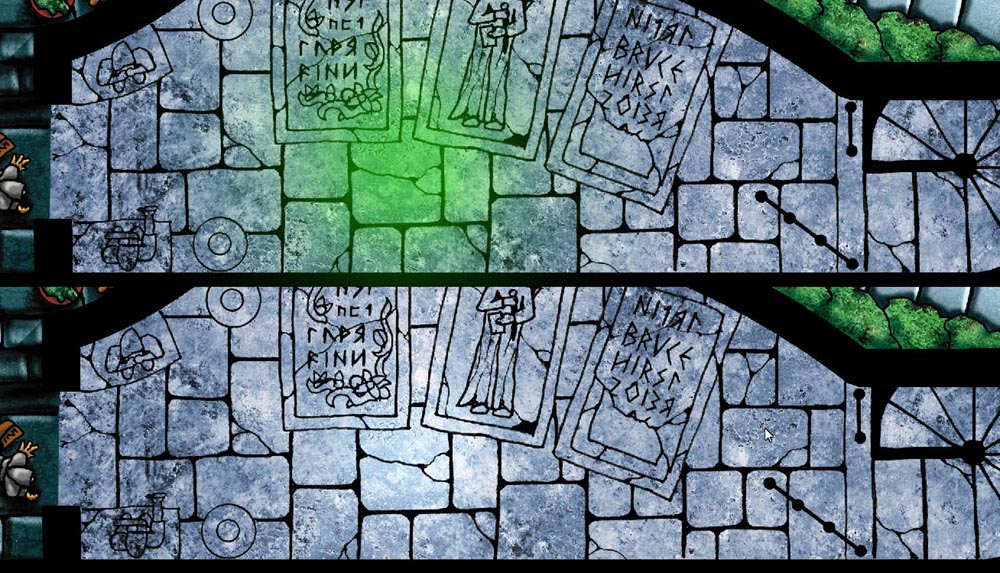
In Photoshop I use a thing called "quick mask". It allows you to paint an area with an airbrush. After you are done painting, you can do things to the area you had painted. The quickmask I am using is colored green (so you can see where you have painted). In other words, I activate the "quick mask" and start spraying paint. When I deactivate the quick mask, every place that I spray paint green will become the area that is selected and have a dotted outline around it. Then I can use a command like "Image - adjust - brightness/contrast" and lighten up the center of the floor without losing the stone details. |
|---|
| 13. |
When I get out of "quick mask" the areas I had painted are now the "selected areas" and have dotted outlines around them. These dotted outline areas are the only ones that can be affected at this point. I go to "Image - adjust - brightness, contrast" and lighten these areas up. Now it looks like light is hitting the edges of the floor tiles. You might ask "why didn't I just paint the edges in a light color instead?". Because if I painted the edges with a light color, I would end up painting over the stone texture. If I "lighten" these areas, then I get to keep the stone texture. |
|---|

| 14. | Next I'll "darken" the shadow areas of the stone tiles. Pretty much any edge that doesn't have light hitting it will have a shadow instead. Do the "quick mask" thing and paint the shadowed edges. Once you have these edges selected, then darken these edges using the same steps above. |
 |
|---|
| 15. | Next I'll spray where I want the shadows. At this point I look at the other object in the room and try to determine where the shadows will be. You would see them along the edges of the tombs and behind the statues and jars. Don't worry about over-spraying inside of the objects in the room. We'll paint these object with color and cover it up later on. Notice that I've also sprayed where the iron bars are on the right side of the room. Since this map is a top-down view only, sometimes adding shadows is the only way to convey what the side shape of the object is. It's pretty hard to tell that they were iron bars before adding the shadows. |
 |
|---|
| 16. | For the marble on the tombs and statues, I'm using the same process as in step 11. I copy the green marble texture, then pick around the tombs and go "edit - paste into". |
 |
 |
|---|
| 17. | Then I repeat this process of using "quick mask" to paint the edges of the tombs and statues where light will hit them, then lighten the edges up using "image - adjust - brightness/contrast". Also do the same for the shadow areas around the edges of the tombs and statues. |
 |
|---|
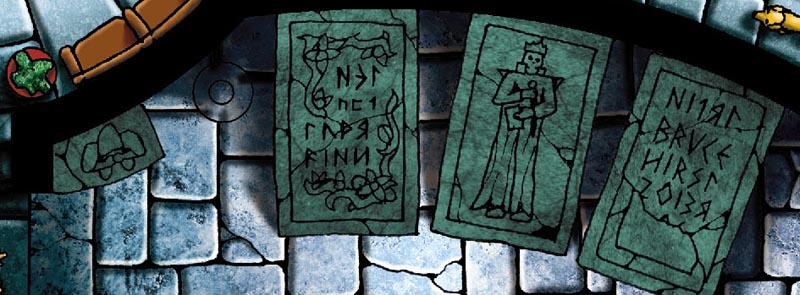
| 18. |
Here is where the real "coloring book" thing comes in. For any object i want to paint, I simply use 3 colors. For the golden vase here I used a light, medium and dark color of yellow. Start by selecting just the area you want to paint (for this example, just the vase). I do this by picking around the vase through the middle of the black line. When I paint color into the vase, it will not spill over onto the floor accidentally. This way you can always color between the lines without messing up. I colored the main body of the vase yellow. Keep in mind that I am painting on the layer underneath the black so the black will always be on top and I won't paint over it accidentally. Then I switched to the airbrush and sprayed light yellow where light would hit the vase. Then I switched to dark yellow and sprayed the back of the vase where the shadows would be. When finished, select a different object you want to paint and do it all over again. |
|---|
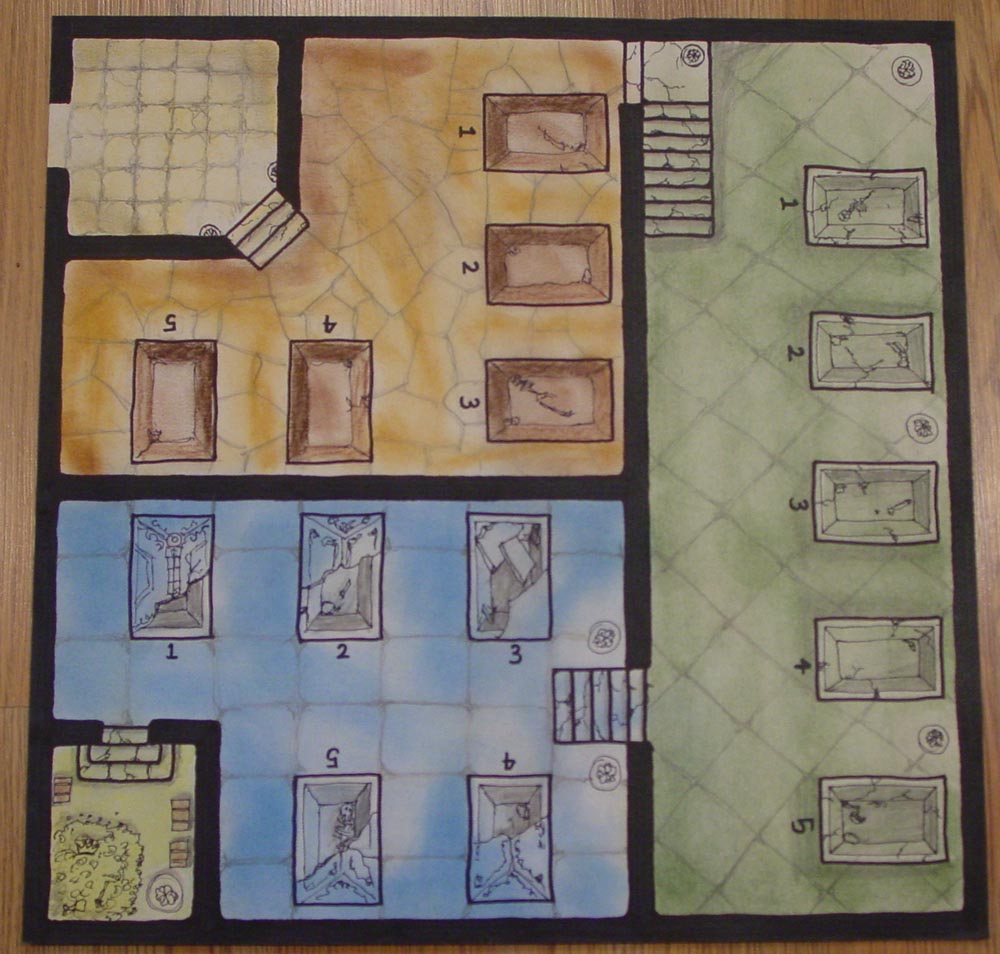
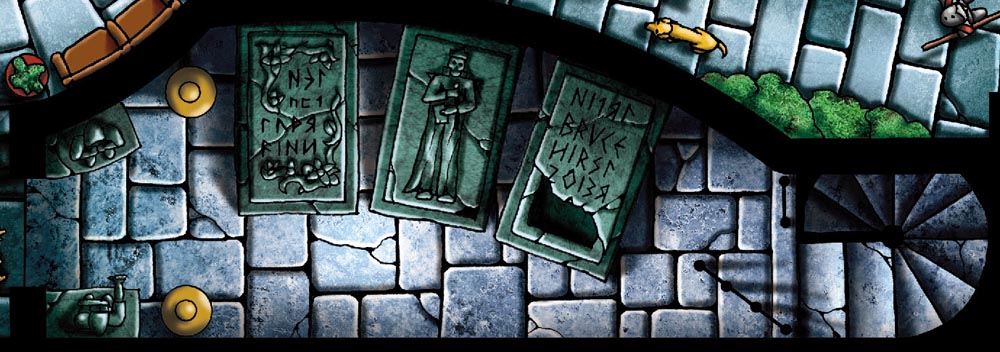
| 19. | Here is the finished tomb room. Look back at the original black line drawing from step 7. It's not that good but once you start adding color, light and shadow to the picture, it starts to take on much more life. |
|---|---|
 |
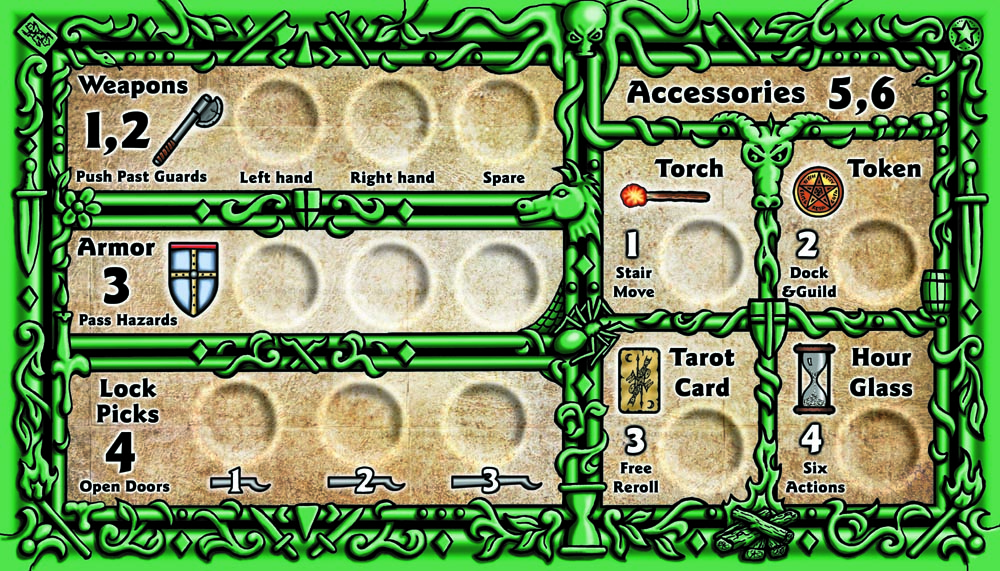
Drawing the Player Item Card
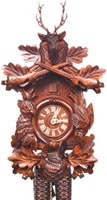
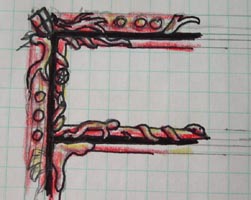
One good way to save time when drawing something is to make thumbnail sketches. These help give you some idea if you're going in the right direction before you spend a lot of time on details. I had several thumbnail sketches but ending up using the one on the right. Some were more clean and fancier but I thought it would be interesting to have items from the game board stuck in around the frame. Kind of like you see on a cuckoo clock or very old and ornate picture frames. |
 |
 |
 |
 |
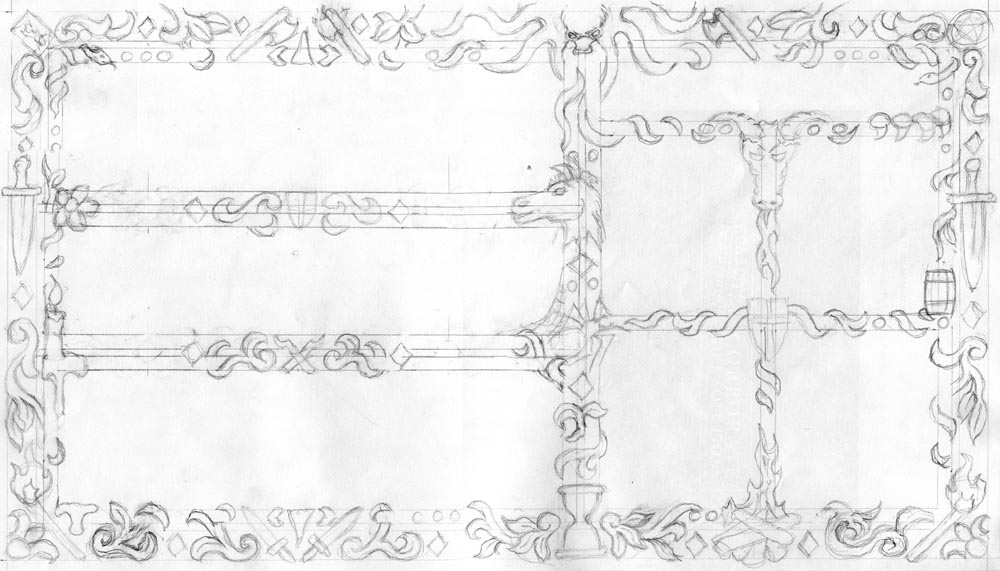
I started with a pencil drawing that was twice the size of the actual card. I knew that even if it was sloppy, the drawing would look better when it was reduced down. |
I went over the pencil outline in ink. I had to make sure that the lines were twice as thick because when you reduce the drawing, the line thickness is reduced also. |
 |
 |
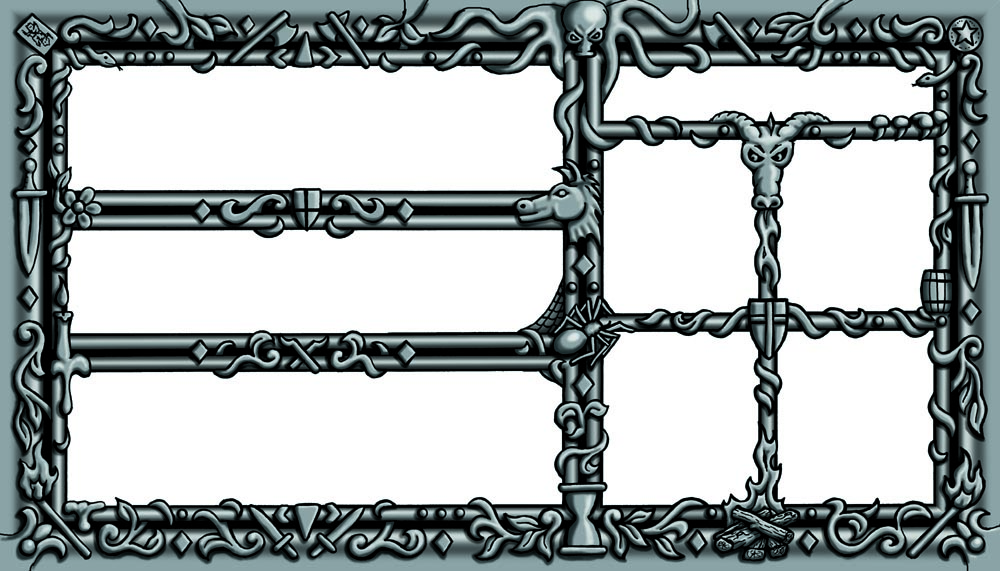
Next I scanned the ink drawing, brought it into Photoshop and shaded each area using the same methods as shown above. The shading was on a layer underneath. |
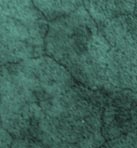
Finally, I colorized the border by changing the color of the whole layer. Then I added backgrounds, items and text until I was happy with the final result. |
Sculpting and Casting The Miniatures
| 1. | I don't consider myself to be very good at sculpting when it comes to people and animals. However, most people will probably throw these miniatures away and use their own miniatures in the game anyway so I didn't let it bother me too much. I sculpted the fellow shown here out of "milliput" epoxy putty and is only 1" tall. I don't have specific steps on doing this because it was a struggle to get him to come out at least this good. The real trick was to make something that would come out of a one-piece mold. I could not have any arms or weapons sticking out from the sides and even the neck had to be thickened up with the cloak so the head would come out of the mold. If you are planning to make your own miniatures and want to make a simple one-piece mold like I have, you will need to make sure that your piece can physically come out of the mold. This may take a few tries before you figure out what works and what does not. |
 |
|---|
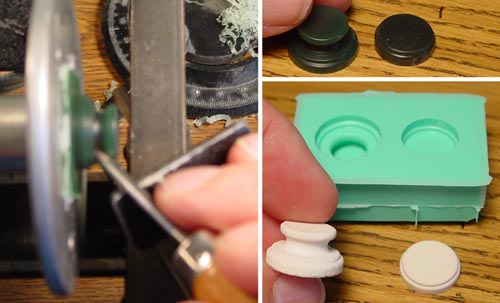
| 2. | The base for the miniature and for the pillar is made from jewelers wax turned on a lathe (sorry for the blurry photo). Then a mold was made of them and they were cast in dental stone (more on mold making below). I was surprised that the groove on the pillar base came out of the mold because the undercut is pretty steep. Small skulls will fit inside of this groove on the finished base. Finally, I sand blasted them to give them a worn look. |
 |
|---|
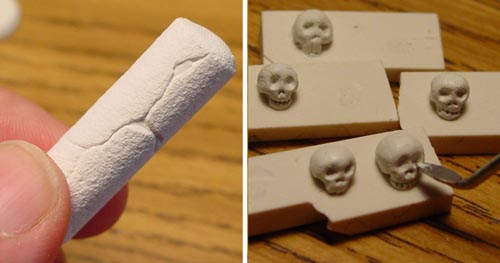
| 3. | The Pillar was made from a piece of chalk which was sand blasted. The cracks were done with a hobby knife. The small skulls are made out of milliput epoxy putty. I probably had made about 30 different skulls and picked the best ones. The hardest part was getting them the right size to fit into the groove around the pillar base. If you pinched off too much or too little clay, the skull would be the wrong size. |
 |
|---|
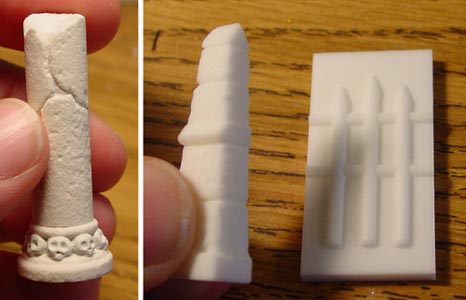
| 4. | Here's the completed pillar. The barred gate miniature was made in 3 parts. The gate was made by cutting grooves in a piece of plastic and embedding brass rods in it. I made a mold and cast it in plastic so I could have 2 of them to glue back-to-back. The sides and top were cut and carved from hardened polymer clay. A mold of the side piece was made and cast so I would have two of them also. |
 |
|---|
| 5. |
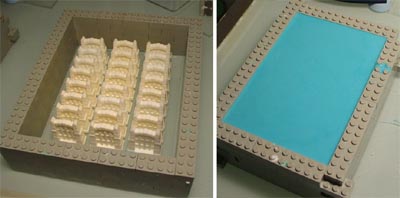
You can find some basics on making molds on our Mold Making Page. First you'll need to glue your original sculpture down to a piece of plexiglass with a tiny drop of super glue. Then you want to make a wall of Legos around the piece and leave about 1/2" of space of all sides. Next, mix up your mold making rubber and pour it over the top. You'll get the best and longest lasting mold if you vacuum the air out of the rubber using a vacuum chamber but I realize that most hobbyists won't have access to such a thing. For the very first molds I had made when starting out, I did not use a vacuum chamber and the molds still came out OK. The most important thing is that the original sculpture does not have steep undercuts, otherwise air bubbles will get trapped under these areas and cause you some problems. |
|---|
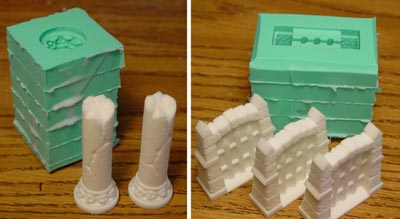 In order to produce hundreds of pieces, I needed to make a large mold. So to begin with, I needed lots of castings to make this large mold with.
| 6. | After I had enough duplicate pieces, then I made a large mold that could cast 24 gates at one time. My large mold for pillars can cast 25 pillars at once and I made 6 pawn molds that could each cast 32 game pawns each. |
 |
|---|
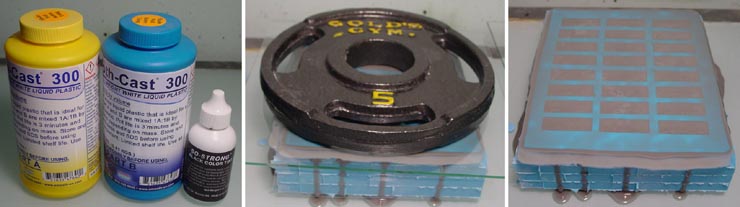
| 7. | I'm casting the gate pieces using Smooth-cast 300 and coloring the plastic with So-strong colorants. These colorants are made specifically to color liquid plastic that's poured into the molds. The pawn figures also use this colorant (in different colors of course). These products are from Smooth-On. You might have noticed the 5 pound weight on top of the mold. I use a piece of plexiglass (sprayed with mold release) over top of the mold, then I put a 5 pound weight on it to squeeze out the excess plastic. For more information on casting plastic into the molds, be sure to look at our Plastic Casting Instructions page. The last photo shows the mold after the plastic is cured. I can now pop out the pieces from the mold. |
|---|---|
 |
Hopefully this article will be helpful or at least interesting to those of you who want to make parts for your own games. The methods I have used are not the way games are usually made. I'm sort of a hard core do it yourself kind of guy and like the challenge of trying to figure out how to do things.
I have printed 1000 copies but I honestly don't know if I will end up selling many of them. I believe the game is a good one but there are a lot of game players out there and they all like different things. There's also the problem that most people will never hear about this game. At least I have the advantage by hosting a web site that sells gaming related molds, so I think I have a chance of selling a few.
In conclusion, I'm definitely not telling you that this is how you should make your game. What I'm encouraging you to do is try and create what you want and hopefully this information can help you on your way to make it happen. If what you want does not exist, I encourage you to try and make it yourself. I think you'll be surprised at how much you will end up learning, even if your game only ends up on your own gaming groups table.
Back to the Wayward Main Page