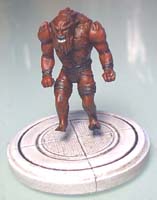
Tips & Tricks 19
Adding Colored Panels to Doors
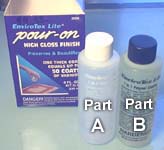
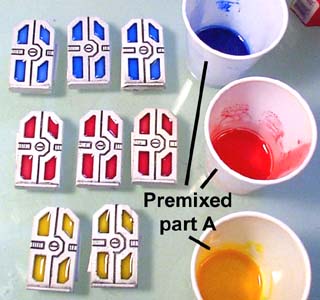
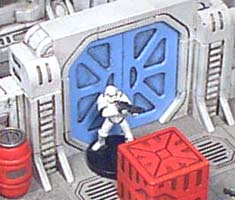
| 1. | To add nice glossy color panels to the doors, I'm going to use Envirotex Lite. It's a 2-part resin used to put a thick layer of varnish onto table tops. We've also used it for most of the fountains and pools shown on other Tips & Tricks pages. We're going to add some ink wash to the resin and drip it into the panels on the door. |
 |
 |
|---|
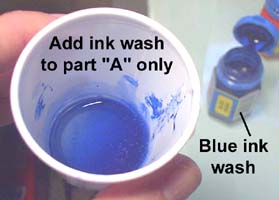
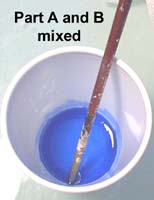
| 2. | The problem will be to mix the exact same color twice. This is because you need to color both sides of the door, but you can only color one side at a time and wait for it to cure. What we want to do is add ink wash to part "A" only. I'm using Games Workshop blue ink wash here and adding several drops to a small amount of part "A" in a cup. Once mixed, tilt the cup. What you see lightly covering the bottom of a white cup is about the color you'll get on the door. |
 |
|---|
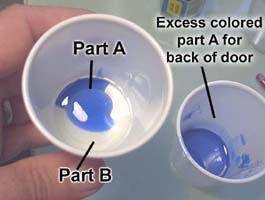
| 3. | Next put equal amounts of part "A" and part "B" in a cup. Don't use all of your premixed part "A" because you will need more of it for the back of the door. Mix just enough to fill in the front panels on the doors you're working on (which shouldn't be much). Mix the two parts together using a paintbrush handle. The resulting color will be a bit lighter than the premixed "A" side. |
 |
 |
|---|
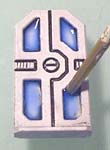
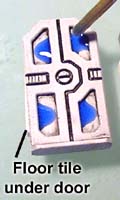
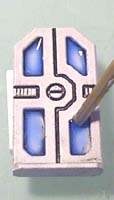
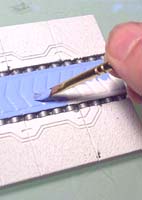
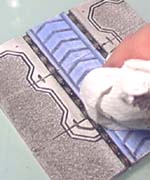
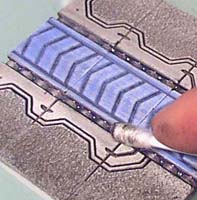
| 4. | Be sure the door is painted before you add the color. Place a floor tile under the door to make it rest level. If the door does not lay flat, then the color will run to one side. Use a paintbrush handle to add a drop of color to each of the panels. Use the handle to gently work the resin around the edges of the door panels. Continue to add more drops of color until the panels reach the amount of color you want them to have. |
 |
 |
 |
|---|
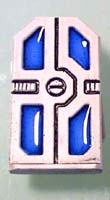
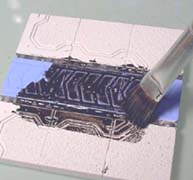
| 5. | The Envirotex resin will take about 6 hours to set up. Once the color on one side of the door is cured, turn the door over and mix up the color for the other side. Getting the same color of blue is easy because you already have the color mixed in part "A". This photo shows the different colors I've mixed up for the doors. I've used blue, red and yellow ink washes and premixed them into the part "A" for three different colors of doors. |
 |
|---|
Painting and Anchoring Med Lab Beds
| 1. | Painting the beds is fairly easy. To start with, spray paint them white like you would do with any wall piece. Next, paint them tan using a small brush and some water based acrylic paint. Once the paint is completely dry, paint over the bed with black shoe polish and wipe it off immediately. You'll find that when you wipe off the shoe polish, you'll also be wiping off some of the tan paint on the higher surfaces. This will help add to the look. |
 |
 |
 |
|---|
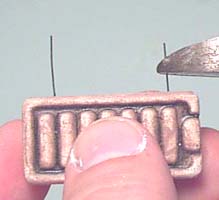
| 2. | To anchor the beds, I'm going to drill a small hole into the side of the bed using a miniature drill bit and a pin vice. Then I'll put a dab of white glue on a piece of wire (or you can use super glue) and insert it into the holes. Cut the wires off to the same length afterward (about 1/4") long. |
 |
 |
|---|
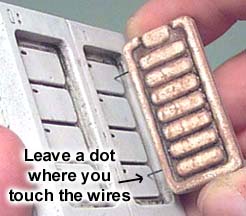
| 3. | Run a black magic marker over the wire tips and touch them to the wall where you want the bed positioned. This will leave black dots on the wall. Then drill 2 holes where the black dots are and glue the beds into place by putting glue on the wires and along the side of the bed. These beds are used in the barracks. |
 |
 |
|---|
Making a Stasis Tube
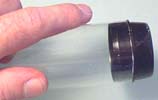
| 1. | For stasis tubes and other sci-fi bits that need a clear plastic tube, I'm going to use a fluorescent light bulb protector. These are used to cover a fluorescent bulb so that if it breaks, it doesn't shower broken glass on everyone. You can find these at most hardware stores for about $2. They're a clear plastic tube about 4' long with black caps on each end. |
 |
|---|
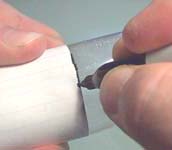
| 2. | It's very important that the bottom of the tube is nice and straight. If it is not, the tube will not sit up straight and it might leak. To cut both edges straight, wrap a piece of paper around it and draw a line using a fine tip marker. Use that line as a guide when you cut the tube using a pair of scissors. |
 |
 |
|---|
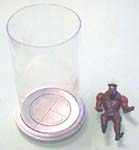
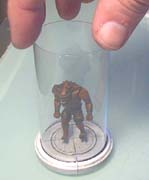
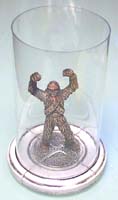
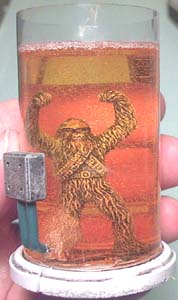
| 3. | The tube shown here is about 3" tall. You can see that it will set into a groove in the round base nicely. I am hoping that most diameters of the plastic light bulb protectors are close to the same. If not, then yours might not fit as nicely into the groove. The monster I'm putting in the tube is a Star Wars miniature from Wizards of the Coast. |
 |
|---|
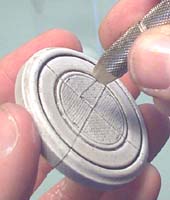
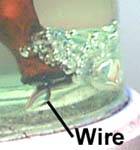
| 4. | The base shown here is from the Med Lab. Make sure that the base is fully painted before you continue. To mount the monster, I'm drilling a small hole using a pin vice and drill bit. Also, drill a hole in the monster's foot. Glue a piece of wire into the base and then into the foot to suspend the monster in the air. Most any kind of glue will do. |
 |
 |
|---|
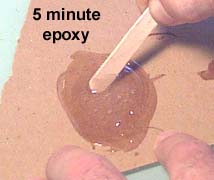
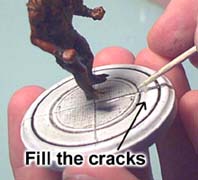
| 5. | I'm using 5 minute epoxy to glue the tube in place. Mix equal parts of A and B with a stick. First you need to use the epoxy to fill the cracks in the base. I'm using a toothpick to do this. If you don't do this the resin we pour into it will leak out the bottom of the base. |
 |
 |
|---|
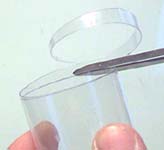
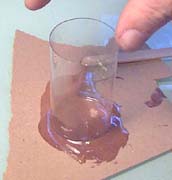
| 6. | Now that the cracks are filled, take the plastic tube and dip it into the epoxy. Be sure and move it around the epoxy so the bottom will pick up a good solid bead of it. Carefully place the tube into position over the monster and into the groove on the base. Let it cure completely before moving onto the next step. |
 |
 |
|---|
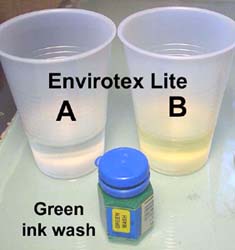
| 7. | For the liquid in the tube, I'm going to use Envirotex Lite. It's a 2-part resin used to put a thick layer of varnish onto table tops. I'm also using Games Workshop's green ink wash. Here is what I call the Envirotex Lite principle of mixing: For a very thin layer: For a very thick layer: |
 |
|---|
| 8. | This can be a little confusing if you follow the directions on the package. The package says to mix it like crazy and don't worry about any air bubbles that happen. Well, I tried that when doing a test and the air bubbles didn't go away. The reason is because they don't expect you to pour a large mass like I was doing for the stasis tube. For thin coverage like a table top their directions work fine. When mixing, add 1 or 2 drops of green ink wash (or whatever color you want). Don't use much or you won't be able to see your figure suspended in the resin. Doing a test batch really helps. |
 |
|---|
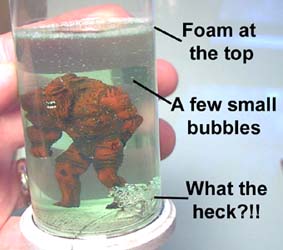
| 9. |
As a result, you will get some foam at the top and you'll still have a few small bubbles around after the resin cures. However, mine had an extra surprise at the bottom. What the heck is that? It looks like air seeped in from the bottom or something. |
 |
|---|
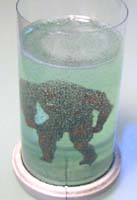 Once you pour the resin over the figure, you'll see lots of tiny bubbles. If we were pouring a thin layer then they would all come out. But since it's a thick mass, the resin sets up quickly not giving the bubbles time to come out.
| 10. | I assumed what happened here is air came through where I had put the hole for the anchor wire. That's all I could think of because I sealed all the cracks in the bottom of the base and it only happened by the foot where the wire was. If I had thought about it more, I would have asked the question "Why air bubbles? Shouldn't the resin have just flowed out the bottom hole?" Anyway, this one didn't work so it was time to do another test! |
 |
|---|
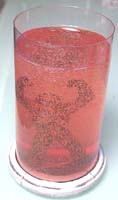
| 11. | This time I'm sticking our old friend Chewbacca in the tube and he doesn't look too happy about it. This time I used red ink wash in the resin mixture to color it. After an hour of waiting, I couldn't believe that it did the same thing again! AARGGHH! (stupid foot). The bubbles appeared again at the bottom and I have no idea why. One of my customers suggested to coat the bottom with clear varnish before pouring the resin in. |
 |
 |
 |
|---|
| 12. | They say that if you end up with lemons, make lemonade. Instead of throwing out this one, I drilled a couple of holes in the side and added some wires and a box. That way it looks like I intentionally wanted bubbles pouring into the tank at that spot. To summarize, here are a few guidelines to follow when making people in stasis tubes: 1. Don't use Envirotex lite. Instead use a product like Silk Shoppe Acrylic Water Kit shown on my other tips page. It seems to be difficult to get a bubble-free look from Envirotex for this sort of thing. 2. Dry brush white or a light color on the model. The tinted resin will make the model appear much darker in the tank. I dry brushed Chewy shown here with white. 3. Use a skinny figure. The tube distorts the figure and makes it look about twice as wide as normal. |
 |
|---|
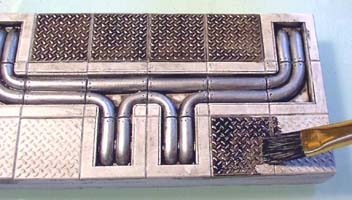
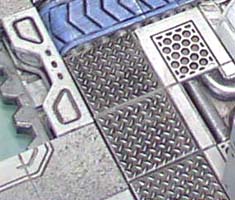
Painting Pipes, Conveyors and Diamond Plate
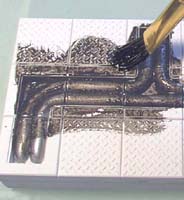
| 1. | Floor pipes (and even wall pipes) are fairly easy to do. First spray paint the floor section flat white and let it dry completely. Then use silver acrylic model paint and a small brush to paint just the pipes. Don't worry if you get paint down on the floor below. The next step will cover it up. |
 |
|---|
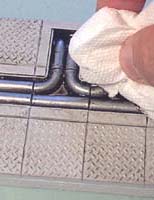
| 2. | Paint liquid black shoe polish over the whole floor. It's the same shoe polish shown on the Painting Instructions page. Wipe it off with a paper towel or rag. If there are any puddles of shoe polish in recessed areas, wipe them up with a cotton swab. Your pipes are finished! |
 |
 |
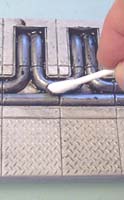 |
|---|
| 3. | Painting conveyor belts is fairly close to the same. Here I'm using post-it notes to mask the area. They're the note pads with a temporary adhesive on one edge. Since I want to paint the rollers silver, I'm putting one on each side of a strip of rollers. |
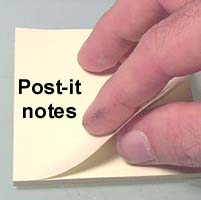 |
 |
|---|
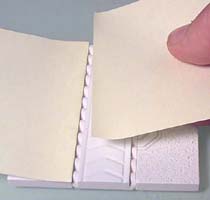
| 4. | Use a medium stiff-bristled brush to push the silver paint down into the cracks. I'm using boltgun metal for the color. When finished, remove the paper to reveal a nice clean set of steel rollers. Once dry, paint the tread of the conveyor a medium blue color, or pick a different color if you like. Brown may work well also. |
 |
 |
 |
|---|
| 5. | Paint liquid black shoe polish over the whole floor. It's the same shoe polish shown on the Painting Instructions page. Wipe it off with a paper towel or rag. Since the blue paint is water based (acrylic), some of it may wipe off when you wipe off the shoe polish. If done carefully, this will help give the conveyor a worn look. Wiping off the blue paint on the higher edges also gives the treads a raised look without dry brushing. |
 |
 |
|---|
| 6. | Use a cotton swab to wipe up the excess shoe polish on the rollers. This will help them look nice and shiny. The conveyor in the second photo is from the Cargo Bay building instructions. |
 |
 |
|---|
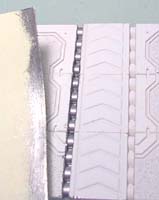
| 7. | To paint the diamond plate tiles, start by spray painting the floor white and going over it once with black shoe polish and wiping it off. Using a 1/2" wide soft flat brush, give it a careful coat of shoe polish only on the diamond tiles and don't wipe it off. The shoe polish will flow down away from the diamond pattern and help bring it out. Let it dry completely. |
 |
|---|
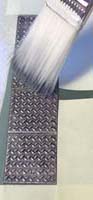
| 8. | Finish the look by lightly dry brushing silver paint onto the diamond tiles. This is easier to do if you use post-it notes to mask off the area. Take a wide soft brush, dip it into silver paint and wipe most of it off onto a paper towel. Then gently run it across the tops of the diamond plate to bring out the detail. |
 |
 |
 |
|---|
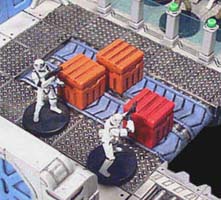
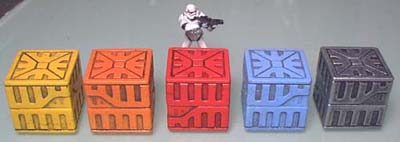
Painting Doors, Barrels and Crates
| 1. | Painting these items is fairly easy. To start with you must spray paint them white. This seals the plaster so the water based acrylic paint won't soak in. This becomes very important especially when you stain the piece with shoe polish. If you don't seal the piece with spray paint, the shoe polish will soak into the piece and you won't be able to wipe it off. For the doors I've decided to paint them blue, the same color as the conveyor belts. Silver would also be a good color, but feel free to experiment with any you want. |
 |
|---|
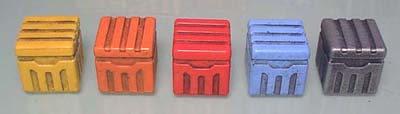
| 2. | The painting process for doors, barrels and crates is all the same: 1. Spray paint the items flat white. 2. Paint them the color you want using water based acrylic paints. I've tried colored spray paint, but usually the colors are too dark for my tastes. 3. When dry, give them a coat of black shoe polish and wipe them off. The crates on the right were painted black and dry brushed with silver. |
 |
|---|---|---|
 |
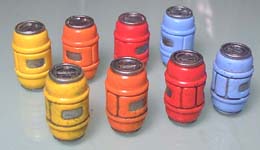
| 3. | Painting the barrels is a little different. I spray painted them white and then painted the whole barrel a solid color using water based acrylic paint. Afterwards, I painted the top and bottom of the barrel silver along with the oval window on the sides. Finally, give them a coat of black shoe polish and wipe it off. |
 |
|---|
Making a Plastic Strip Railing
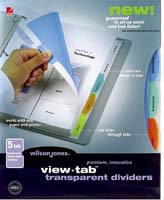
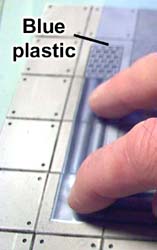
| 1. | For the colored plastic forming our railing, I'm using plastic notebook dividers. This brand is called the "Wilson Jones view tab transparent dividers". This package had about four colors in it, and the plastic was fairly thick and sturdy so it will hold up well for a railing. I am sure there are other sources for clear and colored plastic wherever you find office supplies. |
 |
|---|
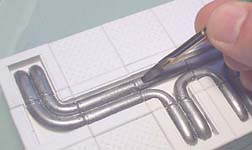
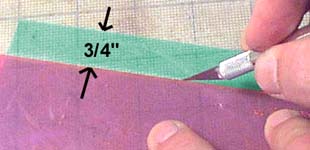
| 2. | I'm cutting a 3/4" strip of the blue-green colored plastic. You could use a pair of scissors, but I got a much straighter line when using a straight edge and a hobby knife. I'm cutting on a cutting mat which helps keep your hobby blade sharp. |
 |
|---|
| 3. | Test fit the plastic under the railing. By pushing and pulling you can get the diameter roundness of the corner that you want. Once you have it, cut the strip to the length you need. I placed the plastic strip as far up as I could so it was touching under the post tops. While looking at your railing you can decide if you want to cut the plastic strip thicker or thinner. |
 |
|---|
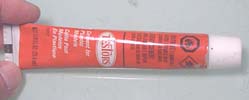
| 4. | I'm using Testors model cement for the glue here. It's used for plastic car models. I've found that it works better than super glue (cyanoacrylate) because super glue will frost the plastic and can give you bad looking results. |
 |
|---|
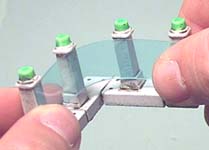
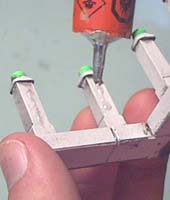
| 5. | Put a small amount of glue on the first two posts and use a clothespin to clamp the plastic down on them. Add glue to the other posts, carefully thread the plastic back through the corner and clamp the plastic to the remaining posts. |
 |
 |
 |
|---|
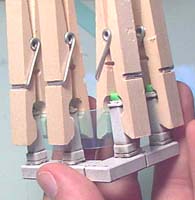
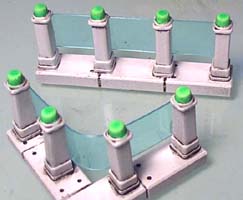
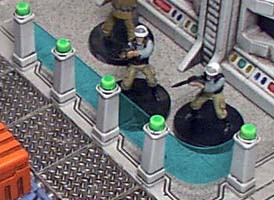
| 6. | These photos show the finished railing. Putting the railing on when the posts are glued down to the floor is a little more challenging, but not too hard to do. You'll find the posts on mold #272 service area floor mold. |
 |
 |
|---|
Covering Pipes With Plastic
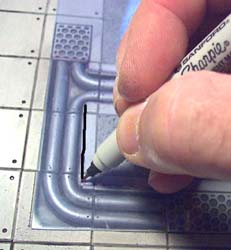
| 1. | This is not easy to do, but you can get some good results if you do a good job on it. Some people don't like the pipes on the floor because it doesn't feel like you could walk over them very easily. If you cover the pipes with plastic, it gives the floor a much more even and professional look. Start by taking some colored plastic (shown above) and lay a corner of it in the groove of a corner pipe tile. Take a fine tip marker and mark around the other edge. This will take a little practice. |
 |
 |
|---|
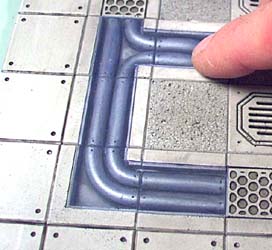
| 2. | Take a pair of scissors and cut on the line you have drawn. Test fit the piece into the groove and trim the piece wherever it needs it so the piece will fit into the groove all around. Once the piece sets nicely in the groove, you can glue the plastic into place. You can use very small dots of super glue (cyanoacrylate) if you're careful. If you use too much it will frost the plastic and look bad. You might also use plastic model cement, but it's harder to get small amounts around the outside edge of the tile unless you use a small applicator. Another customer suggested using clear varnish to stick the plastic down with. Once it dries it would be clear and not frost the plastic. |
 |
|---|