How to Use the Skematic Pyramid Mold
This page shows different ways to use the Skematic Pyramid mold #311. For the best results with this mold, you should use the "wet water" method shown on the Advanced Casting Instructions page.
|
|
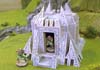


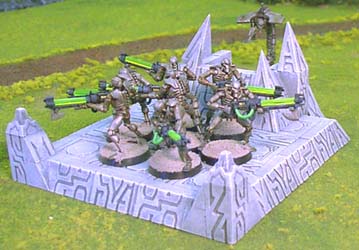
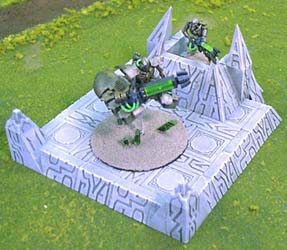
Making the Portal Tomb
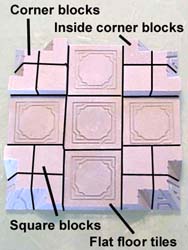
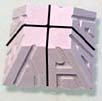
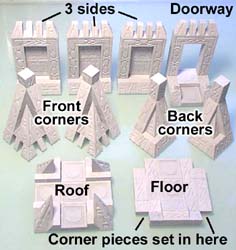
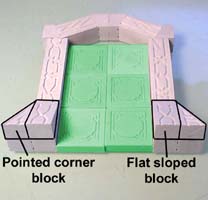
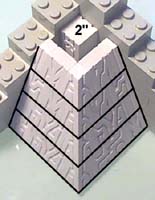
| 1. | You will need to cast mold #311 Eight times to build the portal tomb. We'll start with the roof on this one. Lay down 5 of the flat floor tiles and glue them together on the edges. Now add the inside and outside corner pieces along with the square blocks as shown. Finish the roof using the pointed corner pieces on the top. |
 |
 |
|---|
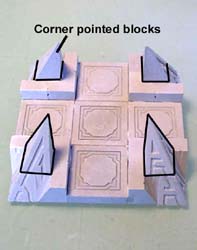
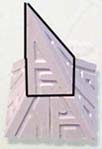
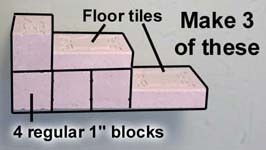
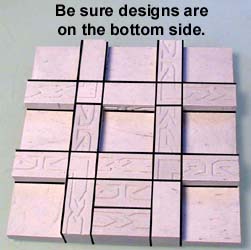
| 2. | We need to make 3 panels. Start with two floor tiles and place the blocks around the outside as shown. Be sure all of the blocks have designs on two opposite sides (so they'll show up on the other side as well). For the top two square blocks, I picked a "corner" design. When dry, stand them up and add the base pieces and the top pieces as shown. Make 3 of these. |
 |
 |
|---|
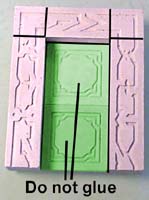
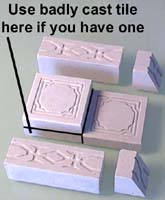
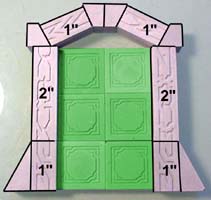
| 3. | The doorway comes next. Do not glue the tiles shown in green! These will keep our doorway the correct size. Let it dry. Always use badly cast tiles where you won't see them (like on the base). Finish the doorway by adding the top decorations. |
 |
 |
 |
|---|
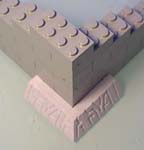
| 4. | The two back corners of the tomb will be built this way. For the 1" corner blocks, use the blocks that have designs next to each other, so the inside of the temple will have some design to it. To keep the corner nice and straight, I'm using a corner wall made of Legos to push the glued pieces against. Make 2 of these corners. |
|
 |
 |
|---|
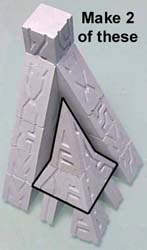
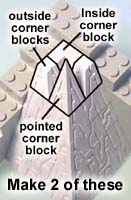
| 5. | The two front corners of the tomb are more complicated. Glue the pieces together as shown. |
 |
 |
 |
|---|
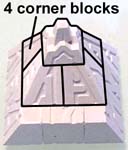
| 6. | Continue stacking the pieces up. I'm using Legos as a guide to keep them straight. The smallest pieces in the second photo are sloped pieces. The corner piece by itself will be glued when you set the next piece on top of it. The next piece is made using 4 corner blocks with one of the long pointed corners on the very top. |
 |
 |
|
|---|
| 7. | Here is the complete front corner. Make 2 of these. The final piece is the floor. Glue the pieces together as shown. Do not glue the pieces shown in green! The green blocks will hold the place for where your corner pieces will go when you assemble the model. |
 |
 |
|---|
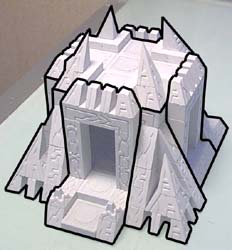
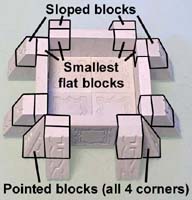
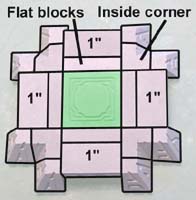
| 8. | The first photo shows all of the pieces to the tomb. The second photo shows where each of the pieces goes. Do not glue the pieces together until after you paint them! |
 |
 |
|---|
 |
 |
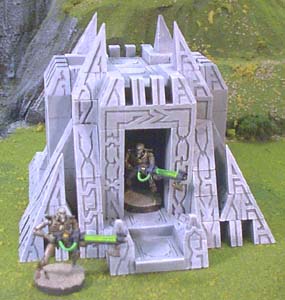
If you leave one side and front corner unglued, you can open up the side of the portal tomb to set figures inside. For painting instructions and finishing ideas such as the control panels, take a look at the Tips & Tricks 11 page. All the Necron models shown in this article were painted by Brian Morin. | |
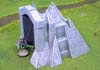
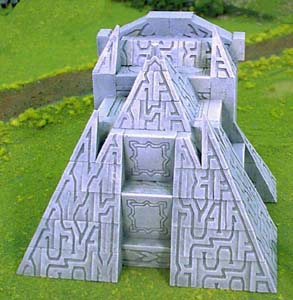
Bunker Entrance
| 1. | You will need to cast the Skematic Pyramid mold 6 times to build this bunker. There are no building plans for this except for the photos you see here. We'll start with the main doorway of the bunker. Glue the blocks as shown. Do not glue the blocks shown in green! These are used to keep the opening the right size. |
 |
 |
|---|
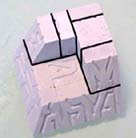
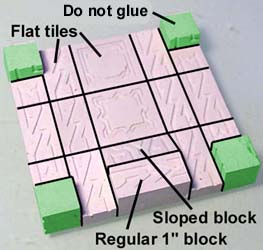
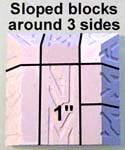
| 2. | Next is the top of the bunker. The first photo shows a regular 1" block surrounded on 3 sides with sloped blocks. The second photo shows 4 corner blocks placed on top with the decorative cap block to finish it. |
 |
 |
|---|
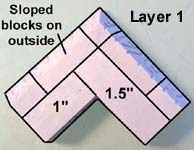
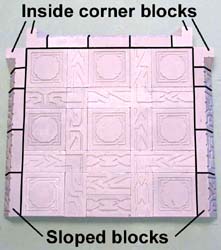
| 3. | We're going to build the two back corners in layers. Glue each layer together and let them dry completely. Then we will glue the layers together for the finished corner. Also, you can use Legos to help keep each layer straight as you build them. The first layer is made of regular blocks with sloped blocks around the outside. |
 |
 |
|---|
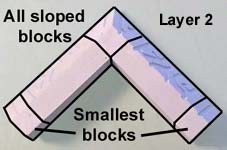
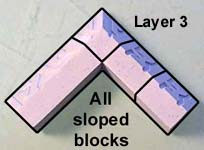
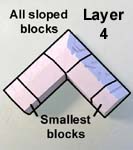
| 4. | Here's layer 2, 3 and 4. |
 |
 |
 |
|---|
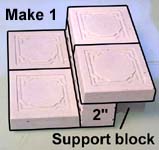
| 5. | Stack and glue the layers together. Place a 2" block down the center to support the final blocks, but don't glue it! You will need the 2" block somewhere else. Glue the final pieces on the top. Make 2 of these back corner pieces. |
 |
 |
|---|
| 6. | We need 3 sides next. These are made of four 1" blocks and two floor tiles each. We also need one roof piece. Place a block underneath the floor tiles to support them but do not glue it. |
 |
 |
|---|
| 7. | For the final pieces, we need 2 front corners. These two pieces will be mirror images of each other. Once these pieces are dry, you can begin to assemble the complete model. |
|
 |
|---|
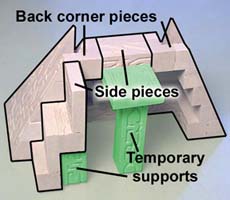
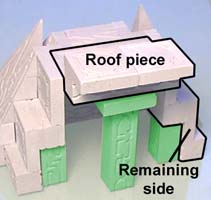
| 8. | Now to assemble the bunker. Start by gluing together the 2 back corners onto the 2 sides as shown. The blocks shown in green are used to hold the pieces up while the glue dries (so don't glue them). Next, glue on the remaining side along with the roof. |
 |
 |
|---|
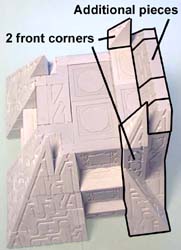
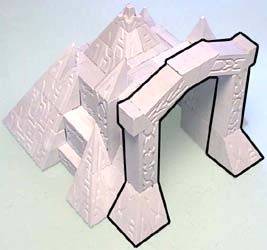
| 9. | The 2 front corners are glued on next. Also add the additional pieces shown. These fill the space between the roof and the doorway. We'll finish the bunker by gluing on the doorway piece. |
 |
 |
|---|
 |
 |
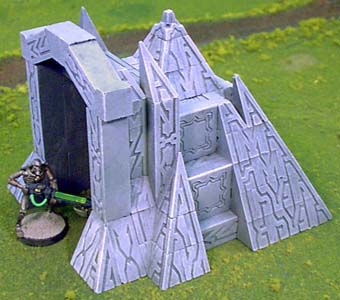
This entrance could lead to an underground bunker or weapons hangar. For painting instructions and finishing ideas such as the control panels, take a look at the Tips & Tricks 11 page. | |
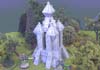
The Teleport Pad
You can build both the Teleport Pad and the Signal Tower if you cast the Skematic Pyramid mold 8 times.
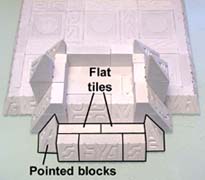
| 1. | We'll make the main base of the pad upside down. Start with flat floor tiles, regular 1" blocks and square blocks. Be sure you glue the blocks with the design side down! Let it dry completely before you flip it over. Next add the blocks shown around the outside. |
 |
 |
|---|
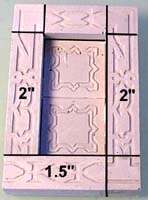
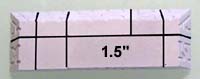
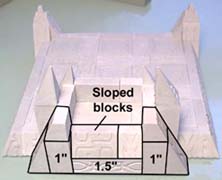
| 2. | The control area will be next. Start with sloped blocks surrounding a square block and a 1.5 block. Glue the next row on top. Place this control piece on the unfinished edge of the teleport pad. Continue by adding on the additional piece shown below. |
|
 |
|---|
| 3. |  |
 |
 |
|---|
 |
 |
The teleport pad is a good way to bring in troops, or to take your objective item off of the battlefield. For painting instructions and finishing ideas such as the control panels, take a look at the Tips & Tricks 11 page. Don't forget, since you've cast the mold 8 times to build this, you already have enough blocks to build the Signal Tower shown below. | |
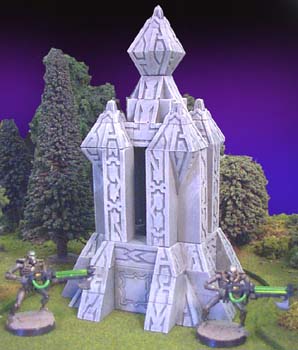
The Signal Tower
You can build both the Signal Tower and the Teleport Pad when you cast the Skematic Pyramid mold 8 times.
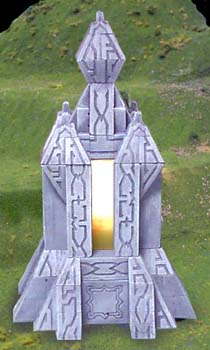
| 1. | These pieces will form the base of the tower. When the tower is finished, this empty base can be used to store items or to hold batteries for a light source. |
 |
 |
|---|
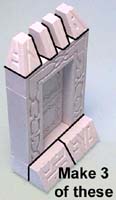
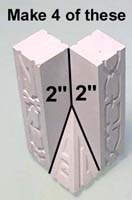
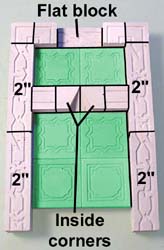
| 2. | Next is the cap for the base. Do not glue the tiles shown in green! We also need 4 copies of the next piece. They're simply made using two 2" blocks glued to a pointed block. There are no blocks on the back side of the 2" blocks. |
 |
 |
|---|
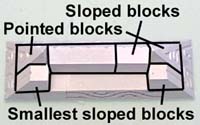
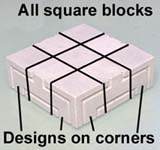
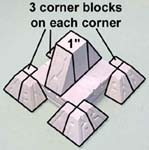
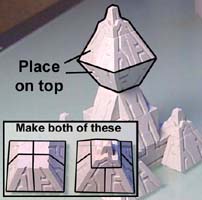
| 3. | The last piece is the top of the Signal Tower. Glue together the 9 square blocks as shown. It will look better if the blocks around the outside have the patterns as shown. Onto that, add 3 corner blocks on each corner. Also add the 1" block in the middle with the two large wedge shaped blocks on opposite sides. |
 |
 |
|---|
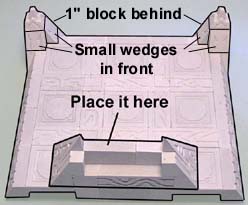
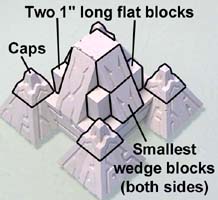
| 4. | Add the decorative caps on the four corners along with the 1" flat tiles and small wedge blocks as shown. The very top is made by gluing each set of corner blocks together. Once they dry, glue these shapes bottom to bottom and place it on top of the tower. |
 |
 |
|---|
| 5. | The pieces stack together like this. Paint the pieces before you glue them together! For painting instructions and finishing ideas such as adding light to the tower, take a look at the Tips & Tricks 11 page. Don't forget, since you've cast the mold 8 times to build this, you already have enough blocks to build the Teleport Pad in the article above. |
 |
 |
|---|
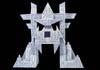
Face Gateway
I borrowed the idea of making a face gateway from Dennis Bryson. He had made a great looking face temple which he submitted in the Hirst Arts Design Derby. You can see his original idea at the Void Gamer's Web Site.
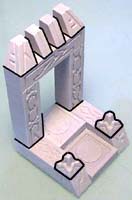
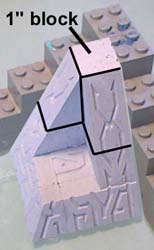
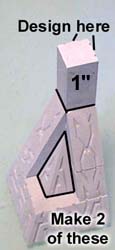
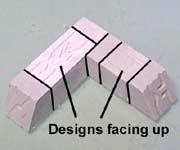
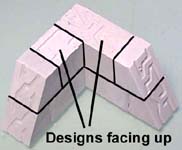
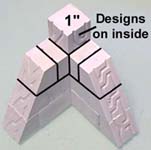
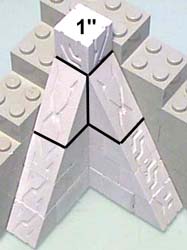
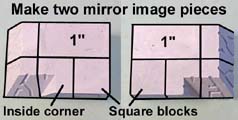
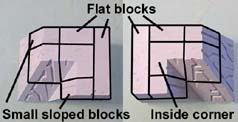
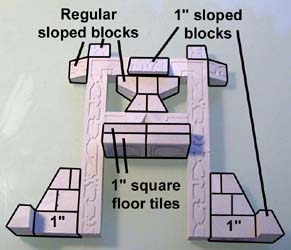
| 1. | You will need to cast mold #311 four times to build the face gateway. There are 6 square blocks in the first photo. Be sure you use the inside corner pieces where the nose will go. The second photo uses 12 regular sloped blocks plus three of the 1" long sloped blocks. The 1" square floor tiles are standing on end. |
 |
 |
|---|
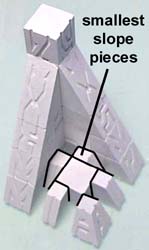
| 2. | 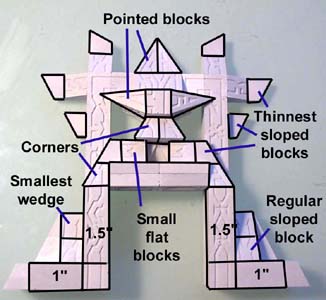 |
 |
|---|---|---|
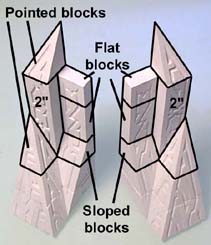
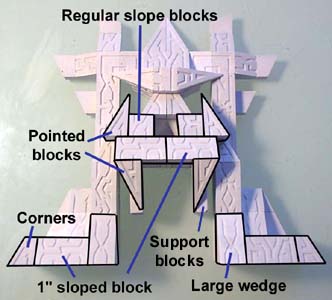
These photos are a little more complicated. The second photo has two of the flat floor tiles on end to support the fangs while they're being glued. Do not glue these supports. | ||
 |
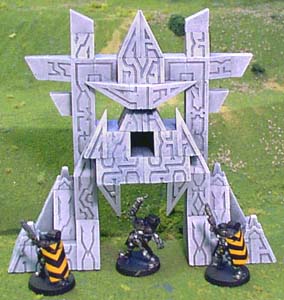 |
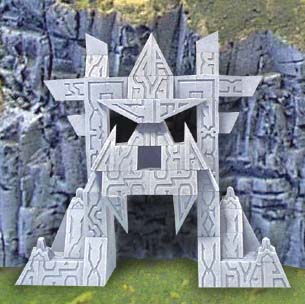
The face can be placed in front of a cliff opening or simply used as a gateway. You can even make two faces and glue them back-to-back. For painting instructions, take a look at the Tips & Tricks 11 page. | |