Ruined Tower Building Instructions
|
This page contains instructions on how to use mold #65 to build the ruined tower. You will have to cast the mold 16 times to build the ruined tower. This ruined tower is slightly more difficult to build than the average model. The pieces cast easily, but the difficulty lies in getting the pieces in the correct placement. Many of these blocks look similar. Putting the wrong block down will greatly affect how your model fits together. Sorting the pieces before you start is a necessity. Instructions for making the hill are found on the Tips & Tricks 9 page. |
|
Click on the video to watch it on YouTube. This video shows the completed detailed tomb project. Every piece is shown in detail relating to the instructions below. This also includes the basic tomb pieces, shown near the end of the video. The end of the video also showns the completed tombs assembled into a tomb complex. |
 |
Piece Descriptions
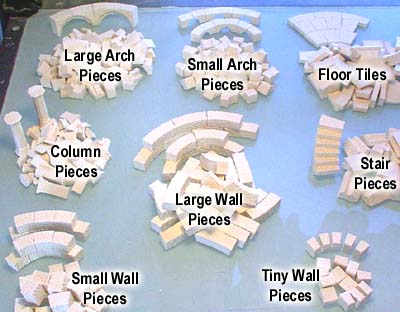
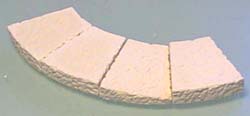
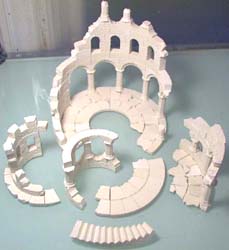
| 1. | You will need to cast the #65 Ruined Tower mold 16 times to have enough blocks to build the ruined tower. After you cast them, sort the blocks into 8 different piles as shown. These 8 piles will have to be sorted further because some of the blocks are used for an 8" diameter tower, and some are for a 4" diameter tower. A more detailed description of the pieces is shown below. |
 |
|---|
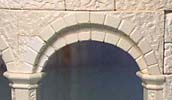
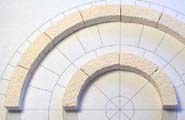
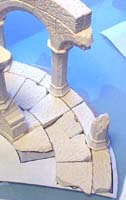
| 2. | The Large Arch Pieces look like this. It takes 4 pieces to make a complete arch. They're easy to pick out because of the brick pattern on the underside. |
 |
 |
|---|
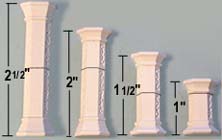
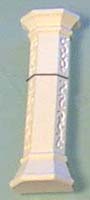
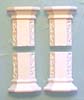
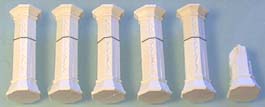
| 3. | The Column Pieces are also easy to sort from the others. There are 3 different types of pieces which include a long piece (with a base cap), a short piece (with a top cap), and a cap by itself. You can make 4 different heights of pillars depending on how you arrange these pieces. |
 |
|---|
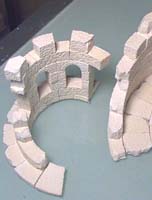
| 4. | The Small Wall Pieces look very similar. Some are used for 4" diameter walls and the rest are used for 8" diameter walls. To separate these 2 kinds of pieces, place them on edge. You'll notice that the 4" diameter pieces have a steeper angle to them. Use the correct pieces for the appropriate diameter of tower. |
 |
 |
|---|
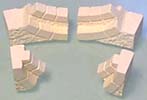
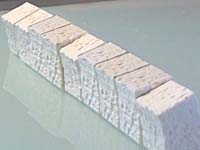
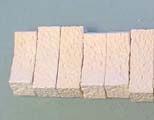
| 5. | The Large Wall Pieces are easier to tell apart. To separate these 2 kinds of pieces, place them on their backs. You'll notice that the 4" diameter pieces seem slightly shorter than the 8" diameter pieces. |
 |
 |
|---|
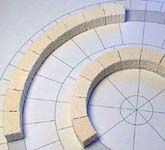
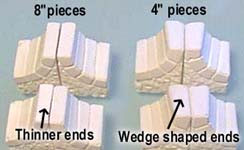
| 6. | The Small Arch Pieces are the toughest to separate. Place them back-to-back, smooth sides facing each other to pair up matching arches. The ones with the wedge shaped ends are the 4" diameter pieces. |
 |
 |
|---|
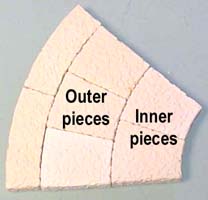
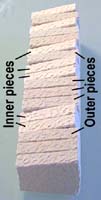
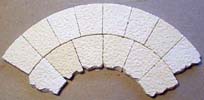
| 7. | The Floor Tiles also look very similar. Place these next to each other on their side. The pieces with the steeper angle are the inner pieces. The pieces with a shallow angle are the outer pieces. |
 |
 |
|---|
| 8. | The Tiny Pieces don't need sorting. They're meant to be used for 4" diameter walls. With all of the pieces sorted, it will be much easier to build the model below. |
 |
|---|
Ruining Pieces
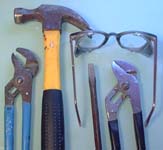
| 1. | First important note here: Whenever you break blocks, always wear safety glasses! Chips will fly from blocks that are broken so be very careful. Here are the tools I'm using to break and chip the pieces. These include 2 pair of pliers, a hammer and a large screwdriver. |
 |
|---|
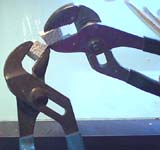
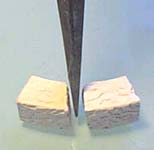
| 2. | To break blocks in half, 2 pair of pliers work the best, and there's also less chance of pieces flying. Simply grab both ends of the block and snap it in half. If you don't have access to pliers, a hammer and screw driver will also work, but it's more dangerous and it's harder to get the break to happen where you want. |
 |
 |
|---|
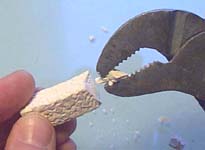
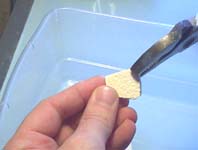
| 3. | Use the pliers to chip the ends of a block. Channel lock pliers work the best because you can open them up wide. It's also handy to do your chipping over a plastic tub. That way you can save the broken bits for rubble later on. |
 |
 |
|---|
| 4. | Sand the bottom of a few floor tiles to give them the impression of sinking into the ground. Don't do this to pieces you are going build onto later, but any time you have tiles out in the open, letting them lean randomly will give them a good ruined look. |
 |
|---|
Building The Tower
| 1. | You may want to download the printed plans for the ruined tower from the Building Plans page. This will make building much easier. Glue the plan down to a piece of cereal box. After it's dry, cut away the bottom quarter section as shown. We will want to move this section around after the model is completed. |
 |
|---|
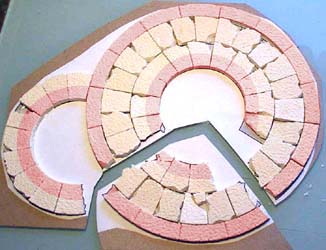
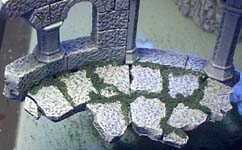
| 2. | Lay the tiles down onto the plan. This will give you a feel for where to chip and sand the bottom of the tiles. Do not sand or chip the areas shown in red. Chipping is not as big a problem, but if you sand these tiles (to make them tilt), you don't have a level base to build your tower on. Once you are happy with the layout, glue the tiles down onto the plan. You may also have to place a heavy book on it to help it dry flat. |
 |
|---|
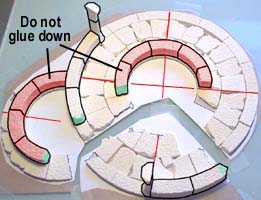
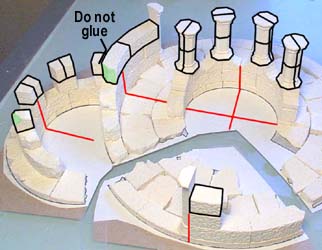
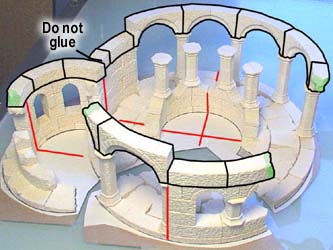
| 3. | Here's the first row of blocks. The half columns are made of a long and short piece glued together. I've placed red reference lines that will appear on all of the remaining photos. These lines fall across the center of the circle like a "target" and land exactly (horizontally and vertically) where the floor tiles meet. Do not glue down the blocks shaded in red. Just glue them together. You will need to remove these sections later when painting them. |
 |
 |
|---|
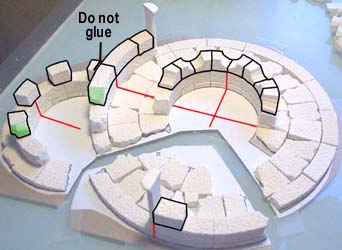
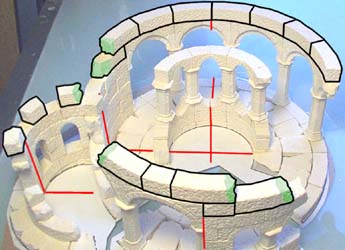
| 4. | Here's the second row of blocks. Note how the red reference lines now start to crawl up the wall. Now you can tell where the seams of the blocks meet in relation to the original floor tiles. The green shaded areas represent where blocks have been broken. Do not glue the small block against the wall. Only glue it to the section it's setting on. |
 |
|---|
| 5. |
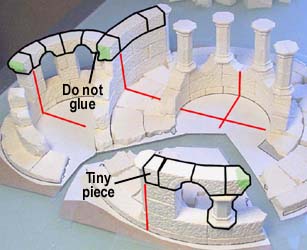
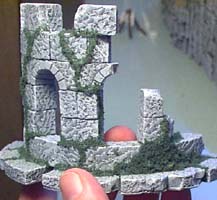
The four pillars are all made of short pillar sections. The tower on the left uses only tiny blocks for this row. Do not glue the small block against the wall. Only glue it to the section it's setting on. |
 |
|---|
 Here's the third row of blocks.
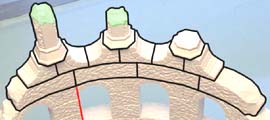
| 6. |
The short pillar is made using the short pillar section and a cap. The tower wall nearest you uses a tiny piece, even though it's not meant to be used for this diameter of tower. However, it fills the space well enough for this exception. Do not glue the small arch against the wall. Only glue it to the section it's setting on. |
 |
|---|
 Here's the fourth row of blocks.
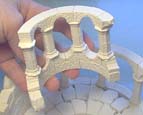
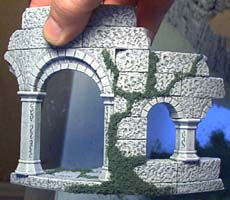
| 7. | Assemble and glue 5 large arches and 2 half (broken) arches. Also glue 5 complete columns and 1 broken column (using long and short column pieces). |
 |
 |
|---|
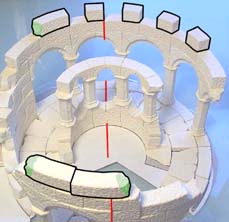
| 8. | Here's the fifth row of blocks with the arches and columns included. Glue an arch and column down at the same time. This will give you time to slide the column around and position it directly under the ends of the arch. Remember not to glue the side tower, even though the long block overlaps the wall. |
 |
|---|
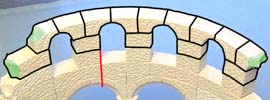
| 9. | Here's the sixth and seventh row of blocks. Once dry, you should be able to remove the side tower and the center tower. This will be important when you try to paint the model. |
 |
|
|---|
| 10. | For the upper floor, glue the tiles shown down to a piece of cereal box. Be sure to glue the tiles securely to each other as well. Let it dry with a heavy book on top of it, then cut the excess cereal box away from the outside edge with a hobby knife. |
 |
|---|
| 11. | Here are the remaining rows of blocks. |
 |
|
|---|
| 12. | Add the last broken pillar onto the base as shown. Using a hobby knife, cut the side tower tiles away from the main tower. Next, glue the side tower onto its floor tiles. This will make the side tower easier to paint. While you're at it, use a hobby knife to trim away the excess cereal box from around the base of the model. |
 |
 |
|---|
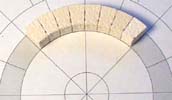
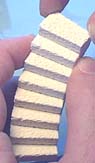
| 13. | You will need 6 step sections for the spiral staircase. You should start by sanding the first piece so the bottom step will lay flat on the floor. The steps interlock so it's easy to put them together. They will automatically angle the right amount to make circular stairs. You will have to hold the step sections until they dry or use superglue to assemble them quickly. The last photo shows all 6 pieces ready to paint. |
|
 |
|---|
Finishing Touches
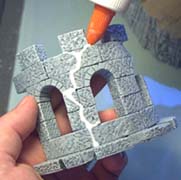
| 1. | For instructions and colors used to paint the tower, refer to the Painting Instructions page. One of the ways to make a tower look old is to add vines growing up the side. To do this, use some water based glue (Elmer's) and pour a trail up the side. It's important to follow the joints between blocks about half the time. Natural vines use these joints to grab hold and continue to grow. |
 |
|---|
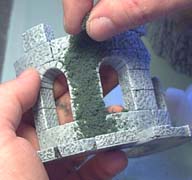
| 2. | Next sprinkle on some green foam. I'm using some of Woodland Scenics coarse turf. You can find it any model railroad or hobby shop. They also have a web site where you can order on line at www.woodlandscenics.com. |
 |
 |
|---|
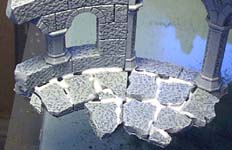
| 3. | Also do the same for the cracks between the floor tiles. Most unkept structures have grass growing everywhere between the joints. |
 |
 |
|---|
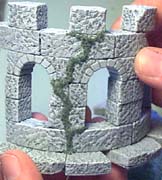
| 4. | Lastly, clump up the vines in some areas. The key to realistic looking scenery is variation. Try not to get stuck in any kind of pattern. Some areas will be heavy with vines and others will be light. Some areas will clump up and others will be thin. Some will follow the block seams and others will not. |
 |
 |
|---|
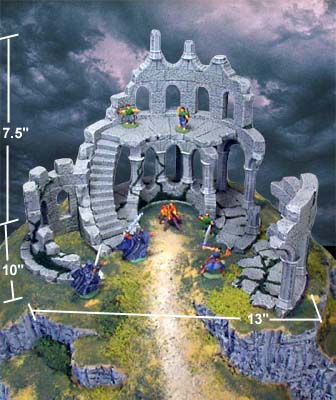
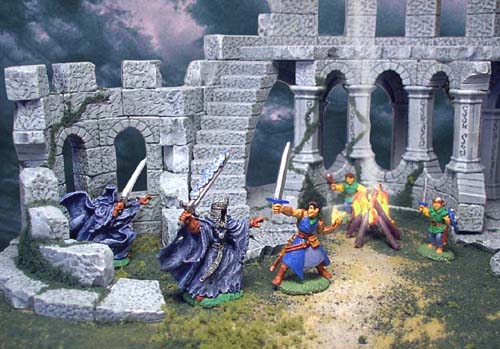
Here are a couple photos of the finished tower. For instructions on making the hill it sets on, visit the Tips & Tricks 9 page. |
 |
Believe it or not, it took me longer to paint the miniatures than it did to carve and paint the hill for this display (including adding the ground cover). The miniatures shown here are from Reaper Miniatures(TM). |
 |