Rubble Bridge Building Instructions
|
This page contains instructions on how to use mold #259 and #224 to build the Rubble Bridge. You will have to cast the mold #259 eight times and cast mold #224 four times to build the bridge. Click the photo for a larger view. |
|
Building Instructions
The main purpose of this mold is to add a variety of large arches and decorative railing to the rubble block molds.
For this project, the bridge mold #259 will be used to make the sides of the bridge and mold #224 is used to make the wooden plank floor. If you do not want to use an extra mold for the floor, you can always make the floor out of cardboard and cover it with glued on fine dirt.
You will need eight castings of mold #259 and four castings of mold #224 to complete this project.
| 1. | Here are the Building Plans for the bridge. Print them out and cut one sheet on the dotted line. Tape the two halves together for the full plan. |
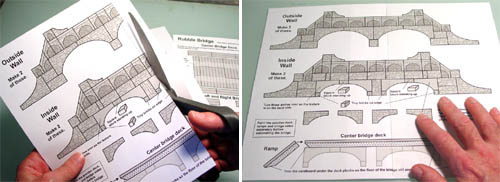 |
|---|
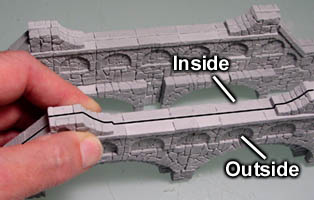
| 2. | Each side wall of the bridge will be made in two halves, sandwiched together. The rubble block texture is so deep that I could not make full building blocks without lots of air bubbles. For this reason, the blocks are only textured on one side and need to be glued back to back. |
 |
|---|
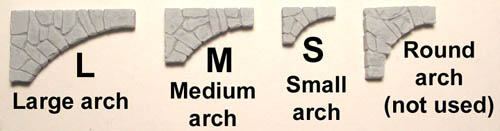
| 3. | This key shows how each of the arches are labeled on the plan below. The round arches on the right are not used for this project. |
 |
|---|
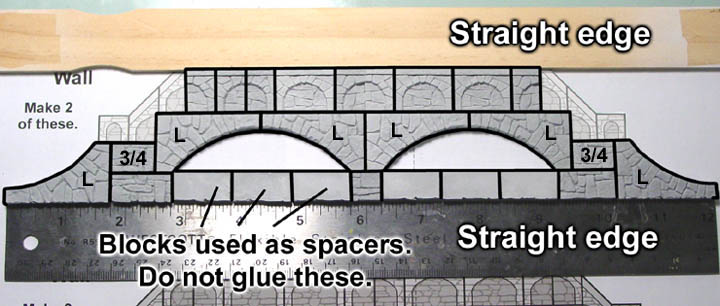
Bridge Outside - Make 2 of these
| 4. | Glue the edges of the blocks together as you lay then down onto the plan. You will notice that I have not put the top corner pieces on yet. I left them off so I could put a straight edge on the top and bottom to keep things lined up. The blocks under the arches are used as temporary spacers so do not glue these blocks. |
|---|---|
 |
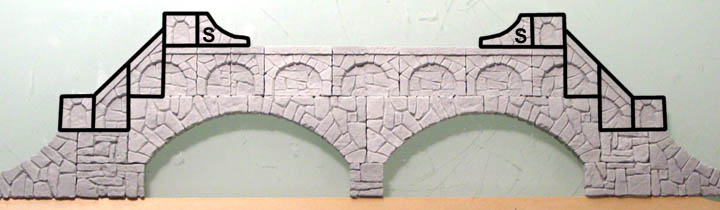
| 5. | Once dry, glue the upper side railings and top decorations on. |
|---|---|
 |
Bridge Inside - Make 2 of these
| 6. | Glue the edges of the blocks together as you lay then down onto the plan. Once again I have not put the top corner pieces on yet. I left them off so I could put a straight edge on the top and bottom to keep things lined up. |
|---|---|
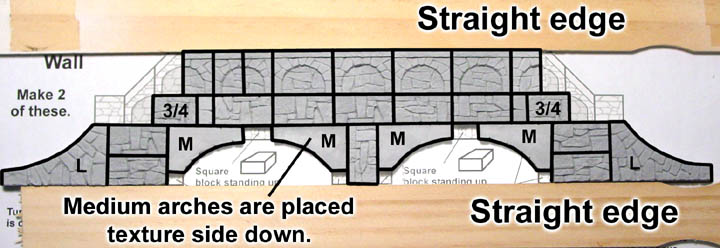 |
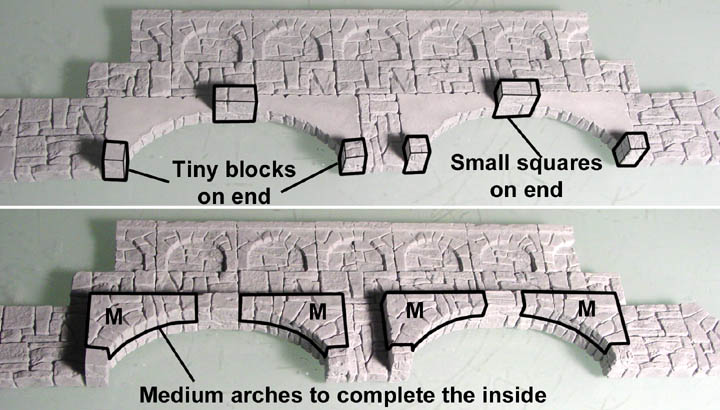
| 7. | Before it dries, glue the tiny blocks and square blocks on end to fill between the medium arches and at the bottom of the arches. Then glue another medium arch on top of the first arch to complete the under arches. |
|---|---|
 |
| 8. | Once dry, glue the upper side railings and top decorations on. Note that the square blocks on this side do not have the recessed decoration on them. |
|---|---|
 |
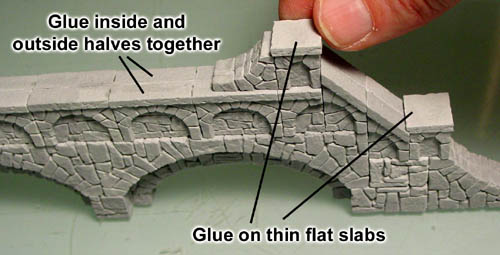
| 9. | Complete each side of the bridge by gluing an inside to an outside. Finish the sides by gluing on eight thin flat slabs on top of the squares. |
 |
|---|
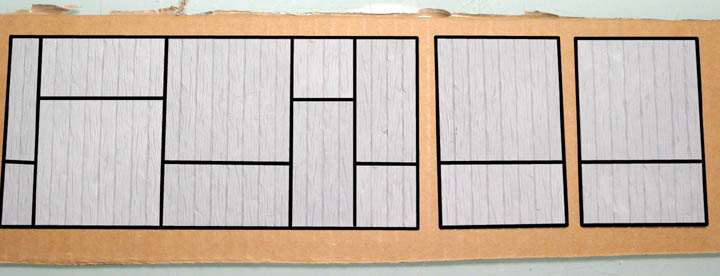
Bridge Floor - Blocks from Mold #224
| 10. | Glue these wooden floor sections onto a piece of cardboard or thick card stock. |
|---|---|
 |
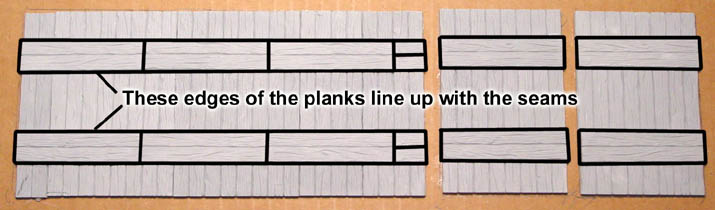
| 11. | Glue these groups of two planks on top. These are placed so that the inside edges of the planks line up with the seam lines underneath. |
|---|---|
 |
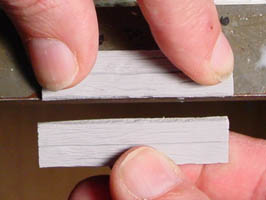
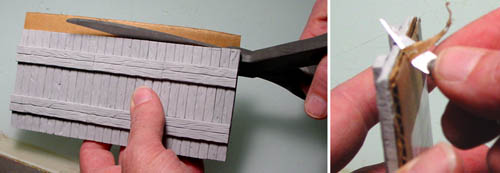
| 12. | With only making 4 castings of this mold, you will not have enough of the long 2-plank pieces. For the rest of them you will need to break some 4-plank pieces in half. To do this, place one face-up on the sharp edge of a table and snap them in half. They should break fairly cleanly. |
 |
|---|
| 13. | When the floors are dry, trim out the sections with scissors. Use a hobby knife to angle the short ends of the cardboard on the main floor section. This will help to close the gap between sections. |
 |
|---|
| 14. | Test fit the floor onto one of the bridge sides. One end of the short floor pieces should rest on the corner of the arch block. You may also choose to angle the edge of the short section that touches the ground. You can do this using a hobby knife or by sanding it. |
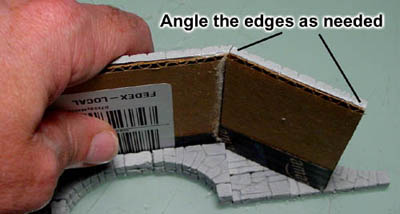 |
|---|
| 15. | Here are the finished sections ready to be painted. |
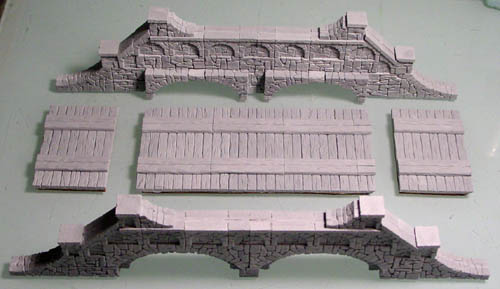 |
|---|
Painting Instructions
Both the stone sides and the wooden floor use the same basic paint colors. However, they will be applied differently to help the floor stand out from the sides. The three colors used for this project are:
|
|
|


Painting the Bridge Sides
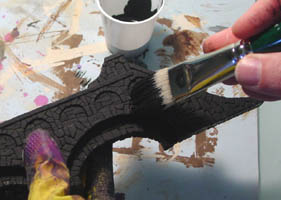
| 1. | The first coat of paint is solid black. Be sure to thin the paint down enough so that it goes into all of the cracks easily. I'm wearing a rubber glove to keep the paint from getting all over my left hand while painting. If you prefer, you may also spray paint this flat black. Just be sure to get it from all angles and straight on so that it goes into all the cracks. The cracks are mainly where you need the black paint. |
 |
|---|
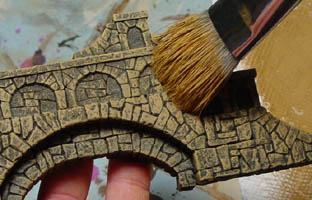
| 2. | The second coat of paint is earth tone medium color from the Earth Tone Painting Instructions page. This is sort of a "pumpkin pie" color. Dry brush this on lightly and when the brush starts to run out of paint, then dry brush heavily. If you do it right, each stone should have varying shades of brown on it with no black. If you do it badly you will have solid brown stones with no variety of shade on each stone. |
 |
|---|
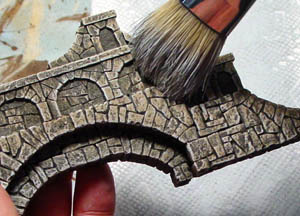
| 3. | The last coat of paint is castle gray light color from the Castle Gray Painting Instructions page. Dry brush this on lightly. This color will highlight the edges of the stone in gray. It will also gray out the brown a bit. After the brush runs a bit dry, you can go a little more heavily but keep it lighter than when you were applying the brown. |
 |
|---|
Painting the Bridge Floor
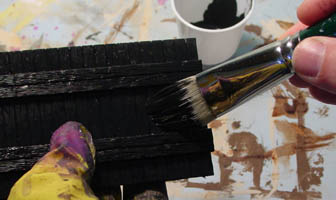
| 4. | Just like the sides, the first coat of paint is solid black. Be sure to thin the paint down enough so that it goes into all of the cracks easily. I'm wearing a rubber glove to keep the paint from getting all over my left hand while painting. If you prefer, you may also spray paint this flat black. Just be sure to get it from all angles and straight on so that it goes into all the cracks. The cracks are mainly where you need the black paint. |
 |
|---|
| 5. |
To make the floor stand out differently from the sides you need to thin the paint slightly and make the brush as dry as possible. If the paint is too thick, you will get solid brown on the top of your planks. If you thin the paint and put too much on, the paint will run into the cracks. The trick here is to thin the paint slightly, dip your brush in and brush almost all of it off on a paper towel (even more than usual for dry brushing). What you want are lots of thin coats of paint. If the coat of pumpkin pie color is thin enough, the black transmutes through the brown and changes the color completely. Pumpkin pie turns into a dark oak. Just look at the difference in color between what's on the brush and what's on the boards. Remember to brush lightly, keep the paint thin and keep the brush really dry. You may feel that this color is good enough and just stop there without adding the gray. |
|---|
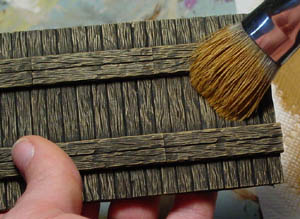 The second coat of paint is earth tone medium color, exactly what you used on the bridge sides above.
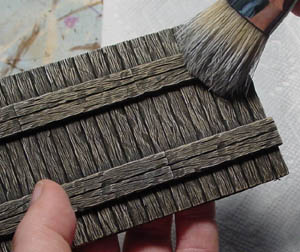
| 6. | If you feel the wood is just a bit too brown then go ahead and give a very light dry brush of light gray, exactly the same color as used on the bridge sides above. Be sure to do this very lightly or else your floor will end up looking the same color as the bridge sides. |
 |
|---|
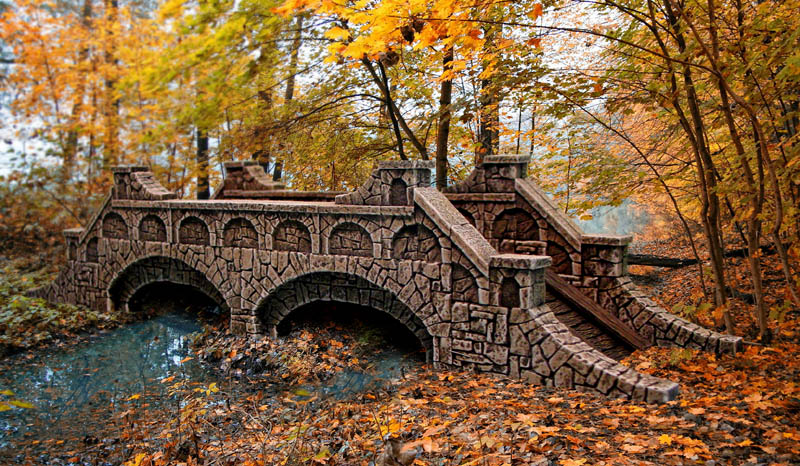
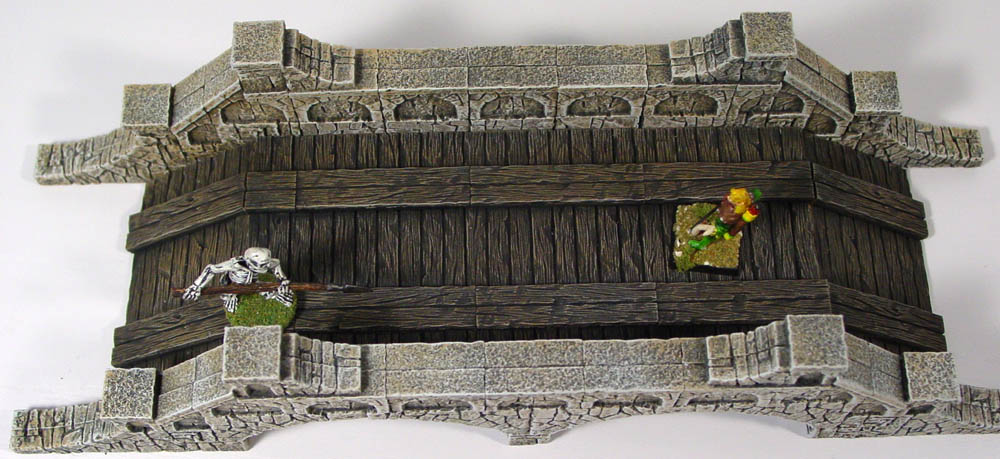
Finished PhotosClick on the photos to see a larger version. 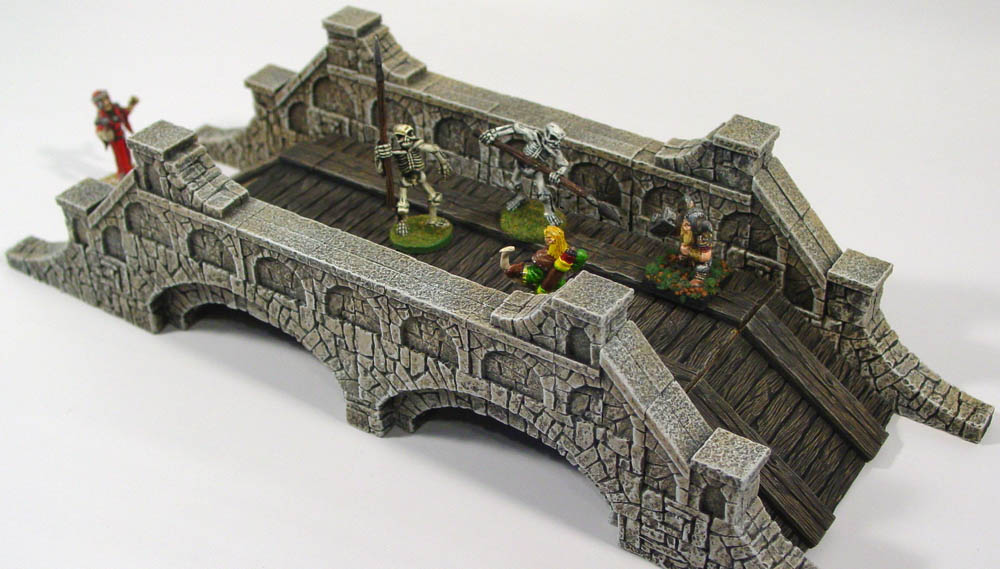
|
|