Gloomhaven Wall and Floor Set
This page will show you how to use make a wall and floor set that can be used with the Gloomhaven board game. This set will make all the walls and floors needed to play every scenario in the game book.
Please note that Hirst Arts has no affiliation with the designers or makers of the game. You can find out more about the game at www.cephalofair.com.
|
|
What's Needed to Make This Set
To build this set you will need:
Click on the photo for a larger view. |
 |
This is not a difficult set to build. However, it is an expensive and time consuming project. If you like to do any kind of basic craft project then you should have good success in making this set. You can also use almost any of our other molds to make additional walls for the set later on.
You will need to spend about 3 weekends to complete this project. The first weekend will be for casting the blocks. The second weekend will be for gluing the walls and floors together. The final weekend will be spent painting the set. This set will make all the walls and floors needed to play every scenario in the game book.
Wall and Floor Types
| 1. | Wall Types and How to Use ThemClick on the video to watch it on YouTube. This video describes the different wall types and how they are used to frame around the floor sections. |
|
|---|
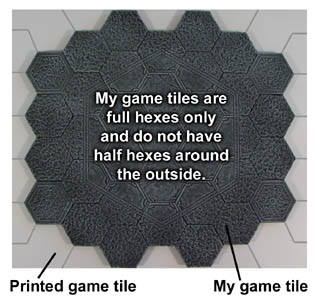
| 2. | Floor SectionsThe floor sections on this set do not have the half hexes around the outside. Instead, we will leave a gap between the board sections where we can set self-standing walls that will separate the floors. When referring to the map you are trying to assemble, only look at the full hexes on the map to see how sections connect. |
 |
|---|---|---|
 | ||
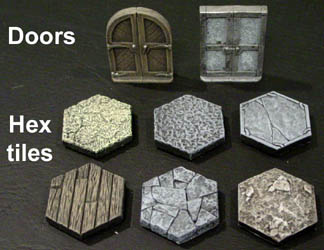
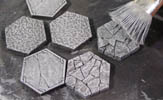
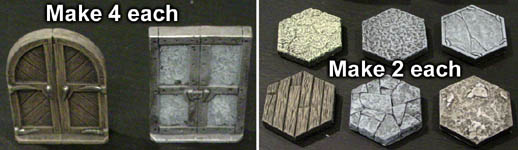
| 3. | Hex Tiles and DoorsWe will make several single hex tiles that will be used to connect sections together and fill holes that occur around the game board. 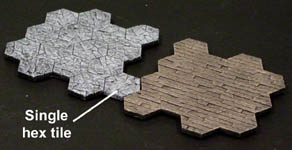 |
 |
|---|
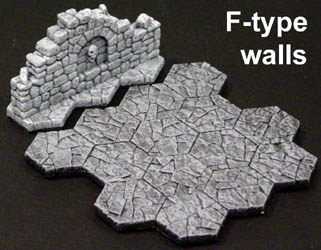
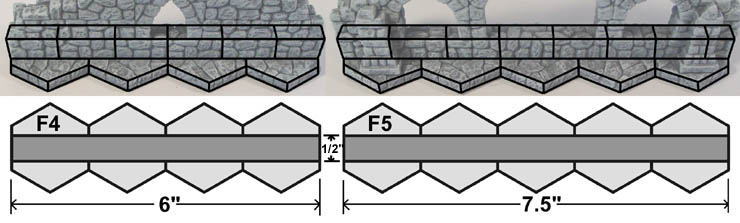
| 4. | F-type WallsThese are wall sections that span across the tiles from flat to flat. These are used to separate rooms and also form walls around the outside. These walls are the easiest to use. Since each hex measures 1.5" from flat to flat, it will be easy to construct any style of wall you want to span across the flats of the tiles. |
 |
|---|
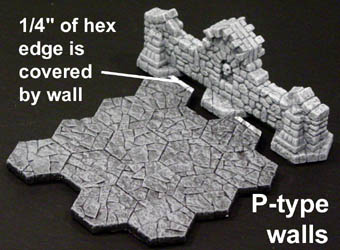
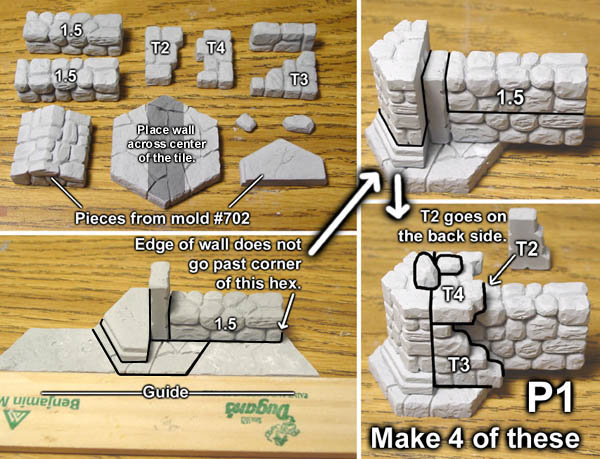
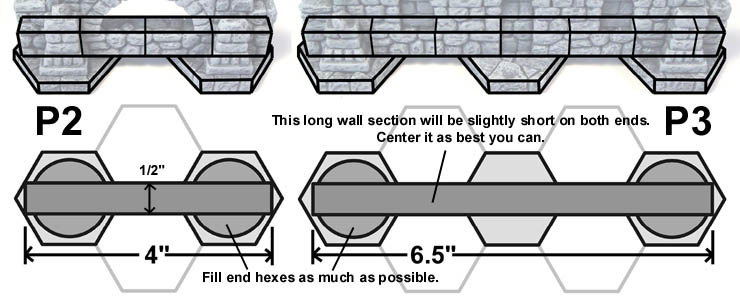
| 5. | P-type WallsThese wall sections span across the tiles from point to point. These walls bridge across the edge of hexes, covering up 1/4" of the hex they cross. This is not a problem because our hexes are slightly larger than the ones used on the actual game board so game markers and miniatures will still fit in the hexes. |
 |
|---|
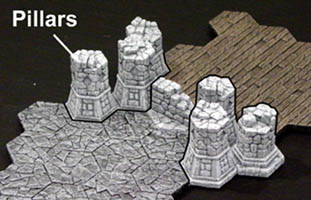
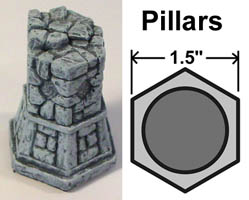
| 6. | PillarsPillars are used to completely fill a hex when needed. You will end up using a lot of these because there are so many odd wall shapes and combinations regular flat walls just can't fit around neatly. |
 |
|---|
A Beginner's Introduction to Casting
| 1. | Click on the video to watch it on YouTube. This video is for those who want to make a copy of the game board but have never cast molds before. If you have used Hirst Arts molds before, feel free to skip this video and section of the instructions. |
 |
|---|
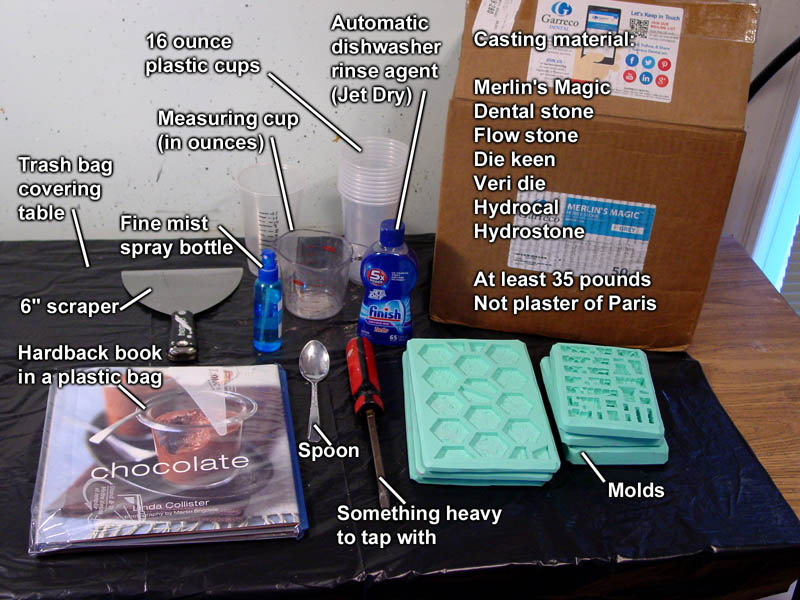
| 2. | This photo shows the tools and materials needed to complete this project. Click on the photo for a larger view. For complete casting instructions and for a list of other casting materials visit our Casting Instructions page. |
 |
|---|
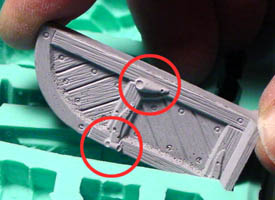
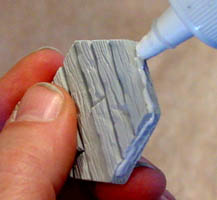
| 3. | One piece that may give you trouble when casting is the round topped door on mold #702. This door is cast on end and sometimes it's difficult for the mixture to get down into the details without getting air bubbles on the hinges and handle. Here you can see an example of the hinges and handle with air bubbles. |
 |
|---|
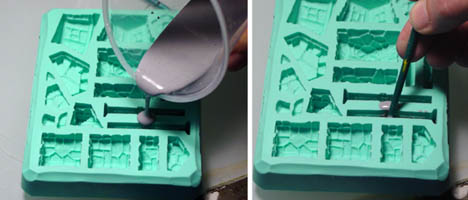
| 4. | The best way to get this piece to turn out is to pour the dental stone into the door half way. Then take the handle of a small paintbrush and work it around to remove the air bubbles. Then pour the dental stone into the mold as usual. |
 |
|---|
Assembling the Walls
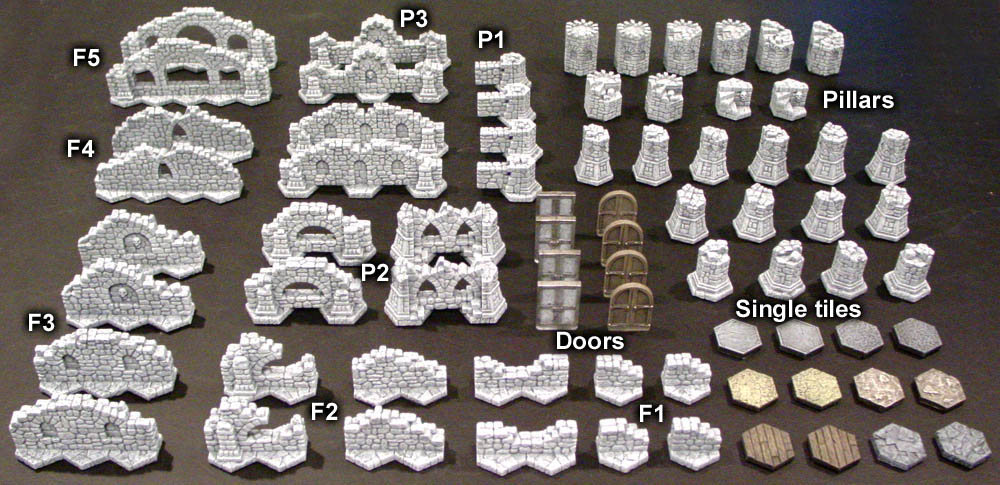
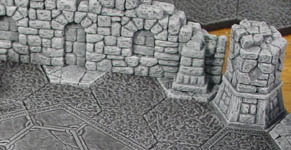
| 1. | Here is a photo of the complete wall set. Click on the photo for a larger version. So far the amount of walls in this set has been sufficient to surround every layout I have tried. Also feel free to make additional unique wall sections using different Hirst Arts molds. |
 |
|---|
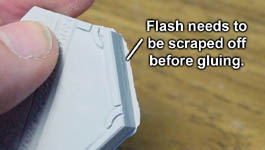
| 2. | Be sure there is no "flash" on the edges of the hex tiles. You usually will not have this problem if you scrape the face of the mold clean when scraping. If you have any material sticking out around the sides of the tiles, be sure to scrape it off. Otherwise the tiles will not set flat together. |
 |
|---|
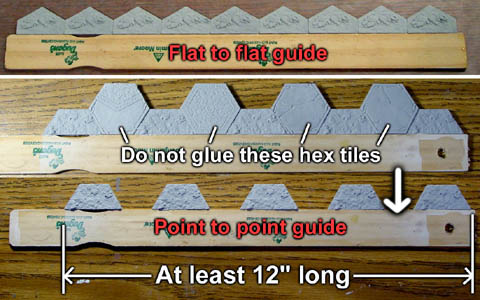
| 3. | First you will need to make 2 guides. One guide will be used to line up flat to flat and the other guide will be used to line up point to point. Glue tiles onto a straight wooden edge such as a paint stirring stick or wooden ruler. I suggest using the dirt and rock half hexes for this since they do not make good single hexes on their own and they are very accurate. |
 |
|---|
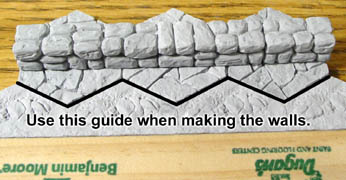
| 4. | Use these guides when making the wall and floor sections so the edges of the hexes will line up properly. This photo shows how the guide is used to make the F-type wall section. |
 |
|---|
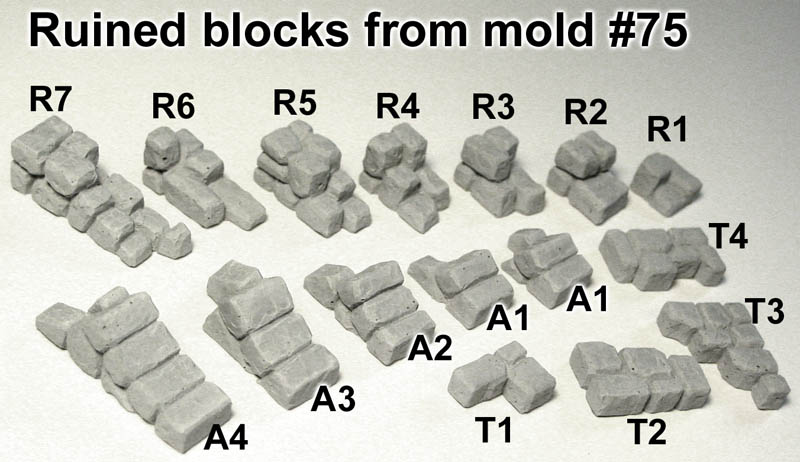
| 5. | I've included this chart to help you identify blocks from mold #75. Click on the photo for a larger view. I suggest that you print out this photo and use it as a guide when trying to pick out the blocks for each wall section. Most of the arch blocks (A1-A4) will be glued together using four blocks to make one full arch. However, there are a few wall sections where single blocks are used so do not glue all of the arch blocks together at the beginning. |
 |
|---|
All of the hexagon floor tiles used under the walls will be the rubble stone from mold #179.
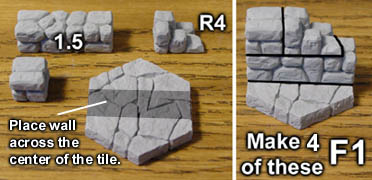
| 6. | Here is the first wall section F1. Be sure to place the wall across the center of the floor tile. On all the following instructions, 1" long blocks and the 1/2" long blocks will not be labeled because they are fairly easy to see what they are. Make 4 of these wall sections. |
 |
|---|
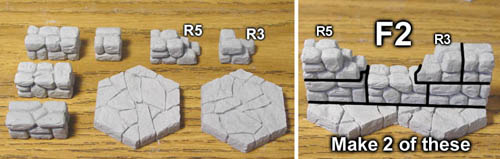
| 7. | These F-type walls are very simple to make. Be sure that you place the wall across the center of the hex tile. Also use the guide (the half hexes glued onto a straight edge) to make sure that everything lines up properly. |
 |
|---|
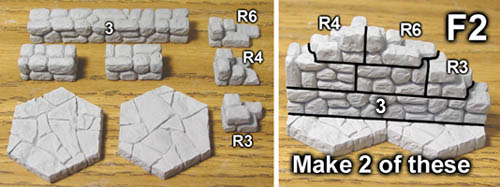
| 8. | These F-type walls are simple enough that you can easily make your own custom walls out of different molds and blocks than I have listed here. |
 |
|---|
| 9. | 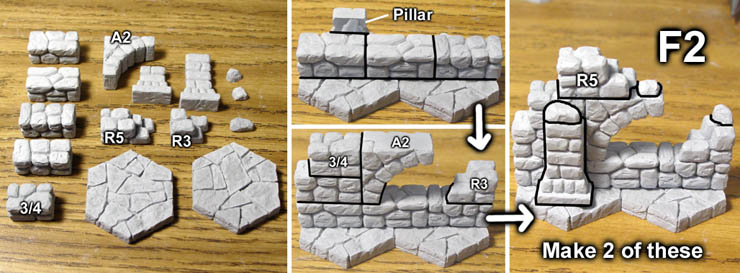 |
|---|
| 10. |  |
|---|
| 11. |  |
|---|
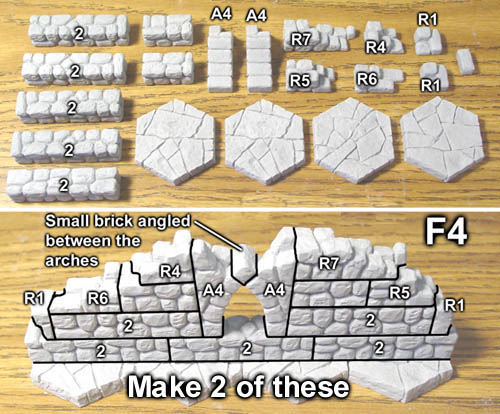
| 12. | For this wall, I'm using the largest A4 arches in an odd way. If you set these two quarter arches on end as shown, you will end up with a nice little 45 degree space to fit in a small brick. This small brick is one of the extra little stones from mold #75. Drop it into this space where the arches meet and you have a ruined gothic pointed arch. Make 2 of these wall sections. |
 |
|---|
| 13. | 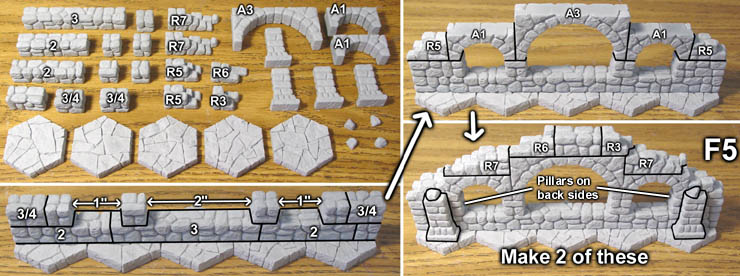 |
|---|
| 14. | Now onto the P-type walls. These span across the hex from point to point. For these pieces you will need to use the guide. Be sure that the wall does not extend past the upper right corner of the hex (bottom left photo). As with the wall sections above, the wall centers across the middle of the hex. Make 4 of these. |
 |
|---|
| 15. | 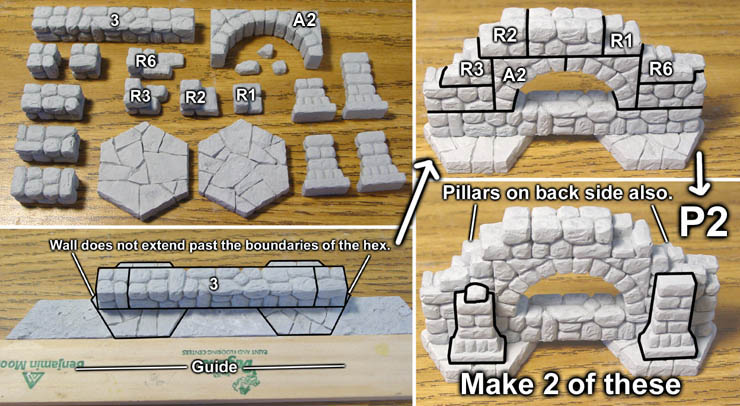 |
|---|
| 16. | 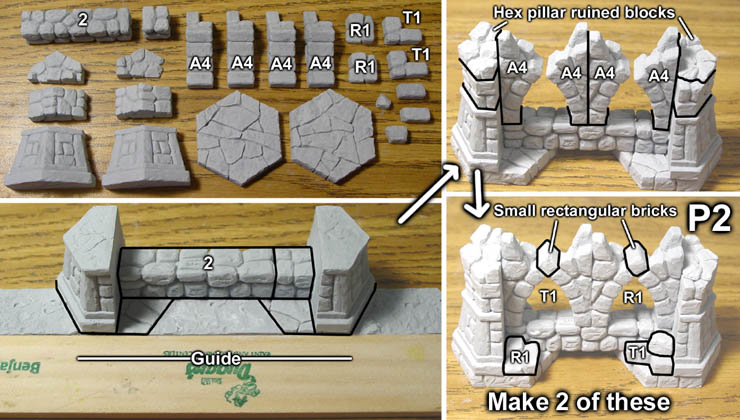 |
|---|
| 17. | 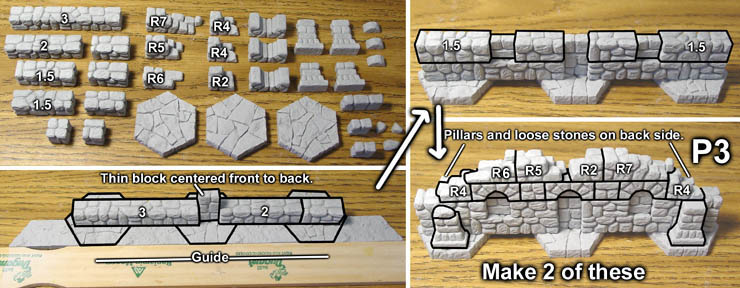 |
|---|
| 18. | 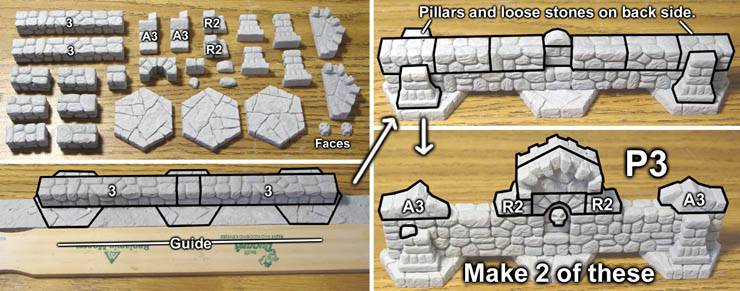 |
|---|
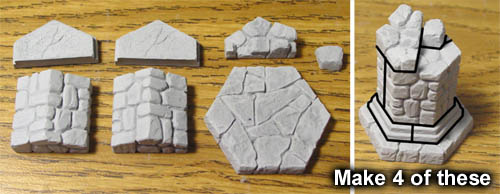
| 19. | The final wall pieces are the Pillars. These completely fill one hex on the game board. All of the pillars use blocks from mold #702. The ruined top is made from two different ruined pieces. I usually try to rotate the seams going up the sides of the pillars so the seams are not so obvious. Make 4 of these pillars. |
 |
|---|
| 20. | The top ruined part of this pillar is a complete half hex (not a partial half hex). Make 4 of these. |
 |
|---|
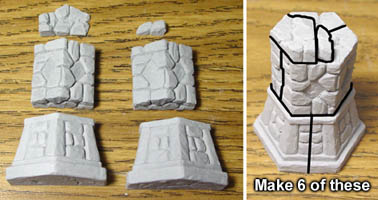
| 21. | The top ruined part of this pillar is a partial half hex. The main hex part of the pillar has the diamond shapes on the sides. Make 6 of these. |
 |
|---|
| 22. | 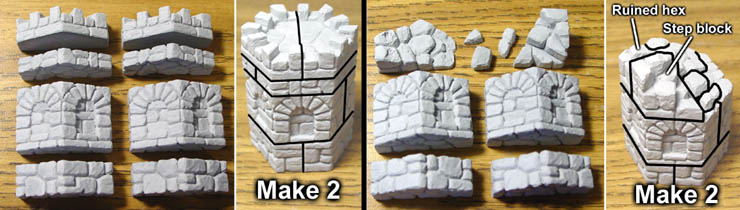 |
|---|
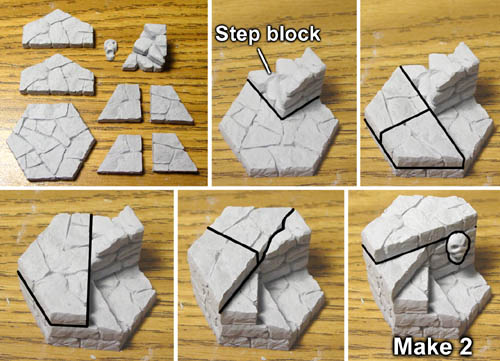
| 23. | This is kind of a fun little stairway. It can be used as a pillar or you can place it in the center of a room to indicate going up a level. It uses the half and quarter hexes from mold #179 as well as the stair block and face from mold #702. Make 2 of these. |
 |
|---|
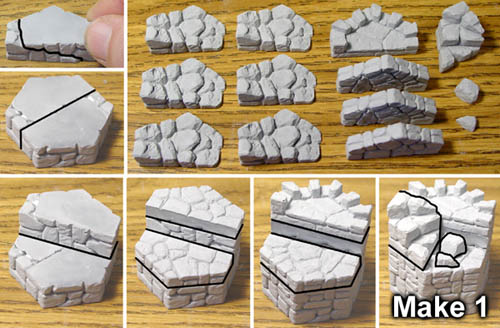
| 24. | The ruined blocks on the hex pillar mold #702 will fit into each other. Just take two of the ruined blocks and stack them together face to face to form a half hex that's 1/2" tall. Three of these half hexes are stacked together to make the bottom left photo. The final photo shows one of the step blocks used along with single stones to make the ruined side of the pillar. Make 1 of these. |
 |
|---|
| 25. | 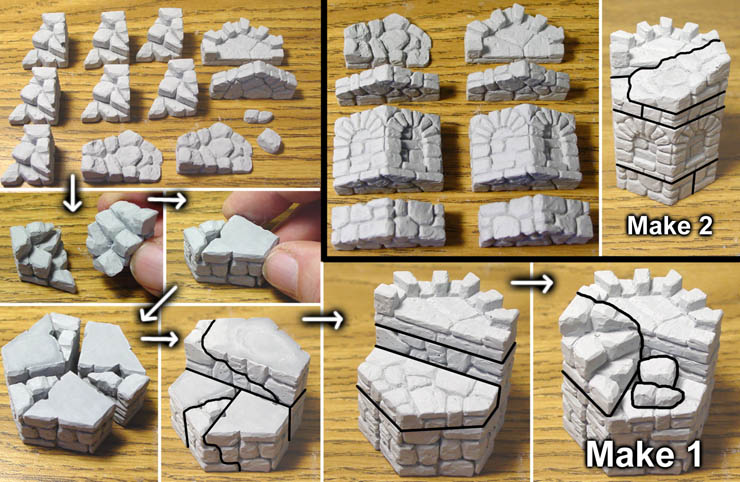 |
|---|
Assembling the Floors
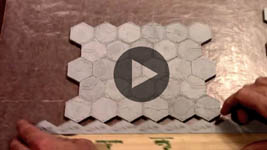
| 1. | Click on the video to watch it on YouTube. This video shows how to glue together the floor sections and keep the tiles aligned. |
 |
|---|
| 2. | First you will need to make 2 guides. One guide will be used to line up flat to flat and the other guide will be used to line up point to point. Glue tiles onto a straight wooden edge such as a paint stirring stick or wooden ruler. I suggest using the dirt and rock half hexes for this since they do not make good single hexes on their own and they are very accurate. |
|
|---|
| 3. | Be sure there is no "flash" on the edges of the tiles. You usually will not have this problem if you scrape the face of the mold clean when scraping. If you have any material sticking out around the sides of the tiles, be sure to scrape it off. Otherwise the tiles will not set flat together. |
|
|---|
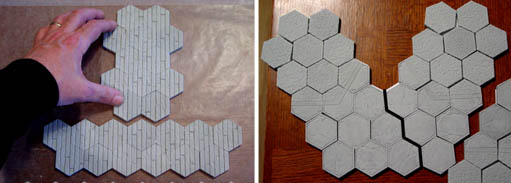
| 4. | We won't have enough full hexes so you'll need to glue together some partial hexes in order to have enough. There's no need to glue all of the partial hexes, just glue together what you see here. When assembling the floors, sprinkle in a few of these glued together hexes at random. |
 |
|---|
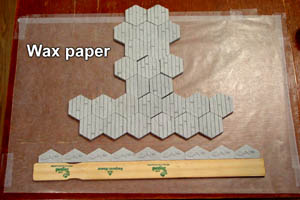
| 5. | Tape a piece of wax paper down to your work surface. This will keep you from gluing your tiles down to the table surface. For these floor tile sections we will not glue them down onto any type of base material. Instead, we will simply glue the tiles together edge to edge. These will be very strong once dry and we will line the bottoms of the floor sections with a thin layer of rubber to protect the table surface after they are painted. |
 |
|---|
| 6. | I'm using Aleene's tacky glue to glue the tiles together. Aleene's works well because it stays flexible after it dries. Do not use Elmer's wood glue because it will dry brittle and a slight jar will knock the tiles apart. I'm sure there are other types of glue that would work but you want to be sure that they stay flexible after they dry. Aleene's dries to a consistency of hard rubber. Put enough glue on the edge of each tile to cover well but not squeeze out of the cracks too much. |
 |
|---|
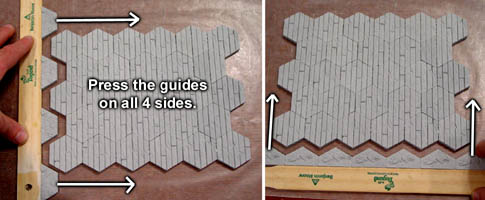
| 7. | After gluing all the edges of the tiles press the guides around all four sides of the board section. Be sure that the point to point sides (left photo) mesh perfectly with the guides. The flat to flat sides (right photo) are not as important and are pretty easy to get to line up. |
 |
|---|
| 8. | Many of the tiles will have to be done in two separate sections. This includes the "T" shaped floors and the "V" shaped floors because you can only use the guides effectively on the smaller sections. |
 |
|---|
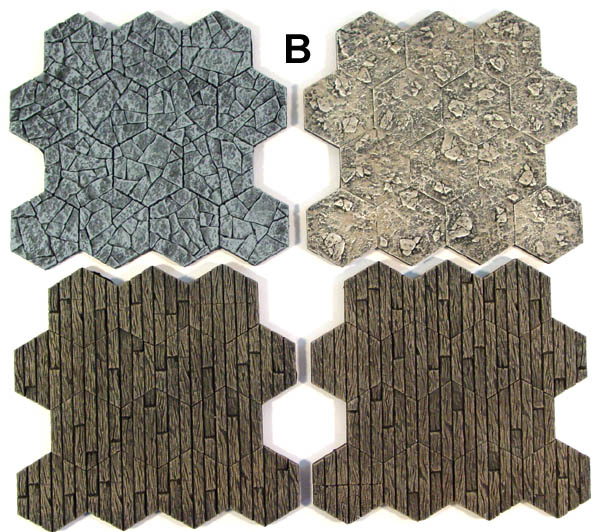
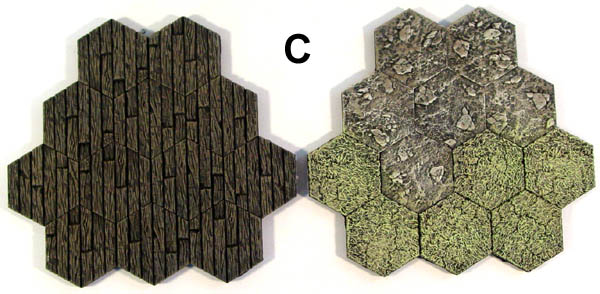
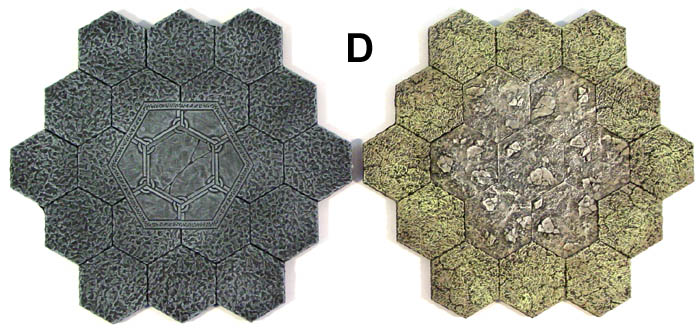
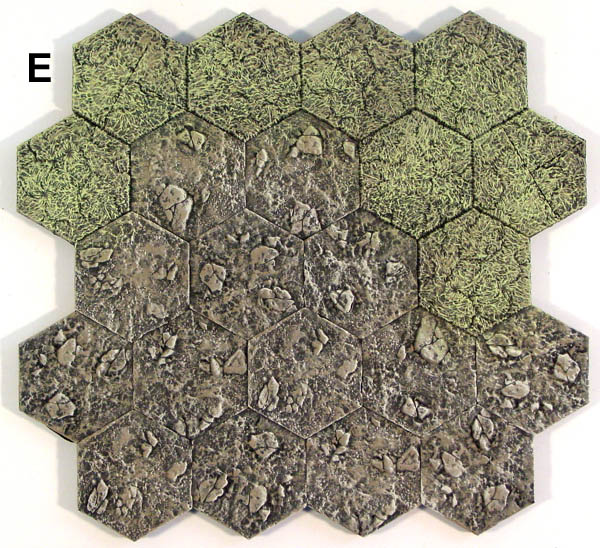
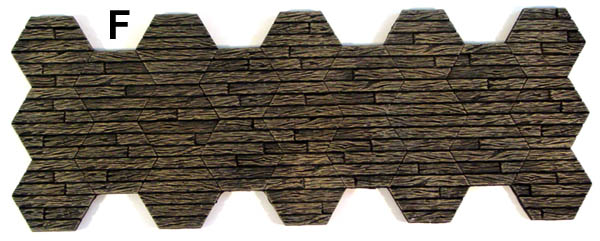
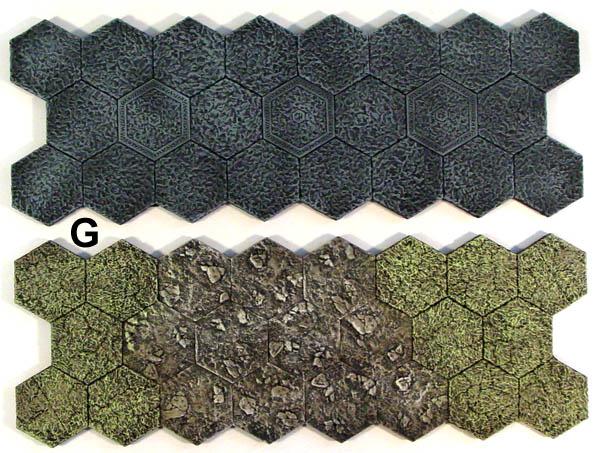
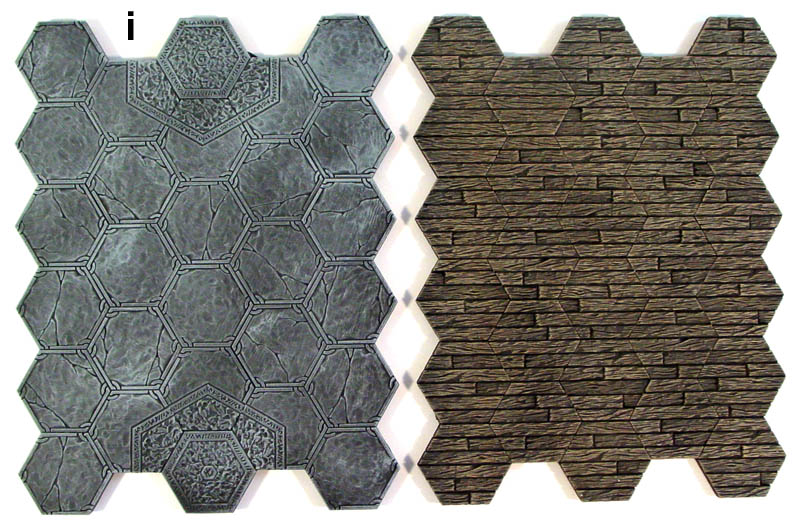
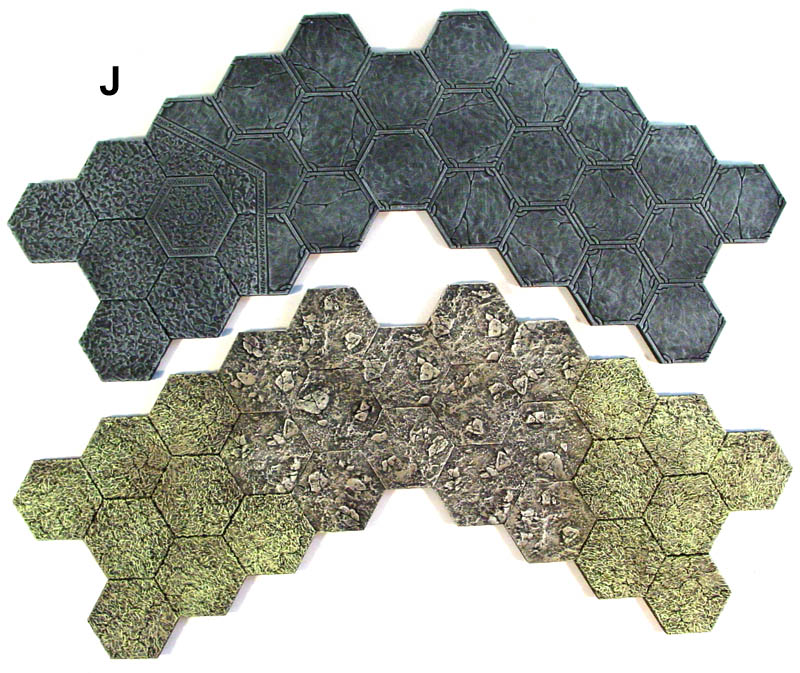
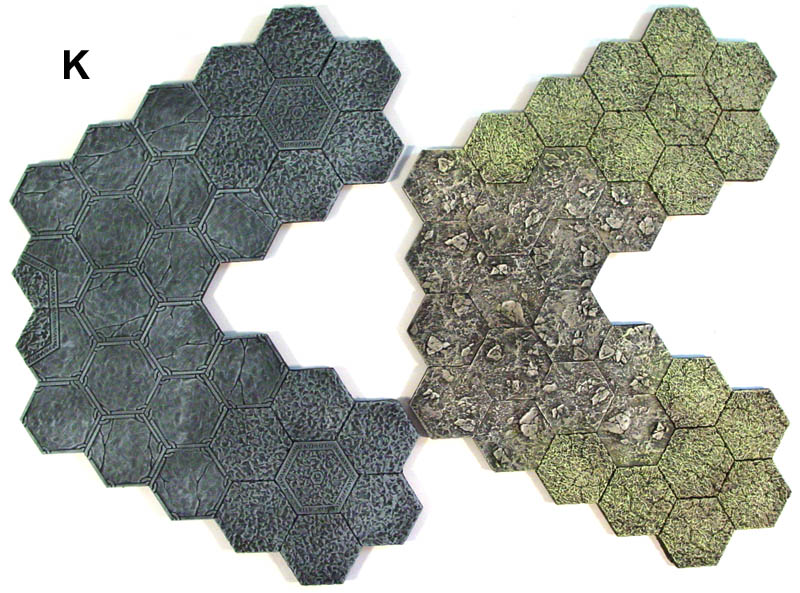
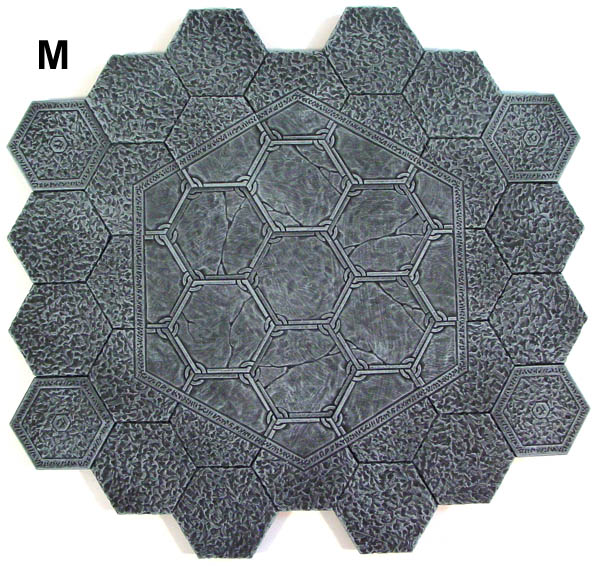
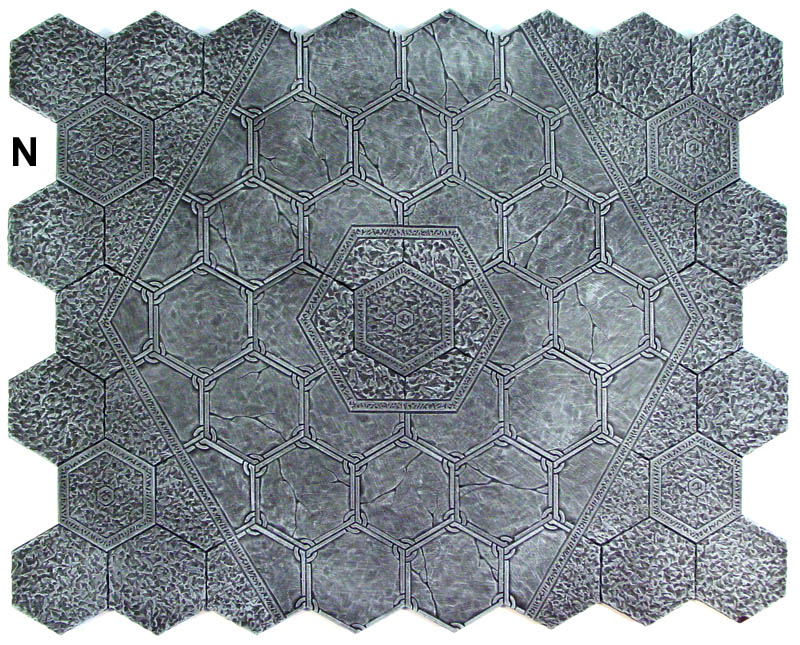
| 9. | Below are detailed photos of all of the board sections you will need to assemble. I have made all 30 floor sections that come with the original game so you can lay out every scenario in the book. Each of the floor tile shapes have a letter assigned to them. If the map calls for piece H1a, just pull out one of the "H" tiles and use it because all "H" sections have the same number of hexes and arrangement. Click on each photo to see a large detailed version of each section. If a photo has two or three variations, make one of each exactly as each photo shows. You should end up with 30 floor sections when you are all finished. | ||||||
|---|---|---|---|---|---|---|---|
 |
 |
 |
 |
 |
 |
 |
|
 |
 |
 |
 |
 |
 |
 |
|
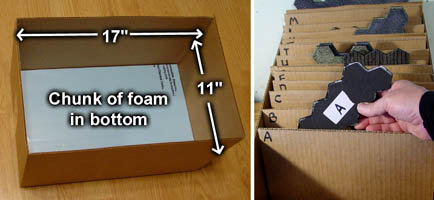
| 10. | To sort and store the floor tiles, I've taken an 11" x 17" box and placed a chunk of foam in the bottom of it to cushion the edges of the tiles. Then I've made cardboard dividers labeled with letters and filed each of the tiles accordingly. |
 |
|---|
Painting the Walls and Floors
Updated Grass Painting InstructionsI have added updated painting instructions for dirt rock and grass using ink washes. After reading over the instructions below, please look over this new painting method shown on the Outdoor Painting Instructions page. I believe that using ink washes will give you much nicer looking grass and this method is also fairly easy to do. |
 |
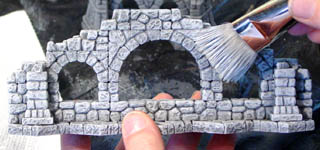
| 1. | Painting the WallsClick on the video to watch it on YouTube. This video shows the paint colors and method used to paint the walls and pillars. |
 |
|---|
| 2. | The video above will give you instructions on dry brushing but for more detailed instructions on painting, be sure to see the Painting Instructions page. This page will show what materials you will need and show step by step how to mix up the gray colors and paint them on. |
 |
|---|
| 3. | Painting the Stone FloorsClick on the video to watch it on YouTube. This video shows the paint colors and method used to paint the stone floors. |
 |
|---|
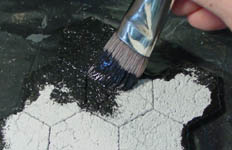
| 4. | All of the floor sections will be painted flat black.
You can either use flat black spray paint or thin down some flat black acrylic paint and completely cover the top and sides of the floor sections. If you use acrylic or latex paint, be careful because the water based paint will soften the glue on the floor tiles. |
 |
|---|
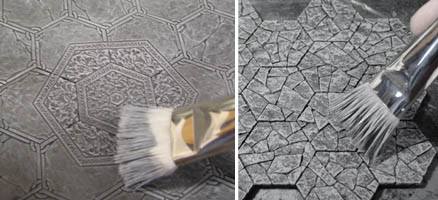
| 5. | For the stone floors I am only using two colors of paint. The flat black base coat and then a dry brush of the Castle Gray Medium color of paint. This color of paint is very lightly dry brushed over the black surface. For the rubble stone (right photo) you may have to dry brush a little more heavily. |
 |
|---|
| 6. | Don't forget to paint two each of the single hexes of every texture. We will need these to fill in under the doors and where floor sections connect. |
 |
|---|
| 7. | The color of the floors will be darker than the walls. I did this on purpose for several reasons. All of the other floors (wood and dirt) will be darker and I wanted the floors to be a similar shade. A two color paint job is faster to paint and the floors stand out nicely from the walls. If the walls and floors were the same color, I think it would all blend together too much. |
 |
|---|
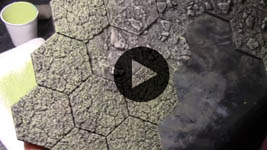
| 8. | Painting the Wood and Earth FloorsClick on the video to watch it on YouTube. This video shows the paint colors and method used to paint the wood grass and dirt floor sections. |
 |
|---|
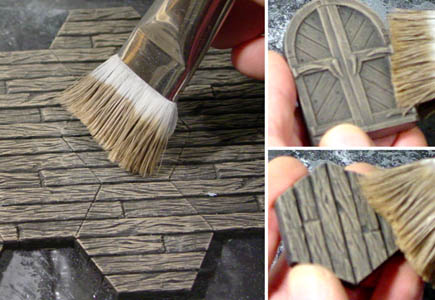
| 9. | The wooden floors are base coated flat black. Afterwards, they are dry brushed with dirt colored paint. When you place an order for molds, we can send you a color chip of this color that you can take to your local hardware store so they can mix you up a quart of this color in flat exterior latex house paint. Don't forget to paint the single tiles and wooden doors while you have the dirt colored paint on your brush already. |
 |
|---|
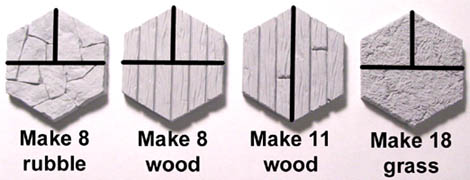
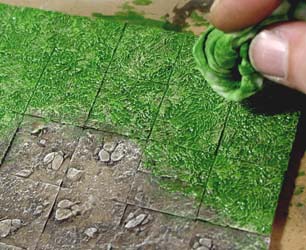
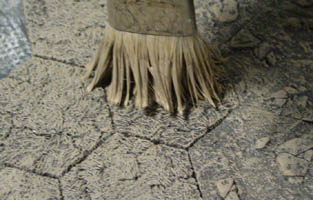
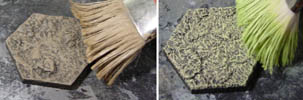
| 10. | The dirt, rock and grass tiles are also base coated in black. Afterwards they are heavily dry brushed with dirt colored paint, the same dirt color as used above on the wooden planks. Both dirt and grass tiles are dry brushed with this dirt color but apply the dirt color more heavily on the grass. Continue dry brushing the grass until there is no charcoal black showing in the cracks but you still have a variety of shades of brown color on the grass. |
 |
|---|
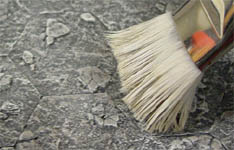
| 11. | The dirt and rock is dry brushed with the Earth Tone Light color which can be found on the Earth Tone Painting Instructions page. This is a light cream color of paint. You want to do this very lightly and keep your brush very dry, just hitting the tops of the stones and dirt. It won't matter if you paint over onto the grass a little. |
 |
|---|
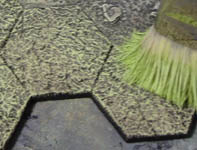
| 12. | The grass will be dry brushed using the same Earth Tone Light color, but add a bit of yellow to it so it looks more like dead grass. You can also add a little green but keep the green to a minimum. Dry brush this color on top of the grass. You can do this more heavily than you did with the rocks. You can overlap the dirt a little without it looking odd. |
 |
|---|
| 13. | Once again, don't forget to paint the small individual hexes while you have the paint on the brush. I painted two of the dirt hexes and two of the grass hexes. |
 |
|---|
| 14. | Assemble and paint four copies of each type of door. Also paint up at least 2 copies of each type of floor tile. It's probably a good idea to paint up a few more of each floor tile. |
 |
|---|
Adding a Rubber Backing
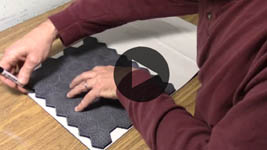
| 1. | Click on the video to watch it on YouTube. This video shows how to add a neoprene rubber backing to the bottom of the floors and walls. It also shows how a few places on the floor sections need trimming, and also shows how to store and sort the floor sections. |
 |
|---|
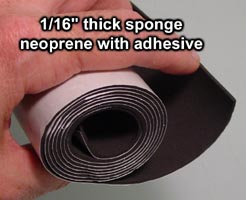
| 2. | I chose to mount everything on self-adhesive black foam. The foam I used was 1/16" thick and had a white backing that you peel off. To find this foam, you will need to do a search for "sponge neoprene with adhesive" and you should be able to find it on Amazon, Ebay or Google. The rolls I purchased were 12" wide x 54" long x 1/16" thick and I needed three of these rolls to have enough rubber to cover all of the floor sections, walls and single tiles. |
 |
|---|
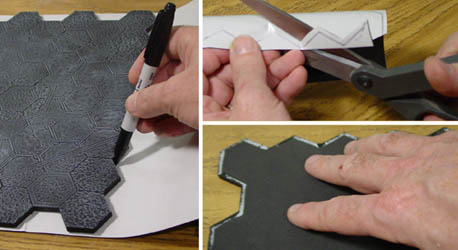
| 3. | Unroll the rubber and lay it rubber side down on the table. Start with the largest floor sections and lay them painted side up on top of the white backing. Use a medium tipped black magic marker to draw around the outside edge of the tiles. Use a pair of scissors to trim around the outside. Be sure to trim off an extra 1/4" all around. You don't want any extra rubber sticking out around the outside but it's okay if the rubber is a little short. |
 |
|---|
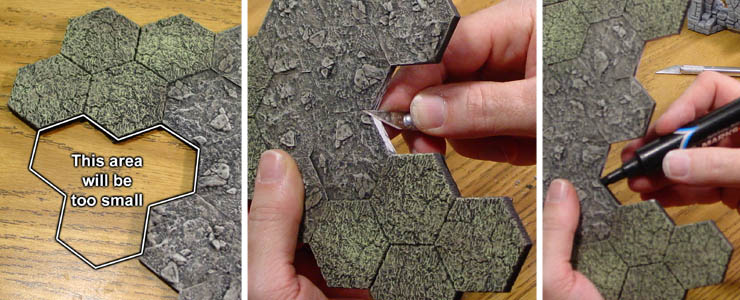
| 4. | Trimming the PiecesYou will need to trim pieces "H" and "K". Each of these pieces has an interior group of three hexes that will be too small to fit three pillars into. This happens because the hexes are an exact size and painting the pieces adds thickness. However, this is easy to fix. Take a hobby knife to trim off the paint and enlarge the holes. Then test fit pieces around it to make sure that you can fit any configuration of walls inside of these spaces easily. After you trim them out to your satisfaction, color the bare edges using a black magic marker. |
|---|---|
 |
Making Custom Walls
| 1. | 
F-type WallsThese wall types span from flat to flat across the hex. There are 1/2" wide walls centered onto the hexes. If you want to expand your set beyond what is shown in these instructions, it will be easy to use any type of wall style for these walls such as rubble stone, half-timber and stucco. However, if you do create new walls for the set, it's important to not make the walls go up too high. If the walls are too tall, you will not be able to see the figures or markers on the game board to play the game. |
|---|---|
 |
| 2. | 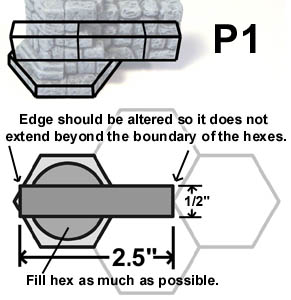
P-type WallsThese wall types span from point to point across the hex. There are 1/2" wide walls centered onto the hexes. You want to be sure that these walls do not extend past the boundaries of their hex. If they do, then you will not be able to place a pillar in the hex adjacent to it. You will notice that the smallest wall section is just a bit too long and extends past the hex on the left side (photo on the left). You can fix this by chipping away at the wall corners until it fits in the hex. You also want to fill in the end hexes as much as possible. You can do this by adding a column, buttress or pieces of rubble to fill in the space. This is not absolutely necessary but it will give the illusion that all of your walls connect. |
|---|---|
 |
| 3. | PillarsPillars fill the entire hex You can pretty much use anything you want to completely fill a hex but I have made mold #702 especially for this purpose. Pillars are extremely useful for filling up all of those odd places where the other wall sections just don't fit well. You can even completely surround a room using pillars alone. I have included a lot of these in this set especially for that reason. |
 |
|---|
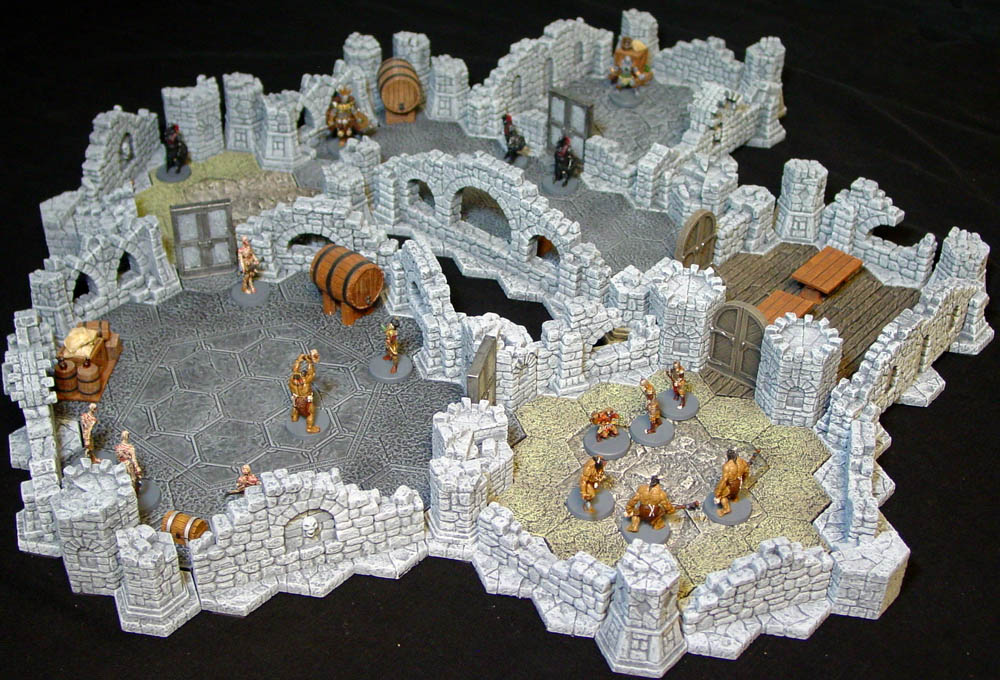
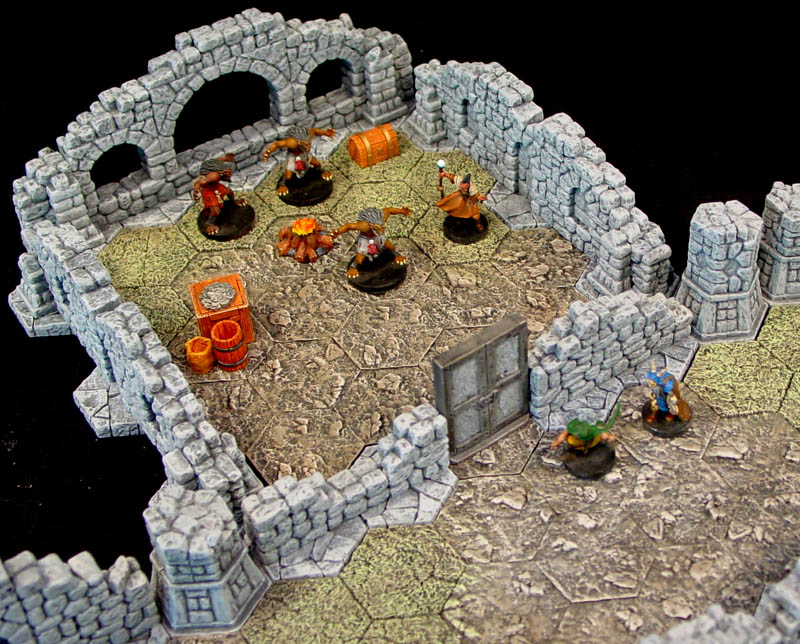
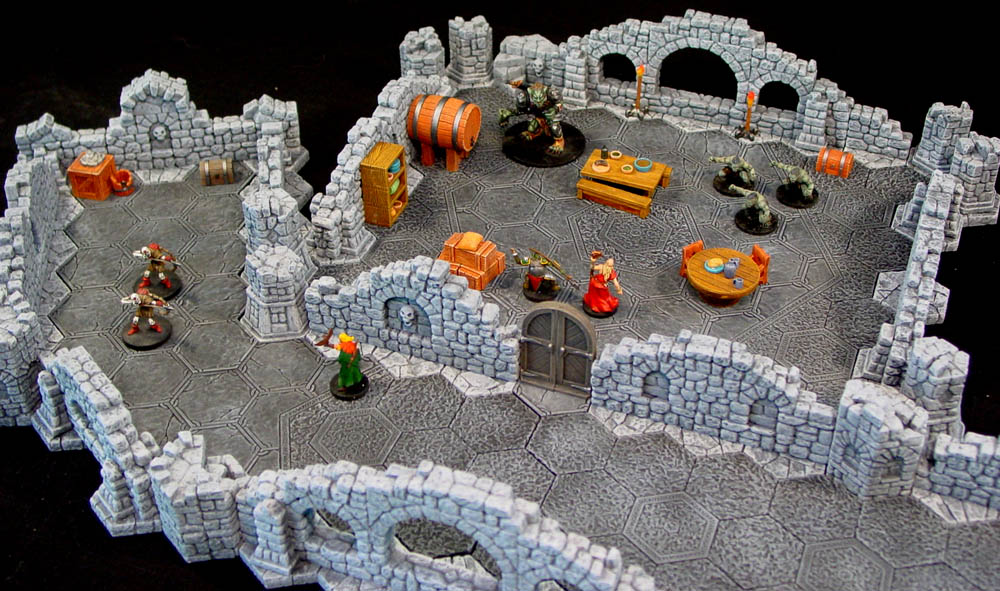
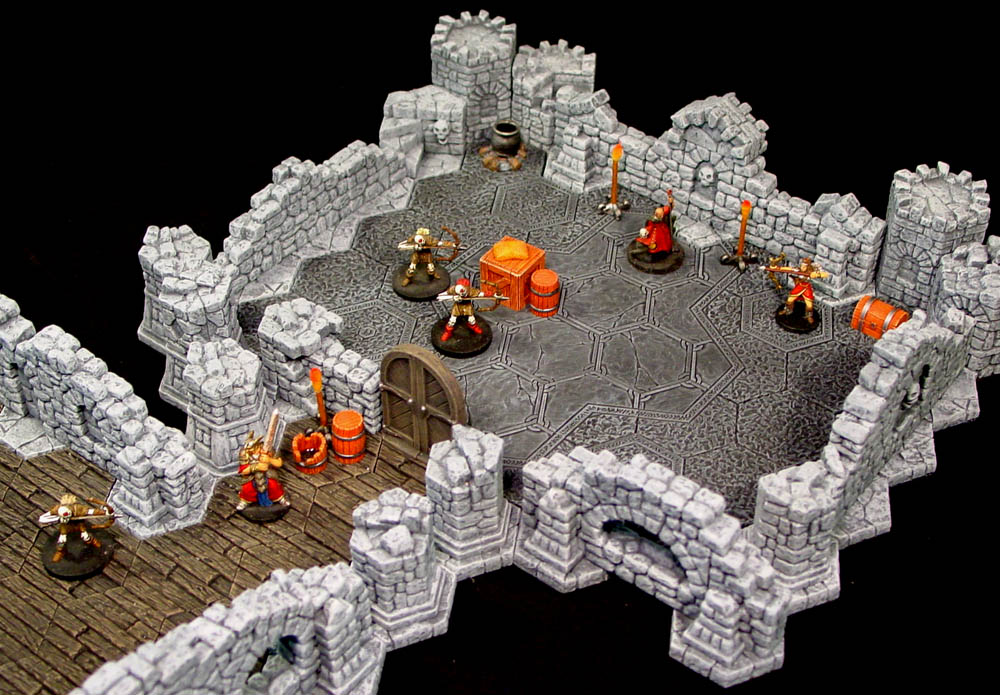
Finished Photos
Click on the photos to see a larger view.
The miniatures shown here are from the Descent game by Fantasy Flight Games. I could have used miniatures from the Gloomhaven game but I did not want to show any spoilers about the locked characters. The other accessories you see scattered around are from molds #85, #58 and #59.
 |
 |
 |
 |