Detailed Dungeon Pieces Page 3
 |
 Corner Rail Room |
 Up Level Room |
 Stair Section |
 Skull Bridge |
 Grate Hallway |
 |
Corner Rail Room
| 1. | You will need these decorative pieces. From mold #70 1 skull, 4 small, 2 medium and 2 large arches. From mold #80 4 twist stands, 3 square teeth, 3 square rail blocks, 1 claw foot and 6 rail sections. From mold #71 2 curved step pieces, 2 step sections and 8 recessed arch pieces. |
 |
|---|
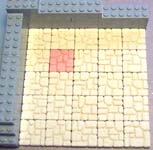
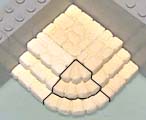
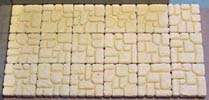
| 2. | Glue a 5 x 5 grid of tiles down to a piece of cereal box. Do not glue the tile shown in red! After the floor is dry, remove the tile and sand down the sides a little. You want it to fit loosely so it can be removed easily after it is painted. |
 |
 |
|---|
| 3. | Glue these pieces to form the back wall. Please note that the 3" pieces go behind to form the back corner. You don't have to use the exact same pieces I did. As long as they add up to the same length then everything will work out fine. |
 |
|---|
| 4. | Add the remaining pieces shown on the photo. The bottom front is finished using the claw foot and a skull. Glue together halves of the twisty posts to make 2 complete posts. Sand the sharp bottom edge off of 2 step sections so they will set flat on the floor. Make a square base by gluing 2 regular blocks with 1 square flat tile on top. |
 |
  
|
|---|
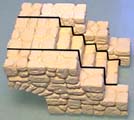
| 5. | Take the square base you just glued and glue the 2 sanded step pieces onto the sides. Glue the curved step pieces onto the gap in the front to complete the step section. |
 |
 |
|---|
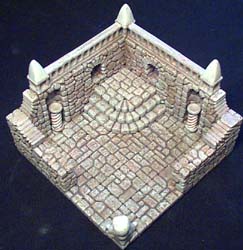
| 6. | Paint the twisty posts and steps separately. After the room is painted, glue the twisty posts down but leave the steps loose. They can be removed to reveal the secret passage under the stairs. |
 |
 |
|---|
Up Level Room
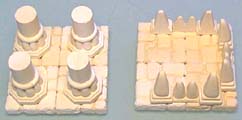
| 1. | 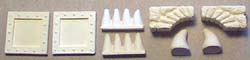 You don't need very many decorative pieces for this room. From mold #70 you need 2 medium arches. From mold #80 you need 2 steel plates, 2 spike sets and 2 teeth. Start with a 5 x 5 grid of floor tiles glued to a cereal box. Glue the steel plates back-to-back. Glue down the blocks as shown on the photo. Glue the teeth on top of the doorway back-to-back. They don't line up exactly, so match up the teeth as best you can. |
 |
|---|
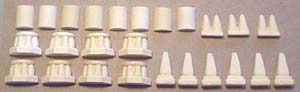
| 2. | To make the stand that goes in front of the doorway, you will need the following pieces. From mold #71, 8 short column pieces. From mold #80, 8 column bases, 6 large spikes and 3 small spike sets. |
 |
|---|
| 3. | Glue together two platforms made of 4 tiles each. Add the pieces onto flat tiles, but don't glue the 2 halves together yet! You'll want to paint them first, then glue them together. |
 |
|---|
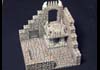
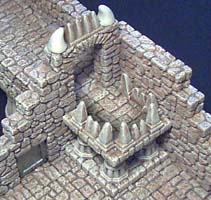
| 4. | Here's the final photo with the stand. Don't glue it into the room. The stand can be a protected or forbidden area of the dungeon. It can also be a place for monsters to pop out and fire at your characters. You can also add a stairway (instructions below) to lead your characters to an upper level. |
 |
 |
|---|
Stair Section
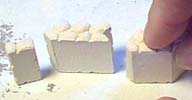
| 1. | This is how to make a stair section. The width of the stairs should be thinner than normal so it can fit into any hallway or room. To do this, you have to sand the sides of 2 step pieces and a flat tile as shown. Also, sand the sharp corner off the bottom step. Glue these together. |
 |
 |
|---|
| 2. | For the sides of the stairs, glue the pieces shown. Make 2 of these sides. Glue the sides onto the stairs. |
 |
 |
|---|
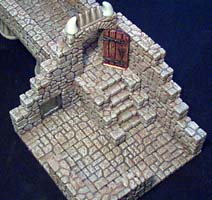
| 3. | Here are the steps placed in front of the doorway. Don't glue them down! It's important to sand the steps thinner when making them so they can easily fit in any hallway section (second photo). |
 |
 |
|---|
Skull Bridge
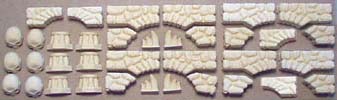
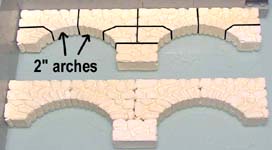
| 1. | You will need these decorative pieces. From mold #70 4 medium arch pieces and 6 skulls. From mold #80 6 column bases and 4 teeth sets. From mold #71 four complete 2" arches. |
 |
|---|
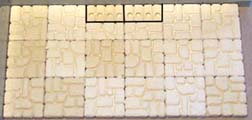
| 2. | Lay out a 3 x 6 grid of floor tiles and glue them down to a piece of cereal box. Let it dry completely. This will be the floor of the bridge. |
 |
|---|
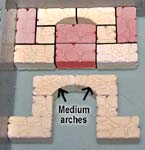
| 3. | Create two long sides of the bridge using the four 2" arches. Add a 1" block to the bottom middle of the arch pieces. The ends of the bridge use the medium sized arches. Do not glue the pieces shown in red! They are used to help you line things up. Make 2 of these ends. |
 |
 |
|---|
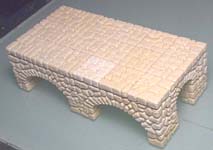
| 4. | Glue the sides together and glue the flat tiles on top. Next, glue 1 row of stone on each side for the bridge railing. |
 |
 |
|---|
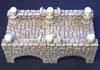
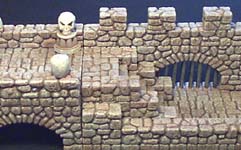
| 5. | The last step is to add the pillar bases, skulls and teeth sets onto the top railing. When painting, I used a cream color for the skulls, teeth and parts of the pillar bases. Feel free to make the bridge as long as you want. You could also make a right-angle bridge just as easily. Tiles left out or hinged downward could make interesting traps for the bridge. |
 |
|---|
Grate Hallway
| 1. | The only extra pieces you need for this room are the 2" arch and 2 grate builder blocks from mold #71. |
 |
|---|
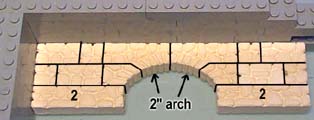
| 2. | You'll start with a 3 x 6 grid of tiles with a few exceptions. Notice that on the top middle you have the 2 grate builder blocks and two 1/2" tiles to make it work out evenly. Glue these down to a piece of cereal box. |
 |
|---|
| 3. | Lay out and glue these pieces to form the back wall. Let it dry completely before you go onto the next step. You will need to use it as a guide. |
 |
|---|
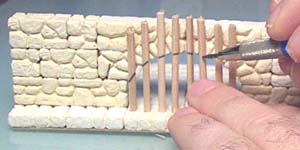
| 4. | For the bars, you will need to use match sticks, kabob skewers, dowel rods or plastic model sprues. Don't glue them in, just set them in the holes as far as they will go. Place the back wall on top of the floor tiles as a guide. Use a pencil and mark each of the pieces just a little shorter than you need. |
 |
|---|
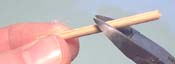
| 5. | Cut the pieces to length using wire cutters or a hobby knife. Glue them in the holes and also place a dot of glue on the tops. Glue the wall section on top of the floor tiles. Glue the remaining pieces onto the hallway. |
|
 |
|---|
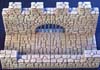
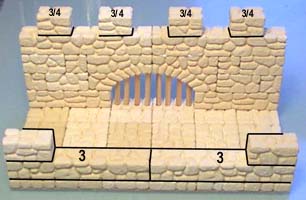
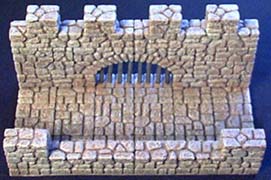
| 6. | Here is the completed hallway section. After the stone was painted, I gave the bars a coat of black paint. Then I dry-brushed silver on top. |
 |
|---|