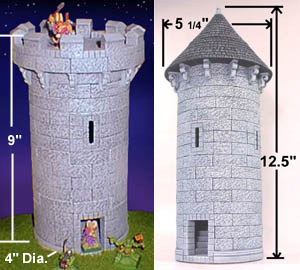
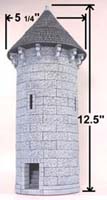
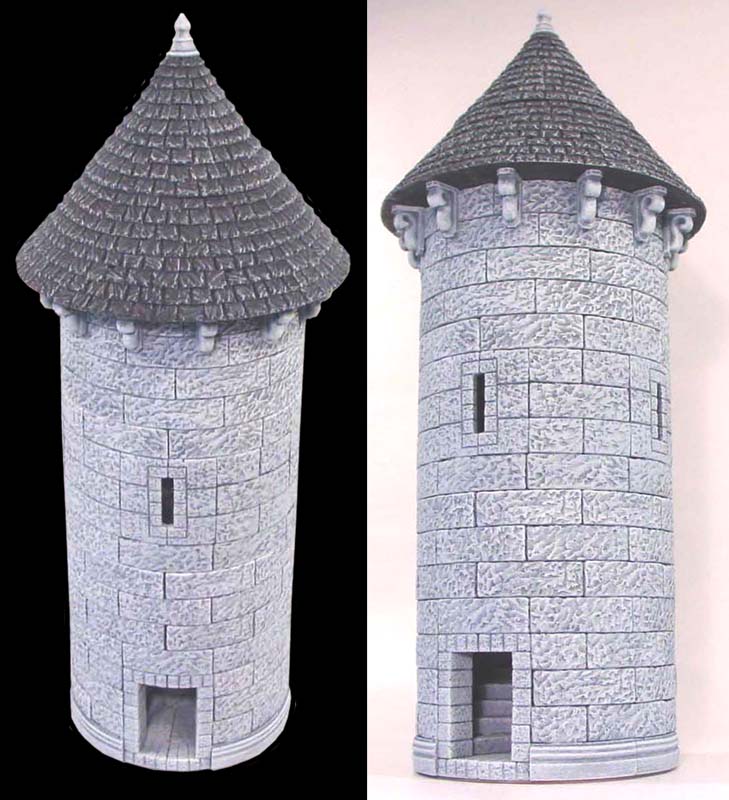
The Circular Tower |
|
Building Instructions
You will use mold #52 and will need to fill this mold 20 times to have enough blocks to build the circular tower. Be sure the blocks are completely dry before gluing them together. For detailed instructions on pouring the blocks, see the Casting Instructions Page. To get a copy of the printed plans, you can download them from the Building Plans Page and print them out yourself.
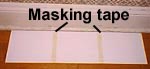
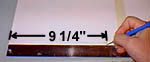
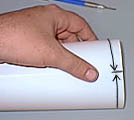
| 1. | We'll start by making a circular form to build around. Take 3 sheets of typing paper and line them up end to end in a perfectly straight line. I used my wall at home to help. Tape them together as shown. Measure 9 1/4" from one end and put a mark. Roll up the paper (starting from the unmarked end) and match the line you've drawn to the edge of the paper. This will form a fairly exact 3" diameter circle. |
|
 |
|---|
| 2. |
One of my customers had suggested using a Pringles can for the core. You will have to cut the metal rim off the bottom before you can use it. I tried this and it works excellent! If you can get a Pringles can I would strongly suggest it. |
 |
|---|
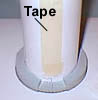 This roll of paper is used to hold the inside diameter of the tower while you build it. You simply stack the blocks around it and they will line up much more straight.
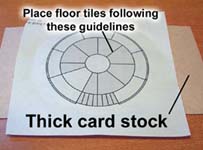
| 3. | Glue the floor plan down to a piece of thick card stock or cereal box. You can download the plans from the Building Plans Page and print them out yourself. Glue down the floor tiles to the plan. Be sure you follow the guidelines shown in the gray area. |
 |
 |
|---|
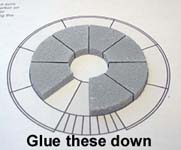
| 4. |
Glue these together then remove them from the base. We need to use them separately to build the circular staircase. Make 8 of these. |
 |
|---|
 Now we will make the circular stair pieces. Start by placing a round block in the center and adding the 2 step blocks shown. The top step overlaps the bottom ones half way.
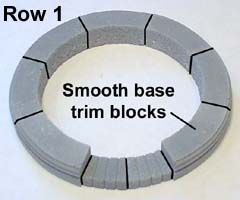
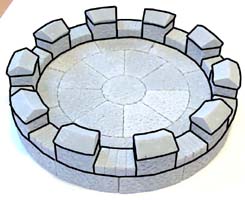
| 5. | Glue this ring of smooth base blocks together along with the thin blocks in front of the door. Then place a Pringles can or roll of paper in the center and continue to build around it. The short rounded blocks go on each side of the doorway and the rest are regular blocks. |
 |
 |
|---|
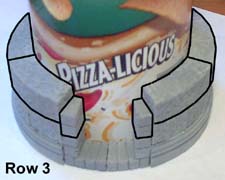
| 6. | Here is Row 3 and 4. For a printed plan showing where every block will go, visit the Building Plans Page. Be sure to occasionally remove the Pringles can in the center to be sure you have not accidentally glued blocks to it. |
 |
 |
|---|
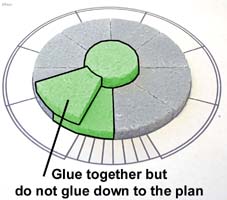
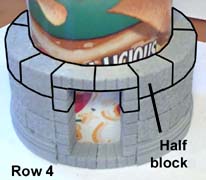
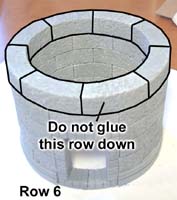
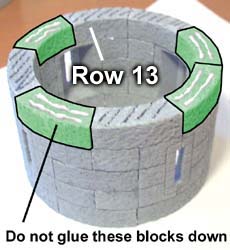
| 7. | Glue this row down and leave out the 2 blocks shown. We want the tower to come apart so I marked the top of this row with a marker to remind me not to glue here. Place the blocks shown in green down but do not glue them. Then, place glue on top of these blocks only. |
 |
 |
|---|
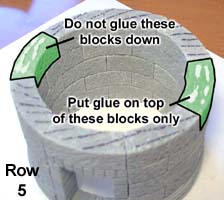
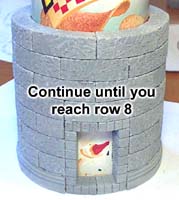
| 8. | Do not glue the next row down but do glue the blocks to each other end-to-end. The two loose blocks underneath will stick themselves to the bottom of this row. Continue to glue the next few rows on until you finish row 8. |
 |
 |
|---|
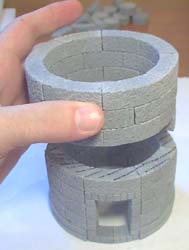
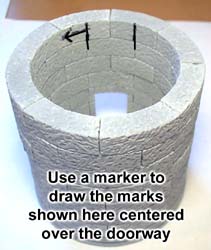
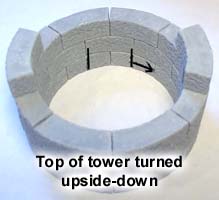
| 9. | When you've finished and the glue is dry, you'll notice that the tower will come apart in the middle. We need it to come apart so we can paint the inside and add the stairs. Turn the tower around and look at it from the back side. Do you see the doorway at the bottom? Take a magic marker and draw these marks on it as I have done. Be sure they are centered over the doorway. Draw the arrow as well. |
 |
 |
|---|
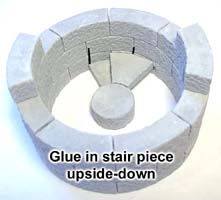
| 10. | These marks will help us put the circular stairway in the right place. Pull off the tower top and place it upside down on the table. Now glue a stair piece in the position shown. Be sure it is also upside down and the floor tile touching the table surface is placed between the marks. |
 |
 |
|---|
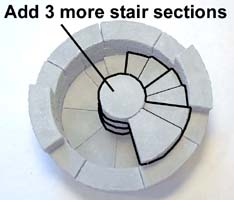
| 11. | Glue in 4 floor tiles face down around the left of the stair piece. Now add 3 more stair sections on top of the first. Make sure that each additional section halfway overlaps the floor tile under it. You can use the block seams on the inside of the tower as a guide. |
 |
 |
|---|
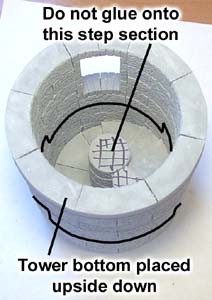
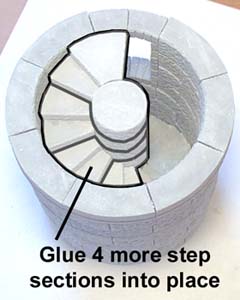
| 12. | To continue this, place the tower bottom into place (upside down as well). I've marked the stairway section with a marker to remind me not to glue the next set of stairs onto this one. If you glue the stairs together here, then the tower will not come apart again. Now continue gluing 4 more step sections onto the inside of the tower. The final step should be halfway in front of the door. |
 |
 |
|---|
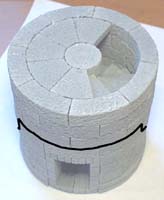
| 13. | If you have trouble getting the stairs to reach from the top to the bottom (they seem a little short), it's probably because the stairs have leaned or sagged inside the tower. To remedy this, you may have to hold them in place by hand while they're drying to keep them from sagging. When the glue dries, flip the tower right-side-up. The stairs should now go around from the bottom to the top as you see it here. The tower should also come apart in the center where the black line on the photo is. |
 |
|---|
| 14. | No matter how carefully I design the blocks, sometimes there's one little thing you have to fix. The arrow slit for the curved tower is about the most difficult piece I've ever carved. After all my calculations, it's still 4/1000's of an inch too wide. Take that measurement times 8 arrow slit blocks, and the tower will bulge 1/16th of an inch on one side. To remedy this, sand a little off the arrow slits as shown and test fit the blocks together before you glue them. |
 |
|---|
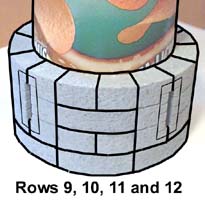
| 15. | Now we will continue the tower. There is no need to continue building on top of the existing tower. Instead we'll start building the next rows from the table so the bottom will be nice and flat. With the Pringles can back in the center, here are what rows 9, 10, 11 and 12 look like. You'll notice that we're putting the arrow slits around. Compare how the arrow slits fit on top of the first row of blocks that has no arrow slits on it. If the rows with the arrow slits bulge out, then you need to sand a little more off of them. |
 |
|---|
| 16. | Glue this row down and leave out the blocks shown. We want the tower to come apart so I marked the top of this row with a marker to remind me not to glue here. Place the blocks shown in green but do not glue them down. Then, place glue on top of these blocks only. |
 |
 |
|---|
Do not follow the rest of these instructions, but instead skip down to the Adding a Conical Roof instructions below. |
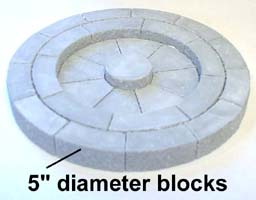
| 17. | Do not glue the next row down but do glue the blocks to each other end-to-end. The loose blocks underneath will stick themselves to the bottom of this row. Continue to glue the next few rows on until you finish with row 15. This finishes the main part of the tower. |
 |
|---|
| 18. | Glue the blocks shown upside down to make the tower top. When dry, flip it over and glue on the blocks shown to finish the top. |
 |
 |
|---|
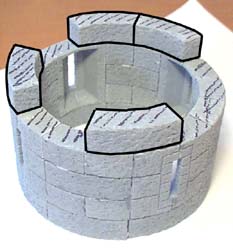
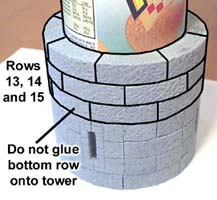
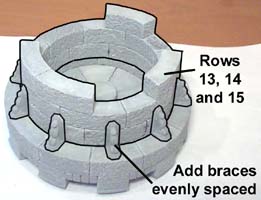
| 19. | Let the top dry completely, then turn it upside down and glue on the last tower section that you had made. This is the section that includes rows 13, 14 and 15. Once this section is glued on, add the decorative braces around the outside edge evenly spaced out. I centered a brace under each decorative crenellation piece. The building of the tower is finished! |
 |
|---|
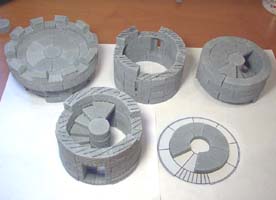
| 20. | Here are all five pieces ready for painting. Do not glue these pieces together until after you have painted them. These separate pieces will allow you to paint the inside more easily. Even in separate pieces the circular stairway is a little hard to reach. |
 |
|---|
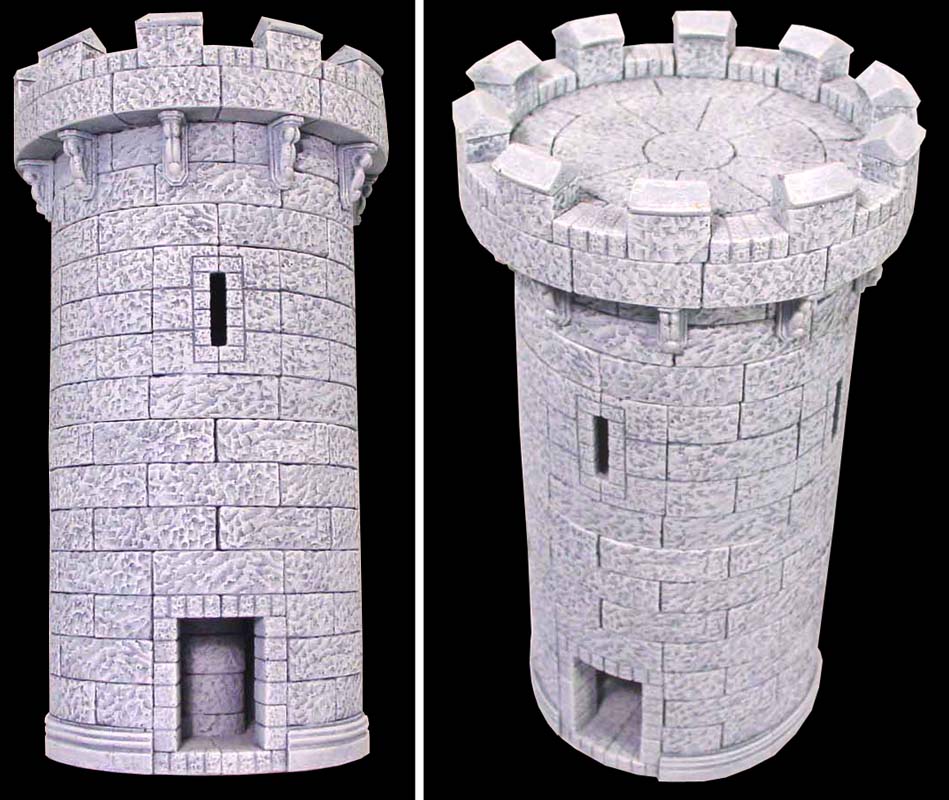
| 21. | For complete painting instructions, visit the Painting Instructions page. These are photos of the completed tower. Click on them for a larger view. |
 |
|---|
Adding a Conical Roof
| 1. | To add a conical roof to your tower, you will need to use mold #87. You will have to cast this mold 4 times to build the conical roof. Start by following the building instructions shown above. Follow this until you reach step 16. After you stop there, come back down to these instructions to finish the top of the tower. |
 |
|---|
| 2. | Continue the very top of the tower by gluing together rows 14, 15, 16 and 17. You may end up running out of regular wall blocks by this point. If this happens, just fill in with half blocks instead. To finish row 13, place blocks onto the existing tower but do not glue these down! Place a bead of glue on top of these blocks. |
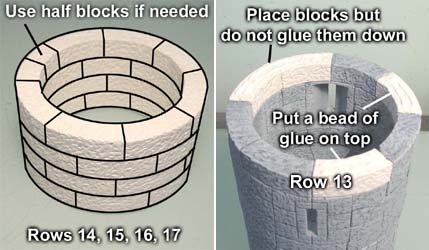 |
|---|
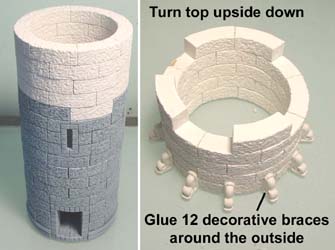
| 3. | With the bead of glue on the white blocks only, set rows 14-17 on top of the tower and let this dry completely. When dry, flip the tower top upside down and glue 12 decorative supports around the top of the tower. Evenly space these around the tower like you would numbers on a clock. The supports I used are from mold #87 but you could also use the decorative supports found on the tower mold #52 if you liked them better. |
 |
|---|
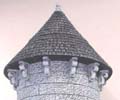
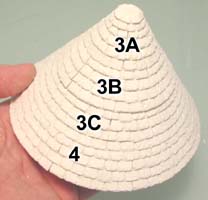
| 4. | Next assemble the roof. You can find instructions on the Conical Roof Building Instructions page. You will need 4 castings of mold #87 to build this roof. You will notice that I have not glued on the top decoration yet. Since the top spike is the same color as the stone tower, I will paint it separately and then glue it on after everything is painted. |
 |
|---|
| 5. | After painting all the pieces, glue the roof to the top of the tower. The roof will be permanently attached to the tower top but the tower top will lift off of the rest of the tower so you can see inside. For instructions and colors used to paint the tower, refer to the Painting Instructions page. For instructions on painting the wood shingle roof, visit our Conical Roof Painting Instructions page. Click on the photos for a larger view of the tower. |
 |
|---|
Using Connector Blocks
| 1. | The connector brick looks like this. It's especially made to connect your circular tower to straight walls. I haven't had time to make a model showing every possible way to use the brick, so I'm going to show diagrams of how you can use it. |
 |
|---|
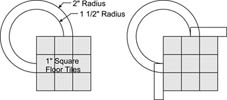
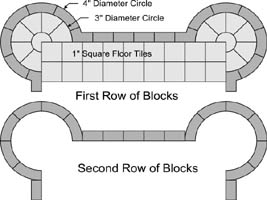
| 2. | This shows a layout using the circular towers on the corners. You can lay this out easily on regular graph paper. Start by drawing 1" square floor tiles (don't put the outside walls on yet). Then set your compass at 1 1/2" and draw a circle using the corner of your floor as the center point. Now draw another circle with your compass set at 2" (same center point). This represents your curved wall section. Now draw the straight outside wall around your floor tiles. |
 |
|---|
| 3. | Now you can use your graph paper to draw in the blocks that represent the wall. For the first row we'll use the connector blocks. On the second row, we'll use only the curved tower blocks and straight blocks. You can see that I've alternated the blocks so they overlap each other. It lines up nice and straight. If you wanted your towers completely round with a circular staircase inside, simply add a few more curved blocks to close off the inside (except for your doorway). |
 |
|---|
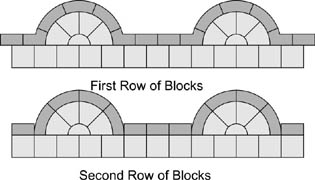
| 4. | This example shows using the connector blocks to add curved walls onto a flat one. Once again, you can continue the circle all the way around if you want a circular staircase, or you can leave it empty to add interest to a flat wall. Circular walls can also be used for balconies, especially with the decorative braces along the bottom and finishing caps on the top. Experiment with the blocks and see how they stack up. You'll find a lot of interesting uses for the curved sections. |
 |
|---|