Basic Brick Dungeon
For this set, you will need to cast the #207 rock slab floor tile mold 10 times and the #343 underground brick mold 12 times. After you complete these basic sections, feel free to make your own custom pieces any size you want. The beauty of casting pieces is that you can always make more and build whatever you want. Click on the photo for a larger view. |
 |
The Finished Brick Dungeon This video shows what the dungeon pieces will look like which may help you to decide if you want to attempt this project. |
 |
Casting Tips
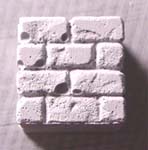
| 1. | These steps show helpful tips on casting blocks from mold #343. This is an extreme example of some of the problems you can have with casting this brick texture. This casting was done without any surfactant and without washing the mold before using it the first time. This texture is not very deep but there are still many tiny steep angled edges that the plaster must flow into to get a good casting. |
 |
|---|
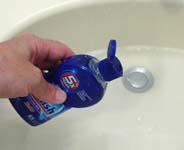
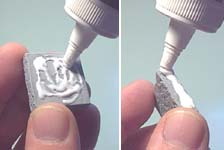
| 2. | Before your first casting, fill a sink with a couple inches of water and put one small squirt of Jet Dry into the water afterwards. Jet Dry is a rinse agent used in an automatic dish washer to help get rid of spots on your drinking glasses. It breaks the surface tension of the water so that water (and plaster) can flow into all the cracks. Do not use ordinary dish soap! It will cause more bubbles than it gets rid of. |
 |
|---|
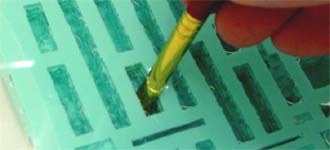
| 3. | Next, submerge the mold in the water. Then use a small stiff bristled brush to work the air bubbles out of all corners of each block. I would have used a toothbrush for this but a toothbrush is just too large to fit down into the pockets of the mold. For the best casting results, follow the Advanced Casting Instructions by using a surfactant and a vibrating table. |
 |
|---|
Building Tips
This section will cover the types of blocks that are on mold #343 and suggestions on how to use them.
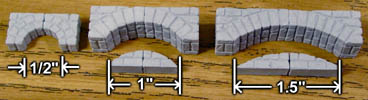
| 1. | The smallest arch is only 1/4" thick and is a half circle. The other two arches are 1/2" thick and have lower sloping arches. This mold also has arch fillers so you can make recessed arches in the walls. |
 |
|---|
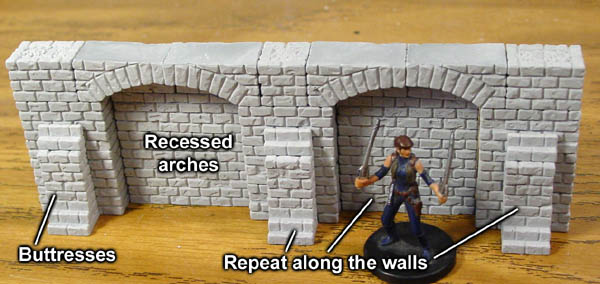
| 2. | The main design of the dungeon will be to alternate recessed arches and buttresses. These simple elements will help your plain walls look great. |
 |
|---|
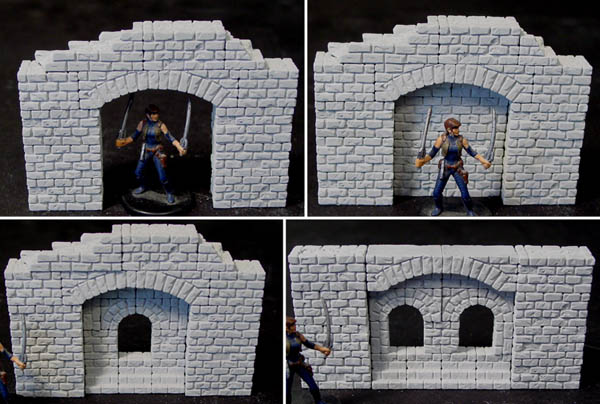
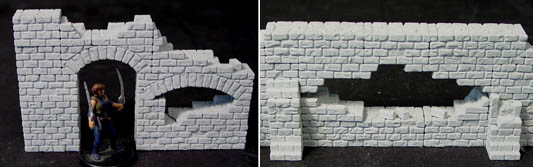
| 3. | Here are some examples using the largest arches (1.5" wide). This arch can be left open or the back can be filled in with a thinner wall. This arch can also be filled in with the smaller window. The footer blocks can be used under the windows. |
 |
|---|
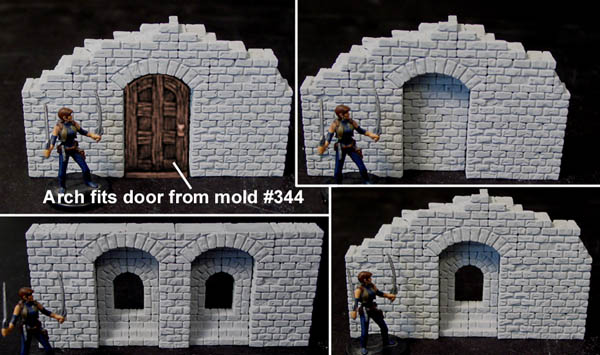
| 4. | Here is how the 1" wide arches can be used. The door shown here is from mold #344. |
 |
|---|
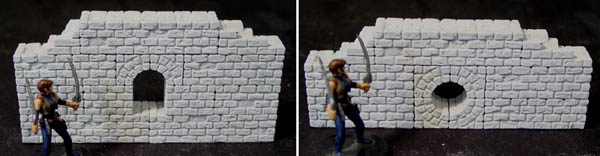
| 5. | The small arches can be doubled up to make a thicker arch or a round hole in the wall. |
 |
|---|
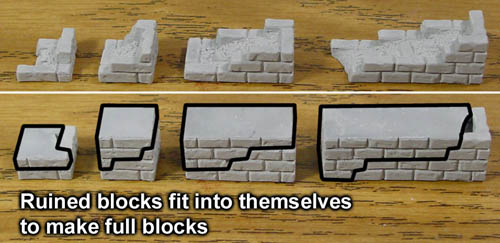
| 6. | This photo shows the four sizes of ruined blocks. Identical block can be flipped over and can stack onto a copy of itself to make a full building block. This is also handy for making a building whose top level can lift off and the lower level can look like a ruin when you do. |
 |
|---|
| 7. | Not only can the ruined blocks be used to decorate the tops of walls, they can also be used under arches or be flipped upside down to make parts of a destroyed wall. |
 |
|---|
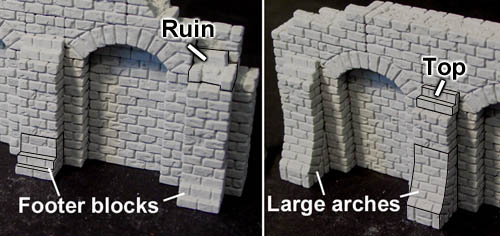
| 8. | Footer blocks are used to finish the bottoms of the buttresses but large arches can be used as well. The top of the buttress can be capped with a top block or one of the smaller ruined blocks. |
 |
|---|
Basic Set Pieces
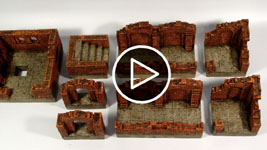
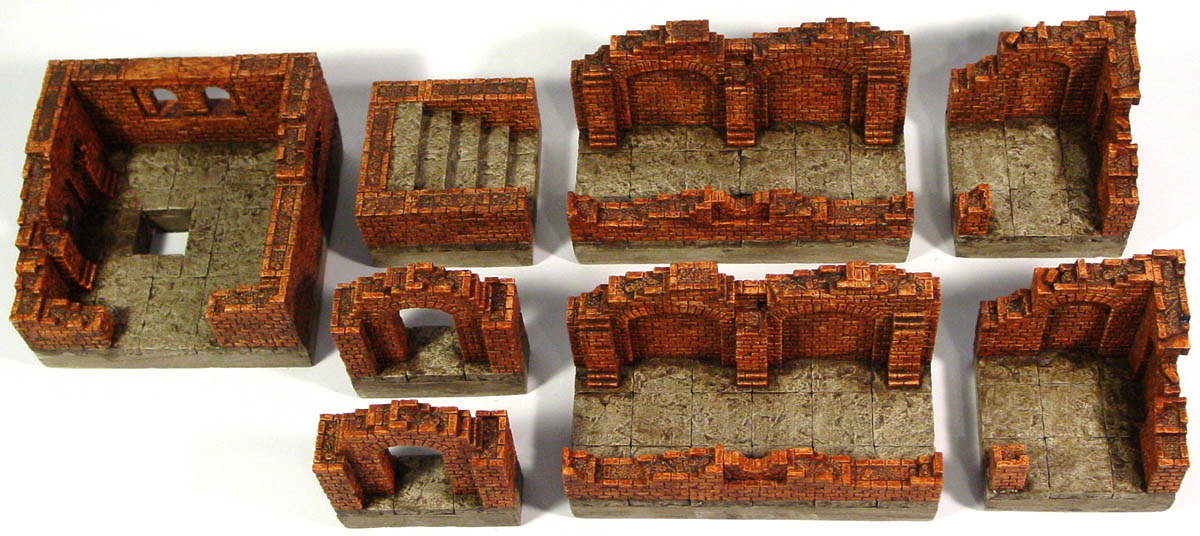
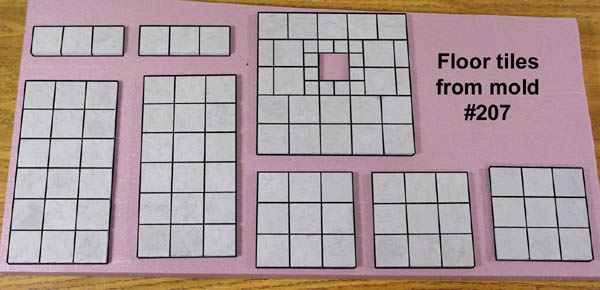
| 1. | This photo shows all of the pieces we will make in this basic set. Click on the photo for a larger view. |
 |
|---|
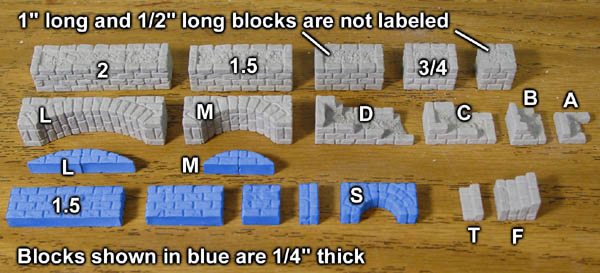
| 2. | This key shows how the blocks are labeled. Blocks shown in blue are 1/4" thick. 1" and 1/2" long blocks are not labeled. |
 |
|---|
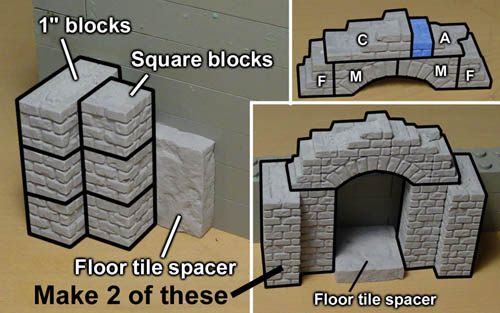
| 3. | Glue together a stack of three 1" long blocks and a stack of three square blocks. Glue these two stacks together with a 1/4" floor tile as a spacer. Make 4 of these stacks. Glue together 2 doorway tops as shown in the upper right. Then glue the whole doorway together, placing a floor tile in between to make sure there is a 1" space between the sides of the doorway. Make 2 of these pieces. |
 |
|---|
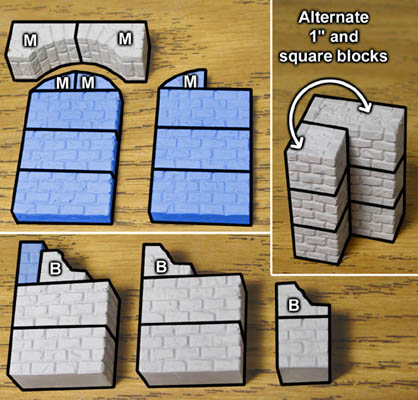
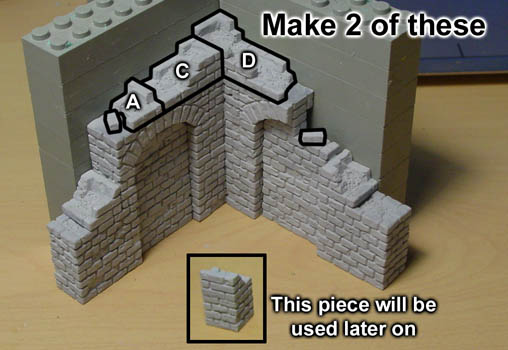
| 4. | For the corner pieces, start by assembling all of these separate pieces together. The blue blocks are those which are only 1/4" thick. The stack of blocks on the far right are alternated so they will hold together better. The blue block in the lower left corner is 1/2" x 1/2" x 1/4" thick. Make 2 of each of these pieces because we will want to make two complete corner sections. |
 |
|---|
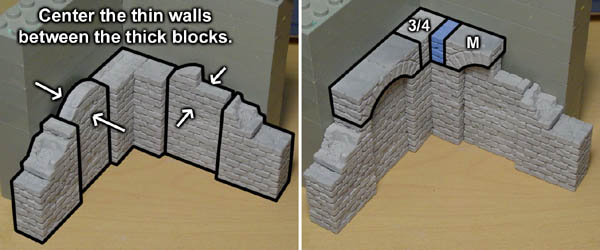
| 5. | Center the thin walls between the thicker walls. Add the medium arches along with the smaller blocks to fill in the corner. |
 |
|---|
| 6. | Glue the ruined blocks and single bricks onto the top to finish the corner. The small single block in the bottom center of the photo will be used later on. Make 2 of these pieces. |
 |
|---|
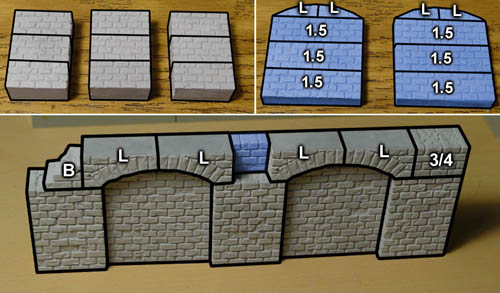
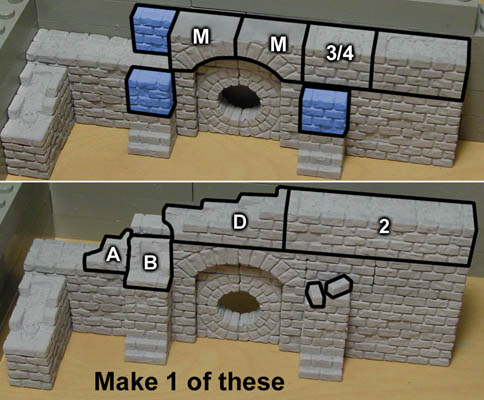
| 7. | The long back wall is made by assembling the stacks of 1" long blocks and also the 1.5" long thin blocks. Center the thin walls between the thicker wall sections so they only recess halfway back (1/8" deep). Glue on the arch tops and other blocks shown. The thin blue block is flush with the back of the wall. |
 |
|---|
| 8. | Finish the wall section by gluing on the final blocks. The footer blocks and thin blue blocks are centered on the faces of the wall. Make 2 of these pieces. |
 |
|---|
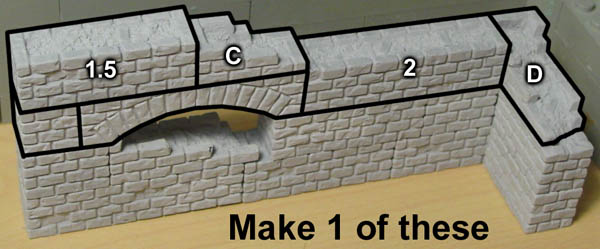
| 9. | This wall section will form the opposite wall of the long hallway. Make 2 of these pieces. |
 |
|---|
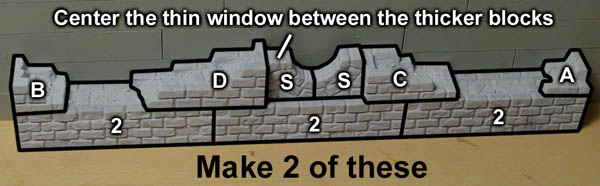
| 10. | This will be the back wall of the large room. Center the thin window in the thick wall. Make 1 of these. |
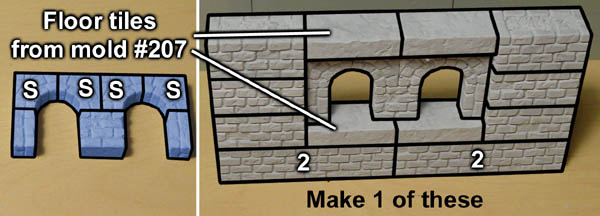 |
|---|
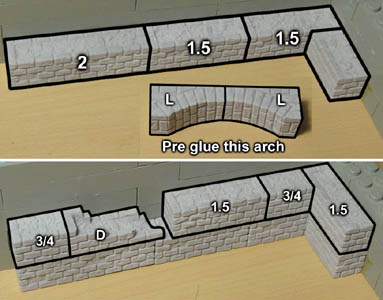
| 11. | This step shows the right side wall of the large room. Pre glue the arch and then start to glue together this wall section. I'm using an "L" of Legos to help keep the corner at a 90 degree angle. |
 |
|---|
| 12. | Glue on these remaining blocks to finish this right wall section. |
 |
|---|
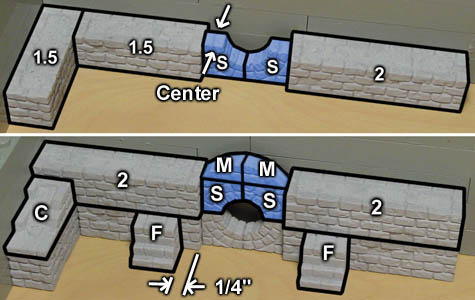
| 13. | This will end up being the left wall of the large room. The small arches are centered between the thicker wall sections. The footer blocks on the bottom photo are positioned about 1/4" away from the window gap on each side. |
 |
|---|
| 14. | Continue the wall section by adding the thinner blocks above the footers and also adding the third row of blocks. Finish the left wall section by adding the ruined blocks and bricks. Make 1 of these. |
 |
|---|
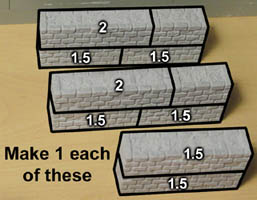
| 15. | Make these small wall sections for the stair block. The second photo shows all of the wall pieces. Click on the photo for a larger view. |
 |
 |
|---|
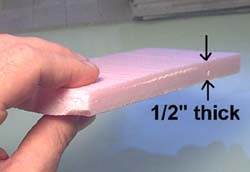
| 16. | To base the floor sections, I'm going to mount the floor tiles on pieces of 1/2" thick polystyrene foam insulating board. This is the stuff they use for sheeting on houses before they put siding on. You can get it at any lumber yard and usually comes in pink or blue. The main advantage is that it's stiff and doesn't warp easily. It's also easy to cut (with a sharp knife), and you can make pits and holes in the floor that actually look deep. |
 |
|---|
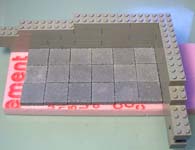
| 17. | When gluing the blocks down, be sure to spread glue on the bottom and sides of the blocks. I'm using a corner made out of Legos as a guide to keep the tiles square and straight. Let the glue dry completely before trying to trim off the outside edges of the foam. |
 |
 |
|---|
| 18. |
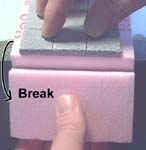
If it doesn't cut all the way through, break off the excess edge after you cut the foam and it will break fairly clean. |
 |
 |
|---|
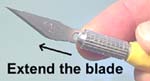 If you extend the blade of your hobby knife, you can cut completely through the foam. Be sure you use a sharp blade or the foam will tear.
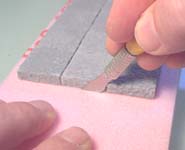
| 18. | Glue the floor tiles from mold #207 down to a piece of 1/2" thick insulating foam. Once dry, use a hobby knife to trim them out. Don't forget to cut out the hole in the center of the floor. |
 |
|---|
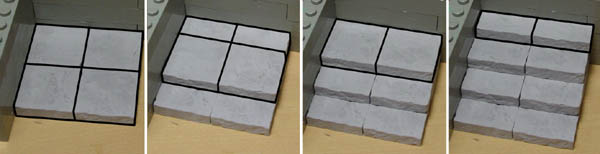
| 20. | Glue this set of steps together. All of these tiles are from mold #207 |
 |
|---|
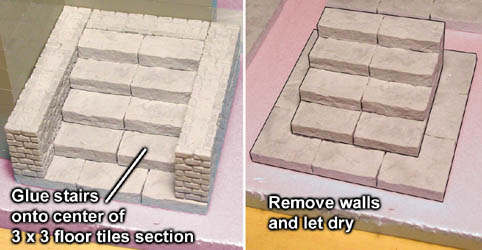
| 21. | Glue the stairway onto the center of a 3 x 3 floor tile section. Temporarily set the walls around the outside to be sure the stairs are in the center, then remove the walls. The walls and the floor sections will be painted separately. |
 |
|---|
Painting Instructions
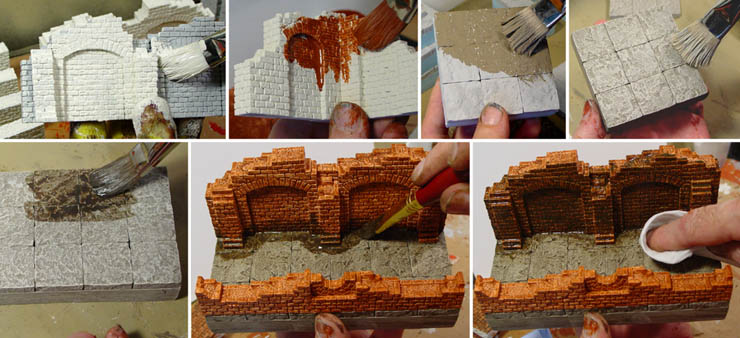
Painting instructions for this dungeon can be found on our Brick Painting Instructions page. The walls are painted separately from the floors, glued onto the floors and then a darker stain is painted over both. The photo below shows a brief glimpse of the process. |
 |
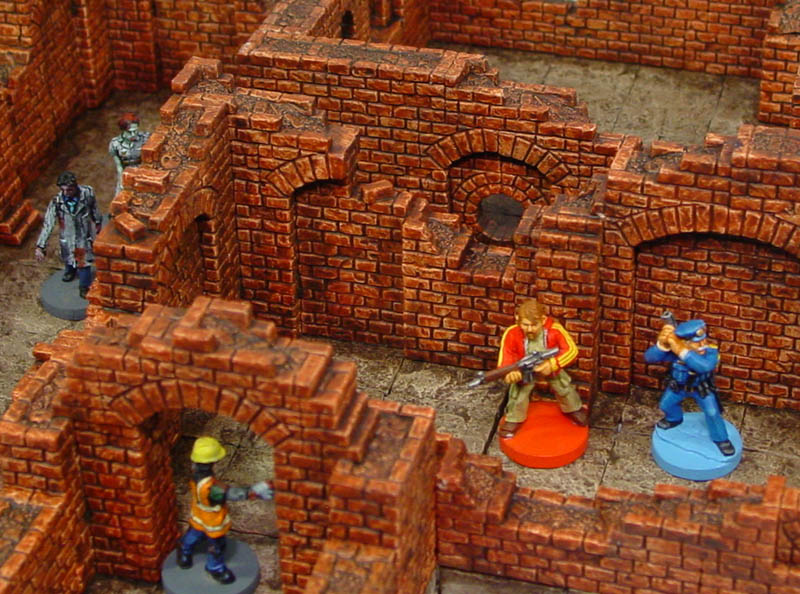
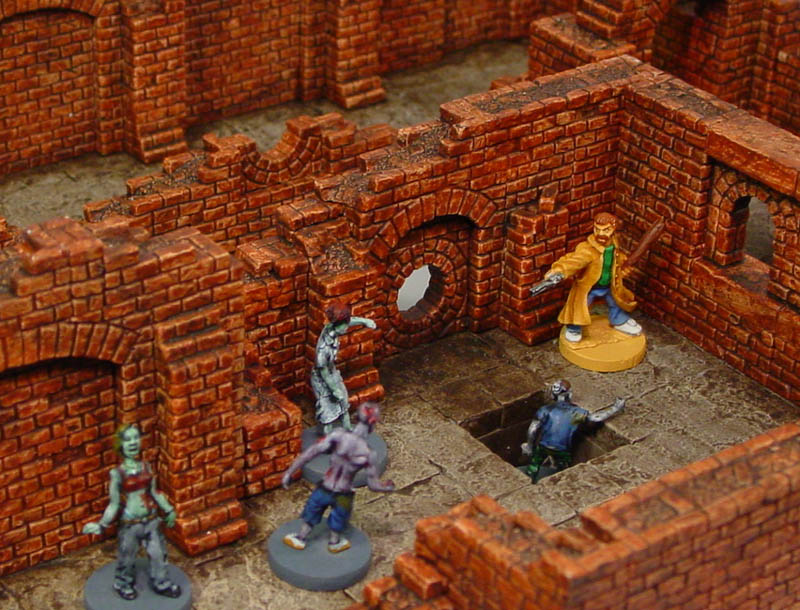
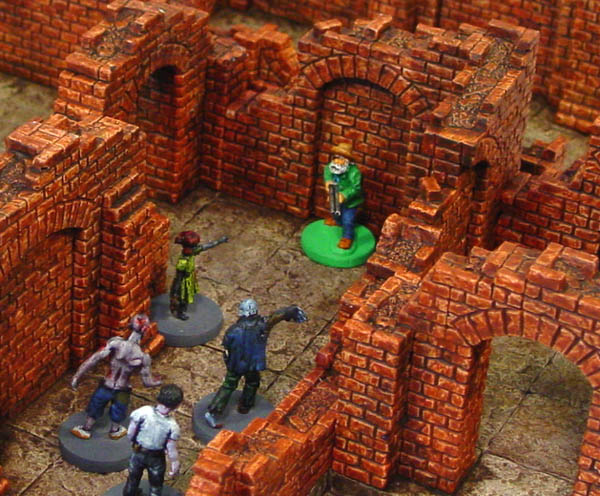
Finished Photos
Here are some finished photos of the basic set. Click on a photo for a larger view. The zombie miniatures shown are from Cold War Miniatures. I can't remember where I got the survivor miniatures from. I also can't remember who painted these miniatures long ago or I would give them credit also. In the future, I intend to add many more building instructions and expansions to this brick dungeon. |
 |
 |
 |